
Advanced Query for Secondary Schools
Conference 2015
Advanced Query for Secondary Schools Section 270 - Page 1
Session Description: Multi-table queries, the "CHANGE" button and command; advanced
applications of Query for secondary school personnel.
1. Query Principles and a Review of Basics
Query Tips
The Query Form is Dynamically Helpful in Building
How do we know what tables to include and the order?
Aeries Database Definitions
Related Tables in Aeries
2. Query Commands
Selecting Records By Criteria
Using Connectives AND and OR
Sorting Data – Ascending or Descending Order
Aeries Query Symbols Versus Access Symbols
Modifying A Datasheet View in Design View
Commands Utilized in Datasheet View
3. Math Operations
4. Aeries Query Buttons
Change Command versus Change Button
Change Button
Change Button with Multiple Tables
Change Command
Query Letters

Query Advanced for Secondary Schools Section 270 - Page 2
QUERY TIPS
• Identify the fields you wish to include and the tables from which they come.
• Using a KEEP or SKIP may make the final outcome easier or more accomplishable, but a full use
of the IF portion is always best if you wish to save the query as a one-step solution.
• What is the required table order to make the query run with the desired outcome?
• Using sorts can make it easier for those that run it later?
• Do I need to teach someone else how to do this query? Share the load and make life easier for
yourself and more rewarding for others.
The Query Form is Dynamically Helpful in Building Statments
The 5 function areas of a query statement are:
• Command [LIST TOTAL KEEP SKIP CHANGE]
• Table(s)
• Field(s) (optional)
• Sort [BY] (optional)
• Conditions [IF] (optional)
NOTE: not all are required but they are to be in this order if utilized
NOTE: The highlighted areas have opened up since we are further along building the statement

Query Advanced for Secondary Schools Section 270 - Page 3
HOW DO WE KNOW WHAT TABLES TO INCLUDE AND THE ORDER?
• Rely on the interactive nature of the Query Form starting with a primary first table.
• Review queries that resemble what you are trying to accomplish.
o Review queries your district/school already has saved by hitting the LOAD button.
o
Check aeries.com for queries. http://www.aeries.com/training-support/queries
o Sign up for the Aeries_Talk Listserv. https://groups.yahoo.com/neo/groups/aeries_talk This is
not moderated by Eagle Software. It is our users helping each other.
AERIES DATABASE TABLE INFORMATION
The Print Database Table Information report is available through View All Reports. This report can be
very helpful and will supply you with all tables available to Aeries CS including the relationships, field
names, and descriptions.

Query Advanced for Secondary Schools Section 270 - Page 4
RELATED TABLES IN AERIES
The following are various forms available from the Control Panel and Student Data form which displays
some of the related tables for these forms.
Control Panel
STU DAY
MST TCH CRS
SMS CRS TCH
STU SSS SMS CRS TCH
Student Data Form
STU ATT (Attendance)
STU ATT ABS (Codes)
STU ATT ATN (Notes)
STU SUP (Student info)
STU SSD (Sec Stu Data)
STU RAL (Record Access)
STU RJN (Rejoinders)
STU AUT (Author/Prohib
STU ACT (Activities)
STU PGM (Programs)
STU MED (Medical)
STU MHS (Med History)
STU IMM (Immunization)
STU DEN (Dental)
STU ADS
STU DSP
STU DIS
STU EXP
STU CON
STU TST CTL
STU CTS
STU FEE STU CNF
STU VIS
STU CSE (Special Ed)
STU CSE CSS (Suspen)
STU CSE CSV (Services)
STU LAC (LF info-SABE)
STU LAC LAF (FLOSEM)
STU LAC LAS (Assessmt)
STU INV
STU SEC MST CRS TCH
STU GRD CRS TCH
STU GRH CRS TCH
STU HIS CRS
STU CAR
STU CTS
The relational order of the tables must be correct in order for Query to work properly and the query form
will block you from specifying tables in an order that does not relate. For example, the table order STU
MST SEC will not run because the STU table is not directly related to MST.
On the right the table order is STU SEC MST. This query will run because STU relates to SEC through
SN and SEC relates to MST through CN.
REMEMBER - ONLY Related tables can be used in a multiple table query. The order in which we
list tables does make a difference.
The following “Aeries can’t find the object ‘Query’.” is a generic message in AeriesCS that some
syntax within your query was not understood. Aeries.net will display the message “Your query
does not return any data!”

Query Advanced for Secondary Schools Section 270 - Page 5
QUERY COMMANDS AND STRUCTURE
A Query Command is the first step used when generating a query. The structure is a definite order that
the query must be entered when being created. The following are the Commands:
LIST – will display the data selected from tables which are required but fields, sorts and
conditions are optional
TOTAL - will calculate a total amount but must contain a sort on all fields in the same
order as listed
SKIP - will bypass specific records
KEEP - will select specific records
CHANGE - will make permanent changes to an existing record
(Only if user has permissions and they are not logged into District Client Server)
The following are the structures used for each Command:
LIST Command: Table(s) – Field(s) – Sort(s) (BY) – Condition(s) (IF)
LIST MST CRS TCH
TCH.TE MST.RM MST.SM MST.PD CRS.CO MST.MX MST.TS BY
TCH.TE MST.PD MST.SM IF CRS.CO # TEACH
TOTAL Command: Table(s) - Field(s) - Sort(s) (on ALL fields in order) - Condition(s) (IF)
TOTAL STU ADS STU.GR ADS.CD BY STU.GR ADS.CD IF ADS.DS : SUS
SKIP Command – Table(s) (Start with STU) – Condition(s) (IF)
SKIP STU CSE IF CSE.DI > 0
KEEP Command – Table(s) (Start with STU) – Condition(s) (IF)
KEEP STU TST IF TST.PL < 3 AND TST.PL > 0
CHANGE Command – Table(s) – Field (being copied to) “TO” Field (being copied from)
CHANGE STU SSD SEC MST CRS TCH SSD.TGC TO MST.TN IF CRS.DC = E
NOTE: If using KEEP/SKIP reset MUST be performed or all data accessed will be limited to the
query generated. Also, there is NO UNDO button for the CHANGE command.
SELECTING RECORDS BY CRITERIA (IF):
• Using the contents of a field as the criteria:
(Using the semi-colon which means does NOT CONTAIN)
LIST MST CRS TCH MST.CN MST.SE CRS.CO MST.PD MST.SM IF CRS.CO ; TEACH
(Medical History using a populated code as the criteria)
LIST STU SEC MST TCH CRS MHS TCH.TE STU.NM MHS.CD? BY TCH.TE IF MHS.CD > 0
• Using Red flags as the criteria:
(Assertive Discipline using the red flag as the criteria.)
LIST STU ADS FLG STU.GR STU.NM ADS.CD ADS.CD? ADS.DT ADS.DS IF FLG.TC = ADS
(Flags sorted by table)
LIST STU FLG STU.NM STU.GR FLG.TC FLG.CO BY FLG.TC IF FLG.SN > 0
(Flags listed for a specific table)
LIST STU FLG STU.NM STU.GR FLG.TC FLG.CO IF FLG.TC = MED
(Flags for a specific student)
LIST STU FLG STU.NM STU.GR FLG.TC FLG.CO IF STU.NM : ABBOTT

Query Advanced for Secondary Schools Section 270 - Page 6
• Using "Null" or " "
(Looking for students with no course requests)
LIST STU SSS STU.SN STU.NM STU.GR STU.CU BY STU.CU IF SSS.SN = NULL
(Using a populated user field as the criteria.)
LIST STU NM PG AD CY ZC TL MW FW IF U7 # " "
• Working with dates
(The colon following BD means CONTAINS with “*” representing “any day” and “any year”, while the “?”
after BD will produce the age of the student.)
LIST STU TCH TCH.TE STU.NM STU.BD STU.BD? IF STU.BD : 12/*/*
(Students who have not had the 1
st
polio shot – no date is entered)
LIST STU IMM STU.SN STU.NM IF IMM.P1 = NULL
USING CONNECTIVES "AND" and "OR"
Using connectives "And" and "OR":
When using AND all records must meet all of the IF conditions.
LIST STU TST CTL CTL.NM TST.SN STU.NM TST.ID TST.GR TST.RS TST.SS TST.PL TST.TD BY
STU.NM TST.PT IF TST.ID : CST AND TST.TD : */*/2008
When using an OR the records must meet either condition.
LIST STU GRD CRS TCH TCH.TE STU.NM CRS.CO GRD.M1 IF GRD.M1 : D OR GRD.M1 : F
When combining AND with multiple OR parts in an IF STATEMENT, encase the OR portion in
( ) and place a space before and after each parenthesis.
LIST STU GRD CRS TCH TCH.TE STU.NM CRS.CO GRD.M1 IF ( GRD.M1 : D OR
GRD.M1 : F ) AND STU.GR = 9
*Note the “OR” portion of the condition is placed inside of ( ) so as to be considered one condition
when the “AND” portion is added.
SORTING DATA – ASCENDING OR DESCENDING ORDER
When a LIST query is generated the program determines which field will be used to sort in ascending
order. For example LIST STU is sorted in ascending order by student last name. When creating a query
the sort can be changed to descending order. To descend a query statement you must either use DESC,
REV, or ^ symbol after the field in the BY portion of the query. If more than one sort field is selected the
first sort field entered will be used to determine the page break in Aeries formatted reports.
LIST STU SEC MST TCH CRS MST.SM MST.PD STU.SN STU.NM TCH.TE CRS.CO BY TCH.TE
MST.PD IF MST.SM = F OR MST.SM = Y
A query sort order reversed to descending order has REV added after the sort field. Also, as soon as BY
is entered into the query, REV displays on the left-side menu below the commands.
LIST STU ADS STU.SN STU.NM STU.GR STU.SX ADS.CD ADS.CD? ADS.DS BY STU.GR REV IF
ADS.CD # " "
A sort on more than one field can also be setup to descend with one field and ascend with another.
LIST STU ADS STU.SN STU.NM STU.GR STU.SX ADS.CD ADS.CD? ADS.DS BY STU.GR REV
STU.SX IF ADS.CD # " "

Query Advanced for Secondary Schools Section 270 - Page 7
AERIES QUERY SYMBOLS VERSUS ACCESS SYMBOLS
The Aeries program uses Aeries Query symbols in the Query program and Access Query symbols can
be used throughout various forms and reports. The following are the different Aeries and Access symbols
that are utilized.
AERIES SYMBOLS
ACCESS SYMBOLS
• Recognizes text fields
• # Is NOT EQUAL to
• : CONTAINS or is Like
• ; Does NOT CONTAIN
• < LESS THAN, > GREATER THAN
• (( START MATH, )) STOP MATH
• + ADD, - SUBTRACT
• LEFT(field,1) chooses 1 char from left side
• RIGHT(field,4) chooses 4 char from right side
• Text fields must be enclosed in quotes
• <> Is NOT EQUAL to
• LIKE ("___"), where ___ is the text
• NOT LIKE ("___"), where ___ is the text
• < LESS THAN, > GREATER THAN
• <= LESS THAN OR EQUAL TO
• >= GREATER THAN OR EQUAL TO
• + ADD, - SUBT, / DIV, * MULT
• LEFT(field,1) chooses 1 char from left side
• RIGHT(field,4) chooses 4 char from right side
Some Aeries programs will display a selection box allowing you to enter an Access Query IF statement.
The Query IF selection only uses Access symbols not Aeries symbols.
The following are Access Query examples that could be utilized on Class Roster Setup:
TN <>605 - Print all rosters except teacher number 605
TE LIKE "A*" - Pint rosters for all teachers whose last name starts with "A"
TE NOT LIKE "A*" - Print rosters for all teachers whose last names do not start with "A".
AD LIKE "*Alliance*" - In a directory report where the students address contains “Alliance”
MODIFYING A DATASHEET VIEW IN DESIGN VIEW
Temporary changes can be performed through the Access Design View that will modify the appearance
of the Query Datasheet View.
The following LIST query uses the STU table and has 2 fields – the NM field and a field created that will
print a line on a report.
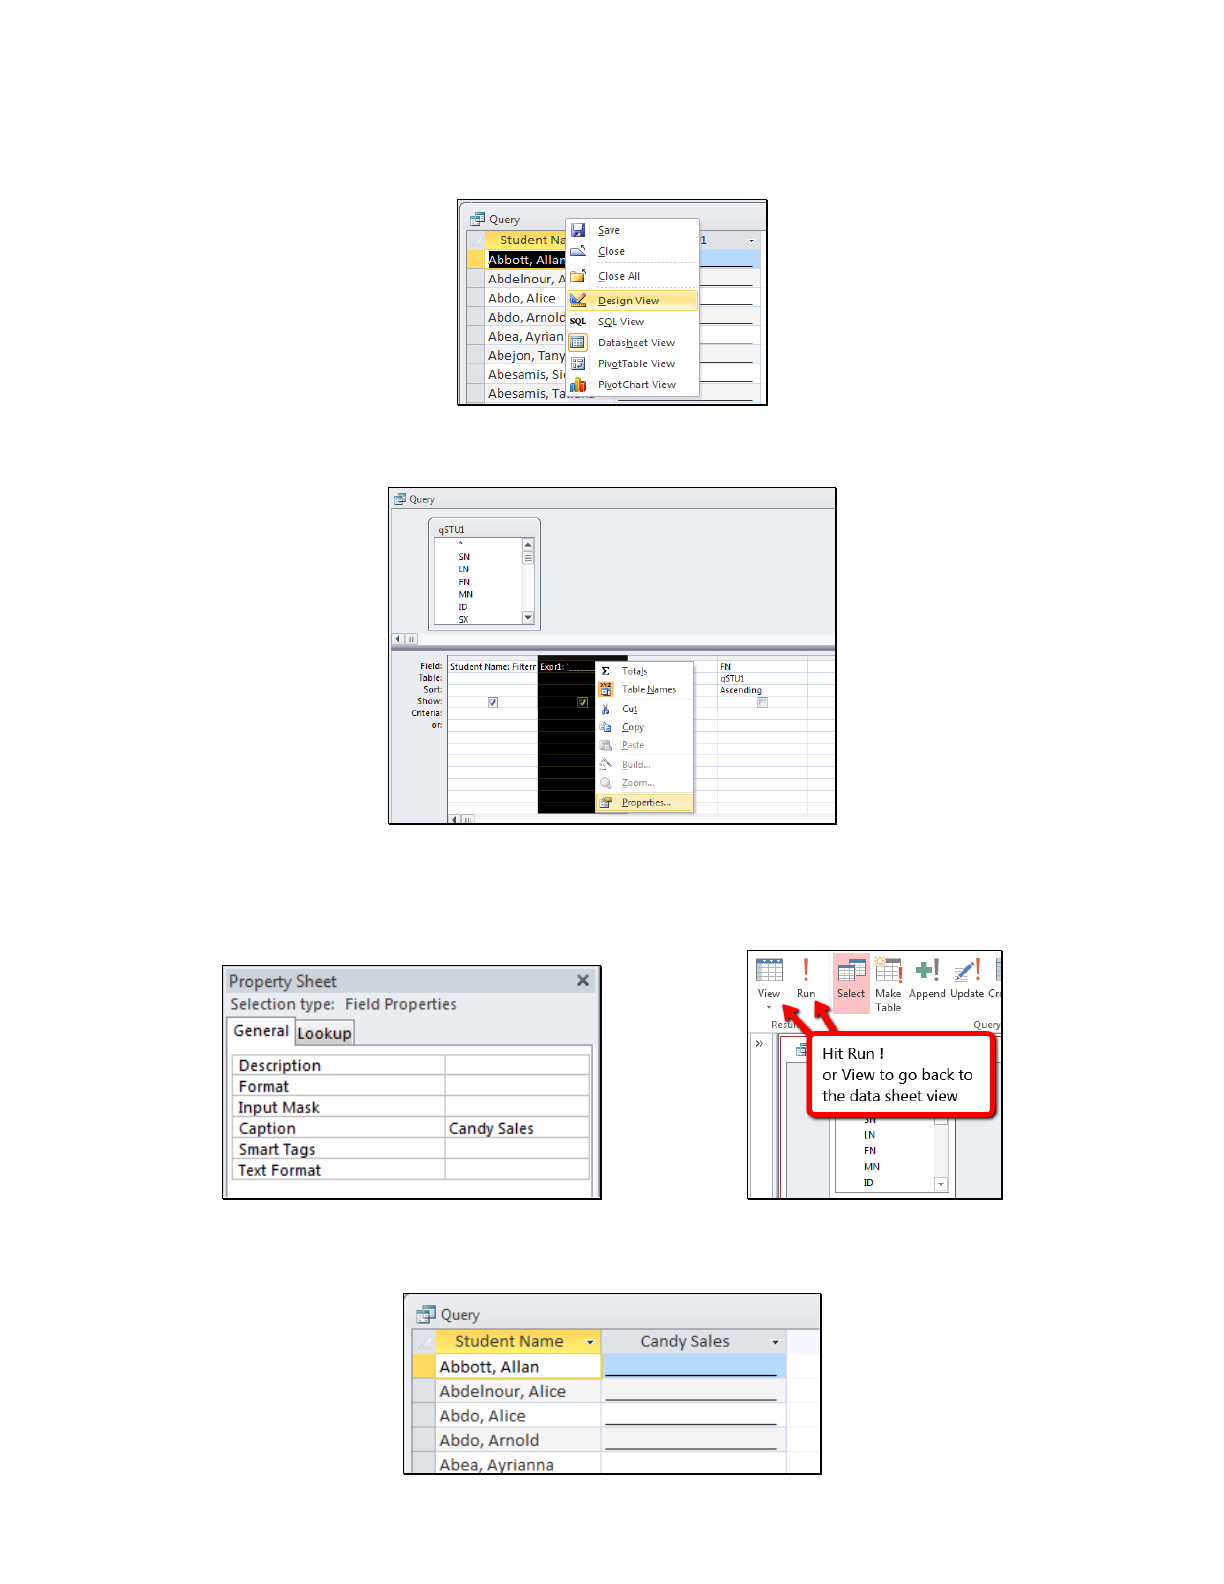
Query Advanced for Secondary Schools Section 270 - Page 8
Column Heading - the query generated contains two fields. One field was manually created and contains
a column caption named Expr1001. The caption for this column can be changed. After generating a
query the results are displayed in Datasheet View. One way to get in to Design View would be to right
click on the header of the query’s results window where it says ‘Query’ and choose Design View.
The Design View will now display. To select the column right click the mouse on the narrow bar just
above the Field row and the column will be highlighted.
Field properties will be listed at the upper right margin of your screen. In Caption, type the new caption
selected such as Candy Sales. Next, run the query again by hitting the red
! exclamation run button or
click the view button to return to datasheet view.
The column in Datasheet View will now display Candy Sales. The changes cannot be retained in the
existing Query generated and cannot be printed using Query Report. The results can ONLY be
printed, copied, or exported.

Query Advanced for Secondary Schools Section 270 - Page 9
Add Existing Fields – after a query is generated and displayed in Datasheet View additional fields can
be added through going back to Design View. You may return to Design View by right click on the
header of the query’s results window where it says ‘Query’ and choose Design View.
The Design View will now display. There are various ways to add an existing field. Locate the field in
the table displayed in the top of the form and double click the mouse on the field selected. The field will
then display in the next available column.
The field can also be typed into an available column. Also, if you click the mouse on the Field line a drop
down will display with a listing of all existing fields. Click the mouse on the field selected and the field
will display in the column.
After the fields have been selected, run the query again by hitting the red ! exclamation run button or
choose Datasheet View button in the left upper corner and the new fields will be selected with the
previous fields. The changes cannot be retained in the existing Query generated and cannot be
printed using Query Report. The results can ONLY be printed with File Print.

Query Advanced for Secondary Schools Section 270 - Page 10
COMMANDS UTILIZED IN DATASHEET VIEW
Once a query is generated and the Datasheet View has displayed there are various Commands that can
be utilized.
Moving columns – left click the column heading to select the column, then left click the column a second
time and you will notice a square displays below the arrow.
Hold the mouse down and drag the column to the desired location then release the mouse.
Column Changes – A column can be selected by left clicking the mouse on the heading. Right click the
mouse on column header and the following menu will display.
The following commands can be utilized for the highlighted column:
"Sort A to Z" will sort the selected column in ascending order.
"Sort Z to A" will sort the column selected in descending order.
"Copy" will copy the selected column to the windows clipboard.
"Freeze Fields" will move a selected column to column1 and not permit other
columns to be moved as described above.
"Unfreeze All Columns" will restore all columns to a movable state.

Query Advanced for Secondary Schools Section 270 - Page 11
More than one column can be selected by holding the left mouse down and moving across the column
headings. Then right clicking the mouse in the body of the selected data will bring up the same menu.
This can be useful for example to modify the column width of a wide report to “best fit” for all columns or
to change the sort order of more than one column, such as grade and sex.
Column Filters – certain criteria can be used to sort out data using various filter commands. All
commands are executed by right clicking the mouse into the field next to the record to be filtered and the
following menu will display. The example at the right below is next to the Teacher Name of Turner.
Equals “Turner” – will select only those records where “Turner” is the teacher.
Does Not Equal “Turner” – will select only those records where “Turner” is not the teacher.
Equals… - enter access conditions such as:
• like "T*" to select all records where the teacher name begins with “T”.
• not like "T*" to select all records where the teacher name does not begin with “T”.
• like "A*" or like "B*" to select all records where the teacher name begins with “A” or “B”.
You can apply multiple filters and remove them from a field by choosing ‘Clear filter from’ {field_name}.
The following is an example of a query that is generated.
LIST STU GRD CRS TCH STU.SN STU.NM TCH.TE GRD.PD CRS.CO GRD.M1 IF GRD.M1 > 0
Two filters are placed on two fields, which are Teacher Name Acosta and Period 1. Click the mouse on
Equals "Acosta".
The filter will add an AND condition and will list only students with Teacher Acosta in Period 1.
All filters, freezes, and hides will be retained in Access for printing, copying, or exporting. The Aeries
Report Button will ONLY format the results of the query as listed in the query statement.

Query Advanced for Secondary Schools Section 270 - Page 12
MATH OPERATIONS
Various math operations can be performed in query. As usual, there is a space between each command,
table, field, operation or condition. You can add, multiply, divide or subtract within the start and stop math
symbols.
For example, in the below query the students are listed with their grade and one grade level higher:
LIST STU ID NM GR (( GR + 1 ))
The “Class Of” can also be calculated based off of the student’s current grade:
LIST STU ID NM GR (( 2014 + 12 - GR ))
In the query below the cumulative credit completed (CC) is being divided by the cumulative credit
attempted (CA) and then multiplied (*) by 100 to convert it to a percent:
LIST STU NM CC CA (( CC / CA * 100 )) IF CA # 0
In the next example the days present are divided by the days enrolled and then multiplied by 100 to
calculate the Attendance Percentage. Formatting is also done to trim the percentages to two significant
digits and add a % symbol to the end:
LIST STU NM DE DA DP (( LEFT ( DP / DE * 100 , 5 ) + "%" )) BY (( DP / DE )) REV IF DE # 0
NOTE: this query does not produce any results when run in Aeries.net.
This query demonstrates the effects of using the Rounding function:
LIST STU NM DE DA DP (( ROUND ( DP / DE * 100,2 ) & "%" )) (( LEFT (DP / DE * 100,5 )+"%" )) BY ((
DP / DE )) REV IF DE # 0
NOTE: this query does not produce any results when run in Aeries.net.

Query Advanced for Secondary Schools Section 270 - Page 13
The next example is using the fee amount charged (AM) and subtracting the amount paid (PD) and then
only displaying the information if the remaining amount is greater than zero:
The outstanding fee balance can also be displayed by inserting the mathematical operation in the field
area before the IF. This query could be used for a Fee Letter that would go home to the parents:
LIST STU FEE STU.ID STU.LN STU.FN STU.GR STU.PG STU.AD STU.CY STU.ST STU.ZC (( FEE.AM
- FEE.PD )) IF (( FEE.AM - FEE.PD )) > 0
Math operations can also be performed to truncate a field or “cut off” characters or numbers from left or
right. The following query examples will truncate to the left all characters up to the first character of a
student’s first name:
LIST STU FN (( LEFT ( FN, 1 ) ))
LIST STU ID FN LN (( LEFT (FN,1) & LN ))
NOTE: When querying from Aeries.net substitute the “&” for a “+”:
LIST STU FN (( LEFT ( FN, 1 ) + LN ))
Another example is truncating the CGPA field left to reduce it to 2 digits. Take note to the truncation
(CP,3). The reason for this is so that it will include the decimal point:
LIST STU CP (( LEFT (CP,3) )) IF CP > 0
The following query example will truncate to the right down to the last four digits of the birth date and will
only display the birth year:
LIST STU NM BD (( RIGHT (BD,4) ))

Query Advanced for Secondary Schools Section 270 - Page 14
The next two examples will use the MID function to list a certain number of characters within a field:
LIST TCH TE (( MID (TE,8,30) )) IF TE : "ath dir "
LIST CRS CN (( MID (CN,3,4) ))
The next query demonstrates how to change a whole number to an integer using the INT function:
LIST STU ID NM TP (( INT(TP) )) (( INT(TP*100) ))
The following queries using an IIF function to only report information that returns a value based on
another value that is being returned. In the first query the word “Boy” will be returned if the student’s sex
is M, otherwise “Girl” will be returned. In the second example the phrase “Doing Well” will display if the
student’s cumulative weighted GPA is > or = 3.000, display “Need to do More if the GPA is > 2, and
display “At Risk” if the GPA is < or = 2.000:
LIST STU ID NM GR SX (( IIF( SX = "M","Boy","Girl") ))
LIST STU ID NM GR TP (( IIF(TP>=3,"Doing Well", IIF(TP>2,"Need to do more","At Risk" ) ) ))
NOTE: the MID, INT and IIF functions are not compatible in Aeries.net.
In the next example the dash in a student’s last name is removed in the query results by using the
Replace function:
LIST STU (( REPLACE(LN,"-","") )) LN FN IF LN : "-"

Query Advanced for Secondary Schools Section 270 - Page 15
Math Operations can also concatenate or combine fields and strings. For example, the student’s last
name and first name can be joined. In the example below the students last name is joined with the first
name and has a comma inserted between them.
But take note to the first selection after STU, which is NM. Notice that NM is nowhere listed in the STU
Fields. Aeries Query NM is a programmed concatenation of a student’s last name, plus comma, space
and last name.
Math Operations can also perform operations, concatenate and truncate with in the same query. The
math operation below has calculated from days present (DP) and days enrolled (DE) the actual
percentage that a student has been present. The caption for this field was then changed in Design View
to % Present.
CHANGE BUTTON versus CHANGE COMMAND
After generating a LIST query the Change button will display the records on the form and allow you to
manually change the records selected. If the CHANGE command is utilized in the query statement it will
automatically write a specified value into a field for ALL records selected.
CHANGE BUTTON
Run a LIST query and close the datasheet. Click the mouse on the CHANGE button. The edit form will
display. The first field is dark blue indicating it is locked and the data cannot be changed. Use Tab to
move from field to field and make any changes. The Tab can also be turned off/on for any column by
clicking on the column headings.

Query Advanced for Secondary Schools Section 270 - Page 16
CHANGE BUTTON WITH MULTIPLE TABLES
Run the LIST query with multiple tables selected and close the datasheet. Click the mouse on the
CHANGE button to bring up the edit display. Edit the teacher room assignment by entering the new room
assignment and tabbing to the next field.
NOTE: When multiple tables are used, only related records that exist in both tables will be
displayed on the Change Form
A table can also be linked to another table to allow you to edit data. For example, the STU table can be
linked to the FRE table to edit data for existing records in FRE. Run the following LIST query using two
tables then close out the datasheet.
LIST STU FRE STU.NM FRE.CD
Click the mouse on the CHANGE button and the data in the FRE.CD field can now be changed. Notice
Ayrianna Abea has a blank record, which could be edited even though the Assignment field is blank.
CHANGE COMMAND
The CHANGE Command can be used to create blank records in a table, which can then be edited with
the CHANGE button. The following Query will allow you to create a record in the FRE table for every
student in the school. This will allow you to load Free and Reduced Meal information utilizing the
CHANGE Button.
CHANGE STU FRE FRE.SN TO STU.SN
After the new records have been created in FRE run the following LIST query then close out the
datasheet.
LIST STU FRE STU.NM FRE.CD IF FRE.SN = NULL
NOTE: Be sure you have a fresh backup before running any CHANGE COMMAND.

Query Advanced for Secondary Schools Section 270 - Page 17
Click the mouse on the CHANGE button. Lunch codes can now be entered by using either the TAB key
or the Down/Up arrows.
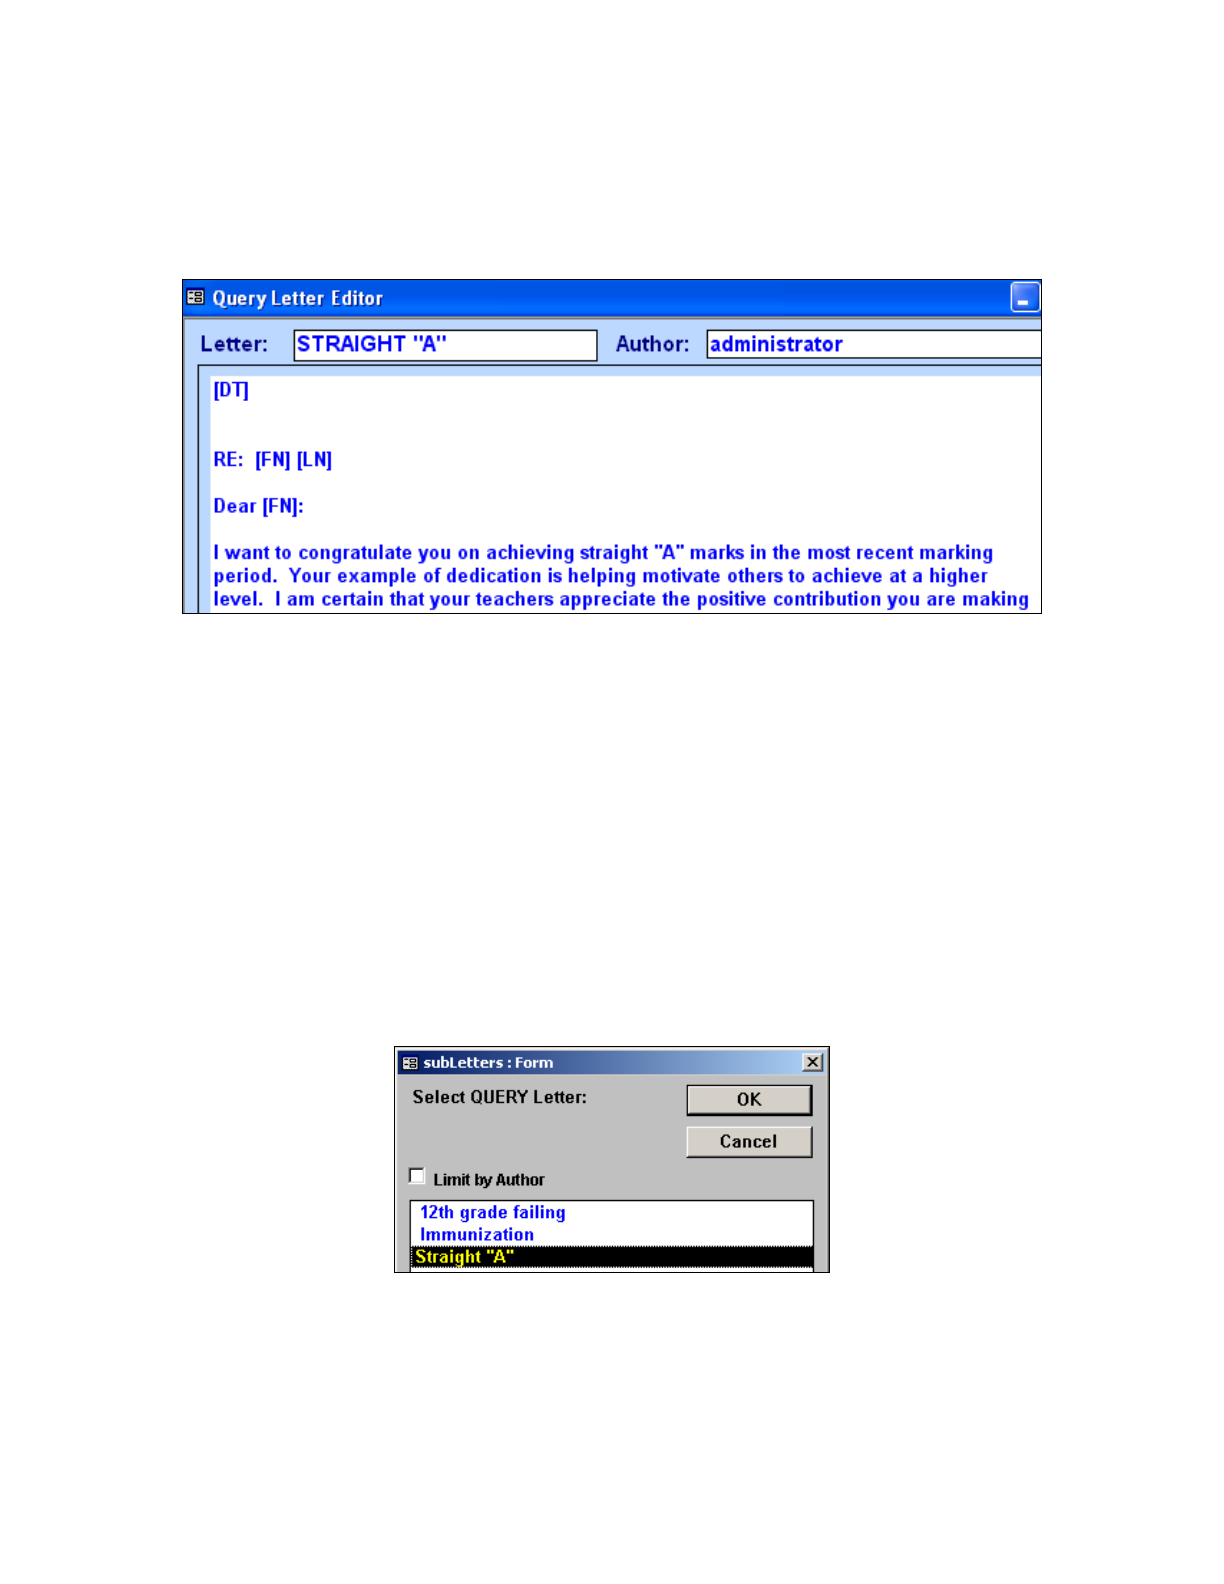
QUERY LETTERS
The LETTERS button is used to merge data into a formatted letter. The letters are first created from the
LETTER EDITOR button. A query statement is then utilized to pull data from tables and fields. The
LETTER button will merge the data from the query into the letter selected. To create a letter in Query
Letter Editor, click the mouse on the Add button. The cursor will automatically display in Letter: to enter
the letter name. Press Tab. The Author: field will automatically display the current user’s name.
Press the Tab key until the cursor displays in the white text box. A school heading and date is not
required. When the letter is generated, a school heading will automatically be created with the school
name, address, and the current date at the top of the letter. This heading will not display in the letter
editor but will print when submitted.
An address heading should be created for the individual receiving the letter. For example, a letter sent to
a parent/guardian use the following fields:
PG = Parent/Guardian
AD = Address
CY = City
ST = State
ZC = Zip Code
On the first line type [PG] and press Enter. The cursor will drop down to the second line. Type [AD] and
press Enter. The cursor will drop down to the third line. Type [CY] [ST] [ZC] and press Enter. ALL
field codes MUST have a square bracket surrounding them and there must be a space between
each field but no space within the brackets.
Type the remainder of the letter combined with text and field codes. An example of a letter is displayed
below. When the Letter is generated a query function is available that will insert either [he/she] or
[his/her] in the letter for the proper sex but the sex code must be used in the query statement. Be sure to
capitalize [He/She] if it is the first word in a sentence. For example, on the second line where his/her
is used, if the sex code is F the above letter will read “a copy of her attendance record”.
Query Advanced for Secondary Schools Section 270 - Page 18
After the letter is complete, click the Exit button at the bottom of the form. Once the letter has been
created a query can be generated through the Query option and the Letter function is utilized to generate
the letters. Remember that each field code used in the letter MUST be in the query statement or
this area will be blank when the letter prints.
The following example is a letter created for straight “A” students. The letter has been previously created
in Query Letter Editor. Several queries need to be generated to separate out data prior to selecting the
LETTER button to create the letters,
The first query is generated to clean out the print tag (QT) field:
CHANGE STU QT TO " "
The KEEP query will select only students that have a grade in the M1 field:
KEEP STU GRD IF GRD.M1 # " "
The QT field will be tagged with an “N” for all marks other than “A”:
CHANGE STU GRD STU.QT TO N IF GRD.M1 ; A
A list can be generated to list the "A" students for verification:
LIST STU GRD CRS STU.NM CRS.CO GRD.M1 BY STU.NM IF STU.QT = " "
The query can be generated with the fields that need to be merged into the query letter:
LIST STU STU.FN STU.LN IF STU.QT = " "
After the query is generated click the mouse on the LETTER button and select the letter. Click the mouse
on the OK button and the letter will be generated.
