
Configure Windows 2012/Windows
2012 R2 with SMB Direct using
Emulex OneConnect OCe14000
Series Adapters
Emulex OneConnect® Ethernet Network Adapters
CONNECT TECH NOTE

2 CONNECT | Configure Windows 2012/Windows 2012 R2 with SMB Direct using Emulex OneConnect OCe14000 adapters
CONNECT TECH NOTE
Introduction
This document gives an overview of how to set up an extension of the Server Message Block (SMB) technology called SMB Direct on
Microsoft Windows 2012 or Windows 2012 R2 server. The configuration uses Emulex OneConnect® OCe14000 adapters. A brief
overview of concepts required for understanding SMB Direct are provided for the purpose of evaluation.
These steps can be followed for two configurations:
Configuration 1—Two hosts connected back-to-back. This configuration can be used when a switch is not available for the infrastructure.
Figure 1. Sample back to back configuration used for this document.
Figure 2. Sample switched configuration used for this document.
Configuration 2—Two hosts connected to a 10GbE networking switch. This is scalable solution when more hosts need to be added.

3 CONNECT | Configure Windows 2012/Windows 2012 R2 with SMB Direct using Emulex OneConnect OCe14000 adapters
CONNECT TECH NOTE
Hardware requirements for back-to-back configuration
Hardware requirements for switch configuration
Hardware components Quantity Description
Server 2 Any server with Intel/AMD processors which supports Windows 2012 or Windows 2012 R2
PCI Express (PCIe) x8 slots 2 PCIe slots for adding the adapters
OCe14000 series adapter 2 Emulex 10GbE adapter with RDMA over Converged Ethernet (RoCE) profile
Cables 1 10Gbps optical SFP+ cables
Software requirements
Hardware components Quantity Description
Server At least 2 Any server with Intel/AMD processors which supports Windows 2012 or Windows 2012 R2
PCIe x8 slots 2 PCIe slots for adding the adapters
OCe14000 series adapter 2 Emulex 10GbE adapter with RoCE profile
Switch 1 10Gbps switch (Cisco 5548p for the purpose of this guide)
Cables 2 10Gbps optical SFP+ cables
Component Quantity Description
Windows 2012/Windows 2012 R2
Server or Data Center OS
2 License key and Windows 2012 / Windows 2012 R2 OS.
OCe14102 Firmware 2
Download firmware and boot code version 10.2.370.19 from the Emulex website. Older version
of the firmware and boot code will not support SMB Direct.
Note: If you are using any other OCe14000 series adapter, the firmware can be downloaded
after selecting the adapter part number.
OCe14102 Driver 2
Download OneInstall Installer Kit 10.2.370.1902 for Windows 2012 R2 from the Emulex
website. This will contain the necessary drivers and Emulex OneCommand® Manager. Older
version of the driver will not support SMB Direct.
Note: The Windows 2012 driver is also located on the download page.
Emulex OneCommand Manager 2
Download OneInstall Installer Kit 10.2.370.1902 from Emulex’s website as a part of driver
install. This will contain the necessary drivers and OneCommand Manager.
IMDisk 1 Free Virtual Disk Creating application.

4 CONNECT | Configure Windows 2012/Windows 2012 R2 with SMB Direct using Emulex OneConnect OCe14000 adapters
CONNECT TECH NOTE
Installation and configuration of servers
Install Windows 2012 or Windows 2012 R2 on the two servers. Connect the OCe14000 adapters to the PCIe slots. Upgrade the adapter
with the latest firmware, driver and OneCommand Manager. After all the upgrades boot to the OS, follow the steps listed below for
configurations.
Notes
n
There will be a system reboot required for upgrading the firmware.
n
The File/Share server will be referred as “SMBServer” and the Client server will be referred as “SMBClient”
Step 1—Enabling the RoCE profile on the client and server side
The RoCE profile can be enabled by the following steps:
a) Start OneCommand Manger.
b) Select the OCe14000 series adapter and go to the ‘Adapter Configuration’ tab.
c) Select Personality as ‘NIC+RoCE’ and NIC+RoCE Configuration as ‘RoCE-2’.
d) Click on Apply and reboot.
e) Complete steps a through d on SMBServer and SMBClient.
Figure 3. Personality change for OCe14100 adapters.
Note—There will be a system reboot required for changing the personality of the adapter.

5 CONNECT | Configure Windows 2012/Windows 2012 R2 with SMB Direct using Emulex OneConnect OCe14000 adapters
CONNECT TECH NOTE
Step 2—Ensuring RoCE profile is “enabled”
Confirm that the RoCE profile is enabled on SMBServer and SMBClient by using one of the following three methods:
a) Start OneCommand Manager and navigate to the ‘Adapter Configuration’ tab for the OCe14100 adapter and ensure that the
personality is set to ‘NIC+RoCE’ and NIC+RoCE configuration is set to ‘RoCE-2’
Figure 4. OneCommand Manager showing RoCE personality.
Figure 5. Advance property showing NetworkDirect is enabled.
b) Go to the ‘Advanced’ tab of the Network Property page of the adapter and ensure that NetworkDirect is enabled.

6 CONNECT | Configure Windows 2012/Windows 2012 R2 with SMB Direct using Emulex OneConnect OCe14000 adapters
CONNECT TECH NOTE
c) Open a powershell command line window and type the following command:
Get-NetAdapterRDMA
Figure 6. Get-NetAdapterRDMA output.
Figure 7. Get-NedOoadGlobal output.
Get-NetOfoadGlobal
Network connectivity
Network connectivity between the adapter on the client and server can be either back-to-back or through the switch. Depending on the
test scenario, pick a configuration and follow the steps listed below.
Notes
n
For Configuration 1 (adapters connected back to back), proceed to “step 4” directly.
n
For Configuration 2 (adapters connected via a switch), “skip step 4.”
Refer to Appendix for QoS concepts.
Step 1—Configuring Virtual LAN (VLAN) on the switch
Please refer to your switch vendor’s configuration guide to create VLANs on the switch. Below is a sample VLAN configuration for a Cisco
Nexus 5548p switch:
a) Enter configuration mode by typing “configure terminal.”
#congureterminal
b) Create a VLAN using the “vlan <VLAN ID>” command.
Note—The VLAN ID will be the same as the ones on the SMB Server and SMB Client.
#vlan10

7 CONNECT | Configure Windows 2012/Windows 2012 R2 with SMB Direct using Emulex OneConnect OCe14000 adapters
CONNECT TECH NOTE
c) Get back to base configuration mode from the VLAN mode using the “exit” command.
Note—The “exit” command gets you to the previous configuration mode/sub-mode.
#exit
d) Enter configuration mode for a connected port using the “interface <type> <slot/port>” command.
#interfaceethernet1/15
e) Set the interface as a trunk port using the “switchport mode <type>” command.
#switchportmodetrunk
f) Allow the VLAN on the trunk port using the “switchport trunk allowed vlan <VLAN ID>” command.
#switchporttrunkallowedvlan10
g) Select the PFC mode using the “priority-flow-control <auto/on>” command. CHOOSE “auto.” Then get back to base
configuration mode using the “exit” command.
#priority-ow-controlauto
#exit
h) Repeat steps d through f for the other ports as well.
i) Enter the VLAN configuration sub mode using the “vlan <VLAN ID>” command.
#vlan10
j) Enable the VLAN using the “no shutdown” command. Then get back to base configuration mode using the “exit” command.
#noshutdown
#exit
Step 2—Configure Priority Flow Control (PFC) on the switch
Please refer to your switch vendor’s guide for creating priority group and enabling PFC. This step enlists the detailed steps for configuring
PFC and QoS for RoCE trac for a Cisco Nexus 5548p switch:
a) Create a priority group for RoCE trac with a priority of 5. There are several commands needed to accomplish this task. Type the
following commands listed in the order shown below:
#class-maptypeqosroce
#matchcos5
#exit
#class-maptypequeuingroce
#matchqos-group5
#exit
#class-maptypenetwork-qosroce
#matchqos-group5
#exit

8 CONNECT | Configure Windows 2012/Windows 2012 R2 with SMB Direct using Emulex OneConnect OCe14000 adapters
CONNECT TECH NOTE
b) Assign the Quality of Service (QoS) group for the dierent types of trac. Enter into QoS policy map configuration mode for
RoCE using the “policy-map type <mode> <group>” command. Type the following commands listed in the order shown below:
#policy-maptypeqosroce
#classroce
#setqos-group5
#exit
#classclass-fcoe
#setqos-group1
#exit
#classclass-default
#exit
#exit
c) Allocate the appropriate bandwidth for the types of trac. Enter into queuing policy map configuration mode for RoCE using
the “policy-map type <mode> <group>” command. Type the following commands listed in the order shown below:
#policy-maptypequeuingroce
#classtypequeuingroce
#bandwidthpercent70
#exit
#classtypequeuingclass-foce
#bandwidthpercent20
#exit
#classtypequeuingclass-default
#bandwidthpercent10
#exit
#exit

9 CONNECT | Configure Windows 2012/Windows 2012 R2 with SMB Direct using Emulex OneConnect OCe14000 adapters
CONNECT TECH NOTE
d) Set the Maximum Transition Unit (MTU) for the separate types of trac. Enter into the network policy map configuration mode
for RoCE using the “policy-map type <mode> <group>” command. Type the following commands listed in the order shown
below:
#policy-maptypenetwork-qosroce
#classtypenetwork-qosroce
#pauseno-drop
#mtu5000
#classtypenetwork-qosclass-default
#mtu9216
#classtypenetwork-qosclass-foce
#pauseno-drop
#mtu2158
#exit
#exit
e) Configure the switches service policies. Enter into the system QoS configuration mode for the switch using the “system
<mode>” command. Type the following commands listed in the order shown below:
#systemqos
#service-policytypeqosinputroce
#service-policytypequeuinginputroce
#service-policytypequeuingoutputroce
#service-policytypenetwork-qosroce
#exit
f) Save the running configuration.
#copyrunning-congstartup-cong

10 CONNECT | Configure Windows 2012/Windows 2012 R2 with SMB Direct using Emulex OneConnect OCe14000 adapters
CONNECT TECH NOTE
Step 3—Enable VLAN and assign IP address for SMBServer and SMBClient connected via switch
Notes
n
PFC is enabled by default in OCe14000 adapters.
n
When using the OCe14000-series adapters for RoCE functionality, the following defaults apply:
- Adapter boot time
PFC is disabled on all the ports in the NIC+RoCE profile.
Generic Pause is enabled on all the ports in the NIC+RoCE profile.
- Back-to-back connection (OCe14000 - OCe14000)
PFC is disabled by default.
Generic Pause is enabled on the connected port.
- DCBX-enabled switch connection
When an OCe14000 adapter is connected to DCBX-enabled switch, it shifts the mode from Generic Pause to PFC.
- An OCe14000 adapter configures RoCE trac for priority
Manually enable priority 5 on the switch under a dierent priority group other than FCoE/iSCSI/NIC priority group (as shown in
steps above).
If you do not enable priority 5 on the switch side, the OCe14000 adapter continues to be configured for PFC mode priority 5. This
configuration may result in packet losses, unrecoverable errors, or infinite retries for RoCE trac.
n
When an OCe14000 adapter is connected to DCBX-disabled switch, it will be in generic pause mode.
With VLAN set up on the switch, we need to assign the same VLAN ID on the client and server. Follow the steps listed below to create VLAN
and assign IP address.
a) Navigate to the ‘Advanced Properties for OCe14000 series Adapter and assign the appropriate VLAN ID (10 for this example) to
‘VLAN Identifier (802.1q)’ field.
Figure 8. Assigning VLAN ID.

11 CONNECT | Configure Windows 2012/Windows 2012 R2 with SMB Direct using Emulex OneConnect OCe14000 adapters
CONNECT TECH NOTE
b) If there is a DHCP server running, then the NIC should automatically get the IP else please configure a static IP address by
navigating to ‘IPv4 (TCP/IPv4) Properties.’
Step 4—Assign IP address for SMBServer and SMBClient connected back-to-back
a) Configure a static IP address by navigating to ‘IPv4 (TCP/IPv4) Properties.’
Figure 9. IPv4 assignment.
Figure 10. IPv4 assignment.

12 CONNECT | Configure Windows 2012/Windows 2012 R2 with SMB Direct using Emulex OneConnect OCe14000 adapters
CONNECT TECH NOTE
Step 5—Enable Network Direct and set NetDirect MTU on SMBServer and SMBClient
RoCE is supported in Windows using SMB Direct with NetworkDirect, it is important that SMB Direct and NetworkDirect be configured
correctly. Please follow the steps listed to configure Network Direct and NetDirect MTU:
a) Go to the ‘Advanced Properties’ page for the OCe14100 adapter and enable the “NetworkDirect” parameter if it is not already
enabled.
Figure 11. Enabling NetworkDirect.
Figure 12. Enabling NetworkDirect MTU.
b) Set the NetworkDirect MTU. Emulex recommends a NetworkDirect MTU of 4096.
Note—The NetworkDirect MTU aects only RoCE trac, but the NIC trac still uses the “Packet Size” MTU. An SMB Server will
accept an incoming connection request from an SMB Client when the NetworkDirect MTU on the server is at least as large as the
NetworkDirect MTU on the initiating client.

13 CONNECT | Configure Windows 2012/Windows 2012 R2 with SMB Direct using Emulex OneConnect OCe14000 adapters
CONNECT TECH NOTE
Step 6—Verify SMB Configuration on SMBServer and SMBClient
a) netstat command
Use the “netstat -xan” command to enumerate the active NetworkDirect connections and listeners. A NetworkDirect enabled
driver creates listeners on any configured IPv4 or IPv6 addresses, and the link-local IPv6 address. SMB Direct listeners listen on
port 445.
Figure 14. Get-SmbServerNetworkInterface output.
Figure 15. Get-SmbClientNetworkInterface output.
Figure 13. netstat command output.
b) Run Get-SmbServerNetworkInterface command on the server to make sure the interface configuration is correct.
c) Run Get-SmbClientNetworkInterface command on the client to make the interface configuration is correct.

14 CONNECT | Configure Windows 2012/Windows 2012 R2 with SMB Direct using Emulex OneConnect OCe14000 adapters
CONNECT TECH NOTE
Creating shares on the SMBServer and mounting the share on the SMBClient
Step1—Create shares on the SMBServer
We are using ImDisk, which is a free Virtual Disk Driver to create virtual hard drives on the server which can be mounted on the client.
ImDisk can be downloaded and installed simply by clicking the download.exe. By default, it can be accessed from the Control Panel. Follow
the steps listed below to create a virtual share on the SMBServer:
a) Double click on ImDisk Virtual Disk Driver and click on mount new. Enter 5 as the size of the virtual disk size and select Gigabytes
(selected for this example) and click on OK.
Figure 16. Mount a new virtual disk using IMDisk.
Figure 17. Format Disk option.
b) Select the Format disk option

15 CONNECT | Configure Windows 2012/Windows 2012 R2 with SMB Direct using Emulex OneConnect OCe14000 adapters
CONNECT TECH NOTE
c) Set Volume label as RamDisk and click start.
Figure 18. Format Local Disk output.
Figure 19. Sample output under drives.
d) The RamDisk will be listed under drives.

16 CONNECT | Configure Windows 2012/Windows 2012 R2 with SMB Direct using Emulex OneConnect OCe14000 adapters
CONNECT TECH NOTE
e) Right click RamDisk and scroll down to ‘Share with’ and ‘Advanced sharing.’
Figure 20. Advanced sharing setting option on the Virtual Disk.
Figure 21. Sharing Tab.
f) Navigate to Sharing tab and click on Advanced Sharing.

17 CONNECT | Configure Windows 2012/Windows 2012 R2 with SMB Direct using Emulex OneConnect OCe14000 adapters
CONNECT TECH NOTE
g) Click Share this folder and Permissions.
Figure 22. Advanced Sharing option.
Figure 23. Permissions for the Virtual Disk.
h) Click Allow for Full control and click Apply and OK.

18 CONNECT | Configure Windows 2012/Windows 2012 R2 with SMB Direct using Emulex OneConnect OCe14000 adapters
CONNECT TECH NOTE
i) Share name can also be edited (RamDisk in this example) if not assigned previously. Click Apply and OK.
Figure 24. Share name under Advanced Sharing.
Figure 25. Close Properties page.
j) Click Close.

19 CONNECT | Configure Windows 2012/Windows 2012 R2 with SMB Direct using Emulex OneConnect OCe14000 adapters
CONNECT TECH NOTE
Step 2—Mapping the RoCE-Enabled SMBClient
a) Using an available network share with the proper permissions configured, open an SMB share from the Windows Run command
or from the command prompt, by typing:
netuse[devicename:*][\\computername\sharename]
Figure 26. Sample output for net use command.
Figure 27. Sample out for Get-SmbConnection command.
Figure 28. Sample mounted drive output.
b) The SMB connection on the client can be verified using “Get-SmbConnection” command
c) The mounted drive can also be seen under drive list.
20 CONNECT | Configure Windows 2012/Windows 2012 R2 with SMB Direct using Emulex OneConnect OCe14000 adapters
CONNECT TECH NOTE
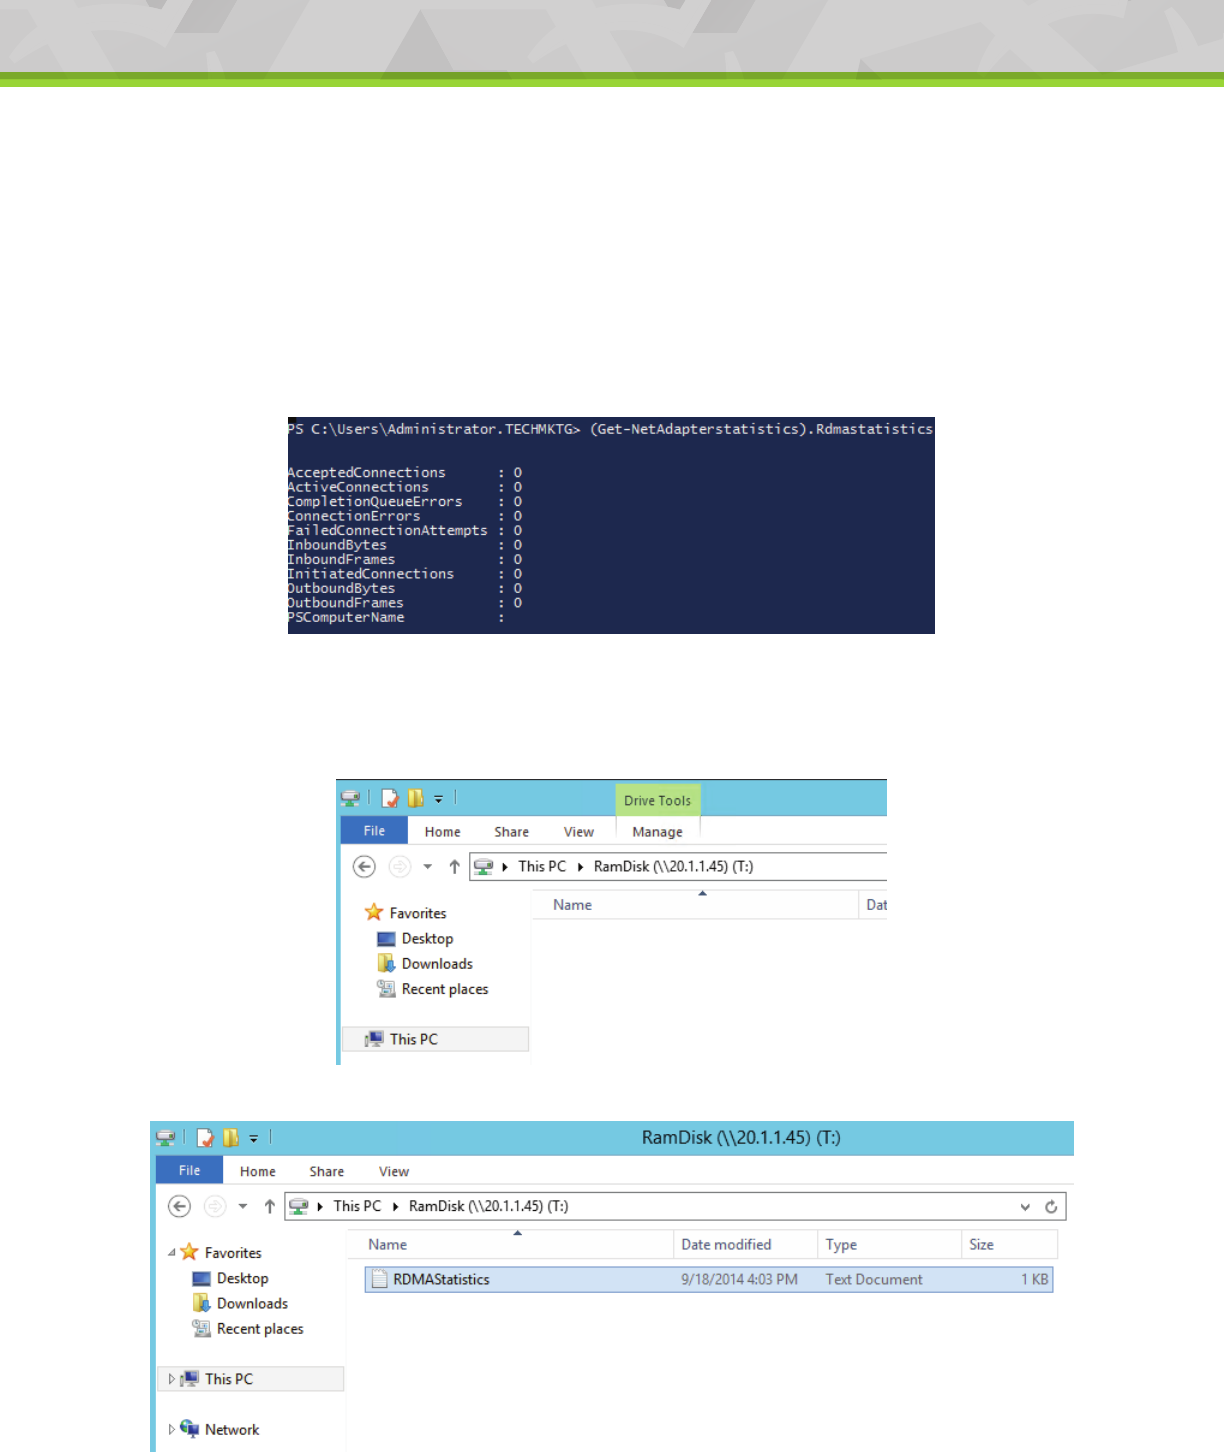
Validate/verify SMB connection by copying a file to the share
After mapping the share, we can verify if the RDMA connection is indeed working. This can be verified by viewing RDMA statistics either
from PerfMon or by using PowerShell commands.
a) On the PowerShell, run “(Get-NetAdapterstatistics).Rdmastatistics” on the SMBServer and SMBClient
- Accepted/ActiveConnection value should be 0.
- Inbound/Outbound frames should be 0 or value greater than 0 is also acceptable.
Figure 29. Sample (Get-NetAdapterstatistics).Rdmastatistics before running the IO.
Figure 30. Share before any file transfer.
Figure 31. Share after file transfer.
b) Create any local test file on SMBClient.
c) Copy the local test file on SMBClient to the mounted share.

21 CONNECT | Configure Windows 2012/Windows 2012 R2 with SMB Direct using Emulex OneConnect OCe14000 adapters
CONNECT TECH NOTE
d) Run the “(Get-NetAdapterstatistics).Rdmastatistics” command on SMBClient and SMBServer to compare RDMA statistics after
running the IO
- On the SMBServer, the AcceptedConnections and Active connections should be 2
- On the SMBClient, only the ActiveConnections should be 2
- The inbound/outbound bytes values have also increased from 0 or from the non-zero value
Figure 32. Sample (Get-NetAdapterstatistics).Rdmastatistics output after running the IO.
Figure 33. RDMA explanation.
Conclusion
A complete overview of hardware and software components required for successfully deploying and evaluating SMB Direct with Emulex
OCe14000 adapters was presented as a part of this tech note. A basic overview and common terms used with reference to SMB Direct is
also explained in the Appendix.
Appendix
Below are some basic overview and common terms used with reference to SMB Direct:
1. RDMA (Remote Direct Memory Access)—Direct memory access from the memory of one computer into that of another without
involving either computer’s operating system. This permits high-throughput, low-latency networking, which is especially useful in
massively parallel computer clusters.
2. NDKPI (Network Direct Kernel Provider Interface)—Enables Kernel mode components, such as SMB Client and servers, to use RDMA
functionality.
3. SMB (Server Message Block protocol)—A network files sharing protocol that allows applications to read and write to files and to
request services from remote servers. Windows Server 2012 introduces the new 3.0 version of the SMB protocol.
4. SMB Direct—SMB over RDMA. Supports the use of network adapters that have the RDMA capability and can function at full speed
with very low latency, while using very little CPU.
5. RNIC—RDMA capable NIC.

22 CONNECT | Configure Windows 2012/Windows 2012 R2 with SMB Direct using Emulex OneConnect OCe14000 adapters
CONNECT TECH NOTE
6. QP (Queue Pair)—Nothing but a connection. Contains a receive queue and transmit queue. An SMB Direct connection uses 1 QP per
connection.
7. Passive Connection—Server side share where the server is “passively” waiting for a connection.
8. Active Connection—Client side that “actively” maps the share to create the connection.
9. Sample RDMA System Diagram
Figure 34. Basic SMB Direct Architecture.
10. QoS Concepts Related to RoCE
a) Priority Groups—It is advisable to split trac into two or more priority groups; one priority group for RoCE and other groups
for non-RoCE trac. Many of the cluster applications use TCP and RoCE trac simultaneously. Some of them use TCP for
establishing connections and share connection-specific information. As a result, it is important to allocate enough bandwidth
(greater than 1%) to non-RoCE (NIC trac) to avoid a slow connection establishment rate and starvation of NIC trac. Work
conserving behavior ensures that each priority group gets enough bandwidth. Based on this behavior, non-RoCE trac should
be given sucient bandwidth; ideally 30-70%.
b) L2 Flow Control—While running a port in generic pause mode because of congestion, RoCE latencies can be adversely aected.
Under these conditions, it is advisable to configure RoCE to use PFC. PFC mode ensures that RoCE trac latencies are unaected
in presence of congestion as a result of NIC trac. However, PFC mode is not required. For switches and adapters that do not
support PFC, RoCE can continue to work without PFC mode. While you can still perform bandwidth allocation for RoCE trac as
opposed to NIC trac, this allocation cannot be guaranteed as all the outgoing trac is paused. We have to enable PFC on the
switches for RoCE trac.

CONNECT TECH NOTE
ELX15-2551 · 4/15
World Headquarters 3333 Susan Street, Costa Mesa, CA 92626 +1 714 662 5600
Bangalore, India +91 80 40156789 | Beijing, China +86 10 84400221
Dublin, Ireland +35 3 (0) 1 652 1700 | Munich, Germany +49 (0) 89 97007 177
Paris, France +33 (0) 158 580 022 | Tokyo, Japan +81 3 5325 3261 | Singapore +65 6866 3768
Wokingham, United Kingdom +44 (0) 118 977 2929 | Brazil +55 11 3443 7735
©2015 Emulex, Inc. All rights reserved.
This document refers to various companies and products by their trade names. In most cases, their respective companies claim these designations as trademarks or registered trademarks. This information is provided for reference only. Although this information is
believed to be accurate and reliable at the time of publication, Emulex assumes no responsibility for errors or omissions. Emulex reserves the right to make changes or corrections without notice. This document is the property of Emulex and may not be duplicated
without permission from the Company.
www.emulex.com
c) When configuring QoS for RoCE, it is important to keep in mind the following:
- A limited QoS configuration is available through OneCommand Manager.
- A single trac class group for RoCE exists per port.
- A single RoCE priority exists in PFC mode.
- Bandwidth allocation for priority groups is supported.
Notes
n
The Windows NIC driver does not support the Microsoft DCB/QoS API.
n
Powershell commands cannot be used to configure QoS-related parameters for the RoCE profile.
References
SMB overview
http://technet.microsoft.com/en-us/library/hh831795.aspx
SMB protocol versions 2 & 3
http://download.microsoft.com/download/9/5/E/95EF66AF-9026-4BB0-A41D-A4F81802D92C/%5BMS-SMB2%5D.pdf
NDKPI
http://msdn.microsoft.com/en-us/library/windows/hardware/jj838834%28v=vs.85%29.aspx
SMB 3.0 features
http://technet.microsoft.com/en-us/library/hh831795.aspx
https://www.eiseverywhere.com/file_uploads/30dd5e8056a0501d6fc9ee818152f7_WED_1140am_File_Systems_and_File_Protocols_
Jose_Barreto.pdf
http://www.server-log.com/blog/2012/5/12/hyper-v-over-smb-30-in-windows-server-2012.html
