
Mobile Application Builder Guide-iOS Guide
Oracle Banking Digital Experience
Patchset Release 21.1.1.0.0
Part No. F40800-01
June 2021

Mobile Application Builder Guide-iOS Guide
June 2021
Oracle Financial Services Software Limited
Oracle Park
Off Western Express Highway
Goregaon (East)
Mumbai, Maharashtra 400 063
India
Worldwide Inquiries:
Phone: +91 22 6718 3000
Fax:+91 22 6718 3001
www.oracle.com/financialservices/
Copyright © 2006, 2021, Oracle and/or its affiliates. All rights reserved.
Oracle and Java are registered trademarks of Oracle and/or its affiliates. Other names may be trademarks of their respective
owners.
U.S. GOVERNMENT END USERS: Oracle programs, including any operating system, integrated software, any programs
installed on the hardware, and/or documentation, delivered to U.S. Government end users are “commercial computer
software” pursuant to the applicable Federal Acquisition Regulation and agency-specific supplemental regulations. As such,
use, duplication, disclosure, modification, and adaptation of the programs, including any operating system, integrated
software, any programs installed on the hardware, and/or documentation, shall be subject to license terms and license
restrictions applicable to the programs. No other rights are granted to the U.S. Government.
This software or hardware is developed for general use in a variety of information management applications. It is not
developed or intended for use in any inherently dangerous applications, including applications that may create a risk of
personal injury. If you use this software or hardware in dangerous applications, then you shall be responsible to take all
appropriate failsafe, backup, redundancy, and other measures to ensure its safe use. Oracle Corporation and its affiliates
disclaim any liability for any damages caused by use of this software or hardware in dangerous applications.
This software and related documentation are provided under a license agreement containing restrictions on use and
disclosure and are protected by intellectual property laws. Except as expressly permitted in your license agreement or
allowed by law, you may not use, copy, reproduce, translate, broadcast, modify, license, transmit, distribute, exhibit, perform,
publish or display any part, in any form, or by any means. Reverse engineering, disassembly, or decompilation of this
software, unless required by law for interoperability, is prohibited.
The information contained herein is subject to change without notice and is not warranted to be error-free. If you find any
errors, please report them to us in writing.
This software or hardware and documentation may provide access to or information on content, products and services from
third parties. Oracle Corporation and its affiliates are not responsible for and expressly disclaim all warranties of any kind
with respect to third-party content, products, and services. Oracle Corporation and its affiliates will not be responsible for
any loss, costs, or damages incurred due to your access to or use of third-party content, products, or services.

Table of Contents
1. Preface .............................................................................................................................................. 1–1
1.1 Intended Audience ...................................................................................................................... 1–1
1.2 Documentation Accessibility ....................................................................................................... 1–1
1.3 Access to Oracle Support ........................................................................................................... 1–1
1.4 Structure ..................................................................................................................................... 1–1
1.5 Related Information Sources ...................................................................................................... 1–1
2. OBDX Servicing Application ........................................................................................................... 2–1
2.1 Pre requisite ................................................................................................................................ 2–1
2.2 Create Project ............................................................................................................................. 2–1
2.3 Create Project Using Remote UI ................................................................................................ 2–1
2.4 Create Project Using Local UI by adding UI to workspace......................................................... 2–1
2.5 Open project in Xcode ................................................................................................................ 2–2
2.6 Generating Certificates for Development, Production and Push Notifications ........................... 2–5
2.7 Push Notification Actionable Alerts Configuration ...................................................................... 2–8
2.8 ODA Chatbot Inclusion ............................................................................................................... 2–9
2.9 eKYC Implementation ............................................................................................................... 2–11
3. Archive and Export .......................................................................................................................... 3–1
4. OBDX Authenticator Application ................................................................................................... 4–1
4.1 Authenticator UI (Follow any one step below) ............................................................................ 4–1
4.2 Authenticator Application Workspace Setup .............................................................................. 4–3
4.3 Building Authenticator Application .............................................................................................. 4–5

Preface
1–1
1. Preface
1.1 Intended Audience
This document is intended for the following audience:
Customers
Partners
1.2 Documentation Accessibility
For information about Oracle's commitment to accessibility, visit the Oracle Accessibility Program
website at http://www.oracle.com/pls/topic/lookup?ctx=acc&id=docacc.
1.3 Access to Oracle Support
Oracle customers have access to electronic support through My Oracle Support. For information,
visit
http://www.oracle.com/pls/topic/lookup?ctx=acc&id=info or visit
http://www.oracle.com/pls/topic/lookup?ctx=acc&id=trs if you are hearing impaired.
1.4 Structure
This manual is organized into the following categories:
Preface gives information on the intended audience. It also describes the overall structure of the
User Manual.
The subsequent chapters describes following details:
Introduction
Preferences & Database
Configuration / Installation.
1.5 Related Information Sources
For more information on Oracle Banking Digital Experience Patchset Release 21.1.1.0.0, refer to
the following documents:
Oracle Banking Digital Experience Installation Manuals

OBDX Servicing Application
2–1
2. OBDX Servicing Application
2.1 Pre requisite
Download and Install node js as it is required to run npm and cordova commands.
XCode to be download from Mac App Store.
OBDX iOS App is supported only on versions 12 and 13.
2.2 Create Project
Ensure Nodejs Version is >= 12 and latest Xcode version
1. Extract iOS workspace from installer and place in a folder.
2. The workspace by default contains framework for running on devices. Hence to run the
application on simulator, delete and copy the 4 frameworks (OBDXExtensions.framework,
OBDXFramework.framework, OBDXWatchFramework.framework, Cordova.framework) from
installer/simulator to zigbank\platforms\ios directory.
2.3 Create Project Using Remote UI
Make the following changes to index.html using any code editor of choice:
In var server_url, put the same KEY_SERVER_URL to be used in app.plist
In workspace create a copy of index.html in the same folder and rename it to home.html.
In index.html/home.html in workspace update jet_url = “https://static.oracle.com/cdn”On the
server side where UI is deployed in framework/js/configurations/config.js set Jet “baseUrl” as
https://static.oracle.com/cdn/jet After this proceed to 2.5 Open Project in Xcode.
2.4 Create Project Using Local UI by adding UI to workspace
Use any 1 option below of a/b
a. Building un-built UI (required in case of customizations)
(UI is same for internet and mobile, same build process of internet to be followed)
b. Using built UI (out of box shipped with installer)
Available at --
OBDX_Installer/installables/ui/deploy (Main release, OBDX installer),
OBDX_Patch_Installer/installables/ui/deploy (Patchsets)
Create a copy of index.html in the same folder and rename it to home.html.
Copy folders(components,extensions,framework,images,flows,lzn,home.html
,partials,resource, index.html,build.fingerprint) to workspace (zigbank/platforms/ios/www)

OBDX Servicing Application
2–2
Note: When copying to www, index.html already present in the workspace should be replaced)
Ensure webhelp folder is not copied.
Download oraclejet-8.3.source zip file
1. Unzip & copy js and css folders to workspace as below
a. assets\www\framework\js\libs\oraclejet\8.3.0\js
b. assets\www\framework\js\libs\oraclejet\8.3.0\css
2. In config.js update values as highlighted below
a. {hostedAt:"local",baseUrl:"framework/js/libs/oraclejet"
3. In index.html update require.js path
a. framework/js/libs/oraclejet/8.3.0/js/libs/require/require.js
2.5 Open project in Xcode
Open Xcode by clicking ZigBank.xcodeproj at zigbank/platforms/ios/
1. Adding URLs to app.plist (ZigBank/Resources)
a. NONOAM (DB Authenticator setup)
SERVER_TYPE
NONOAM
KEY_SERVER_URL
https://mumaa012.in.oracle.com:18443/
WEB_URL
https://mumaa012.in.oracle.com:18443/
b. OBDXTOKEN (Token based mechanism)
SERVER_TYPE
OBDXTOKEN
KEY_SERVER_URL
https://mumaa012.in.oracle.com:18443
WEB_URL
https://mumaa012.in.oracle.com:18443
c. OAUTH Setup (Refer to installer pre requisite documents for OAuth configurations)
SERVER_TYPE
OAUTH
KEY_SERVER_URL
Eg. https://mumaa012.in.oracle.com:18443/
(This URL must be of OHS without webgate)
WEB_URL
Eg. https://mumaa012.in.oracle.com:18443/

OBDX Servicing Application
2–3
SERVER_TYPE
OAUTH
KEY_OAUTH_PROVIDER_URL
http://mum00aon.in.oracle.com:14100/oauth2/rest/token
APP_CLIENT_ID
<Base64 of clientid:secret> of Mobile App client
APP_DOMAIN
OBDXMobileAppDomain
WATCH_CLIENT_ID
<Base64 of clientid:secret> of wearables
WATCH_DOMAIN
OBDXWearDomain
SNAPSHOT_CLIENT_ID
<Base64 of clientid:secret> of snapshot
SNAPSHOT_DOMAIN
OBDXSnapshotDomain
LOGIN_SCOPE
OBDXMobileAppResServer.OBDXLoginScope
d. IDCS Setup
SERVER_TYPE
IDCS
KEY_SERVER_URL
Eg. https://mumaa012.in.oracle.com:18443/
(This URL must be of OHS without webgate)
WEB_URL
Eg. https://mumaa012.in.oracle.com:18443/
KEY_OAUTH_PROVIDER_URL
http://obdx-
tenant01.identity.c9dev0.oc9qadev.com/oauth2/
v1/token
APP_CLIENT_ID
<Base64 of clientid:secret> of Mobile App client
WATCH_CLIENT_ID
<Base64 of clientid:secret> of wearables
SNAPSHOT_CLIENT_ID
<Base64 of clientid:secret> of snapshot
LOGIN_SCOPE
obdxLoginScope
OFFLINE_SCOPE
urn:opc:idm:__myscopes__ offline_access

OBDX Servicing Application
2–4
e. Common configurations
CurrencyCode
Currency code for Siri Payments
PaymentPurposeRequiredFlag
Payment purpose required for Siri payments
SUITENAME
Group identifier for sharing keystore information. Same as
given in app groups (mandatory to be given same as App
Group name)
BankName
Name of bank to be shown on touch id / face id popup
CertificateType
Extension of SSL Pinned certificates (Eg cer/der)
2. Adding chatbot support to mobile application (Optional) (see section 2.8 for more details)
CHATBOT_ID
The tenant ID
CHATBOT_URL
The web socket URL for the ChatApp application in ODA
3. Adding eKYC verification support to mobile application (Optional) (see section 2.9 for more
details)
LX_CLIENT_ID
The client ID
4. Adding Bundle Identifiers
Bundle identifiers needs to be added in the Info.plist of each the frameworks along with the
Signing Capabilities tab in Xcode. For example, the bundle identifier used is abc.def.ghi.jkl.
The steps to be followed are,
Right click on OBDXFramework.framework(in Xcode’s Project Navigator) -> Show in
Finder
When the finder directory opens the right click OBDXFramework.framework -> Show
package contents.
Open Info.plist and set Bundle identifier as abc.def.ghi.jkl.OBDXFramework
Repeat the steps for the other three frameworks as well, with the following values:
Bundle identifier for Cordova.framework : abc.def.ghi.jkl.Cordova
Bundle identifier for OBDXExtensions.framework : abc.def.ghi.jkl.OBDXExtensions
Bundle identifier for OBDXWatchFramework.framework : abc.def.ghi.jkl.
OBDXWatchFramework
5. Siri-Payload.plist (ZigBank/Resources) is provided to specify entries in the Siri payload based
on transaction types (internal, domestic or international). Entries common to all the transaction
types can also be entered.

OBDX Servicing Application
2–5
2.6 Generating Certificates for Development, Production and
Push Notifications
Create all certificates (by uploading CSR for keychain utility), provisioning profiles and push
certificates as shown below by login in developer console. For development add device UUIDs and
add same to provisioning profiles. Add capabilities as shown below and ensure the bundle identifier
matches the one of the application in Xcode

OBDX Servicing Application
2–6
Ensure AppGroups capability is added to all profiles and for mobile profile SiriKit, App Groups,
Push Notifications must by added.
Note the certificate/bundle name
Note the Team ID from top right corner

OBDX Servicing Application
2–7
Navigate to the “Keys” section and create APNS key
Note APNS key and download the .p8 file. Copy the .p8 to config/resources\mobile
Update the password as shown below –
Sr.
No.
Table
PROP_ID
CATEGORY_ID
PROP_VA
LUE
Purpose
1
DIGX_FW_CO
NFIG_ALL_B
APNS
DispatchDetails
<Key ID>
Provides key of .p8
certificate
2
DIGX_FW_CO
NFIG_ALL_B
APNSKeySto
re
DispatchDetails
DATABAS
E or
CONNECT
OR
Specifies whether to
pick certificate
password from
database or from
connector. Default DB
(No change)
3
DIGX_FW_CO
NFIG_ALL_B
APNSCertKe
yStore
DispatchDetails
DATABAS
E or
CONNECT
OR
Specifies whether to
pick certificate from
database or from
connector. Default DB
(No change)
4
DIGX_FW_CO
NFIG_ALL_B
proxy
DispatchDetails
<protocol,
proxy_add
ress>
Provides proxy
address, if any, to be
provided while
connecting to APNS
server. Delete row if
proxy not required.
Example:
HTTP,148.50.60.8,80

OBDX Servicing Application
2–8
5
DIGX_FW_CO
NFIG_ALL_B
CERT_TYPE
DispatchDetails
For dev
push certs
add row
with value
‘dev’
For prod push
certificates this row is
not required
6
DIGX_FW_CO
NFIG_VAR_B
APNSCert
Eg –
-----BEGIN
PRIVATE
KEY-----
abcd
-----END
PRIVATE
KEY-----
Open the .p8 file and
copy contents to
column
(Update for all entities)
7
DIGX_FW_CO
NFIG_VAR_B
APNS_BUND
LE
Eg.
com.ofss.d
igx.obdx.zi
gbank
Bundle Name
(Update for all entities)
8
DIGX_FW_CO
NFIG_VAR_B
APNS_TEAM
ID
Eg.
3NX1974C
93
Team ID of Apple
developer account
(Update for all entities)
If CONNECTOR is selected in Step 2 update key as below
2.7 Push Notification Actionable Alerts Configuration
To enable deep linking with actionable alerts make the following changes on the server end to the
push notifications payload:
1. Send the “category" as “pac”.
2. Send the required deep-linking URL in “SUMMARY_TEXT”.

OBDX Servicing Application
2–9
2.8 ODA Chatbot Inclusion
To enable ODA Chatbot services in the mobile app, the following changes needs to be made:
1. Copy the folder "cordova-plugin-chatbot" from the SVN path
: workspace_installer/AppExtensions/ODAChatbot The frameworks can be found at ODA
Client SDK for iOS x.y.z - Latest in https://www.oracle.com/downloads/cloud/amce-
downloads.html#license-lightbox. After downloading and unzipping the latest version the
frameworks for an actual device and simulator can be found inside the folders named
"FrameworksActualDevice" and "FrameworksSimulator" respectively. Frameworks to be
chosen as per the target and pasted inside "cordova-plugin-chatbot".
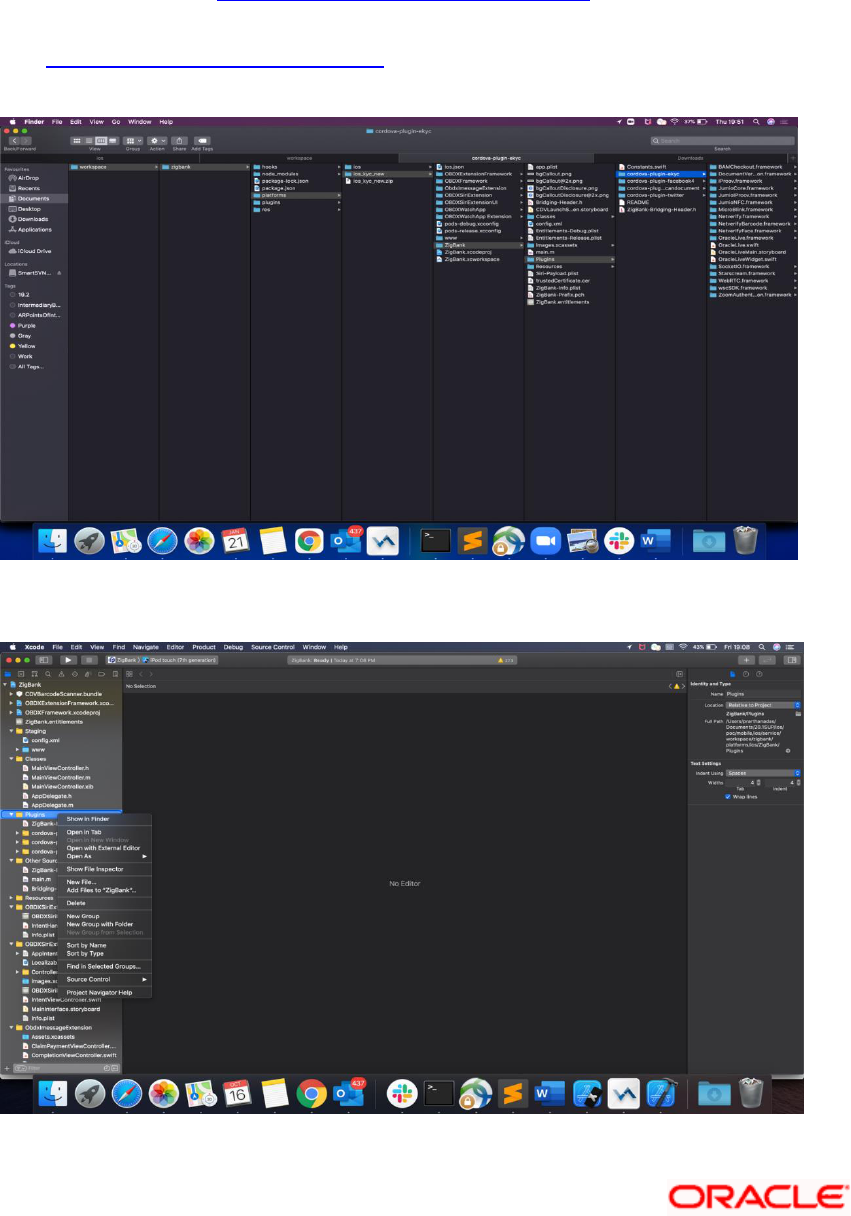
2. Paste the folder "cordova-plugin-chatbot", copied previously in the path
: workspace_installer/Zigbank/plugins A screenshot of the destination in Finder is attached
herewith.
3. Open the Zigbank.xcodeproj file, right click on "Plugins" folder and select "New Group"
option. Name the group as "cordova-plugin-chatbot".

OBDX Servicing Application
2–10
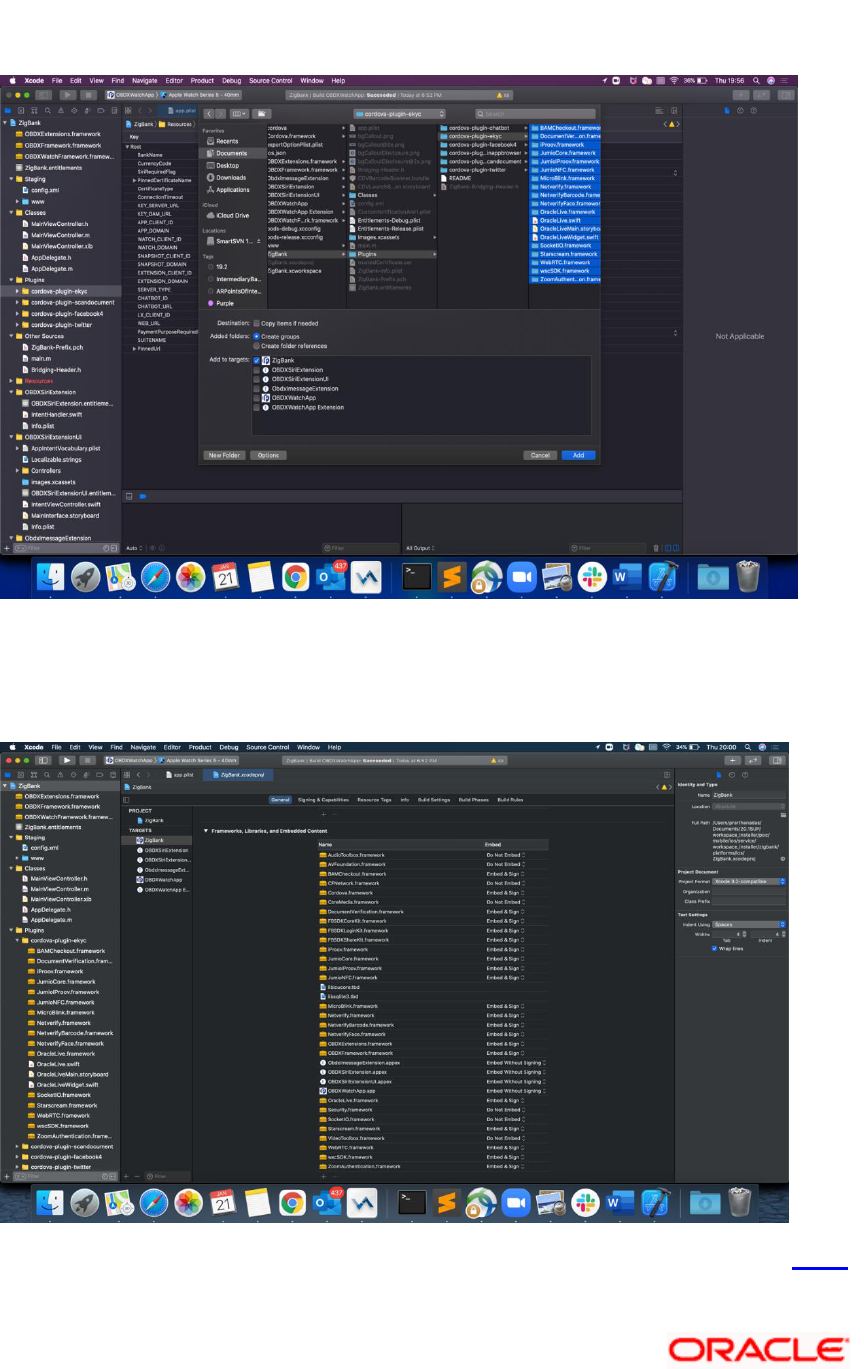
4. Right click on the newly created group and select "Add files to "Zigbank"" option, and
add all the contents of "cordova-plugin-chatbot" folder, pasted previously.
5. After addition of the files, go to "General" tab for "Zigbank" target and under the
"Frameworks, Libraries and Embedded Content" section change the embed type of the
frameworks "Starscream.framework" and "BotClientUISDK.framework" to "Embed and
Sign". Failing to do so will make the app crash after installation.

OBDX Servicing Application
2–11
2.9 eKYC Implementation
To enable eKYC please follow the steps mentioned below:
1. Download the iOS ID Verification SDK from oracle.live.api-ios-id-verification.zip from Oracle
Live Experience. All the frameworks inside “release” folder of “oracle.live.api-ios-id-
verification” are needed viz.
OracleLive.framework
WebRTC.framework
wscSDK.framework
2. Go to https://mobile-sdk.jumio.com/com/jumio/ios/jumio-mobile-sdk/ and navigate to the latest
version to download the Jumio frameworks. Unzip the downloaded folder the following
frameworks are of use to us:
BAMCheckout.framework
DocumentVerification.framework
iProov.framework
JumioCore.framework
JumioProov.framework
JumioNFC.framework
Microblink.framework
Netverify.framework
NetverifyBarcode.framework
NetverifyFace.framework
OBDX Servicing Application
2–12
SocketIO.framework
Starscream.framework
ZoomAuthentication.framework
3. Paste the frameworks downloaded in the previous steps in the folder "cordova-plugin-ekyc"
from the SVN path : workspace_installer/AppExtensions/eKYC
4. Paste the folder "cordova-plugin-ekyc", copied previously, in the path
: workspace_installer/Zigbank/plugins A screenshot of the destination in Finder is
attached herewith.
5. Open the Zigbank.xcodeproj file, right click on "Plugins" folder and select "New Group"
option. Name the group as "cordova-plugin-ekyc".
OBDX Servicing Application
2–13
6. Right click on the newly created group and select "Add files to "Zigbank"" option, and
add all the contents of "cordova-plugin-ekyc" folder, pasted previously.
7. After addition of the files, go to "General" tab for "Zigbank" target and under the
"Frameworks, Libraries and Embedded Content" section change the embed type of all the
frameworks to "Embed and Sign". Failing to do so will make the app crash after
installation.
Home

Archive and Export
3–1
3. Archive and Export
a. In the Menu bar click on Product -> Archive (Select Generic iOS Device)
b. After archiving has successfully completed. Following popup will appear

Archive and Export
3–2
c. Click on Distribute App in the right pane of the popup -> select the Method of Distribution ->
Choose Provisioning Profile according to the method of distribution -> select Next -> Review
the contents and click on Export -> Export and generate the .ipa

Archive and Export
3–3
To run the application on simulator copy & replace 4 frameworks (.framework files) from /simulator
to zigbank/platforms/ios/
Home

OBDX Authenticator Application
4–1
4. OBDX Authenticator Application
4.1 Authenticator UI (Follow any one step below)
4.1.1 Using built UI
For TOKEN-BASED - Unzip dist.tar.gz directory from OBDX_Patch_Mobile\authenticator\TOKEN-
BASED
For Non-OAM - Unzip dist.tar.gz directory from OBDX_Patch_Mobile\authenticator\NON-OAM
For OAM - Unzip dist.tar.gz directory from OBDX_Patch_Mobile\authenticator\OAM
4.1.2 Building UI manually
1. Extract authenticator_ui.tar.gz from OBDX_Patch_Mobile\authenticator\unbuilt_ui.
The folder structure is as shown :
a. OAM Based Authentication
1. Open Terminal at “_build” level.
2. Run following command :
3. After running above commands and getting result as “Done, without errors.” a new
folder will be created at “_build” level with name as “dist”.
sudo npm install -g grunt-cli
sudo npm install
node render-requirejs/render-requirejs.js
grunt authenticator --verbose

OBDX Authenticator Application
4–2
b. NON-OAM Based Authentication
1. Copy “non-oam/login” folder and Replace it at location “components/modules/” [in ui
folder] location. This will replace existing “login” folder.
2. Open Terminal at “_build” level.
3. Run following command :
4. After running above commands and getting result as “Done, without errors.” a new
folder will be created at “_build” folder level with name as “dist”.
sudo npm install -g grunt-cli
sudo npm install
node render-requirejs/render-requirejs.js
grunt authenticator --verbose

OBDX Authenticator Application
4–3
c. Token Based Authentication Mechanism
a. Copy the “token-based/login” folder and replace it at the “components/modules/”
[in ui folder] location. This will replace the existing the login folder.
b. Open the terminal at “_build” level.
c. Run the following commands:
d. After running above commands and getting result as “Done, without errors.” A
new folder will be created at “_build” folder level with name as “dist”.
4.2 Authenticator Application Workspace Setup
1. Unzip and navigate to iOS workspace as shipped in installer.
2. Open the workspace as shown below and find and replace the following generated UI files from
“ui/dist” folder :
components
css
framework
images
pages
resources
sudo npm install -g grunt-cli
sudo npm install
node render-requirejs/render-requirejs.js
grunt authenticator --verbose

OBDX Authenticator Application
4–4
3. Double click on OBDXSecureAuthenticator.xccodeproj to open the project in Xcode
Update HOTP or TOTP in above screenshots and update the server URL.
4. The application can be archived using steps in Section 4.3 for running on device
5. To run the application on simulator, copy & replace the framework from
simulator/ObdxAuthenticator.framework to /authenticator/platforms/ios/

OBDX Authenticator Application
4–5
4.3 Building Authenticator Application
1. Set the simulator to Generic iOS device. Then go to Product -> Archive.
2. Choose your Archive and then click “Export”. .ipa file will be generated
Home
