
Fasthosts Customer Support
Generating
Certificate
Signing
Requests
Generating a CSR is the first step to take when you want
to apply an SSL certificate to a domain on your server.
This manual covers how to do this via various platforms.

Customer Support | Generating Certificate Signing Requests
Page 1
Contents
Introduction ....................................................................................... 1
What is a CSR? .................................................................................. 2
IIS 8 ................................................................................................. 2
IIS 7 ................................................................................................. 7
Apache ........................................................................................... 12
Generate a Key Pair .................................................................... 12
Generate to CSR......................................................................... 13
Backup your private key .............................................................. 15
Plesk Onyx ..................................................................................... 15
Plesk 12 ......................................................................................... 18
WHM .............................................................................................. 22
cPanel ............................................................................................ 25

Customer Support | Generating Certificate Signing Requests
Page 1
Introduction
SSL secures all website traffic between two points, ensuring that any data shared
between your customers and your webserver is safe and secure.
It achieves this in two ways:
1 It encrypts the data between the two computers, preventing anyone from
eavesdropping on your communications.
2 It confirms the identity of the website you are communicating with.
The transfer of data is achieved using public key encryption. This involves
generating two very large prime numbers. The first is used as your private
key and should be kept secret from everyone. The other forms your public
key, and is available to everyone to view.
With this information it is possible to create a “self signed” SSL certificate
that encrypts data between two end points. However the end user cannot
be sure that you are who you say you are. As such their web browser will
provide warnings to anyone attempting to view your site over SSL.
To avoid these errors, you need to prove the identity of your website. This
is achieved by enrolling for a digitally signed certificate from a trusted
authority.
Your computer inherently “trusts” a number of companies (called Certificate
authorities). By creating a public and private key, you can ask a trusted
certificate authority to digitally sign your certificate. As your computer trusts
the Certificate authority, it will also trust the identity of anyone who has their
identity confirmed by having their certificate signed by such an authority.

Customer Support | Generating Certificate Signing Requests
Page 2
What is a CSR?
During a Certificate Signing Request (CSR) your computer will generate the
private and public keys needed to encrypt data between yourself and your
customers. It will also record information regarding your company or
organization.
This information can then be sent to a Certificate Authority that will check the
information provided and sign your certificate.
Once you have received your signed certificate you can install it on your server
and start encrypting traffic to and from your website.
The process for generating a Certificate signing request differs slightly depending
upon which operating system or control panel software you are using.
IIS 8
Step 1
From within Server Manager select Internet Information Services (IIS) Manager
from the Tools drop-down menu.

Customer Support | Generating Certificate Signing Requests
Page 3
Step 2
In the IIS Manager, choose your server name.
Step 3
In the Features pane (the middle pane), open the Server Certificates icon. This
will be located in the IIS section, or the Security section, depending upon how
you are grouping your icons.

Customer Support | Generating Certificate Signing Requests
Page 4
Step 4
Click Create Certificate Request. This is located in the right hand pane marked
Actions.
Step 5
The first screen of the wizard asks for details regarding the new site. The
common name should match the fully-qualified domain name for the site.
Otherwise, provide information about your site, making sure to spell out the name
of your state and locality.
You will be prompted to enter additional information regarding your website. In
the form provided, enter the following details:
Common Name: The Common Name is the Host + Domain Name. It looks
like "www.domain.com" or “domain.com".

Customer Support | Generating Certificate Signing Requests
Page 5
Organization: The Organization Name is your Full Legal Company or
Personal Name.
Organizational Unit: This field is optional; The Organizational Unit field is
the name of the department or organization unit making the request.
City/Locality: Is the city or area in which you are based; E.g. Gloucester.
State/province: Is the area in which you are based. E.g. Gloucestershire.
Country/region: Select the two digit country code for your organization
from the drop down list provided. E.g GB, US or CA for Great Britain,
United States of America or Canada respectively.
Quick tip: The Common Name must be the same as the
Web address you will be accessing when connecting to your
secure site.
For example, an SSL Server Certificate for the domain
"domain.com" will receive a warning if accessing a site
named "www.domain.com" or "shop.domain.com", as
"www.domain.com" and "shop.domain.com" are different
from "domain.com".
Quick tip: A full list of country codes is available in the
appendix of this guide.

Customer Support | Generating Certificate Signing Requests
Page 6
Step 6
Click Next to continue.
Step 7
Next, you are asked to choose cryptography options. Leave the default setting of
“Microsoft RSA SChannel Cryptographic Provider”, but change the Bit length to
2048. Click Next to continue.

Customer Support | Generating Certificate Signing Requests
Page 7
Step 8
Finally, provide a filename to which to save the certificate request. You will need
to retrieve this file later, so make a note of the name and location.
IIS 7
Step 1
Choose Start > Administrative Tools > Internet Information Services (IIS)
Manager.
Step 2
In the IIS Manager, choose your server name.

Customer Support | Generating Certificate Signing Requests
Page 8
Step 3
In the Features pane (the middle pane), open the Server Certificates icon. This
will be located in the IIS section, or the Security section, depending upon how
you are grouping your icons.
Step 4
Click Create Certificate Request. This is located in the right hand pane marked
Actions.

Customer Support | Generating Certificate Signing Requests
Page 9
Step 5
The first screen of the wizard asks for details regarding the new site. The
common name should match the fully-qualified domain name for the site.
Otherwise, provide information about your site, making sure to spell out the name
of your state and locality.
You will be prompted to enter additional information regarding your website. In
the form provided, enter the following details:
Common Name: The Common Name is the Host + Domain Name. It looks
like "www.domain.com" or “domain.com".
Organization: The Organization Name is your Full Legal Company or
Personal Name.
Organizational Unit: This field is optional; The Organizational Unit field is
the name of the department or organization unit making the request.
City/Locality: Is the city or area in which you are based; E.g. Gloucester.
State/province: Is the area in which you are based. E.g. Gloucestershire.
Quick tip: The Common Name must be the same as the
Web address you will be accessing when connecting to your
secure site.
For example, an SSL Server Certificate for the domain
"domain.com" will receive a warning if accessing a site
named "www.domain.com" or "shop.domain.com", as
"www.domain.com" and "shop.domain.com" are different
from "domain.com".

Customer Support | Generating Certificate Signing Requests
Page 10
Country/region: Select the two digit country code for your organization
from the drop down list provided. E.g GB, US or CA for Great Britain,
United States of America or Canada respectively.
Step 6
Click Next to continue.
Quick tip: A full list of country codes is available in the
appendix of this guide.

Customer Support | Generating Certificate Signing Requests
Page 11
Step 7
Next, you are asked to choose cryptography options. Leave the default setting of
“Microsoft RSA SChannel Cryptographic Provider”, but change the Bit length to
2048. Click Next to continue.
Step 8
Finally, provide a filename to which to save the certificate request. You will need
to retrieve this file later, so make a note of the name and location.

Customer Support | Generating Certificate Signing Requests
Page 12
Apache
To generate a CSR, you will need to create a key pair for your server. These two
items are a digital certificate key pair and cannot be separated.
Generate a Key Pair
“openssl” is used to generate the key and CSR. This utility comes pre-installed
on our dedicated and Virtual servers under /usr/local/ssl/bin.
Step 1
Type the following command at the prompt for an encrypted key:
1
openssl genrsa –des3 –out www.mydomain.com.key 2048
This command generates a 2048 bit RSA private key and stores it in the file
www.mydomain.com.key.
Note: Your SSL Certificate matches this key pair, so if you
lose your public/private key file, or you need to re-generate
your password, your SSL certificate will no longer work and
a new one will need to be requested.

Customer Support | Generating Certificate Signing Requests
Page 13
Step 2
When prompted for a pass phrase: Enter a secure password and remember it.
This pass phrase is what protects the private key. Both the private key and the
certificate are required to enable SSL.
Generate to CSR
Step 1
Type the following command at the prompt:
1
openssl req -new -key www.mydomain.com.key -out www.mydomain.com.csr
Step 2
This command will prompt for the following X.509 attributes of the certificate:
Country Name (C): Select the two digit country code for your organization.
A list of country codes can be found in the appendix of this guide.
State or Province (S): Is the area in which you are based. E.g.
Gloucestershire.
Locality or City (L): Is the city or area in which you are based; E.g.
Gloucester.
Organization (O): The Organization Name is your Full Legal Company or
Personal Name. If your company or department has an &, @, or any other
symbol using the shift key in its name, you must spell out the symbol or
omit it to enrol. Example: Smith & Son would be Smith and Son.

Customer Support | Generating Certificate Signing Requests
Page 14
Organizational Unit (OU): This field is optional; The Organizational Unit
field is the name of the department or organization unit making the request.
Common Name (CN): The Common Name is the Host + Domain Name. It
looks like "www.domain.com" or “domain.com". The Common Name must
be the same as the Web address you will be accessing when connecting to
your secure site.
For example, a SSL Server Certificate for the domain "domain.com" will receive a
warning if accessing a site named "www.domain.com" or "shop.domain.com", as
"www.domain.com" and "shop.domain.com" are different from "domain.com".
Don’t enter your email address, challenge password or an optional company
name when generating the CSR.
Your public/private key pair has now been created. The private key
(www.domain.com.key) will be stored locally on the server machine and should
be kept safe. The public key, in the form of a Certificate Signing Request
(certrequest.csr), will be used in generating your certificate.
Step 3
Open the file in a text editor, such as Vi, and save it as a .txt file.
Quick tip: Use a text editor to copy and paste your CSR into
the enrolment form. Word processors such a Microsoft Word
can add formatting information into your text and cause your
CRS to fail.

Customer Support | Generating Certificate Signing Requests
Page 15
Step 4
Once the CSR has been created, proceed to Enrolment.
Backup your private key
It’s good practice to make a backup of your .key. While it is not essential that you
keep a backup of this key and your pass phrase, it may be important in cases of
server failure.
Plesk Onyx
Step 1
In the Plesk control panel, select Domains from the
Hosting Services section within the left menu bar.
Step 2
Click on the domain you wish to add the certificate to.
Step 3
Select the SSL/TLS Certificates icon.

Customer Support | Generating Certificate Signing Requests
Page 16
Step 4
Click on the Add SSL/TLS Certificate icon.
Step 5
Enter a Certificate Name to help you identify this certificate. In the example below we've
named it after the domain name the certificate is for, to make it quickly and easily identifiable.
Step 6
Make sure you select 2048 from the Bits dropdown menu.
Step 7
You also need to enter your company address, the domain name the certificate will protect,
and a valid email address. These details must be accurate as they will be used to generate
your private key.
After the details have been filled in
click the Request button.

Customer Support | Generating Certificate Signing Requests
Page 17
Step 8
You will be directed back to the SSL Certificates section. From here you will need to click on
the certificate that has just been created.
Step 9
Copy the entire CSR part from where the text starts with -----BEGIN CERTIFICATE
REQUEST----- to where it ends with -----END CERTIFICATE REQUEST----- save this to a
notepad file.
Step 10
You will need to provide this to your chosen certificate authority (the company you are
purchasing your SSL certificate from). They will then provide you with at the certificate part to
upload to Plesk.

Customer Support | Generating Certificate Signing Requests
Page 18
Plesk 12
Step 1
Log in to Plesk on your server as the server administrator and click
on Domains in the Hosting Services menu.
Step 2
Click on the Open in Control Panel link next to the domain name you want to add
the SSL certificate to.
Step 3
Click the Show More button at the bottom of the Websites & Domains section.

Customer Support | Generating Certificate Signing Requests
Page 19
Step 4
Click on the Secure Your Sites icon.
Step 5
Click the Add SS L Certificate icon.
Step 6
Enter a Certificate Name to help you identify this certificate. In the example
below we've named it after the domain name the certificate is for, to make it
quickly and easily identifiable.

Customer Support | Generating Certificate Signing Requests
Page 20
Step 7
You also need to enter your company address, the domain name the certificate
will protect, and a valid email address. These details must be accurate as they
will be used to generate your private key.
Click the Request button when you've entered the information. You'll see a
confirmation message that the certificate has been created.
Step 8
Locate the newly created certificate in the list and click on it to see it's properties.
Scroll down and find the CSR section. Copy all the text that starts with:
-----BEGIN CERTIFICATE REQUEST-----
and ends with
-----END CERTIFICATE REQUEST-----

Customer Support | Generating Certificate Signing Requests
Page 21
Step 9
Visit the web site of your chosen certificate authority and follow their procedures
to purchase your certificate. When prompted, paste the CSR text you copied in
the previous step into their online form. They will then generate your certificate.
Save the generated certificate file to your local machine.

Customer Support | Generating Certificate Signing Requests
Page 22
WHM
Step 1
Login to WHM as an Administrator and Select Generate an SSL Certificate and
Signing Request from the SSL/TLS section of the left menu.
Step 2
In the Contact Information section you can choose to have the certificate parts
email to you. To do so check the box labelled When complete, email me the
certificate, key and CSR and enter your email address into the Email Address
field.

Customer Support | Generating Certificate Signing Requests
Page 23
Step 3
Select a key size value from the Key Size drop down menu. 2,048bits is
recommended.
Step 4
Fill out the CSR form using the fields provided.
Domains: Enter the domain name that you want to add SSL to.
City: Enter the City that the domain's registrant details contain.
State: Enter the State or County that the domain's registrant details
contain.
Country: Select the domain registrant's country from the dropdown menu.
Company Name: Enter your company name.
Company Division: Enter the division within your company.
Email: Enter the domain registrant's email address.
Passphrase: Enter a passphrase (optional).
Once finished, click the Create button to generate the CSR.

Customer Support | Generating Certificate Signing Requests
Page 24
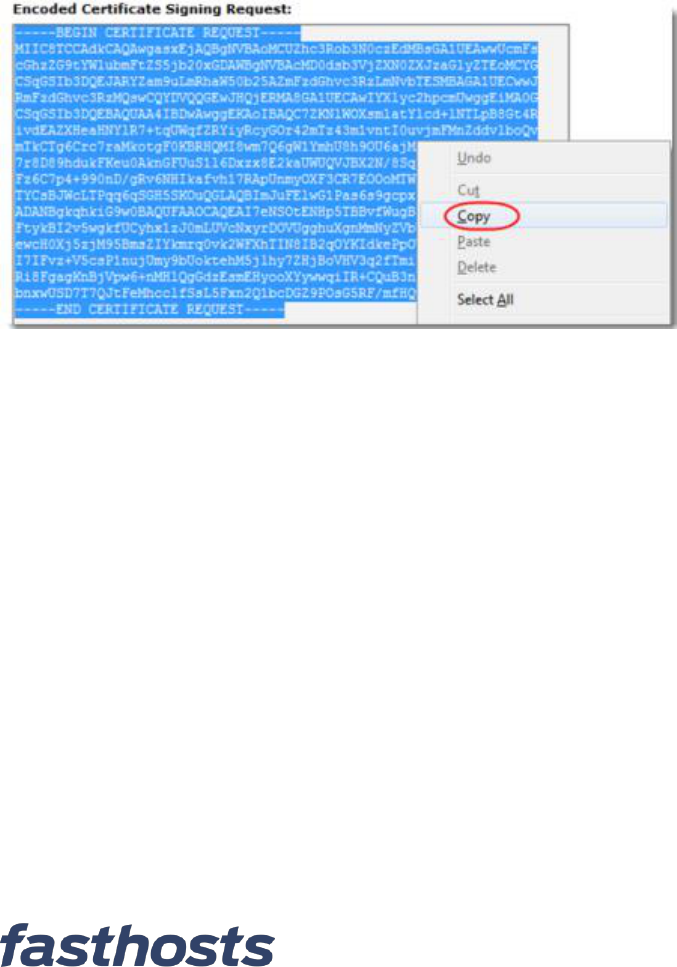
Step 5
Copy the entire Encoded Certificate Signing Request from the start of the line
reading:
-----BEGIN CERTIFICATE REQUEST-----
To the end of the line reading:
-----END CERTIFICATE REQUEST-----
Paste this into a notepad file for safe keeping.

Customer Support | Generating Certificate Signing Requests
Page 25
cPanel
Step 1
Log in to cPanel, scroll down to the Security section and click the SSL/TLS
Manager icon.
Step 2
Click the link Generate, view or delete SSL certificate signing requests.

Customer Support | Generating Certificate Signing Requests
Page 26
Step 3
Fill out the CSR form using the fields provided.
Key: Leave this field set at Generate a new 2,048 bit key.
Domains: Enter the domain name that you want to add SSL to.
City: Enter the City that the domain's registrant details contain.
State: Enter the State or County that the domain's registrant details
contain.
Country: Select the domain registrant's country from the dropdown menu.
Company: Enter your company name.
Company Division: Enter the division within your company.
Email: Enter the domain registrant's email address.
Passphrase: Enter a passphrase (optional).
Description: Enter a description (optional).
Customer Support | Generating Certificate Signing Requests
Page 27
Step 4
Copy the entire Encoded Certificate Signing Request from the start of the line
reading:
-----BEGIN CERTIFICATE REQUEST-----
To the end of the line reading:
-----END CERTIFICATE REQUEST-----
Paste this into a notepad file for safe keeping.
Step 5
You will need to provide this to your chosen certificate authority (the company
you are purchasing your SSL certificate from). They will then provide you with the
certificate part to upload to cPanel. Paste this into a notepad file for safe keeping.

Customer Support | Generating Certificate Signing Requests
Page 28
Other operating systems
Symantec – The suppliers of our SSL Certificates have additional information for
creating CSR’s on operating systems not listed in this manual. This information
can be found on their website.
If your operating system is not listed on this page you should contact your OS
supplier, who should be able to support you through this process.
After generating your CSR
Your request will need to be verified using a DNS TXT record. If your
domain uses Fasthosts nameservers, the TXT record will be created for you.
Our systems will check for the TXT record every few minutes and once verified,
your certificate will become active and you can download your certificate parts.

Customer Support | Generating Certificate Signing Requests
Page 29
My domain's nameservers are not with
Fasthosts
Step 1
Select SSL Certificates from the Servers menu.
Step 2
Scroll down to Active SSL Certs and click on the domain you need the TXT record for.

Customer Support | Generating Certificate Signing Requests
Page 30
Step 3
The TXT record will be displayed at the top of the page, copy this into your records at your
external nameservers.
Our systems will check for the TXT record every few minutes and once verified, your certificate
will become active and you can download your certificate parts.
Downloading your certificate
Step 1
Select SSL Certificates from the Servers menu.

Customer Support | Generating Certificate Signing Requests
Page 31
Step 2
Scroll down to Active SSL Certs and click on the domain you want to download the certificate parts for.
Step 3
Click the links to download your certificate parts.
You now have the certificate parts for installation on your server.
