
WBSCM-Create ASN
Advance Shipping Notice
Once you receive your Purchase Order and you are ready to
begin shipping, you will be required to submit the advanced
shipping notice (ASN).
12/14/2011

2
An Advanced Shipping Notification (ASN) is an electronic notification of pending
deliveries; an electronic packing list.
The ASN should be generated when the product has been shipped from the plant or
shipping point location. An ASN can be generated for partial shipments. One ASN
must be created for each truck or railcar shipped.
Creation of ASN is only the first step in the payment process of a Purchase Order
Contract, followed by the Inspection Results and then Invoicing.
ASN Creation
2.
Click (the All Purchase Orders link) to display a list of Purchase
Orders.
1.
After logging into WBSCM, start the ASN transaction using the following Portal
path: Suppliers tab Supplier Self Service folder Supplier Self Service

3
3.
In the Purchase Order column, locate the PO number for which you would like to
create an ASN. Then under the Document Number column, click the
corresponding hyperlink for the PO you will be creating the ASN. In this example,
you would click (the 3100001934 link) to open the Purchase Order associated with
PO # 4100001601.

4
NOTE:
• Before creating the ASN, be sure to review the PO for the correct line item number as
well as the correct unit of measure for the order quantity. Depending on the PO, the
quantity could be reflected as an each or in lbs.
• You cannot combine multiple shipments into one ASN and one invoice.
• ASNs and Invoices are a one to one match. Therefore, you have to create one ASN per
shipment and invoice for that particular ASN. This is no different than the invoicing
process prior to WBSCM. The vendor would submit a KC-366 with multiple shipments
(those shipments are now ASNs) and an invoice would be submitted against each of
those shipments listed on the KC-366.
• If you are doing partial shipments of 2 or more line items of a PO in one Railcar, you will
need to create different ASN’s for each line item but enter the same railcar name.
• In the new process, there is a function for uploading multiple shipments via spreadsheet
into WBSCM and it will create the ASNs for you. However, you would still need to create
individual invoices for all ASNs created by the spreadsheet.
• When product ships, the vendor should input the ASN immediately to inform recipients
that materials are in route. Vendor may then input the inspection lot.
• The Display Document Flow should be viewed regularly to ensure ASNs are created for
the correct line item and in the correct amount. This screen will list in a table,
documents entered against the PO, i.e. ASNs and invoices, but not inspection lots (See
Screen Print Below)
Navigational path to get to this
screen. Also see next page

5
Process ASN Screen
4.
Click (the Create ASN button) to open the Process ASN screen

6
5.
In the example above, there is only one line item with a quantity of 3500 eaches. If
you are shipping less than this in whatever means of transportation, i.e., truck,
railcar etc., you will need to click in the field and change the quantity amount.

7
If you have multiple line items on your PO as in the example above, but are
shipping for only one or a few line items, you will first need to click on the trash
can icon to remove any line items that you do not want to use, leaving only the
ones that you are applying to the ASN. If there are numerous line items to be
“trash canned”, it is better to use the instructions for multiple ASN Upload.
Due to the large volume of shipments for International, it may be more useful to
also use the multiple ASN Upload instructions (See page 14).

8
The basic data section will contain the Shipping Notification number also known as
the ASN number which begins with “61”. Please retain this number.
6.
Use the Comments field to discuss anything that might be pertinent to the
shipment, such as fumigation needed upon arrival. This is a free form field and is
approximately 50 characters in length.
Schedule Line field in the same row as the comments field. This applies to INTL
shipments only. When a line item is divided into two shipping periods then this
field requires the vendor to input a 1 or 2 depending on which ship period. The
symbol is shown in the screen shot below on line item 3.
Symbol of a Calendar, representing multiple shipping periods
9
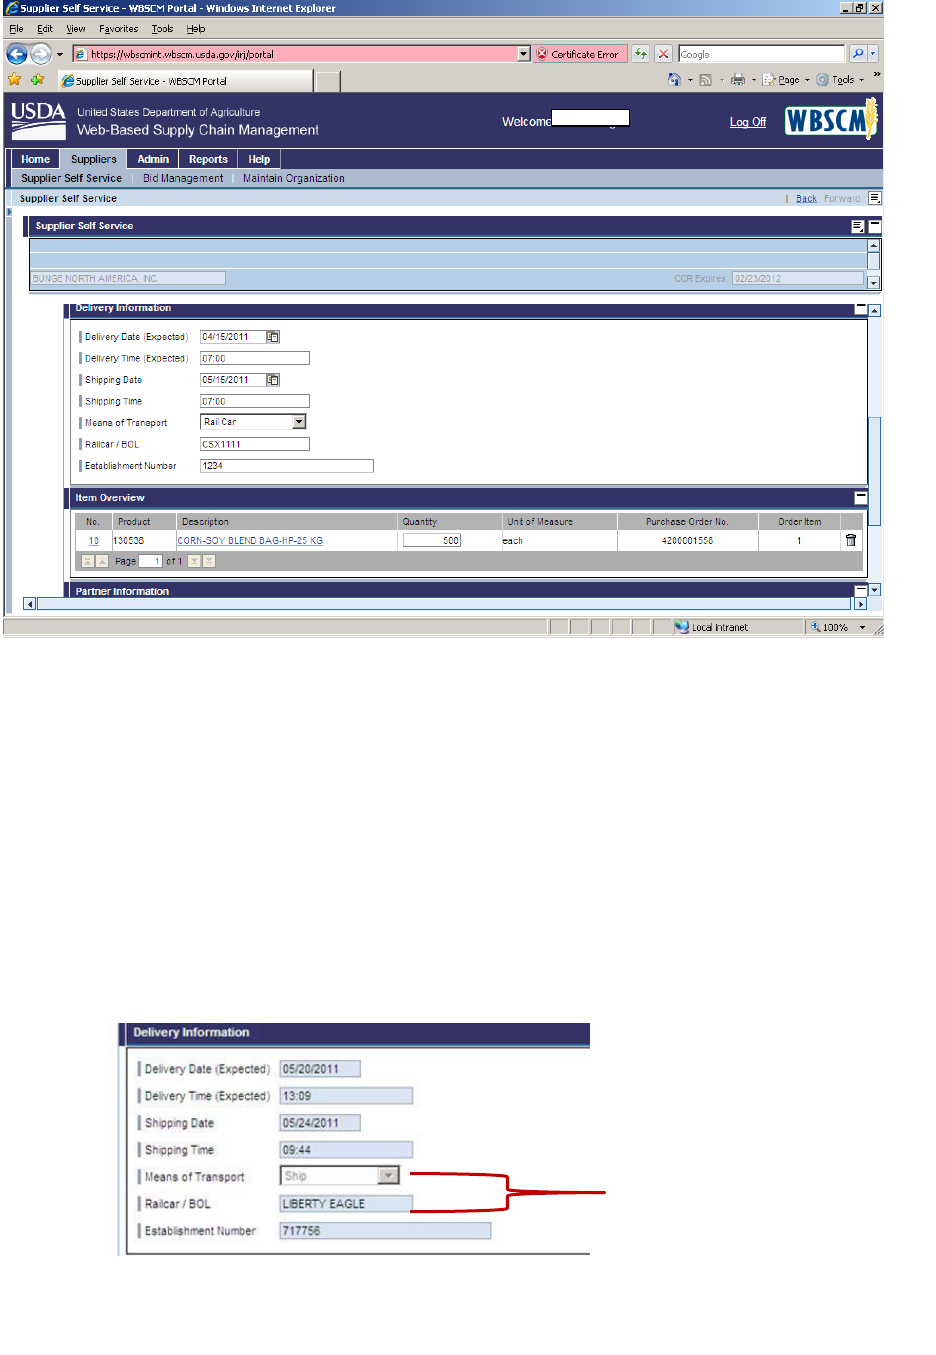
7.
Go back to Fill in the Delivery Information Fields:
1. Delivery Date (Expected) - For the delivery date fields enter the expected date of delivery
to give the recipient a head’s up for planning purposes
2. Delivery Time (Expected) - For the delivery time fields enter the expected time of delivery
to give the recipient a head’s up for planning purposes (This is not a required field)
3. Shipping Date - Record the actual shipping date from plant or shipping point from BOL.
4. Shipping Time - Record the actual shipping time from plant or shipping point (This is not a
required field)
5. Means of Transport - In the Means of Transport field, click on the Dropdown button to
access the list of transport choices i.e., Railcar, Truck Ship, etc.
6. Railcar/BOL - Enter the Railcar, Truck or Bill of Lading (BOL) number in this field.
For Ship
means of conveyance, you will need to put the ship/vessel name in the Railcar/BOL field.
NOTE: Ship as a means of transportation is generally reserved for Bulk Grain and
Bulk Oil.
7. Establishment Number - This field is free-form field that is best used as vendor reference.
Since an ASN and Invoices are a
one to one, it is recommended that information in this field
also be included as the Vendor’s reference number on the corresponding invoice for
tracking purpose.

10
8.
Click (the Goods Delivered to Recipient button)
to send the
ASN. The system sends an email to all recipients in the partner information
section.
If vendor is not ready to submit the ASN, you can click the Hold button instead.
To
access the ASN again use the following path: Suppliers tab > Supplier Self
Service folder > Supplier Self Service, and then click the All ASNs hyperlink.
If you have not clicked on the Goods Delivered To Recipient button to submit
the ASN, you may also cancel the transaction by clicking the Cancel button.
11
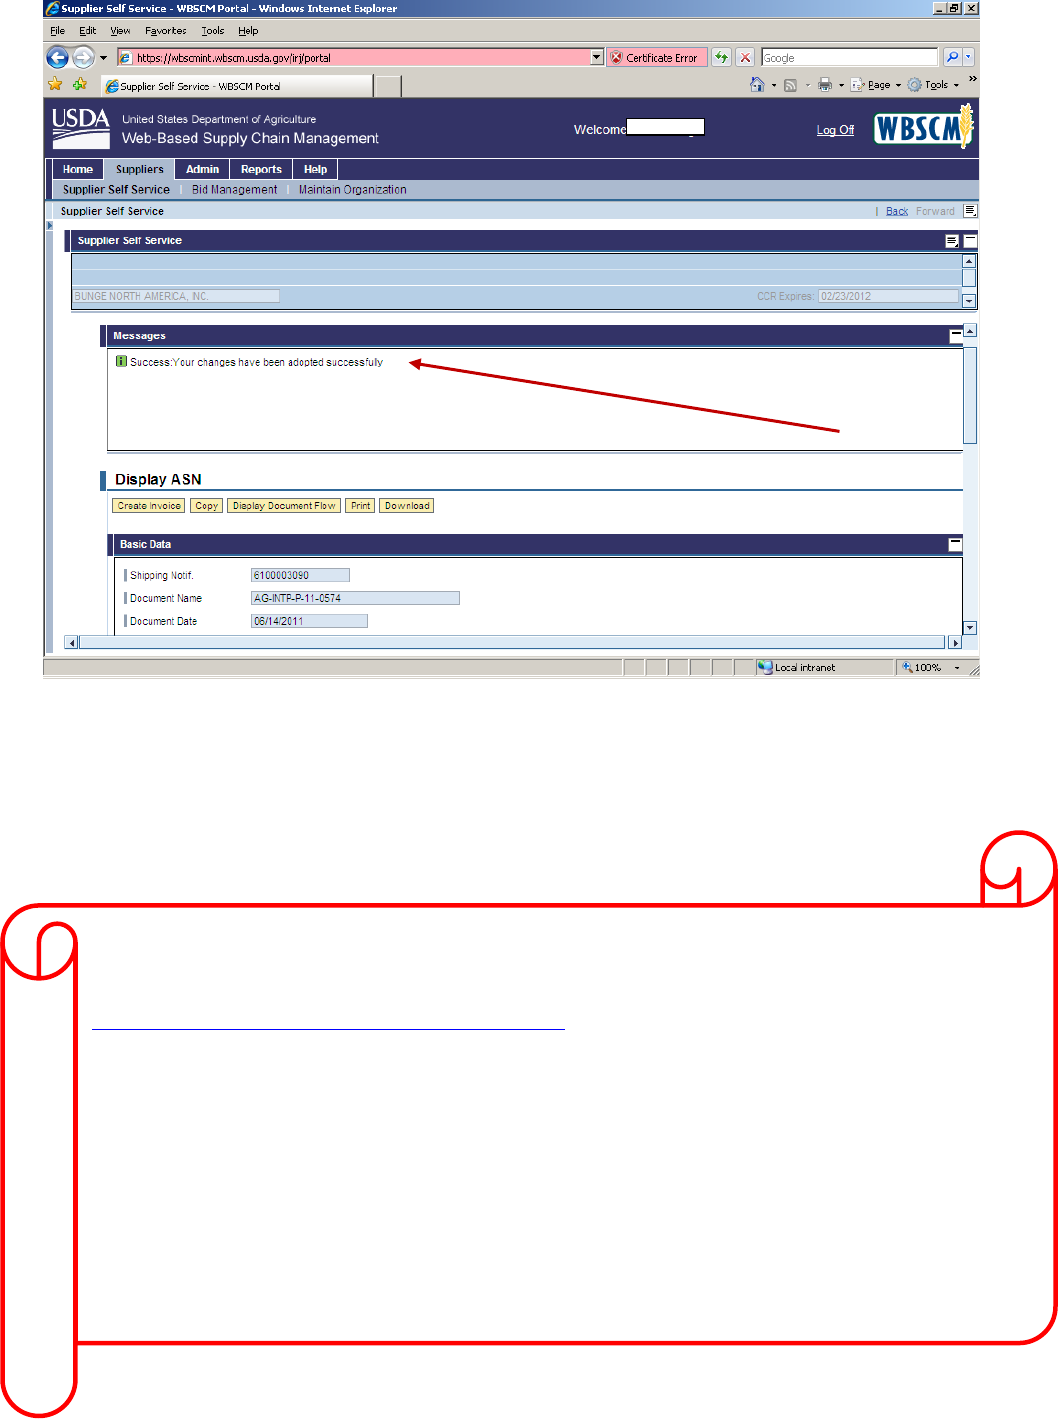
9.
Once you click the Goods Delivered to Recipient button, you will get a notice that
your changes were accepted and the ASN has now been created. Creation of the
ASN also generates an email to the Recipients and the Freight Forwarder for
planning purposes. You may then Print or Download a copy of the ASN for your
records.
NOTE: Once the changes have been successfully adopted, you cannot delete,
change or edit the ASN. You will need to contact the WBSCM Helpdesk. A
request must then be submitted to the WBSCM Help Desk at
FSAWBSCMServiceRequest@kcc.usda.gov or call 816-823-4249
When submitting a request to have an ASN cancelled, plea
se provide the helpdesk
with:
• The Purchase Order number (Not the document number). The purchase
order will begin with a “4”
• The ASN number to be cancelled
• The Line Item number of the ASN to be cancelled

12
10.
If you want to view the ASN you just created, you can go to the Start Page of your
Supplier Self Service menu and click on “ALL ASNs”.

13
11.
You will see the ASNs in date order. The "Status" column indicates whether or not
the ASN has been sent.
Statuses that an ASN may be in are:
• In Process – ASN has been created but has not been submitted
• Cancelled – ASN has been cancelled either by the Vendor or by USDA
• Sent - ASN has been created and submitted

14
Multiple ASNs
Create and Upload ASN Spreadsheet
As an alternative to entering individual ASNs , there is an
option to upload multiple ASNs using a formatted
spreadsheet which is uploaded to WBSCM.
12/14/2011

15
In order to create your spreadsheet for the multiple ASN upload, you first need to log
into WBSCM to record your document number(s) and verify the line items for which you
are creating the ASNs. Log into WBSCM using the following Portal path: Suppliers tab
Supplier Self Service folder Supplier Self Service All Purchase Orders
1.
In the Purchase Order column, locate the PO number for which you would like to
create an ASN and record the corresponding Document Number that begins with
“31”. The Document Number will be used on the spreadsheet, not the actual PO
number. You may then click the corresponding hyperlink to view the PO and line
items.

16
Sample Multiple ASN Spreadsheet
2.
Create your spreadsheet in Excel with data from your shipping documents to
upload into WBSCM.
Columns:
1. Document Number - The number recorded from WBSCM corresponding to your
PO Number.
2. PO Line Item # - This must be the actual line item number of the material from
your PO that is being shipped. It is not just consecutive numbers of your
spreadsheet lines.
3. Delivery Date (Expected) - For the delivery date fields enter the expected date
of delivery to give the recipient a head’s up for planning purposes.
4. Delivery Time (Expected) - For the delivery time fields enter the expected time
of delivery to give the recipient a head’s up for planning purposes.
5. Shipping Date - Record the actual shipping date from plant or shipping point
from BOL.
6. Shipping Time - Record the actual shipping time from plant or shipping point.

17
Sample Multiple ASN Spreadsheet
7. Means of Transport - The data must match the “Means of Transport” field
exactly or it will not work. Example: Rail Car must have the space, it cannot be
Railcar.
8. Establishment Number - This field is free form field that is best used as vendor
reference. Since ASN and Invoices are one to one, it is recommended that
information in this field also be included as the Vendor’s reference number on the
corresponding invoice for tracking purpose.
9. Railcar Number/Bill Of Lading - Enter the rail car number for Rail Car or Bill of
Lading (BOL) number for Truck in this field. For Ship means of conveyance, you
will need to put the ship/vessel name in the Railcar/BOL field.
10. Use the Comments field to discuss anything that might be pertinent to the
shipment, such as fumigation needed upon arrival. This is a free form field and is
approximately 50 characters in length.
11. Schedule Line - This applies to INTL shipments only. When a line item is divided
into two shipping periods, then this field requires the vendor to input 1 or 2
depending on which ship period is being shipped. If there is schedule line, leave
this field blank.
NOTE: You must save the spreadsheet to a “csv” format to upload to WBSCM.
Give the “csv” document a meaningful name so you can refer to it in the future
and browse to find it easily in the upload process.

18
3.
Once you complete the worksheet and have saved it to the” csv” format, go to the
WBSCM SUPPLIERS
SUPPLIER SELF SERVICE
UPLOAD FILES
(MULTIPLE ASN).

19
4.
Using the “Browse” button, locate your saved “CSV” file and click on the “Load
File” button.

20
5.
The information from your “CSV” spreadsheet should appear on the ASN Display
View. You must select all the line items that you want to apply for ASN creation.
Click
on
box
and
select
all to
create
ASNs
for all
line
items.

21
6
Click on the “Create ASN” button to complete the process.

22
7.
You will get a message stating that the ASN was successfully created for the line
items selected on the Display ASN view. Click “OK” to close the box.

23
8.
If you want to view the ASNs you just created using the uploaded spreadsheet,
you can go to the Start Page of your Supplier Self Service menu and click on “ALL
ASNs”.
.

24
9.
You will see the ASNs in date order and the status indicates whether or not it has
been sent.
Statuses that an ASN may be in are:
• In Process – ASN has been created but has not been submitted
• Cancelled – ASN has been cancelled either by the Vendor or by USDA
• Sent - ASN has been created and submitted
NOTE:
However, the Advanced Shipping Notification Report is probably a better option for
viewing the ASNs, because it will show the ASNs created for each PO line item.
This report will only show ASNs that were created prior to the date the report was
created.

25
Advanced Shipping Notification Report
2. You should be able to search on any of the criteria listed above, or you can leave all
of the fields blank and select OK to run the report wide open.
1.
After logging into WBSCM, start the transaction using the following Portal path:
Reports tab Supplier Management folder Advanced Shipping
Notification Report.

26
3. In the example above, we are running the report based on the PO Number then click
OK.

27
The report will provide a variety of information by PO line item number. This report can
also be downloaded into an Excel spreadsheet by clicking on “Export to Excel” button.

28
GOODS RECEIPT DETAIL REPORT
Another useful report to view prior to invoicing is the Goods Receipt Detail Report. This
report provides information on created ASNs as well as the Goods Receipt entered for
each ASN.
1.
After logging into WBSCM, start the ASN transaction using the following Portal
path: Suppliers tab Supplier Self Service folder Supplier Self Service
All
Goods Receipts.

29
2.
You should be able to search on any of the criteria listed above by entering values
such as the Purchase Order, PO Creation Date, Material, Freight Forwarder, Load
Port, etc. Click on the Execute to run the report. The criteria may be a single ite
m
or a range.

30
GOODS RECEIPT DETAIL REPORT
.
3.
In the example above, the report was run using the PO number. The report
provides a variety of information based on the criteria selected on previous screen.
This report can also be printed by clicking on the Print button or downloaded into
Excel by clicking on the Export button at the top of screen.

31
GOODS RECEIPT DETAIL REPORT
Once a Goods Receipt has been issued and all follow-on documents
created, the invoice can be entered, processed, approved and then paid.
4.
The above screenshot includes but is not limited to the additional data on the
Goods Receipt Detail Report reflected.

32
Common Problems and Error Messages
Creating an ASN entering the wrong unit of measure (UOM) in the quantity field.
o Although you may be shipping in barrels, drums, metric tons, pounds, etc, when
creating the ASN, the quantities must be entered in the same UOM that the PO is
in. If created in the wrong UOM, you will need to contact the WBSCM Helpdesk
to have the ASN cancelled.
Creating an ASN for the wrong line item number on the PO.
o If the ASN was created for the incorrect line item, you cannot delete or edit the
ASN. You will need to contact the WBSCM Helpdesk to have the ASN
cancelled.
Unable to upload the excel spreadsheet for multiple ASN creation.
o The spreadsheet must be saved in a “CSV” format to upload to WBSCM.
When trying to upload spreadsheet for multiple ASN creation, you receive an Error
Message saying “Document Number is invalid”.
o The number to use in the Document Number column of your spreadsheet is the
WBSCM generated number that begins with a “31” and corresponds to the PO for
which you are creating the ASN.
When trying to upload spreadsheet for multiple ASN creation, you receive an Error
Message saying “"Object 310000XXXX does not exist".
o Go back to the PO and verify that the document number is correct. If so, log out
of WBSCM and go back in to try to upload the spreadsheet again. If you still
receive the same error message, please open an incident ticket with the WBSCM
Help Desk.
When trying to upload spreadsheet for multiple ASN creation, received Error
Messages saying “Schedule line is not required for line item 0000000006.
o The error message is given because this particular line items (6) does not have a
schedule line (shipping period designated as 1 or 2); therefore it should be left
blank on the spreadsheet for that line item.

33
When trying to upload spreadsheet for multiple ASN creation, received Error
Message telling me to enter means of transport, enter Railcar/BOL/Conveyance ID
multiple times. I have the information on my spreadsheet but it acts like it is not
reading anything in the cells.
o WBSCM is not reading the upload due to the column names of the spreadsheet being
incorrect. For the Excel spreadsheet to be uploaded, the column field names must
match exactly the columns of the sample spreadsheet. WBSCM has to know where
to put the data from the spreadsheet and it is acquired from the column names.
For example, on your spreadsheet:
1) Column F may have “Route” but must be “Route -Shipping Time”
2) Column I on may have said “Railcar” but must be “Railcar Number/Bill Of
Lading”
When trying to upload spreadsheet for multiple ASN creation, received Error
Message saying “schedule line quantity is greater than PO line quantity for item
0000000080.
o The error message is given because the quantity entered reflects more shipped for
that shipping period than the amount remaining as open on the PO line quantity.
It cannot be more than the quantity per line item of PO within a specific schedule
line (shipping period). You will need to contact the WBSCM Helpdesk to have
the ASN cancelled.

34
When trying to create an ASN or upload a spreadsheet for multiple ASN
creation, you get an Error Message that reads: Errors:Enter a transport ID
Errors:System status INCM is active (SUS Shipping Notification
6100041956).
o If you get this error message, it is a WBSCM Technical issue. You will
need to contact the WBSCM Helpdesk at WBSCMhelp@ams.usda.gov or
call 877-927-2648 and advise that this is a Level 1 Technical issue.
Please supply them with the document number being used as well as a
screen print.
When trying to upload a spreadsheet for multiple ASNs, WBSCM is only
creating one ASN.
o After clicking on the “Load File” button, the information from your excel
spreadsheet should appear on the ASN Display View. You must select
the line items that you want to apply for ASN creation. Although you
have several lines of data from your spreadsheet to appear, if you
only select one line item, only one ASN will be created.
Each box must be highlighted to create more than one ASN.

35
Error Message saying “there is no open or suitable item for creating the
ASN for PO 31xxxxxxxx”.
o The message is advising that either you have created ASNs for the full
amount of the PO quantity or you are trying to create an ASN for more
than the remaining balance of the PO. View your ASNs for the particular
PO to ensure you are not trying to duplicate an ASN that has already been
created or you may have accidently created an ASN for more that the
shipment amount.
You may view all ASN created against a PO by going to the Start Page of
your Supplier Self Service menu and click on “ALL PO’s. In the
Purchase Order column, locate the PO number for which you would like
to view transactions. Then under the Document Number column,
click the corresponding hyperlink for the PO. On the Display PO screen,
click on the “Display Document Flow” at the top of the screen. By
clicking on the ASN hyperlink, you are able to view the line numbers and
quantities for which each ASN was created.
You will need to contact the WBSCM Helpdesk to have the ASN
cancelled.
Error Message saying “ASN quantity is greater than PO quantity for item:
0000000012.
o The message is advising that you are trying to create an ASN for more
than the remaining balance of the PO line item 12. View your ASNs for
the particular PO to ensure you are creating an ASN for the correct line
item or that ASNs already created for line item 12 were not accidently
created for more that the shipment amount on previous ASNs. You will
need to contact the WBSCM Helpdesk to have the ASN cancelled.
You are trying to create multiple ASN(s), one for each car for PO
421XXXXXXX. You had already created one ASN but now when you try to
create your second ASN you get the message “No line items left”.
o When you created the first ASN, you did not ‘Trash Can” the line items
that you were not shipping which caused you to create one ASN for all line
items of the PO. You will need to contact the WBSCM Helpdesk to
have the ASN cancelled.
If you have Issues with ASNs, Inspection Results, or Invoicing, contact the
WBSCM Help Desk at FSAWBSCMServiceReq[email protected]sda.gov or call 816-823-
4249.
