
Introduction to Microsoft Publisher
Day One Agenda:
Introduction
Templates
Layout
Inserting and Formatting Text
Inserting and Formatting Pictures
Practice, Questions
Day Two Agenda:
Review Day One
Tables
Calendars
Practice, Questions
In order to keep computer literacy programs running in the future, we must demonstrate its positive impact on our
community. We would be extremely grateful if you would share with us the experiences you have had attending our
training sessions and how our program has impacted your life. Please send your responses via e-mail or regular mail.
Responses may be used to promote Utica Public Library and Mid York Library System as part of grant reporting.
E-mail: sschultz@uticapubliclibrary.org
Mailing Address: Sarah Schultz, Utica Public Library, 303 Genesee St., Utica, NY 13501

Microsoft Publisher 2010 Utica Public Library
Page | 2
Table of Contents
Opening Microsoft Publisher 2010 ......................................................................................................................................... 2
Publisher 2010 Layout ............................................................................................................................................................. 3
Resize a text box ..................................................................................................................................................................... 4
Insert a new text box .............................................................................................................................................................. 4
Connect text boxes for overflow text ..................................................................................................................................... 5
Wrapping text ......................................................................................................................................................................... 5
Hyphenation ............................................................................................................................................................................ 5
Formatting text ....................................................................................................................................................................... 6
Inserting pictures and clip art ................................................................................................................................................. 7
Inserting tables........................................................................................................................................................................ 8
For more help .......................................................................................................................................................................... 8
Opening Microsoft Publisher 2010
2. Next, click on All Programs
1. Click on Windows Start Button
3. Scroll down until you see Microsoft Office,
click on it, and find Microsoft Publisher 2010.
4. Click to Open.

Microsoft Publisher 2010 Utica Public Library
Page | 3
Publisher 2010 Layout
Publisher will give you several templates to choose from. Choose the type of document you want to create
(calendar, flyer, greeting card, etc) then choose a design to work from. You can customize each design with
company logos, different colors, and your unique information.
After you select the template, click on “Download” on the far right of your screen.
o Tabs/Groups
Tip! The ribbon is the menu that runs across the top of your screen. Each tab contains a set of
groups with commands. Groups are collections of related command buttons. Clicking on different
tabs will change the ribbon.
o Mouse over
Hold the mouse pointer over several buttons to find out what they do.
Tip! If you don’t know what a button does, you can hold the mouse over it to find out.
Font Group
Tabs
Publisher opens to a Page Design
Screen.
This page is where you can locate
various template designs for a
multitude of business and
personal needs.
You can start with a blank
document or work from a pre-
designed template.
We are going to start with a flyer
template.
Ribbon
Microsoft Publisher 2010 Utica Public Library
Page | 4
o Layers of a template
You will notice on a template that there are several layers - layers can consist of images, background
colors, or text boxes. Click on different parts of the template to get familiar with the different layers.
Clicking and dragging these objects will move them. If you move something by accident, don’t worry, there
is an undo button on the Quick Access Toolbar at the top of the screen. The keyboard shortcut to Undo is
Ctrl Z.
Text Boxes
A text box is a dedicated area to insert text. Most templates automatically have text box areas predesigned for your
convenience. You can click inside the text box and edit as needed.
Resize a text box:
1. Select the text box by clicking on the perimeter or inside. You should see the box highlight with a
border.
2. On the border you should see little bubbles on the corners and middle of the sides. When you hover
your mouse over these bubbles, you will see your cursor change to a two-pointed arrow.
3. Click and drag your mouse on these bubbles to resize the text box. This takes some practice and finesse so don’t
get frustrated if it doesn’t work for you right away.
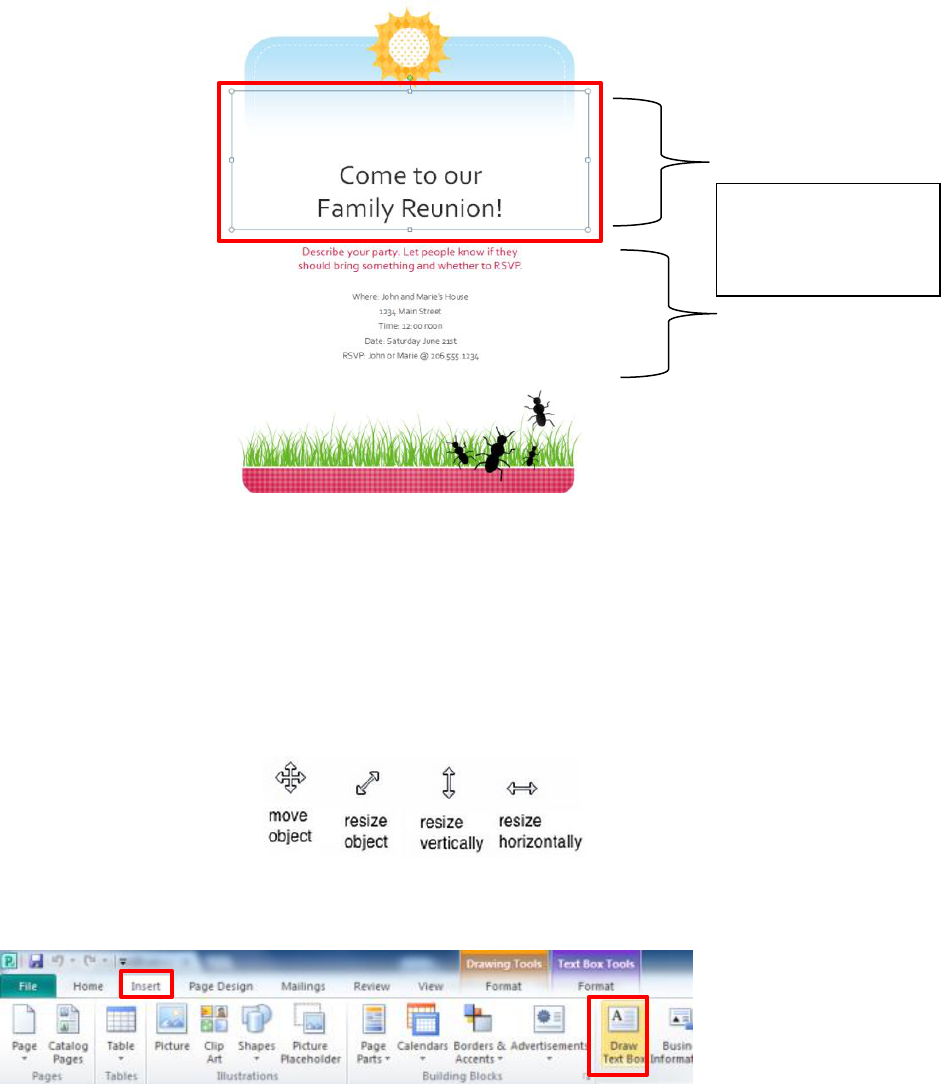
Insert a new text box
1. Click on the Insert tab, and click on Draw Text Box
Default text boxes -
you can edit, delete,
or add more script

Microsoft Publisher 2010 Utica Public Library
Page | 5
2. Move your cursor to the document and notice your cursor has changed to a crosshair icon
3. Click and drag your cursor to form a text box. Once you release the left mouse button, your text box
will be formed. You can resize and move the box as needed.
Connect text boxes for overflow text
You may find yourself in a situation where your text will not fit one given text box. You can link text boxes so overflow
text continues in a separate place.
To connect to a new text box:
1. Make sure your original text box is selected.
2. Click the Text Box Tools Format tab, then click the Create Link command.
3. The link icon will replace your mouse cursor. Click in the document where you want the new text box to appear
with your overflow text.
4. The new text box will appear with your previously unseen text. You may need to resize the text box as
necessary.
Wrapping text
If you place a text box near another text box or object, you may notice them overlapping or not appear exactly the way
you want. Changing the wrap text settings may fix this problem.
To wrap text around an object, such as a picture:
1. Select the object, then click on the Format tab that appears on the Ribbon.
2. Click the Wrap Text command. A drop-down menu will appear giving wrap text setting options. The picture
icon will give you an idea which setting may match your needs. Once a setting is selected, the text will adjust
based on the chosen option.
Hyphenation
Microsoft Publisher automatically cuts words off with hyphens in order to fit text into a confined space. You
can control how often the program hyphenates words by changing the hyphenation settings.
Hyphenation settings:
To remove all hyphens
1. Highlight the text
2. Click on Text Box Tools Format tab, then Hyphenation
3. Uncheck the box next to Automatically hyphenate this story, then OK

Microsoft Publisher 2010 Utica Public Library
Page | 6
Changing the Hyphenation Zone
Increasing the Hyphenation Zone will create fewer hyphens, but the
text may appear more uneven on the right-side.
Decreasing the Hyphenation Zone will break up your text with more
hyphens. More hyphenated words will make the right edge of the text
appear more even.
Formatting text
Home Tab
o Font group
Font style and size
Demonstration: Select text to change the font. Demonstrate changing font size both by changing the
number and by using the grow/shrink buttons.
Tip! When you hold your mouse pointer over each font, you can preview what that change will look
like in your document. The changes aren’t permanent until you click your selection!
Bold, Italic, Underline
Tip! In Microsoft applications, buttons often show, rather than tell, what they do. For instance, the
button for bold text has a picture of a bolded letter B, and the button for italic text has an italicized
letter I.
o Paragraph group
Tip! Once you’ve started a bulleted or numbered list, pressing Enter will automatically take you to
the next item on the list. You can move right one level on a multi-level list by pressing Tab.
Bullet List
Number List
Line & Paragraph
Spacing
Alignment options
Grow/Shrink font

Microsoft Publisher 2010 Utica Public Library
Page | 7
Alignment
Tip! Left alignment is selected in the picture above, which means that the left edge of your text is
straight (aligned), and the right edge is jagged. You can also center your text, align it to the right, or
justify. Make sure the text you want to align is selected.
Tip! Justify stretches the text so that both sides are straight. You may notice that books are usually
justified.
Inserting pictures and clip art
You are able to insert all sorts of graphics into a Publisher document, including pictures, tables, calendars, and more. In
this class we will do a basic picture and clip art, but check out the Insert tab for more options.
Click on Insert tab
If you have a picture saved on your computer, select Picture. If you want to use an image from Microsoft’s
image library, select Clip Art.
If you selected Clip Art, a dialog box to the right will open asking you to enter keywords to search images. Enter your
search terms and press Enter. A collection of images will appear in the window below. Double-click on the desired
image. You may have to resize the image. Resizing images is just like resizing a text box. Click and drag on the border
bubbles to resize.

Microsoft Publisher 2010 Utica Public Library
Page | 8
Inserting tables
Tables make data easy to align and organize.
Using the table option in the “Insert” tab you can insert a
table of any size by choosing the number of rows and
columns. To choose the number of columns and rows,
hover your mouse over the diagram squares. The
dimensions go “column x rows”, so a 4x3 table will have
4 columns and 3 rows.
After you add the table, you can insert additional rows and columns, merge and split cells, and change the
borders and shading by going to the “Table Tools” tabs. The Table Tools will only appear when a table is
selected.
If you need to edit your table, such as insert a column or delete a row, try right clicking in a cell of the
table. You will notice a list of options appear including insert and delete. You can choose whether you
want to insert/delete a column or row, and to the right or left. These and many more options are also
given in the Table Tools Design and Layout tabs. The table has to be selected in order for these tabs to be
visible.
For more help:
Visit the Goodwill Community Foundation (GCF)’s website for free tutorials
http://www.gcflearnfree.org/publisher2010
