
Getting Started with the
PREMIER+™ 2 Embroidery System
&
PREMIER+™ 2 Embroidery
User’s Guide
Windows®
The software to which this User’s Guide relates is subject to change without notice. All efforts have
been made to ensure the accuracy of the contents of this User’s Guide.
The software described in this book is furnished under a license agreement and may be used only
in accordance with the terms of the agreement.
Permission is hereby granted to the licensee of the software to which this guide is related to
reproduce and distribute copies of this guide for nonprofit educational purposes. The copyright
statement on this page must be included on any copy of this work.
Windows® is a registered trademark of Microsoft Corporation. Acrobat®, the Adobe PDF logo and Reader are
either registered trademarks or trademarks of Adobe Systems Incorporated in the United States and/or other
countries. Facebook® and the “f” logo are registered trademarks of Facebook and its affiliate companies.
Google+® and the Google+ icon are registered trademarks of Google Inc. YouTube® and the YouTube® social
icon are registered trademarks of YouTube, LLC, which is a Google® company. Instagram® and the Camera logo
are trademarks of Instagram, LLC in the United States and elsewhere. Twitter® and the Twitter bird logo are
trademarks of Twitter, Inc. Flickr® is a trademark of Yahoo! Inc. Other product names mentioned in this guide
may be trademarks or registered trademarks of their respective companies and are hereby acknowledged.
VIKING, PFAFF, PREMIER+ and 6D are trademarks of Singer Sourcing Limited LLC
HUSQVARNA is the trademark of Husqvarna AB.
All trademarks are used under license by Singer Sourcing Limited LLC.
© 2017 Singer Sourcing Limited LLC
All rights reserved (Version A)

PREMIER+™ 2 Embroidery Contents i
Contents
1 Chapter 1: Installation
1 System Contents
1 Software Installation
3 Registration and Software Activation
3 Updating Your Software
4 Chapter 2: Getting Started
4Where to Start
7 Finding Information
8 Help and How to Use It
9 PREMIER+™ 2 Embroidery System Terms and Conventions
12 Touch Gestures
15 Hoop Selection
16 Chapter 3: PREMIER+™ 2 Explorer Plug-in
19 Chapter 4: PREMIER+™ 2 Configure
21 Chapter 5: Using PREMIER+™ 2 Thread Cache
21 My Thread Ranges
22 My Thread Databases
22 My Thread Stock
24 Chapter 6: Printing
24 Print
25 Chapter 7: Getting Started with
PREMIER+™ 2 Embroidery
26 Parts of the Software Window
29 Chapter 8: Viewing Embroideries
29 3D and 2D View
29 Zoom Commands
30 Show Grid
31 Design Player
32 Life View
34 Chapter 9: Changing Colors
34 Thread Colors
35 Color Tone
36 Chapter 10: Adjusting Embroideries
36 Selecting Embroideries
40 Move

ii PREMIER+™ 2 Embroidery System Contents
41 Resize and Scale
41 Rotation
42 Flip Vertical and Horizontal
42 Alignment
44 Chapter 11: Encore and Endless
44 Encore
45 Endless Embroidery
46 Chapter 12: ExpressMonogram Wizard
46 Adjusting Monograms
48 Chapter 13: Creating Lettering
51 Lettering Shapes
58 Letter Properties
58 Fixing Lettering as an Embroidery
59 Font Manager
60 Import Font from Embroideries
62 Chapter 14: Creating Fonts Automatically
62 How to Create a Font
64 Chapter 15: Creating SuperDesigns
66 Edit SuperDesigns
67 Chapter 16: Frames, Borders and Motifs
67 Frames
68 Fixing Frames and Flourishes as Embroideries
69 Borders and Motifs
69 Border
70 Motifs
72 Chapter 17: Choosing Stitch Properties
72 Fill Types
78 Satin Area
79 Continuous Columns
79 Line Types
83 Chapter 18: Software License
PREMIER+™ 2 Embroidery System Installation 1
1
Installation
Welcome to the PREMIER+™ 2 Embroidery System. Create, edit and display all designs in
true 3D with zoom ability and textured or real-life background. View designs in any color
in your own hoop. View specialty threads and effects, including metallic and multicolor,
puffy foam or felting needles. Select colors from over 21,800 threads or design your
personal palettes. Alter colors in a design automatically with the Color Tone feature.
Use Design Player to play through all sections of an embroidery. Use Life View to
view the embroidery in real-world perspective with the desired export options. Save
your project with its design parts kept separate in multipart .vp4 format. Finally, Export
in the desired format according to the chosen options to optimize for sewing.
This guide explains how to install and start the PREMIER+™ 2 Embroidery System modules.
A printed User’s Guide is included for some of the modules, which provides some ’How To’
examples. For a full reference guide to each module of the PREMIER+™ 2 Embroidery
System, look at the online help or print out the Reference Guide supplied in PDF
format . Step through the PREMIER+™ 2 Embroidery System Tutorials in the online
Learning Center on the Internet.
The most up-to-date details about the program are in its Readme file. (Double-click on a
Readme file to open it in WordPad or Microsoft® Word in Windows®, TextEdit in Mac®.)
For the very latest information about your PREMIER+™ 2 Embroidery System, check on the
Internet at: PremierPlusEmbroidery.com
System Contents
In your PREMIER+™ 2 Embroidery System software package, you will find a USB stick, a
Product Activation Code Sheet, and User’s Guides.
Product Activation Code Sheet
The unique 18-character Product Activation Code is required for activation. It is found on
the Product Activation Code Sheet. Please store the Product Activation Code Sheet in a
safe place. Together with your sales receipt, it is your proof of purchase for your
PREMIER+™ 2 Embroidery System software.
Software Installation
Follow these steps to install your PREMIER+™ 2 Embroidery System software.
For more information, watch the videos at: http://www.embroiderylearningcenter.com/
1 Ensure all existing hardware, such as a an embroidery machine, is disconnected from your computer,
and that the computer has a working Internet connection.
This does not apply to hardware from other providers, such as printers, digital cameras, webcams.
2 Close all programs running on your computer, and ensure you are logged with as administrator.
3 Install your PREMIER+™ 2 Embroidery System software applications, components, backgrounds and
documentation from the USB stick provided.

2 PREMIER+™ 2 Embroidery System Installation
Alternatively, install the software after downloading the most up-to-date version from
PremierPlusEmbroidery.com/Downloads.
On Windows® the following User Account Control message may appear: ’Do you want to allow the
following program to make changes to this computer’, or ’A program needs your permission to continue',
click the Yes or Continue button. If you have disabled User Account Control, this message will not appear.
4 Wait until the PREMIER+™ 2 Embroidery System logo page with the install name in red appears, then
click Next twice.
5 The license agreement for your PREMIER+™ 2 Embroidery System will appear. Read it carefully, then
select the option I Accept the Terms in the License Agreement. Then click Next to install.
On Windows®, the File Type Association window appears. It is recommended to select Associate All
Embroidery Files so you can start the PREMIER+™ 2 Embroidery System by double-clicking on any
embroidery files in Explorer. If you have other embroidery software, and do not want to alter existing
associations, select Do Not Associate All Embroidery Files. You can also associate GEDCOM (genealogy or
family tree) files with PREMIER+™ 2 Family Tree on this page. Click Next.
6 Repeat this process for the Components, Backgrounds and Documentation.
On Windows®, install the device drivers if you have a direct USB connection to your machine, and did
not install them with an earlier version of the PREMIER+™ Embroidery System.
7 Next, register and activate your software.
You will need to refer to your Product Activation Code Sheet to activate your software.
8 After installing the software and registering, you may install the samples. On Windows®, install the
Explorer Plug-in.
Any previous version of the Explorer plug-in (PREMIER+™ 2 or PREMIER+™) must be uninstalled first.
9 Next, connect your embroidery machine(s). This may require responses to further messages.
10 After installing all the desired options, registering and activating, and connecting all your hardware,
use the Check PREMIER+™ 2 Embroidery System Installation option to check your installation.
On Mac®, use Install Check in PREMIER+™ 2 Configure.
11 Finally, remove the PREMIER+™ 2 Embroidery System software USB stick from your computer.
Install all items in this order
Register and Activate your software
Windows®
Install the samples and the Plugin
View the license & documentation
Check your installation
Install all items in this order
Register and Activate your software
Install the samples
Mac®

PREMIER+™ 2 Embroidery System Installation 3
Registration and Software Activation
You must register and activate your software before you may use the PREMIER+™ 2
Embroidery System, and install the Samples.
You may register your PREMIER+™ 2 Embroidery System software and activate your software either using
the computer where your software is installed, or at your authorized dealer. Simply bring your Product
Activation Code Sheet to the store.
1 Select the Register and Activate from the USB stick menu.
Alternatively, select the Register button in PREMIER+™ 2 Configure at any time to activate.
2 You will be prompted to open your Internet connection if it is not already open, then the PREMIER+™
2 Embroidery System Software Registration window will appear. Click Next.
3 The welcome window appears. If you have not registered any PREMIER+™, TruE™, 6D™ or 5D™
software before, select the option ’I do not have a previous registration’. If you have previously
registered any PREMIER+™, TruE™, 6D™ or 5D™ software, enter your e-mail address and password,
then click Next.
If you have registered software before the 5D™ Embroidery System, then click the link to obtain a
password. Once you have received the password, enter it to continue the registration process.
4 Enter or check your name and e-mail address in the window that appears. Leave the check box
selected if you would like to receive an E-mail Newsletter for the latest products and updates (highly
recommended). Check your details. Click Next to continue.
SVP Worldwide will not give or sell your personally identifiable information to any third party outside the
network of authorized PREMIER+™ 2 Embroidery System dealers without your consent. For detailed
information on our privacy policy, visit our website at PremierPlusEmbroidery.com (Privacy Statement).
Enter your password (or change it if desired) in the window that appears, then click Next.
Alternatively, click the link to set up your social media sign-in.
The password must have a minimum of 6 characters.
5 A confirmation of account message will appear. Click Next.
The first time you register your software, or if you change your e-mail address, you will receive an e-mail
confirmation.
6 Enter or check your Contact details in the windows that appears. Select your country. If you live in the
United States or Canada, select your state or province. Click Next.
7 Confirm your dealer information or select a new dealer in the window that appears. This dealer
should be your primary dealer, the one where you wish to do regular business. It is recommended,
but not required, to select the check box to inform the dealer of your contact details. Enter a second
dealer if desired, for example one you may use when traveling. Click Next to continue.
8 The Product Activation Codes window will appear. Enter the 18-character Product Activation Code
found on the Code Sheet (or provided by e-mail if you purchased online). Click Next.
9 After a short time (up to a few minutes) the software will be automatically activated. Click Next and
the Machines page appears. You can enter information on your embroidery machine(s). Click Next.
10 The Smart Update window appears. Select any recommended updates to download, then click Next.
11 A summary window appears. A list of the PREMIER+™ 2 Embroidery System software you have
registered, together with the Product Activation Codes, is provided. If desired, print out the summary.
If you purchase additional modules, you must repeat the Activation procedure.
12 You may now connect your embroidery machines to your computer. Each time you connect a device,
messages will appear and you will be informed when your hardware is ready to be used.
13 Your sfotware has been activated.
Updating Your Software
With the click of a button, you can run the Smart Update utility in PREMIER+™ 2
Configure to see if any new fonts, thread ranges or any other updates have been
released. Click the links to the updates to download them, close Smart Update and
PREMIER+™ 2 Configure, then follow the on-screen instructions to install the updates.
PREMIER+™ 2 Embroidery System Getting Started 4
2
Getting Started
After installing the PREMIER+™ 2 Embroidery System, the information in this chapter will
help you get started. Where specific details are given, for example on the online help
system, these refer to the PREMIER+™ 2 Embroidery or PREMIER+™ 2 Embroidery Extra
module, but they usually apply to the other PREMIER+™ 2 Embroidery System modules
also.
Where to Start
Starting the PREMIER+™ 2 Embroidery System
Windows® 10; Windows® 8 Start Screen
1 At the bottom left of your computer screen, open the Windows® 10 or Windows® 8 Start Screen.
2 Type "Prem" and the Search Screen will appear.
3 Ensure Apps is selected.
4 Click on PREMIER+™ 2 Embroidery to launch it.
Windows® 7 Start Menu
1 Click the Start button at the bottom left of your computer screen and the Start menu appears.
2 Move the arrow pointer to All Programs and another menu will appear.
3 Move the arrow pointer to PREMIER+™ 2 Embroidery System and a menu of programs will appear.
4 Click on PREMIER+™ 2 Embroidery to launch it.
Shortcuts
An alternative to the Start screen/menu method described previously is to use a Shortcut
to PREMIER+™ 2 Embroidery. This is created automatically during the installation process.
Windows® 10 (Start Screen); Windows® 8
1 Click on the PREMIER+™ 2 Embroidery tile in the Start Screen.
Windows® 10 (Desktop); Windows® 7
1 Close or minimize any programs you have running.
2 Double-click on the Shortcut to the PREMIER+™ 2 Embroidery System folder. A list of the programs
appears.
3 Double-click on PREMIER+™ 2 Embroidery to launch it.
QuickLink Toolbar
After opening PREMIER+™ 2 Embroidery, use the QuickLink toolbar to link to any of the
modules of the PREMIER+™ 2 Embroidery System. The QuickLink toolbar is found on the
status bar at the bottom of the screen.
The icons shown are for the modules of the PREMIER+™ 2 Embroidery System. From left to
right, these are: PREMIER+™ 2 Embroidery , PREMIER+™ 2 Card Shop , PREMIER+™ 2
Modify , PREMIER+™ 2 Design Aligner , PREMIER+™ 2 Create , PREMIER+™
2 Sketch , PREMIER+™ 2 PhotoStitch , PREMIER+™ 2 Cross Stitcher , PREMIER+™ 2
Family Tree , PREMIER+™ 2 Thread Cache and PREMIER+™ 2 Configure .
Modules may be shown on the QuickLink Toolbar that you have not purchased. If you try to link to them a
message will appear.

PREMIER+™ 2 Embroidery System Getting Started 5
The Accessories submenu contains PREMIER+™ 2 Font Create and a standalone version of PREMIER+™ 2
QuickFont for embroidery machine owners who do not have PREMIER+™ 2 Embroidery.
1 Open PREMIER+™ 2 Embroidery .
2 Place the pointer over an icon to see the name of each module.
3 Click the desired icon to launch a module.
4 Alternatively, click the Accessories button and the Accessories submenu will appear.
5 Click the desired icon to launch a module.
Double-click Embroidery Files to Start
In Windows® Explorer, double-click any embroidery file (or single-click, then press ENTER)
to start PREMIER+™ 2 Embroidery and open the file on the screen. The main embroidery
file type, with a PREMIER+™ 2 icon , is .vp4 format.
If you double-click an .edo file PREMIER+™ 2 Create will start. If you double-click a .krz file,
PREMIER+™ 2 Cross Stitcher will start.
Right-click a file to see details about the embroidery using the Explorer Plug-in. See
“PREMIER+™ 2 Explorer Plug-in” on page 16.
Switching Between Modules
Once you have started the PREMIER+™ 2 Embroidery System, also use the QuickLink
Toolbar to switch between modules that are already open. This is useful, for example, if
you want to copy an embroidery from one module to another.
Module Icons
PREMIER+™ 2
Embroidery
Adjust, edit and resize embroideries and lettering. Create your own fonts
automatically from TrueType®, OpenType® fonts or imported embroideries, or
use the library of specially created fonts. Place SuperDesigns, motifs, frames and
flourishes to embellish embroideries and monograms. Use Encore to repeat any
embroidery in different shapes or as a hoop border. Use Endless to place your
favorite embroideries as many times as possible automatically in your chosen
hoop. In PREMIER+™ 2 Embroidery Extra, preview your embroideries on a
background with appliqués and decorations, create a word sculpture, customize
an in-the-hoop project, create a filled or outline quilt block, modify stitches and
turn pictures or photos into embroideries with the ExpressDesign Wizard and
the PhotoStitch Wizard. Use the Family Tree Wizard to create a memento.
PREMIER+™ 2
Card Shop
Create personalized embroidery cards automatically with themed templates for
special occasions. Choose a folding card with four sections, a postcard with two
sections or a single-sided project. Create a PhotoStitch embroidery or printed
appliqué of your loved one for a truly individual card.
PREMIER+™ 2
Modify
Restyle, refine and reinvent your embroideries. Reshape and restyle your
embroideries with object editing features. Add Trim commands automatically
and Stop commands with stitchout hints. Convert designs to use cutwork
needles. Use morphing effects to twirl, ripple, wave and more. Use the Border/
Appliqué functions to frame or cut out embroideries. Use the Design Optimizer
to improve the stitching quality of most embroideries. Use the exclusive Emboss
features to add beautiful patterns. Apply the Monochrome effect to create
silhouette or cameo designs.

6 PREMIER+™ 2 Embroidery System Getting Started
Accessories
Send Express, Send & Send to mySewnet™
There are three quick and easy ways to send embroideries to some connected
HUSQVARNA VIKING® or PFAFF® embroidery machines in the PREMIER+™ 2 Embroidery
System.
Use Send Express to send the embroidery to the screen of the connected embroidery
machine; use File, Send to send the embroidery to the MyFiles or Personal Files folder
of the connected embroidery machine; or use Send to mySewnet™ to send the
embroidery to the mySewnet™ cloud for your mySewnet™ enabled embroidery machine.
Alternatively, you could copy an embroidery design to a USB stick, and transfer it to your embroidery
machine from there.
PREMIER+™ 2
Design Aligner
Arrange and split any embroidery for stitching out in any hoop, or split an
embroidery for stitching out in a multipart hoop. Add alignment stitches
automatically for re-hooping, and print an overview and templates.
PREMIER+™ 2
Create
Use the ExpressDesign Wizard to automatically create a design from a picture or
drawing. Use clipart or create your own pictures and drawings. Create
wonderful designs with special lace features. Create additional design areas
with the Freehand functions, including Bezier Mode. Embellish designs with
your own machine stitch motifs. Try the amazing specialty fill effects including
MultiWave, contour, QuiltStipple, Echo, radial, spiral, shape and crosshatch fill.
Emboss areas with personal highlights and use gradient and multicolor gradient
density to produce beautiful shading effects.
PREMIER+™ 2
Sketch
Draw your own stitch paintings with Standard Running, Triple, Satin and Motif
Lines, or free motion stitches. Add free motion highlights and texture to your
favorite pictures. Embellish existing embroideries with extra stitching. Draw
with your favorite machine stitches using the Motif Lines feature.
PREMIER+™ 2
PhotoStitch
Embroider unique color or monochrome embroidery portraits automatically
from your own photos. Use step-by-step wizards to create PhotoStitch
embroideries easily, and edit the picture further if desired. Frame the picture
automatically with your choice of frames, flourishes or motif stitches.
PREMIER+™ 2
Cross Stitcher
Create your own cross stitch designs. Use a picture as the template, or let the
wizard create the design for you automatically. Fill areas or text with patterns, or
design your own patterns and fonts using any cross stitch type.
PREMIER+™ 2
Family Tree
Create embroidery charts automatically from your own family history. Create
memory pieces to highlight your favorite people, pets, vacation scenes, vehicles
and so much more. Use the Chart Wizard to create an embroidered chart of your
family tree, with PhotoStitch embroideries.
PREMIER+™ 2
Thread Cache
Use PREMIER+™ 2 Thread Cache to list your personal thread collection, to create
a list of favorite thread ranges, and to view a shopping list on your mobile
device.
PREMIER+™ 2
Configure
Choose the display settings for your embroidery software and your preferred
export settings. Run Smart Update at any time and Register or Activate.
PREMIER+™ 2
QuickFont
Create your own fonts automatically from TrueType® or OpenType® fonts, for
embroidery machine owners who do not have PREMIER+™ 2 Embroidery.
PREMIER+™ 2
Font Create
Create complex fonts, or modify fonts produced in PREMIER+™ 2 QuickFont.
Also create SuperDesign sets to use in PREMIER+™ 2 Embroidery.
PREMIER+™ 2 Embroidery System Getting Started 7
Purchasing Additional Modules
Additional PREMIER+™ 2 Embroidery System software may be available, depending on
your original purchase. Purchase additional packages from your authorized dealer or
using the Purchase Center on the Internet. To purchase online, go to Help, Purchase
Center, or visit EmbroideryPurchaseCenter.com.
Installing Additional Modules
If you purchase additional PREMIER+™ 2 Embroidery System software it is not required to
reinstall the software from the USB stick if the icon for that module is shown in your
PREMIER+™ 2 Embroidery System program group. Simply repeat the Registration and
Activation process, entering the new Product Activation Code. Your account will be
activated for your new software and when you click on the icon that module will open.
Finding Information
User’s Guides and Reference Guides
The User’s Guides and Reference Guides provide a quick tour of the main screen. This is
followed by information on key features, with short ’How-To’ examples, which will help
you learn how to use the module. The Reference Guide additionally contains full reference
information. The Reference Guide is supplied in PDF format , ready for printing.
Tooltips and Online Help
To learn about a function, position the arrow pointer over its icon. A tooltip with the
function name and some information will appear.
The online help contains the ’How-To’ examples and full reference information. Use the
Help icon , press F1 or click the Help button. Where available, a help topic will appear
that is relevant to the item where help was requested.
Sample Guides
The Sample Guides show examples of the Fonts, Motifs and Stitch Types that are available
in the PREMIER+™ 2 Embroidery System. The Sample Guides are supplied in PDF
format , ready for printing.
Viewing and Printing PDF Guides
To find all the Reference and Sample Guides for your PREMIER+™ 2 Embroidery System
software, in Windows® 10 and 8 select the Desktop tile on the start screen. Then in
Windows® 10, 8 or 7, double-click the PREMIER+™ 2 Embroidery System shortcut on your
desktop, and double-click Reference Guides or Sample Guides. Select the desired PDF
guide.
To view and print the PDF Guides, you will need a PDF reader such as Windows® Reader (included in
Windows® 10 and 8) or Adobe® Reader (available from adobe.com).
Readme
The most up-to-date details about the PREMIER+™ 2 Embroidery System are in the
Readme.rtf file . (Double-click on a Readme file to open it in WordPad or Microsoft®
Word.)
8 PREMIER+™ 2 Embroidery System Getting Started
Internet FAQs
The Internet FAQs option on the Help menu connects to a database of frequently asked
questions about the PREMIER+™ 2 Embroidery System. Search topics relating to the
module you are using, or search all topics.
Tutorials
The Learning Center option on the Help menu connects to tutorials in the Internet
Learning Center. The tutorials or interactive training exercises provide a 'show-me'
experience that will help you learn how to use key features of the software.
Sample Files
Samples are included that are shown in the ’How-To’ examples and tutorials. The sample
files will be installed to subfolders of Documents\Premier+2\Samples\ or the folder of
your choice.
Other subfolders are created in the Documents\Premier+2 folder. These include My
Designs (to store embroideries and design files), My Families (for .ged files created or
modified in PREMIER+™ 2 Family Tree) and My Pictures (for pictures created or modified in
PREMIER+™ 2 PhotoStitch, in PREMIER+™ 2 Family Tree, or PREMIER+™ 2 Create). However,
you are not required to use these folders.
Help and How to Use It
Tooltips and What’s This Help
Use the Tooltips to see the name of a function and some information about it.
1 Move the arrow pointer over an icon to display a tooltip with its name and some information.
Tooltip help is not available for the icons on menus, except the File Menu in PREMIER+™ 2 Embroidery.
Use the What’s This? help to obtain further information, and open the help system.
2 Click F1 while a tooltip is displayed. A Help topic will be shown for the item you clicked. (Alternatively,
hold down the Shift key and click F1.)
Display Help
1 Use the Help icon , press the F1 key or select Help Topics from the Help menu. The PREMIER+™ 2
Embroidery Help will appear. The screen is split into a tabbed navigation panel on the left and the
help information on the right.
Contents
2 If it is not already selected, click the Contents tab.
3 Click the Creating Lettering book title. The book will expand to show all the topics in the book, and
the Creating Lettering topic will appear on the right.
4 Click the book title Font Selection in the Contents and the Font Selection topic will appear.
Navigating Topics
5 Look at the bottom of the Font Selection topic to see the Related Topics section.
Related Topics refers to other topics in the current chapter, and related information in other chpaters.
6 Click Letter Properties and the topic will appear. Notice also that the Contents has followed the topic
selection so that Letter Properties is highlighted. This helps you to see where you are within the Help
system.
7 Scroll down the text of the Letter Properties topic, until you see that Line Formatting is underlined.
This is a link to the Line Formatting topic. Click the link to see the topic. Notice that the Line
Formatting topic is highlighted in the Contents.

PREMIER+™ 2 Embroidery System Getting Started 9
8 Click the Back button at the top of the Help screen. You will be returned to the Letter Properties
topic.
Index
9 Click the Index tab and the list of indexed entries will appear.
10 Click 2D View and the 2D View topic will appear.
11 Scroll down and click Align, Bottom and a box showing topics about bottom alignment appears. Click
the topic you would like to see.
Note that Align, Center has 1, 2 by it. This is because it is indexed twice. Click the number to see the entry.
Search
12 Click on the Search tab.
13 Enter the word 'decoration' in the search box. A list of all topics containing the word 'decoration'
appears.
14 Click the Select Decoration topic in the list and the topic will appear. Notice how all occurrences of
the word 'decoration' are highlighted in the topic page so you can easily see them.
PREMIER+™ 2 Embroidery System Learning Center
The Learning Center is an internet resource for PREMIER+™ 2 Embroidery System Tutorials.
You must be connected to the internet to use the Learning Center.
1 In any module in the PREMIER+™ 2 Embroidery System, click Help, Learning Center.
2 Select the desired module to start the training exercises.
Alternatively, visit EmbroideryLearningCenter.com.
PREMIER+™ 2 Embroidery System Terms and
Conventions
In the online help and guides for the PREMIER+™ 2 Embroidery System, certain lettering
styles and terms are used frequently. For example, the information is in standard text.
Instructions and step by step exercises are in numbered standard text, as shown below.
(Alternatives are in parentheses.)
1 Change the number to three, then click OK (or press ENTER).
Important points, hints and tips are highlighted like this...
On-screen pointers
The pointer is most commonly shown as an arrow on the screen. The pointer may
change according to the chosen function. This most commonly happens when the pointer
is moved over the work area. The main pointers used in the PREMIER+™ 2 Embroidery
System are shown here.
General Pointers
I-bar This appears when the pointer is positioned over a text box where you
can type, such as the Edit Notes dialog box.
Zoom In
This appears when Zoom To Rectangle , or Zoom In in a dialog
box is chosen.
Zoom Out
This appears when Zoom Out in a dialog box is chosen.
Measure
This appears when Get Length is chosen, for measuring parts of an
embroidery.

10 PREMIER+™ 2 Embroidery System Getting Started
Selection Pointers
Drawing Pointers
Other Pointers
Pan This appears when using the Pan feature to move about a window, and
also when moving the view in an Overview window.
Box Select and Draw
Rectangle
This is used when selecting with Box Select, and also when drawing a
rectangle to fill with a design using the ExpressDesign Wizard or the
PhotoStitch Wizard.
Freehand Select This is used when selecting with Freehand Select.
Freehand Point Select
and Select Appliqué
This is used when selecting with Freehand Point Select. In PREMIER+™ 2
Modify, it is also used when drawing Freehand Point border shapes and
for drawing a split line to separate the design. In PREMIER+™ 2
Embroidery Extra, it is used when placing appliqué areas.
Ellipse Select This is used when selecting with Ellipse Select in PREMIER+™ 2
PhotoStitch and the Paint window in PREMIER+™ 2 Create.
Magic Wand Select This is used when selecting with Magic Wand Select in PREMIER+™ 2
PhotoStitch and the Paint window in PREMIER+™ 2 Create.
Position This appears when the pointer is within a selected embroidery, part of a
picture or crop area, to show the selection can be positioned. It also
appears when moving points on split lines in PREMIER+™ 2 Design
Aligner.
Double Arrow The diagonal double arrow is shown when using Resize. The horizontal
double arrow is shown for Flip Horizontal and the vertical double arrow
for Flip Vertical. The double arrow is also used to adjust a crop area in a
wizard, and to move the end points of split lines in PREMIER+™ 2 Design
Aligner.
Rotate This appears when the pointer is over a rotate handle for a design.
Cross-hair
This appears when the pointer is over the center of rotation .
Flood Fill Flood fill an area of a picture with color, or an area of a cross stitch
design with crosses or a pattern.
Eyedropper Pick a drawing or thread color, usually from a picture.
Erase Erase part of a picture with the background color.
Fabric Handle Adjust appliqué fabric pieces.
Insert Color Change Insert a color change at the desired stitch point.
Insert Stop Command Insert a stop command at the desired stitch point.
Insert Stitches Insert stitches at the desired stitch point.
Freehand Tablet This is used when drawing on the Create window of PREMIER+™ 2
Create with a Freehand Create function.

PREMIER+™ 2 Embroidery System Getting Started 11
Not all on-screen pointers are seen in all modules. PREMIER+™ 2 Sketch and PREMIER+™ 2 Cross Stitcher
have a special set of pointers. For full details of the pointers used in each module, see the Reference Guide
or online help for the module.
Markers
Markers are used to show the position of some items and also to show and adjust some
features of embroideries and designs.
Information Symbols
The following information symbols are used.
Computer Keyboard
Like all Windows® programs, some parts of PREMIER+™ 2 Embroidery use the computer
keyboard as an alternative to a mouse. For example, you can usually touch Enter instead of
Freehand Point This is used when placing points on the Create window of PREMIER+™ 2
Create with a Precise Create function.
Cross This is used to set alignment cross positions in PREMIER+™ 2 Sketch.
Eraser Erase stitches in PREMIER+™ 2 Sketch.
Center of Rotation This shows the center of rotation for the selected embroidery or
selected block of stitches or objects or part of a picture. It may be
moved to change the pivot point around which the selection is rotated.
Color Change Shows the position of a color change command, which instructs your
embroidery machine to stop for a change of thread color.
Stop Shows the position of a stop command, which instructs your
embroidery machine to stop.
Trim In PREMIER+™ 2 Modify, this shows the position of a Trim command.
Create Cursor This shows where the next object will be added to a design in
PREMIER+™ 2 Create, or to a character in PREMIER+™ 2 Font Create. It is
visible after a stitch creation tool has been chosen.
Start of Area In PREMIER+™ 2 Create and PREMIER+™ 2 Font Create, this shows the
adjustable start point of the selected area.
End of Area In PREMIER+™ 2 Create and PREMIER+™ 2 Font Create, this shows the
adjustable end point of the selected area.
Origin In PREMIER+™ 2 Create and PREMIER+™ 2 Font Create, this shows the
adjustable origin of some types of area when they are selected.
Alignment Stitch In PREMIER+™ 2 Create and PREMIER+™ 2 Font Create, this shows the
position of alignment stitches.
Last Stitch This shows the position of the last stitch when drawing in PREMIER+™
2Sketch.
Height Number of Colors Width (percentage)
Width Rotate
Number of Stitches Height (percentage)

12 PREMIER+™ 2 Embroidery System Getting Started
clicking OK with the left button, or use key combinations to access menu or ribbon bar
functions, such as Ctrl + O to Open a file. Shortcut keys have + between them if the first of
a pair must be held down (for instance, Ctrl + O) and , between them to indicate they are
to be used in sequence (for example, Alt, F, V for Print Preview in most modules).
Use the Shift key for pan mode, to resize from center, to select objects in the FilmStrip in
PREMIER+™ 2 Create, and to use a counter-clockwise twirl on a design in PREMIER+™ 2
Modify.
Use the Ctrl key for proportional resize in PREMIER+™ 2 Embroidery, to select multiple
designs in the work area in PREMIER+™ 2 Embroidery, and to create square points (for
straight and angled lines) with Freehand Point Select tools.
Use the Tab key to move between designs in the work area in PREMIER+™ 2 Embroidery
and PREMIER+™ 2 Modify.
Arrow Keys
Nudge
The embroidery(ies), block of stitches, or section of a picture or design can be moved in
small amounts to nudge it accurately into the desired position. Use the arrow keys on the
keyboard to nudge an embroidery or block in most modules.
Stitch Navigation and Selection
Use the left and right arrow keys to step through stitches, one stitch at a time to find the
desired stitch point. A series of stitches can be selected as a block by holding Shift while
moving through stitches with the arrow keys. Alternatively, select a stitch point, then
Shift+click another stitch point to select the series of stitches as a block. This feature is
available in PREMIER+™ 2 Modify and PREMIER+™ 2 Sketch.
Object Selection
Use the left and right arrow keys to step through objects, one object at a time to find the
desired object. This feature is available in PREMIER+™ 2 Create and PREMIER+™ 2 Font
Create.
Also use the up and down arrow keys, home, end, page up and page down to move up and down the
FilmStrip.
Touch Gestures
Touch gestures are used when viewing and moving embroideries in the PREMIER+™ 2
Embroidery System. They are available when using a touch-sensitive screen.
General
Select and move
One finger touch and one finger slide are equivalent to click and drag with a mouse. Use
to move embroideries, select, draw or create stitches with freehand features, and so on.

PREMIER+™ 2 Embroidery System Getting Started 13
Autoscroll
When you drag within a document, the autoscroll feature moves the pointer
automatically, changing the view of the work area. This is useful when zoomed in. Use
autoscroll while moving or resizing a selected embroidery.
Use a two finger swipe on the work area.
Pinch to zoom
Pinch two fingers to zoom in, and spread two fingers to zoom out.
Context menu
Press and hold and a context-sensitive menu will appear if available (as with right-click).
PREMIER+™ 2 Embroidery and PREMIER+™ 2 Modify only
Multiple select
Two finger touch will add or remove an embroidery in the current selection (similar to
Ctrl+click).
Pinch to resize or scale
Pinch two fingers inside the selection box to reduce, and spread two fingers to enlarge the
selected embroidery, lettering or SuperDesign.
Pinch outside the selection box to zoom.
Rotate
Twist your thumb and forefinger to rotate the selected embroidery, lettering or
SuperDesign.
File Types
Embroidery File Formats
Most PREMIER+™ 2 Embroidery System modules can load any of the following embroidery
file formats: Bernina (.art version 1, 2, 3), Brother/Babylock/Bernina PEC (.pec), Brother/
Babylock/Bernina PES (.pes version 2 - 10), Compucon/Singer PSW (.xxx), Husqvarna
Viking / Pfaff (.vp4, .vp3 and .vip), Husqvarna (.hus, .shv and .dhv), Janome (.jef and .sew),
Melco (.exp), Pfaff (.pcs), Tajima (.dst) and Toyota (.10*).
PREMIER+™ 2 Embroidery System modules save embroidery files in Husqvarna Viking /
Pfaff (.vp4) format.
Embroideries may only be saved in .vp4 format as this will preserve the separate parts of multipart designs.
It also preserves thread color information and notes.
PREMIER+™ 2 Embroidery System modules export any of the following embroidery file
formats: Husqvarna Viking / Pfaff (.vp4 and .vp3), Brother/Babylock/Bernina PEC (.pec),
Brother/Babylock/Bernina PES (.pes version 2 - 10), Compucon/Singer PSW (.xxx),
Husqvarna Viking / Pfaff (.vip), Husqvarna (.hus ,.shv), Janome (.jef, .sew), Melco (.exp), Pfaff
(.pcs), Tajima (.dst) and Toyota (.10*).
Picture File Formats
PREMIER+™ 2 Family Tree, PREMIER+™ 2 PhotoStitch and PREMIER+™ 2 Font Create do not
load embroidery files.

14 PREMIER+™ 2 Embroidery System Getting Started
Together with PREMIER+™ 2 Embroidery Extra, PREMIER+™ 2 Create and PREMIER+™ 2
Sketch, they can load any of the following picture file formats: Windows or OS2 Bitmap
(.bmp), JPEG-JFIF Compliant (.jpg, .jif, .jpeg), Portable Network Graphics (.png), Tagged
Image File Format uncompressed (.tiff, .tif), Windows Meta File (.wmf), Windows Enhanced
Meta File (.emf) and Windows Icon (.ico).
PREMIER+™ 2 Create can additionally load the following drawing file formats: 4QB (.4qb), CorelDraw (.cdr
version 7-13), Scalable Vector Graphics (.svg), HPGL (*.hp and *.plt), PC Quilter (*.txt), Statler Stitcher (*.qli),
AutoCAD (*.dxf), CompuQuilter (*.cmd and *.cqp), Handi Quilter (*.hqf) and IntelliQuilter (*.iqp).
PREMIER+™ 2 Create, PREMIER+™ 2 Sketch and PREMIER+™ 2 PhotoStitch can save any of
the following picture file formats: Windows or OS2 Bitmap (.bmp), JPEG-JFIF Compliant
(.jpg, .jif, .jpeg), Portable Network Graphics (.png) and Tagged Image File Format
uncompressed (.tiff, .tif).
PREMIER+™ 2 Create can save 4QB (.4qb) drawing files.
PREMIER+™ 2 Embroidery System can upload pictures and videos of embroidery designs
from Design Player and Life View to the social media sites Facebook® , Flickr® ,
Twitter® and YouTube® .
Design File Formats
PREMIER+™ 2 Create loads and saves design outline files (.edo ). It can also load and
save motif files from the System or My Motifs databases, and it can load SPX (.spx), 9mm
(.9mm ) and Maxi (.max ) stitch files, and export SPX (.spx) stitch files for certain
sewing machines.
PREMIER+™ 2 Cross Stitcher loads and saves cross stitch design (.krz ) files.
Cut, Copy & Paste Features
Embroidery files and blocks of stitches may be cut , copied and pasted or
duplicated within and between PREMIER+™ 2 Embroidery System modules. For
example, after making a design in PREMIER+™ 2 Create, copy the embroidery into
PREMIER+™ 2 Embroidery Extra to view it on a garment, quilt block or fabric background.
When an embroidery is duplicated, a copy is placed on the work area and Clipboard Block.
The Clipboard Block in many modules shows the current embroidery or block of stitches
that can be pasted into the work area. Click the clipboard to remove the Clipboard Block.
The Windows® clipboard is used, so if you copy text in a word processor or use the Print Scrn key after
copying an embroidery file, the embroidery will no longer be available when you return to your
PREMIER+™ 2 Embroidery software.

PREMIER+™ 2 Embroidery System Getting Started 15
Hoop Selection
Use Hoop to choose the hoop size you wish to use in your PREMIER+™ 2 Embroidery
System software. Set the hoop size according to the size of your embroidery or the hoop
you wish to use for stitching out, or enter any other desired size.
Hoop Group
The drop-down list of Hoop Groups shows all the machine Hoop Groups.
Hoop Size
The drop-down Hoop Size list shows the hoops in the chosen Hoop Group. Select the
desired hoop size and a picture of the hoop will be shown in the Preview.
Orientation
Select Natural or Rotated orientation according to the shape of the embroidery that is to
fit in the hoop. Natural orientation is similar to the way the hoop would appear when you
sit in front of your machine; note the position of the bracket.
It is recommended to use natural hoop orientation for designs with Twin Needle colors.
Enter Size
To enter a hoop size that is not listed in any of the Hoop Groups, click the Enter Hoop Size
box so that it is selected (checked). The Width and Height boxes will become available.
You can enter any size from 10mm to 4000mm. The preview shows the shape of the hoop
you enter.
If you position the arrow pointer over the box without clicking, the alternative units and range will be
shown.
Select the hoop size Choose a machine or hoop group
Enter a size for a custom hoop Select the hoop orientation

PREMIER+™ 2 Embroidery System PREMIER+™ 2 Explorer Plug-in 16
3
PREMIER+™ 2 Explorer Plug-in
Use the PREMIER+™ 2 Embroidery System Explorer Plug-in to view your embroideries and
their details.
The PREMIER+™ 2 Explorer Plug-in is integrated with Explorer (File Explorer in Windows®
10 and 8, and Windows® Explorer in Windows® 7) so that embroidery files can be viewed as
icons, and the Windows Search feature can be used on embroideries and embroidery
properties.
• Open embroidery designs (.vp4 and others) in PREMIER+™ 2 Embroidery and other
modules.
• Open embroidery design outline files (.edo) in PREMIER+™ 2 Create.
• Open Cross Stitch design files (.krz) in PREMIER+™ 2 Cross Stitcher.
• View drawing (.4qb) files in Explorer.
Embroidery design outline (.edo), Cross Stitcher (.krz) files, and drawing (.4qb) files appear in Explorer with
a colored representation of the filled areas. Appliqué fabric areas in .edo files are always shown in green.
Embroideries inside .zip files may be viewed individually in the Preview Pane in Windows® 10 and 8.
For more information about the Explorer Plug-in, see the PREMIER+™ 2 Configure Reference Guide, or
online help.
View Embroideries in Explorer
1 Click the Explorer icon in the Status Bar to open Explorer.
2 In Explorer, open the Navigation pane and the Details pane.
In Windows® 10 and 8, click the View tab, and select Navigation pane and Details pane.
In Windows® 7, click Organize, Layout and ensure that Navigation pane, Details pane and Preview
pane are all selected (checked).
3 Browse to Documents\Premier+2\Samples\Premier+Emb\Stitch.
4 Select Tiles. In Windows® 10 or 8 in Layout, click Tiles, and in Windows® 7 select Tiles from the Change
Your View drop-down list.
You can now see the .vp4 embroidery files in the Stitch folder as thumbnail pictures.
5 Click Daisy. On the right, a picture of the Daisy embroidery and full information on it appears,
including the number of colors, stitches, the dimensions, and the Notes and Settings.
In Windows® 7, only the picture is in the Preview on the right. Other information appears at the bottom of
the screen.

PREMIER+™ 2 Embroidery System PREMIER+™ 2 Explorer Plug-in 17
6 Hover the mouse pointer over the Daisy icon. A tooltip appears.
This tooltip includes most of the information about the embroidery that is
present in the Preview pane. The tooltip can also be seen in other view types,
such as List view.
7 Right-click the Halloween embroidery, and select Properties from the
context menu. The Properties dialog box for Halloween opens.
8 Click the Embroidery tab. Full details on the embroidery
appear, including the thread name and shade, the design
information, and the Notes, Settings and Technical
information.
You can search on many properties, and in one or many
folders.
9 In the Search text box, enter the word ’flower’. Twelve items
are found. Some of these items are highlighted in yellow,
for example Purple Flowers.
The highlighted items have ’flower’ in their names. The others
include the word in their Notes or Settings. You can also search
for words that only occur in the Notes or Settings.
10 Browse to the folder Documents\Premier+2\Samples
\Premier+Explorer\Stitch\Flowers.
There are several embroideries with the word ’flower’ in
their name in this folder.
11 In the Search text box, enter the phrase:
notes: flower
Only one embroidery is found, Outline Flowers. It uses the
word flower in its Notes, as well as its name.
12 Delete the last three letters from ’flower’ to make ’flo’.
Many more embroideries are now displayed, as they had
’floral’ in their Notes, not ’flower’.
Use ’Notes:’ and Settings:’ as well as other properties such as ’Stitchcount:’ to search for embroidery
information in Explorer.
13 Click the Flowers folder to close the search.
14 Right-click Buttercup and look at the context menu.
You can print embroidery worksheets from the main menu.
See “Print” on page 24.
15 There is a special PREMIER+ 2 Embroidery submenu.
Click Premier+ to open it. Several more options appear.
16 Use Send Express to send the selected embroidery
to the screen of the connected embroidery machine.
17 Use Send to send the selected embroidery, or
embroideries, to the MyFiles or Personal Files folder of
the connected embroidery machine.
If more than one embroidery is selected, a shorter version of
this menu will appear with Send, but not Send Express.
18 Use Copy Stitches to copy the stitches in the
embroidery to the Clipboard. They can then be pasted into other PREMIER+™ 2 Embroidery System
modules.
This is a quick way of inserting an existing embroidery into a project.
18 PREMIER+™ 2 Embroidery System PREMIER+™ 2 Explorer Plug-in
19 Use Convert to create a copy of the embroidery in another
embroidery file format, with a different thread range, or with
added trims or notes.
PREMIER+™ 2 Intro or Embroidery Machine Communication
owners may only convert to .vp4.
20 Use Convert to Picture to create a picture of the embroidery
in .jpg, .png, .tif or .bmp graphics format.
This feature is not available for PREMIER+™ 2 Intro or PREMIER+™ 2
Embroidery Machine Communication owners.
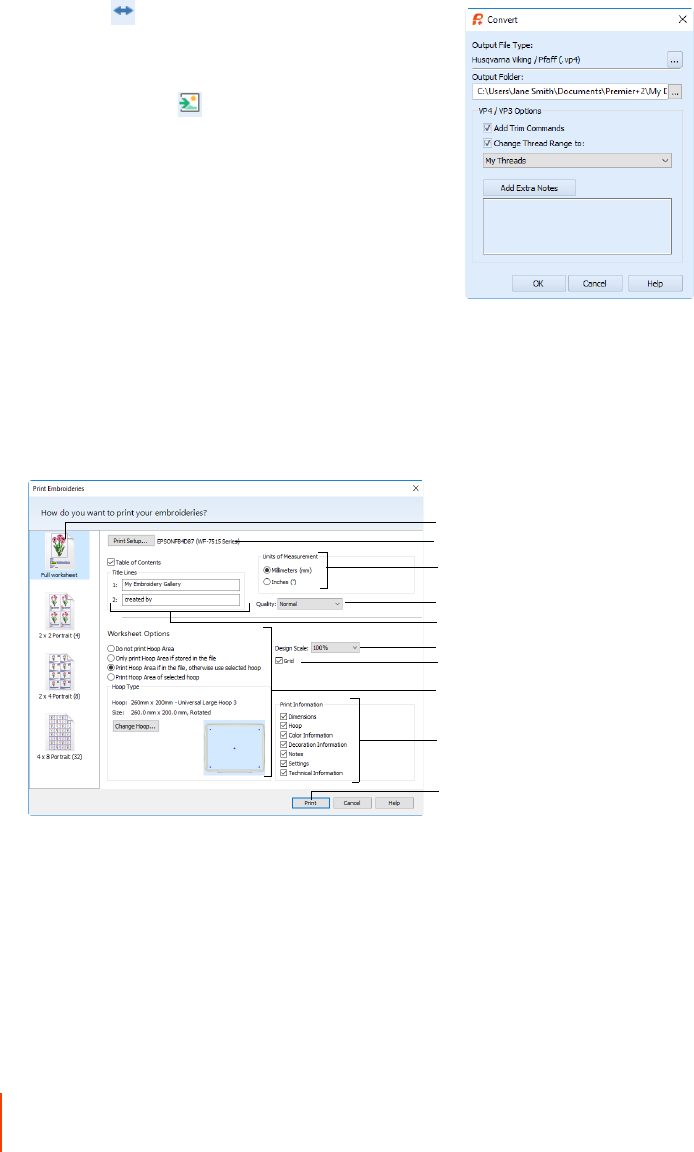
Printing in Explorer
To open the print dialog in Explorer, right-click an embroidery, or a group of selected
embroideries, and select Print in the context menu.
Select the printer and page layout in print setup, enter a name for the catalog, and choose
a scale, hoop, units of measurement, and details to be printed. Then click Print to print the
embroidery worksheet.
Catalog layouts are not available for PREMIER+™ 2 Intro or PREMIER+™ 2 Embroidery Machine
Communication owners.
Select a catalog layout, or one design
Choose a printer
Select measurement units
Give the catalog a title
Set the print quality
Choose a scale for the design picture
Set the hoop size and visibility
Show a grid
Choose which information to include
Explorer Plug-in
Print the worksheets

19 PREMIER+™ 2 Embroidery System PREMIER+™ 2 Configure
4
PREMIER+™ 2 Configure
Use the tabs in PREMIER+™ 2 Configure to adjust settings for displaying embroidery
files, to connect to certain embroidery machines, and to register your software.
For more information, see the PREMIER+™ 2 Configure Reference Guide or online help.
Utilities
Appearance
Use the Appearance settings to vary the way embroidery files will be displayed in your
PREMIER+™ 2 Embroidery System software.
Import
Use the Import tab to choose a thread range for your PREMIER+™ 2 Embroidery System
software.
Check a PREMIER+™ Embroidery System installation
Register your software
Activate your PREMIER+™ Embroidery System
Check for new fonts, threads and updates
Communicate with some embroidery machines
Save your thread, motif, fill and color settings
Restore your backed up settings
Reset toolbars and panels to their original positions
Reset file associations for embroidery, cross stitch
and family tree files (may be required after
installing other embroidery software or Explorer
plug-ins)
Set the background color for all modules
Set the background fabric texture
Set the grid color
Preview the texture, color and grid color
Set the screen color and style
Set real size measurements for embroideries
Set the units of measurement
Set the background fabric color for cut-out
Preview the cut-out fabric settings
Choose a texture for the cut-out fabric
appliqué

20 PREMIER+™ 2 Embroidery System PREMIER+™ 2 Configure
In Import Thread Range select the palette that will be active when loading embroidery
files in your PREMIER+™ 2 Embroidery System software unless their colors have already
been set from another Thread Range. Choose from the following Thread Manufacturers:
Robison-Anton Rayon 40, Anchor-Alcazar Rayon 40, Icord Poly 40, Isafil Rayon 40, Madeira
Poly Neon 40, Madeira Rayon 40, Robison-Anton Poly 40, Sulky Poly Stickma 40, Sulky
Rayon 40. Click the down arrow and the list of options appears. Select the desired option
by clicking on it.
You can convert colors in the selected embroideries to any thread range using Color Tone in most modules,
or when using Convert in the Explorer Plug-in.
Export
Use the Export tab to vary the way embroidery files will be exported and stitched out in
your PREMIER+™ 2 Embroidery System software.
You can change the file format in the Export dialog box of each PREMIER+™ 2 Embroidery System module.
Optimize for Sewing
Combine: Merge the embroideries into a single embroidery during Export.
Remove Overlap: Prevent areas of stitches building up where embroideries overlap.
ColorSort: Reduce the number of thread colors during Export.
Optimize Stitch Length: Automatically remove small and insignificant stitches.
Splitting for Multipart Hoops
If .vp4, .vp3, .pes or .jef is selected as the file format, embroideries for multipart hoops are
split automatically. Use Intelligent (the recommended option) or Straight Line Split.
Alignment Stitches for Turnable Hoop
Add an alignment cross at the end of each embroidery section when using the
HUSQVARNA VIKING® Designer Majestic, PFAFF® creative Grand Dream™, Universal
Multipart hoop or Brother Jumbo Frame.
Create placement stitches for Decorations added in
PREMIER+™ Embroidery Extra, remove decorations
Rotate the embroidery to fit the hoop orientation, or
flip the embroidery for stitching in reverse
Choose settings for splitting with Multipart Hoops
Set the suffix to add to the name of an exported file
Route split line to minimize cut stitches
Use a straight line
Add an alignment cross at the end of each section
Select the Optimize for Sewing settings

21 PREMIER+™ 2 Thread Cache Using PREMIER+™ 2 Thread Cache
5
Using PREMIER+™ 2 Thread
Cache
Use PREMIER+™ 2 Thread Cache to organize your preferred thread ranges in a list called
My Thread Ranges and your personal thread collection in one or more My Thread palettes.
Use the tabs at the top of the PREMIER+™ 2 Thread Cache screen to change the view
between My Thread Ranges, My Thread Databases and My Thread Stock.
Print a list from your My Thread databases, or upload your My Thread databases to the
Thread Cache website. Note your thread purchases as you visit different stores.
Use My Thread Ranges to create a group of favorite personal and manufacturer thread
ranges for use when selecting thread colors.
Use My Thread Databases to create a My Thread database of the manufacturer and
personally created threads that you own. Alternatively, import custom threads from a
friend’s embroidery. Select threads from this range when designing embroideries.
Use My Thread Stock to record how many spools you have for each thread in the selected
My Thread database, and to highlight and annotate threads for which you need extra
spools. Print a list, or upload the database and transfer it to the Thread Cache website.
Use the Thread Cache website on your mobile device to view your threads, and note the
threads as you purchase them. Browse to ThreadCache.PremierPlusEmbroidery.com, then
create a favorite or bookmark for the site.
My Thread Ranges
Use the My Thread Ranges window of PREMIER+™ 2 Thread Cache to create and modify
your list of favorite thread ranges. My Thread Ranges is used in the Color Selection dialog
to make it easier to select your favorite thread ranges.
Move thread ranges up and down your list of My Thread Ranges.
Choose a manufacturer
Click to add the selected thread
range to My Thread Ranges
Change the order of thread
ranges in My Thread Ranges
Remove a thread range from
My Thread Ranges
Choose a manufacturer from
Select a range in
the list
thread range
My Thread Ranges

22 PREMIER+™ 2 Thread Cache Using PREMIER+™ 2 Thread Cache
My Thread Databases
Choose the threads you own from many different manufacturers and list them together in
a My Thread database.
My Thread Stock
Use the My Thread Stock window of PREMIER+™ 2 Thread Cache to note the quantity that
you have of each thread in the selected My Thread Database, and to print the list or
upload it to the cloud, ready to view on the Thread Cache website on your mobile device.
Select a thread range
Select a thread by number or color
Add the thread to the selected My Thread database
Choose a My Thread database
Add, remove or rename the selected
Search for a thread in the
current database
View the selected thread
Create, edit, copy or remove a thread
Move the thread up or down
database
Change the spool size Preferences
Import or export thread definitions
Select a My Thread database
Print the selected database
Upload the selected database
Click to select a thread
Control+click to edit Spools
and Notes
Sort by the column headings
Edit Spools and Notes for the selected threads
Click to highlight a thread with a star
Return to the original order
Change the number of spools
for the selected threads

PREMIER+™ 2 Thread Cache Using PREMIER+™ 2 Thread Cache 23

24 PREMIER+™ 2 Embroidery System Printing
6
Printing
Use the Print dialog to select your print settings, and to print a worksheet for your
embroidery. In PREMIER+™ 2 Embroidery Extra, you may print an overview of the
embroidery on a project background or split into sections. In other modules, you may
print a background picture or an overview of split sections. The printed pages match the
Export settings for the embroidery.
To open the print dialog: in Windows® Explorer, right-click an embroidery, or a group of
selected embroideries, and select Print in the context menu; in PREMIER+™ 2 Embroidery,
PREMIER+™ 2 Modify and PREMIER+™ 2 Create click File, Print ; in most other modules,
click File, Page Setup.
In PREMIER+™ 2 Embroidery, PREMIER+™ 2 Modify and PREMIER+™ 2 Create also use File, Print to preview
and print an overview, worksheets and/or templates for your project. In most other modules, use File, Print
Preview to see how the printouts will look.
Print
Select the printer and page layout in print setup, and choose a scale, hoop, units of
measurement, and details to be printed. Then click Print to print the embroidery
worksheet and/or overview.
Select information & grid
Select measurement units
Choose a scale
Print the worksheets
Choose information
for the Overview
Worksheet settings
Preview the printout

PREMIER+™ 2 Embroidery Getting Started with PREMIER+™ 2 Embroidery 25
7
Getting Started with
PREMIER+™ 2 Embroidery
Welcome to PREMIER+™ 2 Embroidery and PREMIER+™ 2 Embroidery Extra.
In this guide we will use the name PREMIER+™ 2 Embroidery to refer to features available in both modules.
Screen captures show PREMIER+™ 2 Embroidery Extra.
PREMIER+™ 2 Embroidery is available if you own PREMIER+™ 2 EMBROIDERY. PREMIER+™ 2 Embroidery
and PREMIER+™ 2 Embroidery Extra are available if you own PREMIER+™ 2 EXTRA or PREMIER+™ 2 ULTRA.
PREMIER+™ 2 Embroidery helps you to adjust your embroideries on the computer before
you sew. Personalize your embroideries in true 3D in a real hoop, and store the hoop
information in your project file. Rotate your embroideries to any degree, mirror them from
side to side or end to end and scale or resize your embroideries. Adjust an unlimited
number of designs and lettering ’side by side’ in multiple windows. Choose from a library
of hundreds of SuperDesigns with numerous style options.
Adjust the colors to the thread shades from your preferred manufacturer, or even create
your own threads in PREMIER+™ 2 Thread Cache. Add and store Color Effects such as Puffy
Foam or Dual Threads, or Twin, Wing, Cutwork and Felting Needles. ColorSort to
intelligently re-sort the color order of a design to reduce the number of thread changes.
Select multiple designs and align, move, resize or rotate them as a group. Cut, copy or
paste and duplicate embroideries between PREMIER+™ 2 Embroidery System modules.
Use 'Encore' to repeat embroideries in a circle, in 8 line and 28 shape options, or around
the hoop. Use the Endless function to make endless embroideries for any hoop.
Add multi-line lettering with your choice of 35 lettering shapes and flexibility to resize and
space letters individually. Alternatively, use the ExpressMonogram Wizard. Use the
QuickFont Wizard to create new fonts for PREMIER+™ 2 Embroidery from most TrueType®
or OpenType® fonts on your computer. Select machine motif stitches individually or as
lines to create new designs or embellish existing ones, or add SuperDesigns. Surround
monograms, names or any design with frames and flourishes or an automatic border with
optional appliqué stitching and fabric. Adjust the stitch types and settings for most fonts
and SuperDesigns.
Use Design Player to play through all sections of an embroidery. Use Life View to
view the embroidery in real-world perspective with the desired export options. Save
your project with its design sections and groups kept separate and editable (including
lettering, SuperDesigns and frames) in multipart .vp4 format. Finally, Export in the
desired format according to the chosen options to optimize for sewing.
Create appliqué outlines for cutwork needles or your fabric cutter using File, Export
Appliqué Pieces, and create placement stitches for decorations when Exporting.
Alternatively, create crystal transfer templates for decorations using File, Export
Decoration Template. Share pictures and videos of your projects with your friends on
popular social media sites (using Life View and Design Player).

26 PREMIER+™ 2 Embroidery Getting Started with PREMIER+™ 2 Embroidery
Parts of the Software Window
Title Bar
The title bar at the top of the window is
highlighted if PREMIER+™ 2 Embroidery is
active. The Quick Access toolbar gives icons for the following frequently used features:
Insert, Save, Save As, Export, Print, Change Hoop, Undo, Redo, Life View and Design Player.
If more than one instance of PREMIER+™ 2 Embroidery is open, each open window will
show the name of the embroidery file.
Ribbon Bar
There are 13 tabs on the ribbon of PREMIER+™ 2 Embroidery Extra: File, Home, Wizards,
Encore, Letter, SuperDesign, Frame, Border, Appliqué, Decoration, Modify, View and Help.
An alternative way to access ribbon options is to press the Alt key, then the highlighted letter of the tab,
followed by the highlighted letter of the tab item, e.g. Alt, H, R to change between scale and resize modes.
Some functions are available by pressing the Ctrl key and another key at the same time. These shortcuts
are shown in the tooltip for the relevant function.
Use the Home tab to select, copy, group designs, resize, align and rotate, change threads
with Color Tone, change the hoop, and display embroideries with Life View and Design
Player.
Use the Wizards tab to access the wizards. These are: the ExpressMonogram Wizard ,
the Endless wizard, the ExpressDesign Wizard , the PhotoStitch Wizard , the
Word Sculpt Wizard , the Quilt Block Wizard , the Project-in-the-Hoop Wizard ,
and the Split Project Wizard . If PREMIER+™ 2 ULTRA is owned, the Family Tree
Wizard is also available. In PREMIER+™ 2 Embroidery only the ExpressMonogram
Wizard and the Endless Wizard are available.
Title BarRibbon Bar Tabs Ribbon Bar
Design PanelStatus Bar Work Area
Quick Access Toolbar

PREMIER+™ 2 Embroidery Getting Started with PREMIER+™ 2 Embroidery 27
Use the Encore tab to repeat embroideries along 8 different line types, in a circle, around
one of 28 shapes, or to border your hoop.
Use the Letter tab to add lettering using single or multicolor fonts, fonts using puffy foam
or special color effects, and fonts with alternative alphabets. Use the font gallery to choose
a font visually from the font categories. Place characters with 35 different lettering shapes,
31 of which can be used with multi-line lettering, and 29 can be used with individual
lettering. Select the size, line formatting and adjust stitch types and settings in most fonts.
Use the Font Manager to search for fonts by name and size, and to create and delete user
fonts. Use the QuickFont Wizard to create new fonts for PREMIER+™ 2 Embroidery from
most TrueType® or OpenType® fonts on your computer, and use Import Font from
Embroideries to create a font from embroideries of letters.
Use the SuperDesign tab to add SuperDesigns, and adjust their size and appearance.
Use the Frame tab to surround a design with over 700 beautiful decorative frame and
flourish options. Place flourishes above, below, or as a duo.
Use the Border tab to create a border automatically (optionally with appliqué fabric and
placement stitching), or individual decorative motifs, or a motif underline.
In PREMIER+™ 2 Embroidery Extra, use the Appliqué tab to view and adjust appliqué
pieces. The appliqué fabric is shown under the embroidery, as it would appear when
stitched out.
In PREMIER+™ 2 Embroidery Extra, use the Decoration tab to decorate your chosen
background and embroidery with beads or sequins, and hotfix crystals or nailheads.
In PREMIER+™ 2 Embroidery Extra, use the Modify tab to edit and insert stitches, or select a
block of stitches for editing. Hide stitches by color or by using the draw range, to help with
selecting the desired stitches. Cut and copy blocks of stitches or whole embroideries and
paste to attach them to the last visible stitch. Insert new color changes and Stop
commands with stitchout hints, change the order of colors and merge color blocks.
Use the View tab to adjust the Grid, measure a design, show and create garment, quilt
block and fabric backgrounds with the Background Wizard (PREMIER+™ 2 Embroidery
Extra only), and change the view mode or hoop.
Work Area
The work area is the area where embroideries are loaded. The work area includes the area
surrounding the selected hoop. It is where you make changes to an embroidery. The stitch
area is the available area inside the selected hoop.
Stitches are drawn in the appropriate colors. The embroideries are shown in either 3D or
2D. The background color and texture can be changed using PREMIER+™ 2 Configure .
In PREMIER+™ 2 Embroidery Extra a background garment, fabric or quilt block may be
displayed.

28 PREMIER+™ 2 Embroidery Getting Started with PREMIER+™ 2 Embroidery
In Standard 3D view the real hoop is shown, with blue corners
showing the stitch area within the hoop. The background is
shown.
In Realistic 3D view the embroidery and background are
shown without selection boxes, grid or hoop.
In 2D view , the hoop size is shown by a blue outline with bold
corners. Stitches are drawn in plain colors only, and stitches using
multicolor threads are drawn using only the first color in the thread definition. The
background does not use texture in 2D view.
Background Grid
The work area has a grid, which can be turned on or off in the View tab, and the grid size
changed. Zooming in or out makes the grid squares look bigger or smaller. The grid size
can be changed from 2mm to 50mm using the View tab.
Design Panel
To the right of the work area is the Design Panel. Use the Design Panel to change colors,
and to add or edit the Notes and Settings.
Design Information
The Design Information shows the dimensions (Height and Width ), Stitch Count ,
and number of colors for the active embroidery.
Color Select
The Color Select area shows the order of the color blocks in the color worksheet and any
notes that are included in the embroidery. Click on a color block to change thread colors,
and to add thread effects. In the Modify tab (PREMIER+™ 2 Embroidery Extra only), use the
color worksheet to show or hide stitches by color block, and move color blocks up or
down and merge them. Edit or add information to the Notes and Settings as
desired.
Color Select is blank if no embroidery is selected.
Clipboard Block
The Clipboard Block shows the embroidery that can be pasted into the work area.
Click in the clipboard to remove the current Clipboard Block.
Overview Window
The overview window gives a small overview of the whole work area for the embroidery.
Status Bar
The status bar is found at the bottom of the window. Starting from the left, the status bar
shows:
The QuickLink Toolbar.
The zoom tools and Zoom Bar.
Hoop Corner

PREMIER+™ 2 Embroidery Viewing Embroideries 29
8
Viewing Embroideries
3D and 2D View
Use View Mode in the View tab to toggle between 3D View , Realistic 3D , and 2D
View display. Use 2D to see the individual stitches with no shading. Use standard 3D
View to see how the embroidery will be stitched out with three-dimensional shading. Use
Realistic 3D to view embroideries and background without selection boxes, grid or hoop.
Stitches are automatically displayed in 2D when you select the Modify tab. Some functions are not
available in Realistic 3D .
Zoom Commands
A number of functions are available to make it easier to navigate around embroideries,
including the Zoom functions and Overview Window. By default, the hoop is shown at a
size so that the hoop fills the window, the same as if you click Zoom To Fit .
You can also change the view of an embroidery by using the Modify tab to select the colors and stitches.
Pan Mode
Use the Pan feature to move around the screen easily. The Pan feature works when you are
zoomed in on part of the screen, making the scroll bars visible at the right and bottom of
the work area. Hold the Shift key down, then start to click and drag. The pan pointer
appears. Click and drag until the pointer is in the desired part of the screen.
3D View
Realistic 3D 2D View
Show and adjust the grid
Open or create a Background
Move or rotate the Background Show and fade the Background
Change the view mode
Choose a different hoop
View the Design PanelRemove the background
Measure a distance
Click and drag to zoom in on an area
Zoom to Fit
Drag to zoom in and out
Click to zoom in instantly
Click to zoom out instantly
Select or input percentage zoom
100% zoom

30 PREMIER+™ 2 Embroidery Viewing Embroideries
Overview Window
The overview window gives a small overview of the whole work area for the current
embroidery window. When you zoom in a box is shown around the area that is currently
visible in the main window. Click and drag the box to move to another part of the window.
Show Grid
Use Show Grid to switch the grid on and off. The grid may be used to help align
embroideries and stitches. Set the grid size between 2mm and 50mm.
The cross in the center marks the center of the embroidery. The cross is larger when you zoom in closer.
If you position the arrow pointer over the box without clicking, the alternative units and range are shown.
Get Length and Background
Use Get Length on the View tab (and on the Modify tab if PREMIER+™ 2
Embroidery Extra is owned) to measure the distance between any two
points on an embroidery. Click the Get Length icon and the mouse
pointer changes to the Measure pointer . Then click and drag a line
across the embroidery. The length of the line is displayed.
Use the Background slider bar to show or fade the garment, quilt or fabric
background.
Grid On Grid Off
Background On shows the
picture in the background.
Click and drag the slider to fade
the colors in the background.
Background Off hides the
picture.

PREMIER+™ 2 Embroidery Viewing Embroideries 31
Backgrounds are only available in PREMIER+™ 2 Embroidery Extra.
Use Move and Rotate Background to move the garment, quilt or fabric background.
The Background tools are only available after a Background has been selected in the Background Wizard.
Use Remove Background to remove the garment, quilt block or
fabric background that you have placed behind your embroideries.
Design Panel
Use the Design Panel to change colors, to view and change the Notes and Settings, and to
view the Clipboard and Overview window. To open the Design Panel, click Show Design
Panel in the View tab.
The dimensions (Height and Width ), Stitch Count , and number of colors for
the active embroidery are shown. The Design Panel also shows the order of the color
blocks in the color worksheet and any notes and settings in the embroidery.
Information about lettering, monograms, motifs, SuperDesigns, frames and borders is automatically
placed in the settings.
Double-click on a color block to change thread colors (or select the block and click
Change Color ). Also, on the Modify tab in PREMIER+™ 2 Embroidery Extra, use the color
worksheet to show or hide stitches by color block, and move and merge color blocks.
Design Player
Use Design Player to play through the stitches in the embroidery as if they were being
stitched from an exported embroidery.
Any messages are displayed following their Stop commands.
Appliqué fabric is displayed if present, but not a background.
Decorations are shown following their placement stitches.
If an embroidery contains a felting needle, the project will be shown "flipped".
Start or pause play
Control play with
the slider
Design Information
Jump to the first stitch
Jump to the last stitch
Rewind
Play at double the
current speed
Share a picture or video
online

32 PREMIER+™ 2 Embroidery Viewing Embroideries
Use Share to save or share a picture or video of your design on your favorite social
media site. Share over Facebook® , Flickr® , Twitter® and YouTube® .
Life View
Use Life View to show how an embroidery exported from the project will look in 3D
with real-world perspective. Use Life View to see the design with no grid, stitches selected,
or markers displayed, and to see the effects of glow in the dark and solar reactive threads.
Any background garment, quilt block or fabric is shown, together with appliqué fabric.
Decorations are shown, but not their placement stitches.
Use the position slider to move to another part of the Life View
window. Use the rotation slider to view the stitching in the
embroidery in 3D. Use Glow in the Dark to view the effect of
using glow in the dark threads. The preview will darken to simulate
the lights dimming, and the glow in the dark threads will be shown
in their luminescent colors. Use Solar Reactive to view the effect
of using photochromic threads.
Design Information
Move around the window
Change the 3D viewing angle
Zoom in and out
Light and dark effects
Reset
Animate the preview
Share a picture or video online

PREMIER+™ 2 Embroidery Viewing Embroideries 33

34 PREMIER+™ 2 Embroidery Changing Colors
9
Changing Colors
Thread Colors
The thread colors are shown in the color worksheet on the Design Panel, in the order in
which they are used. Any thread effects or special needles used with a color are also
indicated. A group of stitches using a particular thread color is called a color block. The
color worksheet can be used to change thread colors and to add thread effects. Use any
color in the standard thread ranges and an unlimited number of My Threads ranges.
The Display or Hide, Move color and Merge color functions are available only in the Modify tab of
PREMIER+™ 2 Embroidery Extra.
Double-click a thread sample to access the Color Selection dialog box for selecting a
different thread color. Alternatively, select the thread and click the Change Color icon .
When on the Modify tab, click a check box to show or hide a color block.
Change an Existing Thread Color
When you select a new thread color, the color worksheet will show the change and the
work area will show the block of stitches in the new color.
Use the effects area to show the results of using thread effects or special needles.
Puffy Foam Show the effect of stitching over embroidery foam
Pause over a thread color
to see its name
Merge with color above
Click a color to select it
Move color up the stitch order
Display or hide a color
Change the selected color
Move color down the stitch order
Thread effect symbol
Select a thread range
Show chosen thread ranges
Search for a thread number
Click a thread color
to select a thread
View the thread information
Click a Quick Color to select
a matching thread color
Choose a Quick Color Theme
Puffy Foam depth
Twin needle
stitch size & color
Second thread
color
Wing needle
Felting needle
Cutwork needle
angle

PREMIER+™ 2 Embroidery Changing Colors 35
Only one thread effect can be used on any thread. In the Modify tab of PREMIER+™ 2 Embroidery Extra,
most thread effects are not shown in the active subdesign, as it would be difficult to edit the stitches. They
are shown in Design Player and Life View , in addition to the other tabs.
ColorSort
Use ColorSort (Home tab) to reduce the selected embroidery(ies) or group to the
minimum number of color blocks. The final number of color blocks produced in the
ColorSort process can vary, depending on any overlap between areas.
It is usually recommended to use the ColorSort option in Export when creating an embroidery file
optimized for stitching.
Color Tone
Use Color Tone to change the thread colors in the selected embroidery(ies) or group.
Quick Colors
Use the Quick Colors palette to select the nearest matching
color in the current range to the color that you pick. Use one of
the theme palettes: Standard, Spring, Summer, Fall, Winter, or
create your own palette.
Dual Thread Show the effect of using two threads in one needle
Twin Needle Show the effect of using a twin needle. It is recommended to use natural
hoop orientation.
Wing Needle Show the effect of using a wing needle for hemstitch or heirloom designs
Felting Needle Show the effect of using a felting needle with a roving fiber. When Exporting
an embroidery with a Felting Needle effect, the option "Flip design for felting
or reverse embroidery" is initially selected in the Export dialog box.
Cutwork Needle Select a cutwork needle in one of four angles
View the original
colors
Preview the changed
colors
Zoom in on the design
Adjust light & dark
Change the color
contrast
Optimize the light/color
balance
Change the thread range

PREMIER+™ 2 Embroidery Adjusting Embroideries 36
10
Adjusting Embroideries
Selecting Embroideries
Select an Embroidery
On all tabs except the Modify tab, the
currently selected embroidery is shown
with a selection box around it. The
selection box has square resize handles
on the corners, triangular flip handles on
the top and left, and a circular rotate
handle on the right.
If a selection box has round handles on its
corners, part of it is outside the selected hoop.
Move it into the hoop, or change the hoop size.
The handles are blue if in resize mode (density retained when resized), white in scale
mode (stitch count retained when resized). They are green for lettering, SuperDesigns,
Frames and Flourishes, and light green for Monograms.
If no design is selected there is no selection box and the color worksheet appears blank.
Select an embroidery with any of the following methods:
Click an embroidery.
Press the Tab key to select each embroidery in turn.
Click Next Design or Previous Design (Home tab).
When making a selection, only embroideries that are completely enclosed by the selection line (box,
Freehand Point, Freehand Line) will be included in the selection.
After embroideries have been combined, there will be only one embroidery, so it will no longer be possible
to select the individual parts in this way. Use Group to keep multiple embroideries, lettering and
SuperDesigns together while retaining the ability to edit them individually. To select items within a group,
use Restrict Group .
Alternatively, in PREMIER+™ 2 Embroidery Extra, use the Modify tab to select and adjust the desired part of
an embroidery. Individual stitches and blocks may always be adjusted on the Modify tab.
Cut, copy, paste or delete selected designs
Select some or all designs
Step through open designs
Resize or scale a design
Merge designs & change colors
Arrange & resize designs
View the embroidery as it will be stitched out
Choose a hoop
Group and ungroup designs
Edit a grouped design individually
Rotate Handle
Center of Rotation
Flip Vertical Handle
Flip
Resize Handle
Horizontal
Handle

PREMIER+™ 2 Embroidery Adjusting Embroideries 37
The Context Menu and Individual Designs
Use the Context menu to access editing functions for
individual designs, such as size and rotation. Right-click on
the design, and select the desired function from the
context menu.
From the context menu you can also change the
properties for stitch types in lettering, frames and
SuperDesigns, or fix them as stitches.
Adjust the appliqué fabric and margin for lettering, Frames
and SuperDesigns, and decorations for an embroidery
even if PREMIER+™ 2 Embroidery Extra is not owned.
To adjust the properties for an individual design within a group, click Restrict Groups in
the Home tab or context menu, then select the desired item.
Multiple Select Features
Use multiple select to select more than one embroidery at a time. Hold down the Ctrl key
and click the desired embroideries. A selection box will be placed around each of the
selected embroideries. Alternatively, use one of the multiple select tools in the Box
Select drop-down toolbar, or Select All embroideries.
The selection area must include the complete embroidery, otherwise it will not be selected.
The selected designs are surrounded by a selection box with a dotted outline, and orange
handles. The faded outlines of the selection boxes for the included embroideries and
other designs can be seen within the larger selection. Lettering, frames, SuperDesigns and
decoration SuperDesigns retain their green handles, while Monograms retain their light
green handles.
If you click outside the selection box, the designs will become separate. Use Undo , or select them again
to recreate the multiple selection. To keep the selected embroideries together after saving, use Group.
Selection resize handle
Selection Rotate handle
Green handles for lettering
White handles for embroidery
Dotted outline for a selection

38 PREMIER+™ 2 Embroidery Adjusting Embroideries
Select Functions
Use Select All to select all of the embroideries in the work area.
Select All will select embroideries that are outside the chosen hoop.
Use Box Select to select embroideries in a rectangular area. Click and drag around the
area you want to select.
Use Freehand Select to select a block of embroideries within an area of any shape.
Click and drag to draw an irregular outline around the desired designs. When you release
the mouse the area is closed automatically.
Use Freehand Point Select to select a block of embroideries within an area of any
shape, defined by a series of points. Click a series of points to create an irregular outline of
straight or curved lines around the desired designs.
Use Select None to deselect all of the embroideries in the work area, including any
outside the hoop.
Use Replace Selection to replace the currently selected embroideries with the new
selection. Use Add to Selection to add the new selection to the currently selected
embroideries. Use Remove from Selection to remove the new selection from the
currently selected embroideries.
Group
Use Group to make a more permanent group of all the currently selected designs.
Group designs permanently, or make a temporary Group while moving or editing them.
Each design in the group in turn is placed after the one that is earliest in the stitchout
order (nearest the back of the project).
Modify a group in the same way as a selection. You can move, resize or scale it proportionally, or rotate it.
When a design including multiple subdesigns is loaded using Insert , all sections will be grouped
together, ready for moving, resizing and so on. If you use Open, it will match original groups exactly.
Group resize handle
Solid outline for a group
Group Rotate handle
White handles for embroidery
Green handles for lettering

PREMIER+™ 2 Embroidery Adjusting Embroideries 39
The grouped embroideries are surrounded by a selection box with a solid outline, and
orange handles. The faded outlines of the selection boxes and handles for the included
embroideries and other designs can be seen within the larger selection.
The group can be moved, resized or scaled proportionally or rotated. When a group is
enlarged or reduced, each item is resized or scaled according to its individual state. The
stitch count and thread colors for the complete selection can be seen in the Design Panel,
and the width and height of the selection box are displayed.
If you click outside the selection box, and then click one of the designs within the group, the designs will still
be grouped.
Ungroup
Use Ungroup to split the currently selected group into the designs which make it up.
Ungroup can only be used when a group is selected.
Restrict Groups
Use Restrict Groups on the Home tab or context menu to select and edit individual
designs within a group. The first design in the group is selected initially when Restrict
Groups is chosen. Click the desired embroidery, use the tab key or Next Design and
Previous Design to select.
The designs remain grouped, but they can be moved, rotated, mirrored and resized or scaled individually.
Christmas Greetings: Multiple Select and Group Designs
1 Click Change Hoop . From the Universal Hoop Group, set the Hoop Size
to 260mm x 200mm - Universal Large Hoop 3, Rotated orientation. Click OK.
2 Click File, New to open a new window.
3 In the Quick Access toolbar, click Insert .
4 In the folder Documents\Premier+2\Samples\Premier+Emb\Stitch2
\Holidays load the embroidery 'Gifts & Candy Canes'.
This is an embroidery; it has white handles showing that it is initially in Scale
rather than Resize mode.
5 Move the embroidery to the right side of the hoop.
6 Click the SuperDesign tab and select the Christmas Tree 1 SuperDesign in the
Holidays Category.
7 Set the Size of the SuperDesign to 90mm, then click Apply .
The SuperDesign has green handles. See “Creating SuperDesigns” on page 64.
8 Move the christmas tree SuperDesign to the left of the hoop, a little above the
gifts embroidery.
9 Click the Letter tab and enter the words "Merry Christmas" in the Letters box.
10 In the Font drop-down list select the font Ivy 2C 15-60mm in the Floral Category.
Ensure that the Lettering Shape is Horizontal Block, and the Size is 15mm.
11 Click Apply and move the lettering to the bottom of the screen, in the middle.
The lettering has green handles. For more about lettering see “Creating Lettering” on page 48.
12 Click the Frame tab.
13 In the Frames drop-down menu, select banner 3 in the Banners 2 category.
14 Ensure that Group is selected in Frame Surround.
The banner and lettering will be placed as a Group.
15 Ensure that the Merry Christmas lettering is selected, and click Apply . The banner is placed
around the lettering.

40 PREMIER+™ 2 Embroidery Adjusting Embroideries
16 Click the Decoration tab (available if you own PREMIER+™ 2 Embroidery Extra), then click Decoration
SuperDesign . (In PREMIER+™ 2 Embroidery, load a star SuperDesign and go to step 20.)
17 Browse to the folder DecorationDesigns\Miscellaneous, select the design Cross 2, and click Open to
load it into the work area. Close the File Viewer dialog box.
18 Right-click the decoration design and select Pearl Sequin Cup 4.0 mm in the Context menu.
19 In the Quick Colors, set the sequin color to white, then click OK.
20 Move the Decoration SuperDesign to the top center, to look like a star. It also has green handles.
For more about Decoration SuperDesigns, see “Decoration SuperDesign” on page 196.
21 Press the Tab key to see each design in turn.
Each is in a selection or group with a solid
outline and orange, green or white handles.
22 Click the Home tab.
23 Use Box Select to select all of the designs.
The selection box for the selected designs has a
dotted outline and orange handles.
The designs can be moved as a unit.
24 Click outside the hoop. The designs are separate
again.
25 In the ribbon bar, note that the Group and
Ungroup icons are not available.
26 Use Select All to select the designs again.
The Group icon is now available.
27 Click Group . The selection box for the group
has a solid outline.
The faded outlines and handles for the designs within the group can still be seen.
28 Click outside the group. None of the designs are selected.
29 Click the Christmas tree. The whole group is selected again, the Ungroup icon is available.
Groups are permanent until they are broken apart with Ungroup.
30 Click Restrict Groups . The Restrict Groups icon is highlighted.
You can now select and edit the designs within the group individually.
31 Click Restrict Groups again. The group is now a single unit, and the Restrict Groups icon is no
longer highlighted.
32 Click Ungroup . The designs that were in the group now form a selection.
33 Click and drag to move the selected designs. They move as a unit.
While the block is still selected you can reverse the effects of Ungroup by using either Group or Undo.
34 Click outside the selection box. The designs are now separate.
Use Ungroup to make major changes to a group, or to use the designs within the group separately.
Move
Move the selected embroidery(ies), group or selected block of stitches using
click and drag. Move the pointer over the selection box and it changes to the
four-headed arrow pointer . Click inside the selection box and drag it to
the required position.
When a block is moved on the Modify tab, any stitches which lead to or from
the block will be stretched to accommodate the new position of the stitches.
If you accidentally move the center of rotation, simply click and drag inside the selection
box again.
The selected embroidery(ies), group or block of stitches can be moved in small amounts
to nudge it accurately into the desired position. Use the arrow keys on the keyboard to
nudge an embroidery or block.

PREMIER+™ 2 Embroidery Adjusting Embroideries 41
When more than one embroidery is selected, all of the selected embroideries will be moved. If a group is
selected, the whole group will be moved unless Restrict Group is enabled.
You can also position embroideries automatically with Move into Hoop, Center in Hoop,
and the alignment tools. See “Alignment” on page 42.
Resize and Scale
Use Resize to switch between resize and scale for the selected embroidery(ies) or block
of stitches. Use resize to change the size of the embroidery and retain constant density.
Use scale to change the size of the embroidery and retain constant stitch count. The
handles on the embroidery selection show when resize or scale is selected.
The handles are blue if in resize mode (density retained when resized), and white in scale
mode (stitch count retained when resized).
Newly created or inserted non-.vp4 designs are initially in scale mode (white handles).
Move the pointer over one of the square corner handles and it becomes the diagonal
double-arrow pointer . Click and drag one of the handles to resize or scale.
Hold down Ctrl as you click and drag to resize or scale proportionally. Hold down Shift to resize or scale
from the center. If you resize a monogram created with the ExpressMonogram Wizard, it is fixed as stitches.
When a Decoration line or shape is enlarged, the number of decorations increases. It decreases as the line
or shape is made smaller. Decorations placed individually do not change in number.
In the Design Panel, the Height and Width boxes will show the new size of the
embroidery when you release the mouse button.
Rotation
Rotate the selected embroidery(ies), group or block of stitches to any degree using free
rotation, enter a specific angle using Modify Design , or rotate in 45 degree steps .
Free Rotation
Move the pointer over the rotation handle and it
changes to the rotate pointer . Click and drag the
rotation handle to rotate the embroidery freely to any
angle. If desired, move the center of rotation before
rotating the embroidery. The selection box around the
embroidery and the embroidery outline are rotated
around the center of rotation.
Blue handles for resize White handles for scale
Rotate Handle
Center of Rotation

42 PREMIER+™ 2 Embroidery Adjusting Embroideries
Rotate 45 Degrees
Use Rotate 45 to rotate the selected embroidery(ies) or group in 45 degree steps. If
desired, move the center of rotation before rotating.
Modify Design
Use Modify Design to open the Modify Design dialog,
where you can show and change the size and rotation of the
currently selected embroidery(ies) or group.
Use the Modify Design dialog box to show and change the
size and rotation of the selected embroidery(ies) or group.
Whenever you resize or rotate, it is from the original settings.
Designs within multiple selections or groups (shown with orange
handles) are always scaled or resized proportionally. If you resize a
monogram from the ExpressMonogram Wizard, it is fixed as stitches.
When a Decoration line or shape is enlarged, the number of decorations
increases.
Flip Vertical and Horizontal
Mirror the selected embroidery or block of stitches
vertically or horizontally using the flip handles on the
selection box.
There are no flip handles for multiple selections or groups; if
desired, use Combine in order to mirror. There are no flip
handles for Monograms; if desired fix as embroidery, then
mirror.
Move the pointer over the Flip Horizontal handle
and it becomes the horizontal double-arrow
pointer . Click the Flip Horizontal handle to mirror an embroidery or selected block
horizontally. Move the pointer over the Flip Vertical handle and it becomes the vertical
double-arrow pointer . Click the Flip Vertical handle to mirror an embroidery or
selected block vertically.
Alignment
The alignment features are found in the Alignment drop-down list.
Use Center In Hoop to move the selected embroidery(ies) or group to the center of the
hoop. To move individual embroideries in a group to the center, use Restrict Groups.
Use Move Into Hoop to move the selected embroideries and groups into the closest
area of the hoop.
Only the selected embroideries that are outside the hoop will be moved.
The Alignment tools allow embroideries and groups to be aligned precisely.
The Alignment tools are only available when more than one embroidery or group is selected. See “Multiple
Select Features” on page 37.
Flip Vertical Handle
Flip Horizontal Handle

PREMIER+™ 2 Embroidery Adjusting Embroideries 43
Horizontal Alignment
Vertical Alignment
Layout Order
The Layout Order commands on the Home tab: Move Forwards , Move Backwards ,
Move to Front and Move to Back , are used to move embroideries and groups
within the design. Embroideries at the ’back’ of the design will be stitched out first.
Undo and Redo
Use Undo to reverse the last action. If you are not satisfied with the result, click Redo.
When you use Undo while on the Modify tab, all stitches in the embroidery being edited are displayed and
the selected block is deselected.
Use Redo to reverse the last action that was undone by Undo. If you are not satisfied
with the result, click Undo.
Undo and Redo steps are only lost when you use New .
Combine and Fix as Stitches
The Combine functions are useful if you are sure you will never need to adjust subdesigns
again, or to enable mirroring of a selection or group of embroideries. Otherwise, it is
usually recommended to use the Combine Options when you Export your project.
Use Combine All to merge all the embroideries on the work area into a single
embroidery, and fix lettering, SuperDesigns and Frames as stitches. Use Combine
Selected to merge the selected embroideries into a single embroidery and fix
lettering, SuperDesigns and Frames as stitches.
Use Fix as Stitches to fix the selected subdesign or subdesigns as embroidery.
Lettering, SuperDesigns, frames and Monograms are automatically fixed as embroidery if
you adjust them in the Modify tab in PREMIER+™ 2 Embroidery Extra. A warning is given.
You may occasionally wish to fix designs; for example, to mirror some lettering shapes, a selection or
group, or resize or scale it without constant properties. It may also be useful if you wish to adjust the
rotation of the Appliqué Fabric in a SuperDesign.
Align Left
Align Center
(Center Horizontally)
Align Right Distribute
Horizontally
Align all selected
embroideries with the
left edge of the design
furthest to the left.
Center all selected
embroideries
horizontally relative to
each other.
Align all selected
embroideries with the
right edge of the design
furthest to the right.
Align all selected
embroideries to be
equally spaced
horizontally.
Align Top Align Middle
(Center Vertically)
Align Bottom Distribute
Vertically
Align all selected
embroideries with the
top edge of the highest
design.
Center all selected
embroideries
vertically relative to
each other.
Align all selected
embroideries with the
bottom edge of the
lowest design.
Align all selected
embroideries to be
equally spaced
vertically.

PREMIER+™ 2 Embroidery Encore and Endless 44
11
Encore and Endless
Encore
Use the Encore tab features to place repeated copies of embroideries in a line, a circle or a
shape, or around the edge of the hoop.
Choose the number of repeats, or the margin and gap, and the number of embroideries
used. Set the position to standard or mirrored. Click Preview to see the Encore, and
Apply to place the repeated embroidery in the work area according to the chosen
Finalizing options.
Use any number of embroideries with a line or circle, but only one or two embroideries with a shape or a
hoop. To use more embroideries, you may Group them before choosing Encore.
With Line and Circle you can choose the number of Repeats. For Shape and Hoop the number of repeats is
set by the size of the embroidery, the Gap and the Margin.
Repeat an Embroidery with Encore
1 Place a small embroidery on the work area and select it.
2 Click the Encore tab.
3 Select an Encore type (circle , line , shape or
hoop ) and Position (standard or mirrored ), and
any other options for that Encore type.
A preview image illustrates the chosen layout.
4 Set the number of Repeats, or the Gap.
5 Click Preview to view the repeated designs in the work
area.
While in Preview mode it is not possible to select any other
function in the Quick Access toolbar. If you click another tab,
the Encore will be cancelled.
6 Adjust the Encore line or shape on the work area.
Alternatively, adjust the settings on the Encore tab and
click Preview again.
Drag inside the Encore shape to resize, drag the handle to reshape, e.g. to change a circle into an ellipse.
7 If desired, select Group and (if designs overlap) Arrange Similar.
8 Click Apply to place the repeated designs as an embroidery with the chosen finalizing options.
In Encore the designs are repeated in order of their stitching out, from back to front. For Encore Shape or
Hoop the embroidery that is first in the stitchout order will be placed in the corners. To change the order
use the Layout Order commands.
Encore repeats an embroidery clockwise for Circle, Shape and Hoop, and from left to right for Line. If you
combine multiple designs before using Encore, try to work from left to right.
Select an Encore type: circle, shape, line or hoop
Select a Position: Standard or Mirrored
Layout indicator
Choose a line type Choose a shape Set the inner hoop margin
Set the gap or number of copies
Optimize the Encore
Preview the Encore
Cancel the Encore
Create the repeated embroidery
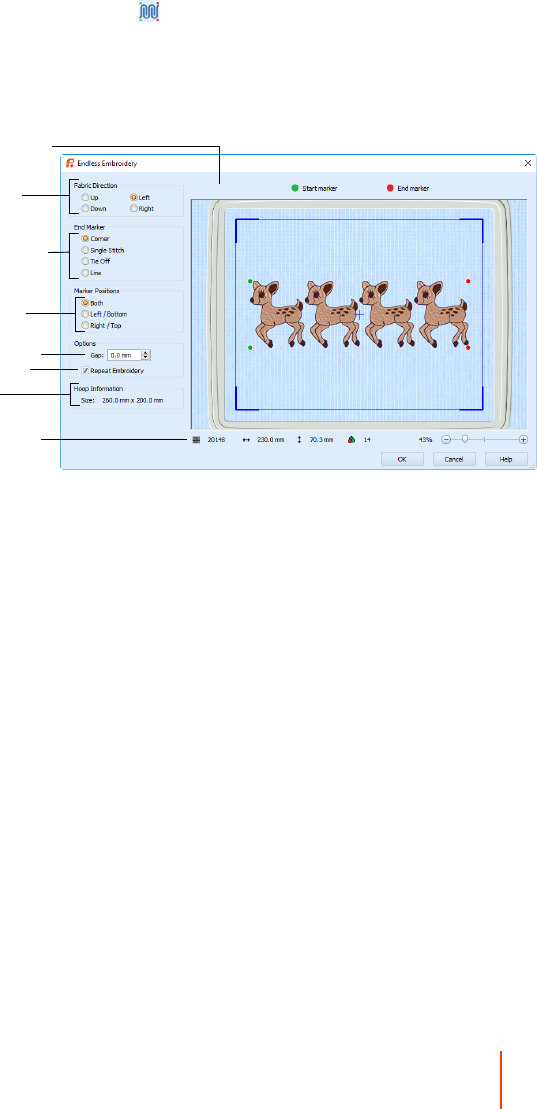
PREMIER+™ 2 Embroidery Encore and Endless 45
Endless Embroidery
Use the Endless Embroidery wizard to add markers (alignment stitches) to an
embroidery so it can be stitched out in a continuous, regularly spaced, sequence as many
times as desired. After each stitchout, the fabric is re-hooped and the markers are used to
align the new stitchout to the previous stitchout. Hence, the embroidery can be stitched
out as a single, endless embroidery in a band.
If there is more than one embroidery on the screen, the embroideries are grouped
automatically when the Endless Embroidery wizard is started.
When the settings are changed, the preview is updated automatically.
The Endless Embroidery settings are reset to their defaults when PREMIER+™ 2 Embroidery is closed.
Adjusting an Endless Embroidery
An endless embroidery is a grouped embroidery with start and end markers (alignment
stitches). After creating an endless embroidery, save it as a .vp4 file to preserve the
grouping of designs with alignment stitches.
To reload an Endless embroidery in the Endless Wizard, open it in PREMIER+™ 2
Embroidery and click the Endless tab. The Endless embroidery will be opened, and the
alignment stitches will be removed. Adjust it as desired, for example change the End
Marker type, then close it again and save it.
When you are ready to embroider your project, export it with the desired settings to
optimize for sewing such as Combine, Remove Overlap and ColorSort.
Fabric Direction
This is the direction the fabric will be moved in the hoop for each repeat. This is according
to the size and orientation of the hoop as it is shown in the Preview area. The Fabric
Direction affects which sides of the embroidery will be the Start and End, so that the Start
marker is always on the side of the embroidery that matches the Fabric Direction. Hence,
the Start Marker 'points' in the direction the fabric will be moved.
Set the direction of the
fabric movement
Update the preview pane
Select an end marker to
align the stitchouts
Select the number and
position of markers
Space between designs
Repeat design in hoop
Hoop information
Information & zoom bar

PREMIER+™ 2 Embroidery ExpressMonogram Wizard 46
12
ExpressMonogram Wizard
Use the ExpressMonogram Wizard to create a monogram of up to three letters.
Select a font style, thread color, shape and
size. Surround the monogram with a
border. Alternatively, create a monogram
with no border, then add a Frame or
Flourish using the Frame tab, or a motif
underline using the Border tab.
On the work area, use Save or Save As to save the
monogram in a .vp4 file for later use.
Unless the monogram has been fixed as
Embroidery Stitches, right-click at any
time and choose Properties from the
Context menu to return to the
ExpressMonogram Wizard for
adjustments.
If you resize the monogram it will be fixed as a group of embroideries.
Adjusting Monograms
When a monogram is placed on the work area it has pale green
handles. These indicate that it can still be adjusted in the
ExpressMonogram Wizard.
To open a monogram in the ExpressMonogram Wizard, right-
click it and select Properties in the Context menu.
A monogram can be saved, rotated and copied in its original
form. However if it is resized, it will be fixed as a group of
embroideries, and the lettering properties cannot be changed.
A monogram saved as part of a group can be selected using Restrict Groups and reopened in the
ExpressMonogram Wizard. When a monogram is exported it is fixed as stitches and uses the Combine and
ColorSort settings in the Export dialog box.
Create a Monogram with a Border
1 Click New , then click the Hoop icon in the Quick Access toolbar.
From the Universal Hoop Group, set the Hoop Size to100mm x 100mm -
Universal Square Hoop 1. Click OK.
2 In the Wizards tab, click ExpressMonogram . The Monogram page of
the ExpressMonogram Wizard will appear.
3 In the gallery at the top left, select the Small - Full - Small layout. This will
produce a monogram with characters sized proportionally: small, full,
small (SFS).
The Monogram fonts are recommended for use with the Classic envelopes
that use SFS (small, full, small characters).
4 Enter the letters ’E’, ’S’ and ’J’ in boxes A, B and C.

PREMIER+™ 2 Embroidery ExpressMonogram Wizard 47
5 In the Envelopes gallery, select the second
envelope in the Classic 1 category. Its name is
SFS_Classic02.
If you position the arrow pointer over a thumbnail
without clicking, the name of the envelope will be
shown.
In this envelope the small characters are relatively
larger than those in the envelope to the left,
proportions which are well suited to the curly
initials to be used.
6 Click Next , or click the Full Letter tab. The
Full Letter page will appear.
7 Click to open the Font gallery at the top left.
8 Click and drag the scroll bar on the side of the
font list to see all the fonts in the Monogram
category.
9 Click to select the font Curly UC 15-30mm.
10 Leave the font size at 23mm.
The initial size of a font is in the middle of the recommended font size range. If you have a desired final size
you may need to alter the font size.
Notice the Height and Width measurements at the bottom of the window have changed. Use these
as a guide to the size of your final monogram as you try different options.
11 Move the arrow pointer over the pink thread in the Thread Colors box. A popup description appears.
12 Click the pink thread color, and in the Thread Range drop-down list select Robison-Anton Rayon 40.
The thread will change to Floral Pink, number 2415. Click OK.
This only affects the letter S as it is the only ’Full’ letter.
13 Click Next , or click the Small Letter tab, and the Small Letter page will appear.
14 Ensure that ’Alternative style’ is selected.
If Alternative style is not selected, the same font will be used for small letters as for the full letters.
15 In the Font gallery, select Curly UC 15-30mm in the Monogram category for the small letters.
Notice the Height measurement at the top of the window has changed. This is the height of the letter ’A’
for the small letter font. It should be within the recommended size range for the font (as mentioned in the
font name). If the height is outside the recommended range, you may need to return to the Monogram
page and change the envelope, or use the Full Letter page to change the full letter size.
16 Click the pink color and the Color Selection dialog box appears.
17 In the Thread Range drop-down list select Robison-Anton Rayon 40.
18 Click pale pink in the Quick Colors and 2501 (Petal Pink) will be selected.
19 Click OK. The smaller letters are now a pale pink.
20 Click Next , or click the Border tab, and the Border page will appear.
The default border is a green satin line. You can use a Motif Line , a Satin Line , a
Running Stitch line a or Triple Stitch line.
21 Select Motif Line . The solid green border is replaced by a line of stars.
22 Select Satin Line and the satin stitches appear again.
23 Click the Thread Color icon to display the Color Selection dialog box.
24 Ensure that ’Robison-Anton Rayon 40’ is selected.
25 Click pale pink in the Quick Colors and 2501 (Petal Pink) will be selected.
26 Click OK to close the Color Selection box. The monogram border is now pink.
27 For a traditional monogram effect, the letters may interlock. In the Full Letter page, set Spacing 1 to -3
mm, and set Spacing 2 to -4 mm.
The new positions of the letters can be seen in the Preview pane below. The border adjusts to fit.
28 Click Finish to close the wizard. The monogram is then displayed in the work area.
When you reopen this .vp4 file, right-click the monogram and select Properties in the Context menu to
open the ExpressMonogram Wizard. When a monogram is exported it is fixed as an embroidery, and can
no longer be adjusted in the ExpressMonogram Wizard.

48 PREMIER+™ 2 Embroidery Creating Lettering
13
Creating Lettering
You can create lettering to personalize your embroidery project using single or multicolor
fonts (lettering styles) and fonts of special characters in the Letter tab.
Choose the font, line format, size, stitch type and thread color. Display the lettering as if
ColorSorted, or vary the colors of some characters. Place lettering around your
embroidery, or anywhere on the work area. Lettering can be altered, including the font,
resized with constant stitch density, and the stitch properties adjusted, even after saving
until it is fixed as embroidery.
Font means lettering style. The current font and the category where it is stored are shown in the Font
section of the Letter tab.
Lettering is created using the settings on the Letter tab from the fonts available in
PREMIER+™ 2 Embroidery. Alternatively use the ExpressMonogram Wizard .
Use Font Manager to search for fonts by name or size, and to create, rename, duplicate
and delete user generated fonts. Use the QuickFont Wizard to create new fonts for
PREMIER+™ 2 Embroidery from any TrueType® or OpenType® font on your computer.
Import embroidered letters to create a font with Import Font From Embroideries .
Additional fonts may be created using the optional PREMIER+™ 2 Font Create module.
When first starting PREMIER+™ 2 Embroidery, Georgia 20-40mm in the Traditional category is selected. If
you have used the Letter tab previously, the last font is remembered.
If you own PREMIER+™ 2 Embroidery or PREMIER+™ 2 Embroidery Extra, not all fonts are available.
Create Lettering
1 Click File, Preferences and ensure Check Spelling is selected and the language is set to English US.
2 Click the Letter tab.
3 Click the arrow to the right of the font, and
the font gallery appears.
4 Scroll up or down to select a font from one
of the font categories.
Alternatively, use the up and down arrows
on the Font section of the Letter tab to see
fonts one at a time.
5 Set the Size in millimeters as desired, from
3mm to 200mm.
This sets the height of the 'A' character in the
font. Other characters and symbols are sized
accordingly.
Choose a font
Manage, create & delete fonts
Enter some text
Place the lettering in the work areaSet the font size & layout
Choose a Shape for your lettering
Set the connection type
Set the stitch type options
Set alignment
and spacing
Minimize the number of colors

PREMIER+™ 2 Embroidery Creating Lettering 49
6 Click in the Letters text box and the pointer changes to the I-bar pointer.
If needed, click and drag to highlight any existing text and overwrite it.
7 Enter your desired text, pressing Enter to create more than one line of text.
Right–click to view alternatives for words underlined in red by the spelling checker.
Some Lettering Shapes can only use one line of text. See “Lettering Shapes” on page 51.
8 Adjust Gap to change the spacing between the letters. Click the arrows, or enter a value.
Negative values move letters closer together, and positive values move them farther apart.
9 Click the arrows for percent Width and Height to change the proportions of the lettering from
25% to 400%. Alternatively, enter a size in the number box.
10 Choose a Lettering Shape.
You can reverse the order of letters, position (or kern) letters individually, or use Step to rotate the
letters at a different angle from the line.
11 Select Trim or Running Stitch as the connection method.
Use Running Stitch connection for small single-color lettering with Nearest Point fonts.
12 Ensure that ColorSort is selected, to display the lettering as if ColorSorted, with the minimum number
of color blocks.
Only deselect ColorSort if you want to change the color for some letters.
13 Choose a line or fill type from the Stitch Type drop-down menu, and the properties dialog box for
the stitch type opens. See “Choosing Stitch Properties” on page 72.
14 Change the stitch properties for the lettering in the properties dialog box, for example the density,
pattern, angle or stitch length. Click OK to close the dialog.
15 Select the alignment of the line of lettering. Click Left , Center or Right , as desired.
16 Click the arrows for Line Spacing to set the distance between multiple lines of text.
Alternatively, enter a size in the number box.
17 Click Apply . The lettering appears in the work area, leaving any existing lettering unchanged.
New lettering is added to the work area each time you click Apply. Any previous lettering is left unchanged.
The circular Lettering Shapes are centered around the selected embroidery(ies) or group when they are
added to the work area. Other Lettering Shapes are placed below the selected embroidery(ies) or group.
18 Right–click the lettering and choose Properties to adjust the lettering properties.
19 Drag the handles on the lettering to resize the lettering, or adjust the proportions for the lettering.
Hold the Ctrl key for most lettering shapes to keep the proportions as you resize. Hold the Shift key
for most lettering shapes to resize from the center. See “Lettering Shapes” on page 51.
Alternatively, use the ExpressMonogram Wizard to create a one, two or three letter monogram, and
add a border automatically.
Searching for Lettering
1 Click File, Preferences and ensure Check
Spelling is selected and the language is set
to English US.
2 Click the Letter tab.
3 Click Font Manager .
4 To search for a font by name, at the bottom
of the Font Manager dialog in the Search
box, enter the name of the font that you
want to find.
Part of the name will narrow the list of fonts
displayed, so a search for ’Athletic’ will display
fonts from the Applique, Foam, Fun and
Monogram Categories.
5 Click Clear to remove the text from the
search box.
6 To search for a font by size, select (check) the
Size checkbox to enable searching by size.
7 Enter the desired Size for the font in the Size number box.

50 PREMIER+™ 2 Embroidery Creating Lettering
8 To choose a size range, adjust the number in the Range box. The list of displayed fonts will change.
For example, set Size to 5mm, and the Range to 5mm, to select a small font for a quilt label. You could also
set an exact size (Range 0mm) to find an imported external font.
Font Category and Name
Click the drop-down arrow on the right of the font gallery and scroll through the list of
fonts by category. There are 18 themed font categories, in addition to My Fonts: Font
names include information in addition to the name of the lettering style. All font names
include the recommended size range, and other information is often included.
If there is more than one stitch area of a particular type in the font, the drop-down menu
will show that stitch type in a numbered list; for example, Pattern Fill 1, Pattern Fill 2.
If the Stitch Type area is grayed out (unavailable), this means that the font was designed with properties
that cannot be edited. This occurs with Foam fonts, that have special settings to ensure the embroidery
foam is cut. It also occurs with a few very complex fonts that have many different fill patterns in different
letters, or multigradient and multicolor fills, such as Acorn 6C UC 35-60mm in the Floral category.
Appliqué, Effects and Foam Fonts
For appliqué fonts, SuperDesigns and Frames, the fabric can be changed as well as some
of the border settings. For example, in Stitch Type select Appliqué Fabric, and in the
Appliqué Selection dialog change the fabric, angle and margin. The appliqué placement
stitching cannot be edited, but the position of the placement line may be adjusted to
match the appliqué piece margin.
For Foam fonts and frames, only the color can be changed. The Stitch Type area is
unavailable, and no properties can be selected in the Context menu. Special instructions
are displayed for stitching out appliqué or foam fonts in the Design Player.
For Effects such as Felting Needle, Twin Needle and Wing Needle you can change the
stitch properties in Stitch Type or in the Context menu after creation.
For information on stitching out, see the PREMIER+™ 2 Embroidery Reference Guide and Help.
Check Your Spelling
1 Click File, Preferences and ensure Check Spelling is selected and the language is set to English US.
2 Click the Letter tab.
3 Click in the Letters text box and enter the words "Roses are red, vilets are blue". The word "vilets" is
underlined in red.
4 Right–click to select the word. A Context menu appears.
5 Click Suggestions. A list of suggested alternatives appears.
6 Choose the word "violets" from the Context menu. The word is replaced in the Letters text box.
You can also use Add in the Context menu to add words to the dictionary, for example your name, or
use Ignore to ignore the suggestion, and Undo if you chose the wrong suggestion.
Alternative Alphabets
To enter characters in other alphabets from the National font category, such as Greek and
Hebrew, refer to the Character Sets section in the PREMIER+™ 2 Embroidery Reference
Guide or help for the keys used.

PREMIER+™ 2 Embroidery Creating Lettering 51
Lettering Shapes
There are three categories of lettering shapes: Block, Line and Vertical Block.
Block
Starting from a template, mould the block of letters as desired. See “Block” on page 53.
Line
Place letters along a straight, curved or wavy line. See “Line” on page 51.
Vertical Block
Place lettering in a straight vertical line. See “Vertical Block” on page 52.
Using Lettering Shapes
If you have used the Letter tab previously in that session of PREMIER+™ 2 Embroidery, the
last setting is remembered. You can adjust lettering with the handles (green squares) until
it is fixed as stitches, for example when it is Combined.
Reverse: When the Reverse checkbox is selected, the lettering is mirrored. Reverse is
available for all lettering shapes.
Monograms created with the ExpressMonogram Wizard have light green handles; select Properties from
the Context menu to adjust the Monogram settings. See “ExpressMonogram Wizard” on page 46.
Line
Place letters along a straight, curved or wavy line. Use the handles to adjust the position of
the lettters and the shape of the line.
• You cannot resize these lettering shapes with the handles. Right-click to open the Letter
Properties dialog box, and use the Size and/or the Height and Width settings.
• Flip handles are not available. To mirror, fix the lettering as stitches first.
• These lettering shapes can only use one line of text, or two for Full Circle. Additional
lines are combined with the first line, or the second line for Full Circle.
Circle Shapes
Place characters along a curved line. Circle lettering shapes always use Center alignment.
Circle
Clockwise
Use Circle Clockwise to place lettering clockwise
around a circle. Click and drag the square green handle
to adjust the radius of the circle and the position of the
lettering. Multiple lines of text are placed in the same
line. Hold down Ctrl, then click and drag the handle to
move the lettering around the circle without changing
the size of the circle.
Circle Counter-
Clockwise
Use Circle Counter-Clockwise to place lettering
counter-clockwise around a circle. Click and drag the
square green handle to adjust the radius of the circle
and the position of the lettering. Hold down Ctrl, then
click and drag the handle to move the lettering around
the circle without changing the size of the circle.

52 PREMIER+™ 2 Embroidery Creating Lettering
• Rotate handles are not available for the Circle lettering shapes. To rotate, fix the lettering
as stitches first.
Fit to Straight and Wavy Lines
Use these line types to place lettering along a straight or wavy line.
Step: When the Step checkbox is selected, the letters can be rotated to any angle. Step is
available for Fit to Straight Line and Fit to Wavy Line.
Full Circle
Use Full Circle to place two sections of text on
opposite sides of a circle. When entering characters in the
Letters box, press Enter to make a new line. When the
lettering is initially placed, the text on the first line is at the
top of the circle and the text on the second line is at the
bottom. There will be two square green handles. Click and
drag either handle to adjust the radius of the circle. Hold
down Ctrl, then click and drag either handle to move the
attached lettering around the circle without changing the size of the circle.
Fit To Straight
Line
Use Fit To Straight Line to
place lettering along a line.
Click and drag the square
green end handles to rotate
the line to any angle and to extend the line. Click and drag the round green
handle to move the text along the line.
The text may also be rotated
independently of the position of
the line. Select the Step option,
then click Apply . There will be
an additional round green handle
at the end of another line. Click
and drag this handle to rotate the
letters to any angle.
Fit To Wavy Line
Use Fit To Wavy Line to place
lettering along a curved line. Click and
drag the square green handles to
change the curve to any shape. Click
and drag the round green handle to move the text along the line.
The text may also be rotated independently of the position of the line. Select the
Step option, then click Apply . There is an additional round green handle at the
end of another line. Click and drag this handle to rotate the letters to any angle.
Vertical Block
Use Vertical Block to place lettering in a straight vertical line with an
outline box that has four square green handles. Click and drag the
handles to resize the lettering.
Hold down Ctrl as you click and drag to resize proportionally, and Shift to
resize from the center.
Lettering is created with Center alignment by default. For Vertical Block,
this changes the alignment of characters in each column of lettering.

PREMIER+™ 2 Embroidery Creating Lettering 53
Block
There are 29 Block templates available. Any Block type can be changed into any other
Block type using the Handles menu, by adjusting the Top and Bottom line types, and by
setting different Constraints.
Individual: When the Individual checkbox is selected, the letters can be moved and
resized individually. Individual is available for all block types. Only one line of lettering can
be made when Individual is selected.
Handles Menu
Use the Handles menu to adjust the settings for the selected block of lettering. Click the
Handles menu icon and change the block settings.
Change Template Settings in the Block Menu
1 Enter the text "Jonathan" in the Letter window. See “Create
Lettering” on page 48.
2 In the Lettering Shape area, click Arch Over , then click
Apply . The lettering appears in the work area.
The top and bottom lines of the lettering use the Arch line type,
with a single handle in the middle.
3 Click and drag the lettering to the top of the work area.
4 Click and drag the two middle handles (top and bottom) upwards,
to raise the height of the arch.
5 Click the Handles menu icon, and the handles menu opens.
Note that the line type for the top line is Arch .
6 Click to deselect Match Top and Bottom Lines , then click to
open the Bottom Line Type submenu. The line type for the bottom
line is also Arch .
7 In the submenu, change the bottom line to Straight .
The bottom of the lettering is now a straight line with a handle at
each end.
8 Open the Handles menu again, and change the top line to
Diamond .
The top line forms a point, instead of a curve. The Double
Diamond option forms a straight line with two peaks.
9 Open the Handles menu again, and change the top line to
Curve . The top line now has a curve with two handles.
10 Move the two middle handles on the top line separately.
11 Open the Handles menu again, and select Add 3 points to
curve . Three more handles are added to the top of the block.
The add and remove points options are only available when the line
type is a Curve.
12 Adjust the top line as desired.
While you can adjust the top and bottom as desired, the sides are still parallel straight lines, and if you
move the handle at the top of one side, the handle at the top of the other side moves with it. This is
Constraint - Size .
If you hold the Ctrl key while dragging, the proportions of the shape are locked. With Shift the shape is
resized from the center.
13 In the Handles menu, select Constraint - Pennant .
14 Click and drag the handle at the top right upwards. The handle
below it moves in the opposite direction.
With a rectangular block, this would create a shape like a
pennant.

54 PREMIER+™ 2 Embroidery Creating Lettering
Hold down the Ctrl key to create a skewed rectangle effect.
15 In the Handles menu, select Constraint - Perspective .
16 Click and drag the handle at the top right to the left. The lines on the side of the block now form a
slope.
17 In the Handles menu, select Constraint - Free . You can now move any of the corner handles in any
direction you like.
Note that you can only drag the middle handles in the curve up and down.
18 In the Handles menu, deselect Force Even Distribution .
19 Drag one of the middle handles on the curve sideways. The letters move with the handle.
The functions in the Handles menu enable you to sculpt a block of lettering into almost any shape
you like.
Top and Bottom Line Types
Select a line type for the top and bottom of the block to choose how the lettering is
displayed.
Use the Add and Remove points functions to change the number of points in a Curve. The
points are added or removed at the right end of the curve. The minimum number of
points in a Curve is four. Add a point to curve adds a single point, Add 3 points to
curve adds three points, and Remove a point from curve deletes a single point.
Use Match Top and Bottom Lines to use the same line type for the top and bottom.
Straight
Use Straight to create a lettering block
with a straight line for the top and / or
bottom, and with a handle at each end.
Diamond
Use Diamond (top) and (bottom) to create a
lettering block with a point at the top and / or
bottom. Click and drag the central handle to
change the angle of the slope.
Double
Diamond
Use Double Diamond (top) and (bottom) to create a
lettering block with straight lines between the four handles
at the top and / or bottom. Click and drag the central
handles to change the angle of the straight lines.
Arch
Use Arch (top) and (bottom) to create a lettering
block with a curve at the top and / or bottom. Click and
drag the central handle to change the angle of the curve.
Curve
Use Curve (top) and (bottom) to create a
lettering block with curved lines between the four
handles at the top and / or bottom. Click and drag
the central handles to change the curves.
You can add and remove extra points (handles).

PREMIER+™ 2 Embroidery Creating Lettering 55
Constraints
Constraints affect how the corner handles on a block behave.
Size
When Constraint - Size is used, the two corners adjacent to the corner that is
dragged move the same distance, in the same direction. The corner diagonally
opposite does not move. The handles on the straight or curved lines between the
corners move in proportion. This preserves the shape of the block.
Use Ctrl while dragging to lock proportions, and Shift to resize from the center.
Pennant
When Constraint - Pennant is used, the corner above or below the corner that is
dragged moves the same distance towards or away from the dragged corner
vertically. The other two corners do not move. This forms a pennant shape.
Hold down the Ctrl key to give a vertical skew to the lettering.
Perspective
When Constraint - Perspective is used, the corner to the right or left of the corner
that is dragged moves the same distance towards or away from the dragged corner
horizontally. The other two corners do not move. This gives a perspective effect.
If you hold the Ctrl key while dragging, the two handles move together as with Italic.
Italic
When Constraint - Italic is used, the corner to the right or left of the corner that is
dragged moves the same distance, in the same direction. The other two corners do
not move. This gives an italic look to the lettering.
If you hold the Ctrl key while dragging, the two handles move separately as with
Perspective.
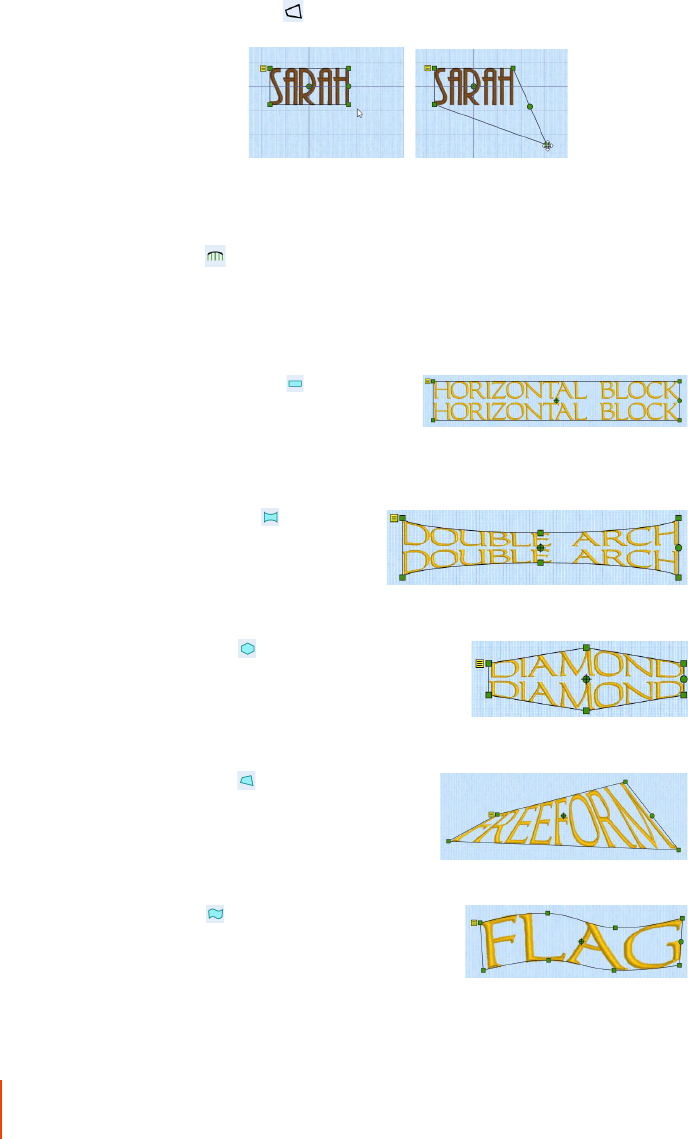
56 PREMIER+™ 2 Embroidery Creating Lettering
Force Even Distribution
Force Even Distribution distributes the handles between the two corners evenly.
Force Even Distribution affects both the top and bottom of the block.
Block Templates
This is a selection of the 29 templates for use with lettering.
Free
When Constraint - Free is used, the corner handles can be dragged in any
direction.
If you hold the Ctrl key while dragging, the proportions of the shape are locked. With Shift
the shape is resized from the center.
Horizontal
Block
Use Horizontal Block to place
lettering in a straight line with an outline
box that has four square green handles.
Click and drag the handles to resize the lettering.
Hold down Ctrl as you drag to resize proportionally, and Shift to resize from the center.
Template Settings: Straight, Straight; Constraint - Size, Force Even Distribution
Double Arch
Use Double Arch to place
lettering in an envelope with an
inwardly curving top and base.
There are six square green handles.
Click and drag the handles to resize the lettering and the curvature of the arches.
Template Settings: Arch, Arch; Constraint - Size, Force Even Distribution
Diamond
Use Diamond to place lettering in a diamond
envelope. Click and drag the handles to resize
the lettering and the distance between vertical
pairs of handles.
Template Settings: Diamond, Diamond; Constraint - Pennant, Force Even
Distribution
Freeform
Use Freeform to place lettering in a fully
adjustable straight envelope. There will be
4 square green handles. Click and drag the
handles to resize the lettering and change
the shape as desired.
Template Settings: Straight, Straight; Constraint - Free
Flag
Use Flag to place lettering in a curving
envelope. There will be eight square green
handles. Click and drag the handles to resize
the lettering and change the shape.
Template Settings: Curve, Reflect Top and
Bottom Lines; Constraint - Perspective, Force Even Distribution

PREMIER+™ 2 Embroidery Creating Lettering 57
Free Sculpt
Use Free Sculpt to place
lettering in a fully adjustable
curved envelope. There will be 14
square green handles. Click and
drag the handles to resize the
lettering and change the shape.
Template Settings: Curve, Curve; Constraint - Free
Pennant Right
Use Pennant Right to place lettering
in an envelope that is larger on the right
side. There will be four square green
handles. Click and drag the handles to
change the size of each end of the
pennant. Hold down Ctrl, then click and drag the handles to move one end of the
pennant up or down.
When the Individual checkbox is selected, each letter is
created in a pennant-shaped envelope and can be
moved and resized individually.
Template Settings: Straight, Straight; Constraint -
Pennant, Force Even Distribution
Bridge
Concave Down
Use Bridge Concave Down to place lettering
in an envelope with a flat top and an inwardly
curving base. There will be five square green
handles. Click and drag the handles to resize the
lettering and the curvature of the base.
Template Settings: Straight, Arch; Constraint - Perspective, Force Even Distribution
Zigzag
Use Zigzag to place lettering in an angled line
envelope. There will be eight square green
handles. Click and drag the handles to resize the
lettering and the angle of the sides.
Template Settings: Double Diamond, Reflect Top
and Bottom Lines; Constraint - Italic
Gem
Use Gem to place lettering in an envelope with seven
square green handles. Click and drag the handles to resize the
lettering.
Template Settings: Double Diamond, Diamond; Constraint -
Perspective, Force Even Distribution
Ramp
Use Ramp to place lettering in an envelope with
a curved top, a straight base, and sloping sides.
There will be six square green handles. Click and
drag the handles to resize the lettering and change
the angle of the sides and top.
Template Settings: Curve, Straight; Constraint - Italic
Rocket
Use Rocket to place lettering in an envelope with
a peaked top and an arched base. There will be six
square green handles. Click and drag the handles to
resize and reshape the lettering.
Template Settings: Diamond, Arch; Constraint -
Perspective

58 PREMIER+™ 2 Embroidery Creating Lettering
Letter Properties
Use the Letter Properties dialog to alter the font, text, proportions, connection, shape and
line formatting when editing lettering. Use Letter Properties to change lettering after it
has been placed, but before it has been fixed as an embroidery.
Lettering Color
When ColorSort is selected, the lettering is displayed with one color block for a single
color in the lettering. For single-color fonts, this will be one color, for multicolor fonts this
will be as many colors as there are in the font. ColorSort is selected by default, but is not
available if Individual lettering is selected, as each character is created separately.
If ColorSort is not selected, each character in the lettering for a single-color font is
displayed as a separate color block. For multicolor fonts, each character will have its own
sequence of color blocks. This allows you to use different colors for some characters in a
piece of lettering.
If Running Stitch Connection is selected, lettering is created as a single design and uses a single color block.
Fixing Lettering as an Embroidery
Lettering is fixed as an embroidery when the Modify tab is selected, when it is ColorSorted
using the Export functions, when it is fixed using Fix as Stitches in the Home tab or
Context menu, or when it is Combined with another design. The stitches are then created,
and any further resizing of the embroidery may affect stitch density and length. The font
and text, and stitch properties, for example the density, pattern, angle or stitch length,
may not be changed after it is fixed. Appliqué fabric cannot be changed in the Context
menu after the lettering is fixed, but if PREMIER+™ 2 Embroidery Extra is owned you may
use the Select Appliqué features on the Appliqué tab.
Change the lettering text. Use Ctrl+Enter to add a line.
Change the font size
Change the height and width proportions of the lettering
Change the spacing between the letters
Select a connection method
Set alignment and spacing
Preview the font
Select a font
Minimize the number of colors in the lettering
Choose another lettering shape
Reverse or rotate the letters in the line

PREMIER+™ 2 Embroidery Creating Lettering 59
Font Manager
Use Font Manager to search for fonts and to arrange, rename, create, duplicate and
delete user fonts.
Use PREMIER+™ 2 Font Create to edit one of your fonts.
When a system font is selected, only the search functions are available in Font Manager.
Font Search
Use Font Search to search for a font by name or size.
Use the Name text box to change the name of the selected user font. Edit the font name in
the text box, then click Apply to save your changes.
Remember to preserve the size range information when changing the name. The recommended size can
only be changed in PREMIER+™ 2 Font Create. Changing the name does not change the size range.
Use Category to select a different Category for the font, or enter the name for a new font
Category. Use Duplicate to create a copy of the selected user font. Use Delete to remove
the selected user font from your computer.
If you delete a font that you used in an embroidery, the lettering will be fixed as an embroidery, and will no
longer be available for editing when you open the embroidery again.
Make a backup of your fonts before using Delete, as you cannot Undo font removal. Copy the contents of
the folder ProgramData\VSMSoftware\Premier+2\Fonts\MyFonts, and any other folder you used.
Size shows the Minimum and Maximum recommended size for the font.
This is the size range used by Font Search. The recommended size can only be changed in PREMIER+™ 2
Font Create.
Selected font
Name of the selected font
Move to a different font Category
Click to select a font
View the size range
Search for a font by name or size
Apply your changes to the font
Duplicate or delete a font
Import embroidered letters for a font
Create a font with QuickFont
Search for a font by name
Search for a font by size
Set the size range for the font search
Show only user created fonts
Clear the font search text
60 PREMIER+™ 2 Embroidery Creating Lettering
Import Font from Embroideries
Use Import Font From Embroideries to import individual embroidered letters to create
a font.
For best results, remove any stray stitches in PREMIER+™ 2 Modify before importing the letters.
As the imported letters are stitch files, rather than fully adjustable design files, they work
best at their original size, with the minimum of reshaping.
Imported fonts work best with the Line, Vertical Block and Horizontal Block lettering shapes.
Create a Font from Embroidered Letters
1 Place your embroidered letters in a folder on your computer.
2 In the Letter tab, click Font Manager . The
Font Manager dialog box opens.
3 Click Import Font from Embroideries . A
dialog box opens for you to name your font.
4 Enter a name for your font, and click OK.
The font naming dialog box closes and an Open
dialog box appears.
5 In the Open dialog box, browse to the folder with
your embroidered letters.
6 Select the Upper Case letter ’A’, then click Open.
The Import Font from Embroideries dialog box opens with the letter ’A’ selected.
When using Import Font from Embroideries to create a font from individual embroideries, the Upper Case
’A’ is always created first. The size of the letters in the font is taken from the letter ’A’.
Select a character set for the font
Code for the selected letter
View more characters
Created letters are highlighted
The selected letter is orange,
and created letters are green
Replace the selected letter
Move the Baseline for the letter
Delete the selected letter
Embroidery information
Font name and size

PREMIER+™ 2 Embroidery Creating Lettering 61
7 In the Letter panel on the left, click the letter ’B’. The Open dialog box opens for you to load the letter
’B’.
8 Click to select the letter ’B’, then click Open to load it in the Import Font from Embroideries dialog box.
9 Click to select the letter ’C’ and load it.
The Tiles option in the Open dialog box is
useful when selecting letters.
10 Click to select the letter ’D’, but in the Open
dialog box select the letter ’K’ and click
Open.
The letter ’D’ is highlighted, but the letter
’K’ is in the preview.
11 With the ’D’ selected, click Load.
12 Click OK when asked about overwriting
the character, and in the Open dialog box
select the letter ’D’.
Alternatively, you could have clicked Delete
to remove the incorrect letter.
13 Load the other Upper Case letters in this
alphabet.
14 The red line across the preview is the Baseline for the selected letter. Click and hold the up arrow in
the Baseline box. The line moves upwards across the letter.
The Baseline sets where the letter will be placed along the line relative to the other letters in the font.
15 Adjust the Upper Case letters so that they will rest on the Baseline.
If you want to start again with a particular letter, click Load and reload the embroidery.
Many Upper Case fonts will need little Baseline adjustment.
16 Load the Lower Case letters for your font.
Lower Case letters are likely to need more adjustment, particularly letters like p, g, and y with descenders.
17 When you have created all of your letters, click Close
to save your font, and then in Font Manager click
Close again.
18 Use your new font in the Letter tab.
To fine tune the placing of your letters in the work area,
use the Individual option. Alternatively, you can adjust
the Baseline and colors of an imported font in
PREMIER+™ 2 Font Create.
Imported fonts work best with the Line, Vertical Block and Horizontal Block lettering shapes.
As the imported letters are stitch files, rather than fully adjustable design files, they work best at or near to
their original size, with the minimum of reshaping.

PREMIER+™ 2 Embroidery Creating Fonts Automatically 62
14
Creating Fonts Automatically
Use PREMIER+™ 2 QuickFont to create fonts automatically for use with your PREMIER+™ 2
Embroidery System, or your embroidery machine.
How to Create a Font
Select Font
1 Start PREMIER+™ 2 QuickFont . The Select Font page appears.
The initial settings in PREMIER+™ 2 QuickFont are remembered from the last time it was used.
2 Click the Font drop-down arrow and select the desired font name in the list. The previews to the right
of the window will change according to the font choice.
3 Click the drop-down arrow for
the Style and select Regular,
Bold, Italic or Bold Italic in the
list. The previews to the right of
the window will change
according to the style choice.
4 Select a File Type. Choose
between:
• A font to use in the PREMIER+™
2 Embroidery System
• A font to use on your
embroidery machine.
5 Click the drop-down arrow for
the Character Set and choose
the desired set.
The choice of character set will
vary, depending on the File Type
chosen above.
6 Click Next. The Set Stitch
Options page will appear.
Set Stitch Options
7 Select the desired Stitch Type
from the drop-down list. The
Output Size may change
according to the selected Stitch
Type.
The previews to the right of the
window will change according to
the selected Stitch Type.
The first three uppercase
characters, lowercase characters
and numbers are previewed. The
size for the 'A' and 'a' characters
are set half way between the
Minimum and Maximum output
size for a PREMIER+™ 2
Embroidery System font, or the
characters are set as near as
possible to the Output Size for a
machine font.

PREMIER+™ 2 Embroidery Creating Fonts Automatically 63
The Real Size % box shows the size of the previews, compared to the Real Size setting in PREMIER+™ 2
Configure.
8 If desired, click Stitch Options and/or Border Stitch
Options and change the settings for the selected
Stitch Type, such as the fill pattern or satin border
width.
9 If desired, adjust the Output Size (for a machine
font), or Output Size Range (for a PREMIER+™ 2
Embroidery System font).
10 In Joining Point, select Baseline to join letters at the
bottom, select Nearest Point to join letters at the
place where they are closest for fast stitchout of a
small font, and use Continuous for a flowing
handwriting effect with a script font.
Joining Point options are only available with a
PREMIER+™ 2 Embroidery System font.
11 To change the thread color used for satin columns
or pattern fill areas, click the Thread Color icon .
The Color Selection dialog box will appear for you to
choose a new color.
12 To change the thread color used for satin borders, appliqué stitching and outlines, click the Border
Thread Color icon . The Color Selection dialog box will appear for you to choose a new color.
After you have chosen a new thread color, the previews will be shown with the new color.
13 To change the appliqué fabric color, click the Appliqué Color icon . The Appliqué Selection dialog
box will appear for you to choose a new fabric.
14 Click Next. A progress bar will appear, showing that the font is being created. The Output Options
page will then appear.
Output Options
15 The Font Name is automatically generated to show the TrueType® font name, then the style (R for
Regular, B for Bold, I for Italic or BI for Bold Italic), then the Stitch Type (S for Satin, F for Fill, FSB for Fill
+ Satin Border, SB for Satin Border, A for Appliqué or O for Outline), then the character set (E for
Extended, SE for Super Extended, and so on). At the end is the minimum and maximum
recommended sizes in millimeters (for a PREMIER+™ 2 Embroidery System font), or the Output size
(for a machine font). If desired, click in the Font Name box to change the name.
16 The PREMIER+ 2 Embroidery System Font Category is initially set according to your choice of Joining
Point. It will be set to MyFonts for Baseline joining, Nearest Point for Nearest Point joining or Script for
Continuous joining. If desired, select a different category from the drop-down list.
PREMIER+ 2 Embroidery System Font Category is not available when creating a machine font.
17 Machine fonts are saved to Documents\Premier+2\My Designs by default. If desired, you can choose
a different folder, or save to a USB stick. Click the button with three dots to choose a new folder or
drive.
18 To view the complete font, use the Previous and Next buttons below the preview to step through the
character set.
19 To print a reference sheet showing the characters in the font, click Print Catalog.
20 To start a new font after creating the current one, select the New Font checkbox.
21 Click Finish and PREMIER+™ 2 QuickFont will close. The font will be saved according to the selected
options.

PREMIER+™ 2 Embroidery Creating SuperDesigns 64
15
Creating SuperDesigns
Create SuperDesigns from the SuperDesign sets available in PREMIER+™ 2 Embroidery.
SuperDesigns are special designs that can be resized with constant stitch density.
Some SuperDesigns are multicolored, and the stitch type and style for many can be
changed. Alter the size, proportions, stitch type and thread color. A SuperDesign can be
resized with constant stitch density, and the stitch properties adjusted even after saving.
When first starting PREMIER+™ 2 Embroidery the Animals category is selected. If you have used the
SuperDesign tab previously, the most recent category is remembered.
SuperDesign sets are grouped into categories. Each set contains 9 SuperDesigns, each of
which may have multiple styles. The SuperDesign gallery shows thumbnails of all the
SuperDesigns in the currently selected SuperDesign set. SuperDesigns have names and
keywords, to allow you to search easily in all categories.
If you own PREMIER+™ 2 Embroidery or PREMIER+™ 2 Embroidery Extra not all SuperDesign Categories
and Sets are available.
Create a SuperDesign
1 Click the SuperDesign tab.
2 Search for a SuperDesign, or choose a SuperDesign Category from the drop-down menu on the left.
The preview will show the first design set in that category.
3 Click the arrow to the right of the set drop-down menu and choose a SuperDesign set, then click a
design to select it.
4 Set the Size in millimeters as desired, from 5mm to 200mm. This sets the height of the SuperDesign,
and the width is set proportionally.
5 Click the arrows for width and height to change the proportions of the design from 25% to
400%. Alternatively, enter a size in the number box.
6 If desired, select a line or fill type from the Stitch Type drop-down menu to open the properties
dialog for the stitch type. See “Choosing Stitch Properties” on page 72.
7 Change the stitch properties for the SuperDesign in the properties dialog, for example the density,
and the stitch length, angle and pattern. Click OK to close the dialog.
8 Click Apply . The SuperDesign appears in the work area, leaving any existing SuperDesigns
unchanged.
Search
Search for a SuperDesign by name, folder name, or keyword. Enter the desired text in the
Search box and press Enter. Click Clear Search to remove the search text, and use the drop-
down menu to reuse previous searches.
Choose a SuperDesign Category
Choose a SuperDesign Set
Place the design in the work area
Select a design
Adjust the size of your chosen design
Change the stitching and appliqué in the design
Adjust the proportions of the design
Search for a SuperDesign
Change the style for the SuperDesign

PREMIER+™ 2 Embroidery Creating SuperDesigns 65
Search for a SuperDesign
1 Click the SuperDesign tab.
2 Enter a search term in the Search box, for example ’christmas’, and press Enter.
3 Click the drop-down menu on the right to view all of the Christmas designs.
These include designs from Christmas categories, and single designs with a Christmas theme.
4 Note that the SuperDesign Category drop-down menu is not available, as Search uses all categories.
Click the Clear Search button on the left. The most recently used category becomes available.
5 In the Search box enter ’dog’, then press Enter.
Besides five household pets, there are also three pictures of a sausage in a roll (a hotdog). Searching may
sometimes produce unexpected results!
6 Click the Clear Search button to return to Category view.
7 In the Search box enter ’lion’, then press Enter. There are six different Lion designs.
8 Place the pointer over the first four lions in turn.
The first three are from the Animals set in the Appliqué Category, and the fourth is from Tassels. They are all
named Lion. The Search checks Category and SuperDesign names, in addition to keywords.
9 Place the pointer over the last two lions.
The fifth and sixth lions are from Zodiac, and are
named Leo. The term "Lion" is from the keywords for
these SuperDesigns.
10 Click to select the first Leo, then click the Stitch
Type drop-down menu. The stitch types for this
individual SuperDesign are listed.
The Search function finds all varieties of a particular SuperDesign, so there is no need to check the Styles
for a SuperDesign set individually when using Search. In the example above, the appliqué lions using Satin
Line, and two styles of Motif Line are found.
Change the Stitch Type in a SuperDesign
1 In the Quick Access toolbar, click Change Hoop and
change to hoop to Universal, 170mm x 100mm - Universal
Midsize Hoop 1, Rotated and click OK.
2 Open the SuperDesign tab and choose "Animals" from the
SuperDesign Category drop-down menu.
3 Click the arrow to the right of the SuperDesign set drop-
down menu and choose Dinosaurs 1.
4 Select design 3, the Stegosaurus, and set Size to 70mm.
5 Click Stitch Type , and in the drop-down menu select Pattern Fill 2. Change the pattern to 174
(column 6 row 1 in Polygons), then click OK. Click Apply .
6 Click the Frame tab, and place a frame around the Stegosaurus.
7 Click the SuperDesign tab. Your settings have been retained. Click Undo to remove the frame.
8 Click the Modify tab. You are warned that the design will be fixed as an embroidery. Edit it as desired.
9 Click the SuperDesign tab again. The settings for the Stegosaurus are still as you set them.
10 Click Apply to place another copy of the Stegosaurus.
11 Click the Triceratops (number 6). The Size has changed to 45mm (the default size for this design).
12 In Stitch Type , select Pattern Fill 2. The settings are the default settings for this SuperDesign
(Pattern 3, and Angle 0).
Adjusting the settings before placing the SuperDesign is useful if several versions of the same design are to
be used. When a different SuperDesign is selected, the default settings are used.
13 Right-click the second copy of the Stegosaurus, and in the Context menu select Pattern Fill, Pattern
Fill 2. The Pattern Fill dialog box appears, enabling you to further adjust the design.
You could create a number of Stegosaurus designs with the same pattern, but different colors, or angle.
You could also duplicate the adjusted SuperDesign, and then make further adjustments to the copy.
14 In the Category drop-down list, select Celebrations, design 3, some bells.
15 Click Stitch Type , and look at the drop-down menu. There are nine types of pattern fill.

66 PREMIER+™ 2 Embroidery Creating SuperDesigns
For this design, you would need to find out where each of many pattern fills were used. It would probably
be easier to place the design and adjust it afterwards.
Edit SuperDesigns
You can adjust SuperDesigns after they are placed in the work area, and before they have
been fixed as stitches, even after saving.
You can change the colors of SuperDesigns before or after they have been fixed as embroideries.
Reshaping a SuperDesign
1 Choose a SuperDesign in the SuperDesign window. See “Create a SuperDesign” on page 64.
2 Click Apply . The SuperDesign appears in the work area.
3 Drag the design a short distance to the right. A four arrow pointer appears as you drag.
4 Place the pointer over one of the square green handles at the corners of the design. The Adjust/resize
pointer appears.
5 Drag the handle to change the shape of the SuperDesign.
6 Hold the Ctrl key and drag one of the handles. The size changes, but the shape remains the same.
Hold down Shift to resize from the center.
7 Right-click the SuperDesign, and in the Context menu select Fix as Stitches . The handles on the
design are now white, indicating that the SuperDesign has been fixed as an embroidery.
The SuperDesign will also be fixed as an embroidery if you adjust it in the Modify tab.
8 Click Undo. The green handles reappear. You can adjust the design again.
Changing SuperDesign Appliqué
1 Open the SuperDesign tab and choose "Appliqué" from the
SuperDesign Category drop-down menu.
2 Click the arrow to the right of the SuperDesign set drop-down
menu and choose Children 1.
3 Click the fifth design in the set, Blocks, and click Apply .
4 Right-click the SuperDesign.
5 Near the top of the Context menu Appliqué Fabric and Satin
Line are listed. Click Appliqué Fabric in the Context menu. A
submenu with three options appears.
6 Click Appliqué Fabric 1. The Appliqué Selection dialog appears.
7 Click Load Previously Saved Fabric and choose a different
colored fabric.
8 Change the other fabrics in the blocks.
You can also change the angle of the fabric pattern, and change the thread color for the border.
SuperDesigns with Appliqué and Effects
For appliqué SuperDesigns the fabric can be changed as well as some of the border
settings. For example, in Stitch Type select Appliqué Fabric, and in the Appliqué
Selection dialog change the fabric, angle and margin. The appliqué placement stitches
cannot be edited. For effects such as Felting Needle, Twin Needle and Wing Needle you
can change the stitch properties in Stitch Type or in the Context menu after creation.
Fixing SuperDesigns as Embroideries
SuperDesigns are fixed as an embroidery when the Modify tab is selected, Fix as
Stitches is used, or they are Combined with another design. The stitches are then
created, and any further resizing of the embroidery may affect stitch density and length.
The stitch properties may not be changed after it is fixed.

PREMIER+™ 2 Embroidery Frames, Borders and Motifs 67
16
Frames, Borders and Motifs
Frames
In the Frame tab you can create a frame which is placed at a size to fit around the currently
selected embroidery(ies), group, lettering or SuperDesigns, or if no embroidery is selected,
on the work area at the size set under Size Options.
The frame and the design it surrounds are usually created as a group. Use Restrict Groups
on the Home tab or the context menu to select and adjust the frame, or one of the
embroideries within it.
Select corners, frames and side pieces to place around your embroidery. Choose from the
categories of corners, frames and side pieces. Then choose a frame set, and select a
design. Place the frame around your embroidery, or anywhere on the work area.
Alternatively, select Flourish and choose a flourish to be placed above, below or as a duo
above and below the selected embroideries.
Some frames are multicolored, and the stitch type for many can be changed. A frame
around a single embroidery can be resized with constant stitch density, and the stitch
properties adjusted even after saving, until it is fixed as embroidery.
The frame is generally placed earlier in the stitch order than the originally selected embroidery, so that any
appliqué fabric may be placed before the embroidery that is being framed. However, if Crop is selected, the
frame will be added after the embroidery.
For an appliqué frame if crop is selected, the placement stitches will be added before the embroidery, and
the border stitches after the embroidery. Whenever Crop is used, if the embroidery contains lettering or a
SuperDesign, it will be fixed as stitches.
If multiple embroideries are surrounded by a frame with the Crop option selected, the inner embroideries
will be combined automatically.
Create a Frame
1 Load one or more embroideries in the work area and select them.
2 Click the Frame tab.
3 Choose a frame category (corners, frames or side pieces) from the Frame drop-down menu.
The gallery will show the first frame set in that category.
4 Choose a set of frames from the drop-down list to the right of the frame gallery, then click a frame to
select it. It will be highlighted.
5 If desired, select Group to group the frame with the embroidery(ies).
6 Select to use a margin or to crop the embroidery when placing the frame.
Use a Frame, Corners or Side Pieces
Use Flourishes
Choose a set of Frames
Select a design for your frame Group the embroidery and frame
Crop to the frame, or set Margin and size
Choose settings for Flourishes
Set the frame size and proportions
Change the appearance of the stitching in the frame
Place the frame around your embroidery

68 PREMIER+™ 2 Embroidery Frames, Borders and Motifs
• Margin leaves a space between the embroidery and the frame around it.
• Crop leaves no margin visible, and will cut the embroidery to the shape of the frame.
7 If you selected Margin, set the Size in millimeters from -50 mm to 50 mm.
8 If desired, click Size Options to set the frame size, and percentage
width and height in the Options dialog box. Click OK to close the
dialog box.
9 If desired, select a line or fill type, or the appliqué fabric for an
appliqué frame, from the Stitch Type drop-down menu to open
the properties dialog for the stitch type or fabric.See “Choosing Stitch
Properties” on page 72.
Change the stitch properties for the frame in the properties dialog, for
example the density, and the stitch length, angle and pattern. Click OK
to close the dialog.
10 Click Apply to view your framed embroidery.
To change the properties in the framed embroidery, select Restrict Groups on the Home tab or context
menu, and then adjust the frame or the enclosed design.
Appliqué Frames and Foam Frames
For appliqué frames, the fabric can be changed as well as some of the border settings. For
example, in Stitch Type select Appliqué Fabric, and in the Appliqué Selection dialog
change the fabric, angle and margin. The appliqué placement stitches cannot be edited,
but the position of the placement line may be adjusted to match the appliqué piece
margin. For Foam fonts and frames, only the color can be changed.
For more information, see the PREMIER+™ 2 Embroidery Reference Guide and Help.
Editing Frames
After a frame has been placed in the work area, you can change its size and stitch types
until it is fixed as an embroidery. If it was grouped, use Restrict Groups to adjust it.
You can change the colors of frames before or after they have been fixed as embroideries.
Change a Frame in the Work Area
1 There are four green handles on the corners of the frame. Move the mouse pointer over one of the
corner handles. The Adjust/resize pointer appears.
2 Click and drag the handle to adjust the size of the frame.
Hold Ctrl while dragging a handle to keep the frame in proportion.
3 To adjust the frame properties, right-click the frame.
4 From the right-click menu, select Properties to change the frame size in the Frame Properties dialog
box, or select a stitch type to adjust it in its stitch properties dialog box.
5 Click and drag the frame to place it as desired.
Rotate the frame with the rotate handle , or flip it with the horizontal and vertical mirror handles.
Fixing Frames and Flourishes as Embroideries
Frames and flourishes are fixed as an embroidery when the Modify tab is selected, Fix as
Stitches is used, or they are Combined with another design. The stitches are then
created, and any further resizing or rescaling of the embroidery may affect stitch density
and length. The stitch properties, for example the density, pattern, angle or stitch length,
may not be changed after it is fixed. Appliqué fabric cannot be changed in the Context
menu after the frame is fixed, but if PREMIER+™ 2 Embroidery Extra is owned you may use
the Select Appliqué features on the Appliqué tab.

PREMIER+™ 2 Embroidery Frames, Borders and Motifs 69
Borders and Motifs
In the Border tab you can create a border to place around your embroidery(ies), group,
lettering or SuperDesigns and lines of motifs.
Border
Select a margin width and whether to use rounded corners, then select a border type from
motif line, satin border, running stitch and triple stitch. Click Options to set the properties
for each stitch type.
The stitch properties may only be adjusted before the border is created.
The border is placed around the rectangular "edge" of the selected
embroidery(ies), or around the inside edge of the hoop. (In the
ExpressMonogram Wizard the border is placed around the edge of
the envelope area.) It is placed earlier in the stitch order than the
originally selected embroidery, so that any appliqué fabric may be
placed before the embroidery that is being bordered.
If more than one embroidery is selected, the border is placed around the
selected embroideries, using the distance set in Margin.
The border is placed with white handles, showing that it is initially
in Scale rather than Resize mode (blue handles).
Border options are retained during the current session.
Create a Border
1 Load an embroidery in the work area and select it.
2 Click the Border tab.
3 Select Rounded or Square corners.
Rounded corners may overlap the corners of the embroidery. Adjust the Margin for the desired effect.
4 If desired, select Group to form a group from the border and the embroidery(ies).
Place a border around an embroidery Place one or more motifs
Select a stitch type for the border
Set the stitch properties for the border
Set the width of the margin
Group the embroidery and border
Choose rounded or square corners Create the border
inside the border
Set the properties for the appliqué
Add appliqué to the border
Audition a fabric for the appliqué

70 PREMIER+™ 2 Embroidery Frames, Borders and Motifs
5 Select a Stitch Type (Satin Line, Triple Stitch, Running Stitch or Motif Line).
6 If desired, click Stitch Options to open the properties dialog for the stitch type. See “Choosing
Stitch Properties” on page 72.
Change the stitch properties for the border in the properties dialog, for example the density and
stitch length. Click OK to close the dialog.
7 To add appliqué to the design, click Add Appliqué , then click Select Fabric to audition a fabric
in the Appliqué Selection dialog.
8 If desired, click Appliqué Options to open the Appliqué Options dialog box and choose an
Appliqué Method.
9 Set the Margin size in millimeters from -50 mm to 50 mm. This is the distance from the selected
embroidery, or from the edge of the hoop.
For a satin or motif border you may need to adjust the margin to avoid overlapping the embroidery.
10 Click Apply to view your framed embroidery.
If PREMIER+™ 2 Embroidery Extra is owned, you can change the appliqué fabric in the Appliqué Selection
dialog box after creating the border. Click Restrict Groups on the Home tab or the context menu. Click the
Appliqué tab and click Select Piece, then click the border. The Appliqué Selection dialog box appears.
Change the fabric as desired.
Add Appliqué
Use Add Appliqué to add appliqué to the border that you create. Appliqué placement
stitches are automatically added to the border that you draw.
Select Fabric
Use Select Fabric to audition a fabric for your appliqué in the Appliqué Selection
dialog box. Click Select Fabric and the Appliqué Selection dialog box appears.
Motifs
Create a motif line of a chosen length or a selected number of repeats. Alternatively, place
a single motif.
Motifs are created from the motif sets available in PREMIER+™ 2 Embroidery. Motifs are
relatively small single-color designs similar to machine stitches, created using single,
running and triple stitches.
If motifs are designed to overlap each other the calculation for number of repeats may not be exact.
Select a Quick Color & texture
Choose an appliqué type
Choose a system fabric
Load an individual picture
Preview the appliqué fabric
Reuse a recent fabric
or add a new one
for printed appliqué

PREMIER+™ 2 Embroidery Frames, Borders and Motifs 71
The motif group, category and set are shown in the Motif Underline section of the Border
tab. The motif line is created below the currently selected embroidery(ies), group,
lettering or SuperDesign, and earlier than it in the stitchout order.
Additional motifs may be created using the optional PREMIER+™ 2 Create module, and added to the
My Motifs database.
Create Lines of Butterfly Motifs
1 Click the Border tab.
2 In the Motif Underline section, click Select
Motif . The Motif Line selection dialog box
opens. See “Motif Line” on page 81.
3 Select Universal from the Group drop-down list.
4 Select General Motifs 1 from the Category list.
5 In the Pattern drop-down list, select motif 23, a
butterfly.
The Height and Width are initially set according to
the chosen motif.
6 In Size, ensure that Proportional is selected
(checked), and set Height to 14mm.
7 In Stitch ensure that Running is selected, and that Length is set to 2.0mm.
Length is initially set to the recommended value for the motif.
8 Click OK to select the butterfly motif.
9 In the Motif Underline section of the Border tab, click Length to select it.
10 Use the up and down arrows to set the Length to 100mm.
11 Click Apply . A line of four butterflies is placed on the work area.
The width of the butterfly motif is 25mm, so the line contains four motifs.
You can resize or rescale this line of motifs, or change its color, in the same way as for any other design.
12 Set Length to 120mm and click Apply
again. There are still four motifs, but they are
more widely spaced.
Only complete motifs are used when placing a
motif line with Motif Underline.
Note that the second line of butterflies forms a
group with the first line. Motif lines are grouped
with the previously placed line, unless you click
outside the selection box before creating the
new line.
13 In the Motif Underline section, click Repeats.
14 Use the up and down arrows to set the number of repeats to four, then click Apply .
The motif line is the same size as the first line you created.
15 Use the down arrow to set the number of repeats to one, then click Apply . This places a single
motif in the work area.
Use Encore to create curved motif lines, circles and shapes using single motifs, and to mirror motifs within
a line. See “Encore” on page 44.
Set the length of the motif line
Set the number of repeats for the motif Choose a motif
Create the line of motifs

PREMIER+™ 2 Embroidery Choosing Stitch Properties 72
17
Choosing Stitch Properties
You can change the properties for many line and fill types in fonts, SuperDesigns and
frames.
The properties for a stitch type can be changed using its properties dialog before or after
the lettering, SuperDesign or frame is created.
Use the drop-down in the Options dialog box for the stitch type.
If required, click Restrict Groups on the Home tab or context menu to enable editing
within a group. Then right-click on the lettering, SuperDesign, or Frame, and select the
stitch type that you wish to change in the design from the right-click menu. The properties
dialog box for that stitch type will appear.
You can only edit the stitch properties for a design with green handles (before it is fixed as stitches).
If the Stitch Type area is grayed out (unavailable), this means that the area was designed
with properties that cannot be edited. For example, this occurs with Foam fonts that have
special settings to ensure the embroidery foam is cut, and it also occurs with a few very
complex fonts that have many different fill patterns in different letters, or multigradient
fills, such as Acorn 6C UC 35-60mm in the Floral category.
Editable Properties
Most fonts, SuperDesigns and frames will allow multiple line and fill properties to be
changed. Where very complex properties such as multicolor gradients or many different
properties in different characters are used, the edit properties functions are not available.
If there is more than one stitch area of a particular type in the design, the drop-down
menu will show that stitch type in a numbered list; for example, Pattern Fill 1, Pattern Fill 2.
Fill Types
Pattern Fill
A pattern fill area is an area of stitching where the threads all
lie parallel to each other, and that has stitch points inserted
to create different types of patterns. The density and color
can also be changed with single gradient density and
multigradient density.
Add new patterns using Manage My Fills in PREMIER+™ 2
Create (if PREMIER+™ 2 ULTRA is owned).
The patterns may be simple textures or decorative shapes. A
satin-effect pattern (pattern number 36 in Standard 3) is also
available.
Constant density creates a uniform fill at the chosen density. Gradient
density creates a fill with varying density or color.
Use the Pattern Fill properties dialog box (if available) to change the pattern, density and
stitch angle used for fill areas.
Litho UC 20-80mm: Pattern Fill
Area, Pattern 107 from Diamonds

PREMIER+™ 2 Embroidery Choosing Stitch Properties 73
Fill Pattern
Set the Fill Pattern number for fill areas. The initial setting is pattern 3.
Patterns in categories other than Standard are recommended for use in relatively large fill areas, as they
have repeating patterns which work well when 'tiled' together. Pattern 36 produces a 'satin effect' fill stitch.
The first four patterns in the Gradient & Lace category (253-256) are recommended for multicolor gradient.
Patterns 257 to 264 provide banded fill patterns that combine with crosshatch parallel fills to create a
weave effect for lace designs. Set Spacing for the parallel fill at 2.4mm to combine with Pattern 257, 2.8mm
to combine with Pattern 258, and so on.
For a complete reference to all the fill patterns that can be used for fonts and shapes, see the Fill Patterns
Sample Guide. This is provided as a PDF for viewing and printing.
Underlay is a low density fill that is perpendicular to the stitches of the actual fill area. It is
useful for stabilizing large fill areas.
Compensation is used to make an area 'bolder' by increasing its relative size. The higher
the number, the bolder the area appears. The initial setting is 0.
Use the Density area to see and change the density settings and the color Gradient of the
fill. Gradient is not initially selected.
Standard Density
Set the standard Density from 2 to 40. The lower the number, the closer together the
stitches and the more stitches are produced.
Choose a Category
and Pattern
Search for a Pattern
by number
Set Standard density
Use gradient density
Set the pattern Angle
Adjust the area’s size
Choose Underlay
density
Settings for Single &
Multicolor gradient
Use a My Fills pattern

74 PREMIER+™ 2 Embroidery Choosing Stitch Properties
Single Color Gradient
Use Single Color Gradient to change the density across a fill with only one color. Set a
value for the start and end density markers for the fill, and the density gradually changes
between the two values. Add multiple markers for a more complex pattern.
Multicolor Gradient
Motif Fill
Motif fill areas contain repeated small stitches placed using a Universal or machine motif
pattern. Motifs are used at any angle, at varying sizes, and alternate lines can use different
motifs. Typically, there are spaces between the motifs in a pattern.
In the Motif Fill dialog you can select motifs, and set the motif angle, spacing, offset, stitch
type and length when creating a motif fill area. Use Motif 1 to select the first motif and its
size, and Motif 2 for a second optional motif.
Motif fill using a heart pattern, number 6, in the
General Motifs 1 category, at an Angle of 350
degrees. A satin line is used for the border.
(Revue 2C UC 25-120mm MF, Display category)
Select single or
multicolor gradient
Return to the
original settings
Add a marker
Adjustment marker
Highlighted value marker
Set the stitch density for
the chosen value marker
Delete the selected
marker
Select single or
multicolor gradient
Return to the
original settings
Add a marker
Adjustment markers
Selected color marker
Choose a thread for the
highlighted marker
Delete the selected
marker
Set the stitch density
for the whole fill

PREMIER+™ 2 Embroidery Choosing Stitch Properties 75
For an example using Motif Fill, see "Create a Quilt Block with a Central Filled Shape" in the PREMIER+™ 2
Embroidery Extra User Guide.
The Motif Fill properties dialog box has tabs for setting all the properties on a motif fill
area.
Use Spacing to set the relative position of the motifs in the fill.
Use the Options tab to change the settings for fill angle, stitch type and length.
Crosshatch Fill
Crosshatch fills are used in quilting, and to create free-standing lace.
The Crosshatch Fill properties dialog box enables you to set the gap, style, line angle,
stitch type and stitch length for the crosshatched lines of stitching in the fill. The preview
changes according to the options chosen.
• Diamond creates a symmetrical crosshatch pattern (balanced horizontally). Diamond is
selected by default, with an initial angle of 315 degrees.
• Square creates a crosshatch pattern of lines set at 90 degrees.
• Parallel creates a pattern of parallel lines, with an initial angle of 0 degrees.
Select a motif Group, Category and pattern
Select the motif size
Preserve motif Height / Width ratio
Flip the motif vertically or horizontally
Select a style for the Crosshatch fill
Set the angle for one or both crosshatch lines
Adjust the gap between the stitch lines
Select a stitch type for the
Set the stitch length for fill lines
Set the width for zigzag lines
Preview your settings
crosshatch lines

76 PREMIER+™ 2 Embroidery Choosing Stitch Properties
• Enter Angles can be used to create an asymmetrical crosshatch pattern. Enter an angle
for each of the two line directions in the crosshatch.
Curved Crosshatch Fill
Curved Crosshatch fills use curving lines in the crosshatch, which can be used to create a
feeling of depth. They are used in quilting, and to create free-standing lace.
The selected Motif is only used by the Curved Crosshatch Fill if the Motif Line option is
selected on the Options tab.
MultiWave Fill
MultiWave fill areas use a wave pattern defined by a line, or lines, drawn on the fill area by
the designer. Vary the density, or use a motif for the stitch lines.
Click Use Motifs if you would prefer to use motifs instead of a plain line to follow the line
angle selected for the fill. Click the Motif tab to choose a motif.
Echo Fill
Echo Fill places echo lines within a shape. Choose from rounded, square and diagonal
corners, and set the gap between the echo lines.
MultiWave Fill, using a density of 20 and a Triple Stitch
border
(Revue UC 25-120mm MW, Display category)
Adjust the gap between the stitch lines
Select a stitch type for the
Set the stitch length for fill lines
curved crosshatch lines
Set the angle for one or both
curved crosshatch lines
Select a style for the
Curved Crosshatch fill
Set the curve for the curved crosshatch lines
Use a Motif with the fill

PREMIER+™ 2 Embroidery Choosing Stitch Properties 77
Some options used in other modules are unavailable in the Quilt Block Wizard. For an example using Echo
Fill, see "Show an Echo Around an Embroidery" in the PREMIER+™ 2 Embroidery Extra User Guide.
Shape Fill
Shape fill areas use one of 75 different shapes. Vary the stitch density and use motif lines
for the fill.
Radial Fill
Radial fill areas use a pattern of radiating lines from an origin point.
The stitch density can be varied.
Shape Fill Area using Shape 26 and Density 12.
(SuperDesign Zodiac 3, number 3)
Choose rounded, square or
diagonal corners for the fill
Select a stitch type for the lines
Select a stitch length for the lines
Set the Gap between the echo lines
Select a shape for the fill
Set the stitch density for the fill
Use motif lines in the shape fill
Select a motif for the fill

78 PREMIER+™ 2 Embroidery Choosing Stitch Properties
Spiral Fill
Spiral fill areas use a spiral pattern from an origin point. Use constant or gradient density.
QuiltStipple Fill
QuiltStipple fill areas use stipple stitch in curved or straight lines. Vary the gap between
stitch lines and use running or triple stitch.
Contour Fill
Contour fill areas use contour stitch lines.
Satin Area
Satin areas contain zigzag stitches that fill the area from one end to the other at the same
density. The stitch angle changes with the shape of the area, and can be adjusted as
desired. Choose automatic edge walk and/or zigzag underlay.
Spiral Fill using Gradient Density with a
Satin Line border.
(Revue 2C UC 25-120 SF, Display category)
QuiltStipple Fill using curved and straight styles
with a Triple Stitch border.
(Inform UC 25-120mm QS, Display category)
Contour Fill, using Triple Stitch and a 1.0mm gap,
and with a Triple Stitch border.
(Per Gothic 25-120mm CF, Elegant category)
Set the stitch density for the satin
Select an underlay type for the satin
Adjust the area’s size
Choose a Category and pattern
Search for a pattern by number
Click to use no pattern

PREMIER+™ 2 Embroidery Choosing Stitch Properties 79
Continuous Columns
Satin Column
Satin Column forms a column of straight or curving satin.
Use the Satin Column Options to set density, compensation,
pattern (for columns wider than around 8-10mm) and underlay.
Choose from more than 250 patterns for satin (for areas wider than
around 8-10mm).
Patterns should only be used for columns wider than about 8-10 mm.
Set the Underlay option that will be used for the satin column.
Standard Density
Set Density from 2 to 80. The lower the number, the closer together the stitches and the
more stitches are produced. The initial setting is 4.
Gradient
Use the Gradient settings to see and change the density settings and the color Gradient of
the satin. The color on a satin column can change over a range, or have multiple color
changes across the area. This is ideal for gradual color changes such as subtle shadow
effects. Gradient is not initially selected. See “Single Color Gradient” on page 74 and
“Multicolor Gradient” on page 74.
Feathered Satin
Feathered Satin forms a column of satin that is
feathered on one, or both sides. A Feathered Satin
column uses zigzag stitches where the start and end
points of the stitches are random rather than all
parallel.
Line Types
Running Stitch
Running stitch is a row of small stitches going forward. Running Stitch is also the preferred
option for traveling stitches between sections of an embroidery.
Lines of running stitch are used for light markout or as underlay.
Flourish Laurel 1/8 uses Feathered Satin
for the leaves
Set the density for the feathered satin
Select which side of the column to feather
Set the length of the feathering stitches

80 PREMIER+™ 2 Embroidery Choosing Stitch Properties
Double Stitch
Double stitch is a row of small stitches going forward, followed by a row of small stitches
going backward, so it ends at the same point where it began.
Double stitch is used for markout and for branching outlines that need to return to their
starting points.
Double Zigzag
Double Zigzag stitch is a row of small stitches going forward, followed by a zigzag row of
small stitches going backward, so it ends at the same point where it began.
Double Zigzag is a special stitch type, recommended for lace. A running stitch line is retraced in a zigzag
pattern to create a mesh if sections are placed together. Alternatively, use this stitch type for crosshatch fill.
Triple Stitch
Triple stitch is a row of small three-part stitches, each composed of one stitch going
forward, one going backward then one going forward. The stitch length can be changed
Crosshatch Fill, using Diamond style and an Angle
of 45 degrees. Double Zigzag is the stitch used in
the fill and for the border.
(Revue Patchwork UC 50-120mm XH)
Set the stitch length
Create a cutwork line
Select 2 or 4 cutwork needles
Create stability gaps in the cutwork line
Set the distance between the gaps
Set the stitch length
Set the width of the zigzag line
Use a linking stitch between sections of
Double Zigzag

PREMIER+™ 2 Embroidery Choosing Stitch Properties 81
from 1mm to 12mm for individual lines in the properties dialog box. Use triple stitch for
heavy markout or as heavy joining lines between sections of a character or SuperDesign.
Satin Line
Satin Line is a line of constant-width satin stitch. It can be used
alone, or as a border to a fill. The width of the line can be set from 1
to 12mm.
Motif Line
Motif line is used for decorative stitches and details.
Contour Fill, using Triple Stitch and a 0.8mm gap, and
with a Triple Stitch border.
(Per Gothic 25-120mm CF, Elegant category)
Set the satin line width and stitch density
Use edge walk underlay inside each
edge of the line
Taper the ends of the satin line
Set the gap between the motifs in the line
Adjust the position of the motifs in the line
Select a stitch type for the motif line
Set the stitch length for the motif line
Select a motif Group, Category and pattern
Set the motif size and Height / Width ratio
Taper the end of the motif line
Taper the beginning of the motif line

82 PREMIER+™ 2 Embroidery Choosing Stitch Properties

PREMIER+™ 2 Embroidery System Software License 83
18
Software License
TERMS AND CONDITIONS OF SALE AND LICENSE AGREEMENT
PLEASE READ THIS “TERMS AND CONDITIONS OF SALE AND LICENSE AGREEMENT” (“AGREEMENT”) CAREFULLY BEFORE
INSTALLING AND/OR USING THE PRODUCT (AS DEFINED BELOW). BY INSTALLING AND/OR USING THE PRODUCT, YOU ARE
CONFIRMING YOUR ACCEPTANCE OF THE SOFTWARE AND AGREEING TO BE BOUND BY THE TERMS OF THIS AGREEMENT. IF
YOU DO NOT AGREE TO THE TERMS OF THIS AGREEMENT, DO NOT INSTALL AND/OR USE THE PRODUCT AND RETURN IT TO
YOUR PLACE OF PURCHASE FOR A FULL REFUND IN ACCORDANCE WITH ITS REFUND POLICY.
The software (including any content) and related documentation, whether on disk, in read only memory, on any other media
or in any other form, (collectively the “Software”) are licensed, not sold, to you by Singer Sourcing Limited LLC and its licensors
(collectively referred to as “SINGER SOURCING LIMITED LLC.”) for use only under the terms of this Agreement, and SINGER
SOURCING LIMITED LLC. reserves all rights not expressly granted to you. The “Product” includes the Software and any
accompanying “Media” (a DVD / CD ROM/USB Storage), “Hardware” (a dongle, Memory Card and/or Reader Writer Kit) and/or
related documentation. You own the accompanying Media on which the Software is recorded and the Hardware, but SINGER
SOURCING LIMITED LLC. retains ownership of the Software itself and grants to you a non-exclusive license to use the Software.
Software will require internet activation.
The terms of this Agreement will govern any Software modules and upgrades provided by SINGER SOURCING LIMITED LLC.
that replace and/or supplement the original Product, unless such modules or upgrade are accompanied by a separate license
in which case the terms of that license will govern. Hunspell is the spell checker of this software. The source code version of
Hunspell is available at http://hunspell.sourceforge.net/ under the terms of the Mozilla Public License. (See: <http://
www.mozilla.org/MPL/MPL-1.1.html>.) This product includes software developed by the OpenSSL Project for use in the
OpenSSL Toolkit (http://www.openssl.org/). The copyright in OpenSSL belongs to The OpenSSL Project. This product also
includes the POCO software, used under the Boost Software License http://pocoproject.org/license.html. The copyright in
POCO belongs to the Applied Information Software Engineering GmBh.
1. Use of the Software.
A. Except as provided in Section 1(B) herein, this Agreement allows you to install and use two copies of the Software on two
computers at one time. This Agreement does not allow the Software to exist on more than two computers at a time, and you
may not make the Software available over a network where it could be used by more computers at the same time as stated
above. The Software may never be used by more than one person at the same time.
B. Module Software may be purchased separately. Module Software requires activation of your record for use in connection
with the Software. Once a record is activated for module Software, the record can not be deactivated, and the module
Software becomes a component of the Software as part of a bundle that may not be separated from the bundle.
C. If the Product is labelled “Educational Institution Version”, this Agreement allows you to install and use one copy of the
Software on a network provided that you purchase an appropriate number of Licenses and activations (sold separately) to
accommodate each individual computer on which the Software is installed, displayed, accessed or used from the network.
2. Trade Secrets and Copyright.
The Software is owned by SINGER SOURCING LIMITED LLC.and/or its suppliers, and the Software’s structure, organisation and
code are valuable trade secrets of SINGER SOURCING LIMITED LLC. and/or its suppliers. The Software is protected by copyright
laws of the United States and other countries, and by international copyright treaties. Therefore, you must treat the Software
just as you would any other copyright-protected material, such as a book. YOU MAY NOT COPY, DUPLICATE, REPRODUCE,
LICENSE OR SUBLICENCE THE SOFTWARE OR THE DOCUMENTATION, EXCEPT THAT YOU MAY MAKE ONE BACKUP COPY OF THE
SOFTWARE FOR BACKUP OR ARCHIVAL PURPOSES. SINGER SOURCING LIMITED LLC. will not provide you a backup copy or
replacement for any lost, stolen or corrupted Software. You agree not to alter, merge, modify, adapt, translate the Software,
nor reverse engineer, decompile, disassemble or otherwise attempt to reveal the source code of the Software. You may not
install your backup copy on any machine if your primary copy is installed. You may copy the Software onto a computer, in
which case the original copy enclosed with this package should serve as your backup copy. Any copies that you are permitted
to make pursuant to this Agreement must contain the same copyright and other proprietary notices, which appear on or in
the Software. You may not sell or transfer any copy of the Software made for backup purposes. Except as stated above, this
Agreement does not grant you any intellectual property or other proprietary rights in the Software.
3. Transfer.
A. You may not sell, transfer, rent, lease, license, sublicense, redistribute or lend any of your licensed rights to another party. All
components of the Software, including module Software that is purchased separately, are provided as part of a bundle and
may not be separated from the bundle and distributed as standalone applications or units.
4. Limited Warranty and Disclaimer, Limitation of Remedies and Damages.
Software and Documentation
YOU ACKNOWLEDGE THAT THE SOFTWARE AND THE DOCUMENTATION MAY NOT SATISFY ALL YOUR REQUIREMENTS OR BE
FREE FROM DEFECTS. THE SOFTWARE AND THE DOCUMENTATION ARE PROVIDED "AS IS".

84 PREMIER+™ 2 Embroidery System Software License
Hardware and Media
SINGER SOURCING LIMITED LLC. WARRANTS THAT THE MEDIA WILL BE FREE OF DEFECTS IN MATERIALS AND WORKMANSHIP
UNDER NORMAL USE FOR 90 DAYS FROM ORIGINAL PURCHASE. SINGER SOURCING LIMITED LLC. WARRANTS THAT THE
HARDWARE IS FREE OF DEFECTS IN MATERIALS AND WORKMANSHIP FOR ONE (1) YEAR AFTER THE ORIGINAL PURCHASE OF
THE PRODUCTS TO THE EXTENTS HERE STATED.
DURING THE RESPECTIVE WARRANTY PERIOD, SINGER SOURCING LIMITED LLC. WILL REPAIR OR REPLACE (AT ITS OPTION),
WITHOUT ANY COSTS FOR YOU, NEITHER FOR PARTS NOR FOR LABOUR, MEDIA OR HARDWARE THAT PROVES TO BE
DEFECTIVE IN MATERIALS OR WORKMANSHIP. NOTWITHSTANDING THE FOREGOING, SINGER SOURCING LIMITED LLC. MAY
ALSO, AT ITS OPTION, REMEDY ANY DEFECTIVE MEDIA BY PROVIDING A FULL REFUND OF THE PURCHASE PRICE.
THE LIMITED WARRANTY FOR HARDWARE DOES NOT COVER ANY ITEMS THAT ARE IN ONE OR MORE OF THE FOLLOWING
CATEGORIES: PARTS THAT NORMALLY REQUIRE REPLACEMENT, FAILURE DUE TO ORDINARY WEAR AND TEAR, USAGE NOT IN
ACCORDANCE WITH PRODUCT INSTRUCTIONS, FAILURE TO PROVIDE NORMAL MAINTENANCE, MISUSE OR UNAUTHORISED
REPAIR, SOFTWARE, EXTERNAL DEVICES (EXCEPT AS SPECIFICALLY NOTED), ACCESSORIES OR PARTS ADDED AFTER THE
HARDWARE HAS BEEN DELIVERED FROM SINGER SOURCING LIMITED LLC.
Joint provisions
THE WARRANTIES STATED ABOVE ARE MADE TO THE PURCHASER OF THE PRODUCTS FOR HIS OR HER OWN NORMAL USE.
EXCEPT AS EXPRESSLY SET FORTH IN THIS AGREEMENT, SINGER SOURCING LIMITED LLC. DISCLAIMS, TO THE FULLEST EXTENT
PERMITTED BY APPLICABLE LAW, ALL WARRANTIES AND CONDITIONS, EXPRESS AND IMPLIED, INCLUDING ANY WARRANTY
OR CONDITION OF MERCHANTABILITY OR FITNESS FOR A PARTICULAR PURPOSE.
ALL EXPRESS WARRANTIES FOR THE PRODUCTS, AND ANY IMPLIED WARRANTIES THAT MAY NOT BE DISCLAIMED UNDER
APPLICABLE LAW, INCLUDING BUT NOT LIMITED TO ANY IMPLIED WARRANTIES OF AND CONDITIONS OF MERCHANTABILITY
AND FITNESS FOR A PARTICULAR PURPOSE, ARE LIMITED IN DURATION TO THE LIMITED WARRANTY PERIOD SET FORTH
ABOVE, AND NO WARRANTIES, WHETHER EXPRESS OR IMPLIED, WILL APPLY AFTER SUCH PERIOD.
YOUR EXCLUSIVE REMEDY FOR BREACH OF WARRANTY WILL BE AS HERE STATED. IN NO EVENT WILL SINGER SOURCING
LIMITED LLC. OR ITS DEVELOPER, DIRECTORS, OFFICERS, EMPLOYEES OR AFFILIATES BE LIABLE TO YOU FOR ANY
CONSEQUENTIAL, INCIDENTAL OR INDIRECT DAMAGE (INCLUDING DAMAGES FOR LOSS OF BUSINESS PROFITS, BUSINESS
INTERRUPTION, LOSS OF DATA, BUSINESS INFORMATION AND THE LIKE), WHETHER FORESEEABLE OR UNFORESEEABLE,
ARISING OUT OF THE USE OF OR INABILITY TO USE THE PRODUCTS, REGARDLESS OF THE BASIS OF THE CLAIM AND EVEN IF
SINGER SOURCING LIMITED LLC. OR AN AUTHORIZED SINGER SOURCING LIMITED LLC. REPRESENTATIVE HAS BEEN ADVISED
OF THE POSSIBILITY OF SUCH DAMAGES.
SOME STATES OR JURISDICTIONS DO NOT ALLOW THE EXCLUSION OR LIMITATION OF INCIDENTAL, CONSEQUENTIAL OR
SPECIAL DAMAGES, SO THE ABOVE LIMITATION OR EXCLUSION MAY NOT APPLY TO YOU. ALSO SOME STATES OR
JURISDICTIONS DO NOT ALLOW THE EXCLUSION OF IMPLIED WARRANTIES OR LIMITATIONS ON HOW LONG AN IMPLIED
WARRANTY MAY LAST, SO THE ABOVE LIMITATIONS MAY NOT APPLY TO YOU. TO THE EXTENT PERMISSIBLE, ANY IMPLIED
WARRANTIES ARE LIMITED IN DURATION TO THE LIMITED WARRANTY PERIOD SET FORTH ABOVE AND NO WARRANTIES,
WHETHER EXPRESS OR IMPLIED, WILL APPLY AFTER SUCH PERIOD. THIS WARRANTY GIVES YOU SPECIFIC LEGAL RIGHTS. YOU
MAY HAVE OTHER RIGHTS WHICH VARY FROM STATE TO STATE OR JURISDICTION TO JURISDICTION.
5. Governing Law and General Provisions.
This agreement will be governed by the laws in force in the State of New York excluding the applications of its conflicts of law
rules. This Agreement will not be governed by the United Nations Convention on Contracts for the International Sale of
Goods, the application of which is expressly excluded. If any part of this Agreement is found void and unenforceable, it will not
affect the validity of the balance of the Agreement, which shall remain valid and enforceable according to its terms. You agree
that the Software will not be shipped, transferred or exported into any country or used in any manner prohibited by the
United States Export Administration Act or any other export laws, restrictions or regulations. This Agreement may only be
modified in writing signed by an authorized representative of SINGER SOURCING LIMITED LLC.
6. Governing Translation.
This Agreement may be translated in two counterparts. One is in English, and the other is in a language previously designated
by you. Each of the translations shall be deemed an original but all of which together shall constitute one and the same
instrument. In the event that there is a conflict in the interpretation of the language, the English language interpretation shall
prevail.
7. Termination.
Any unauthorized copying of the Software, or failure to comply with any provision of this Agreement, will result in automatic
termination of this Agreement and all licenses granted under this Agreement, and Licensee must destroy all copies of the
Software. In the event that you breach this Agreement, SINGER SOURCING LIMITED LLC. shall have available and reserves all
legal remedies.
© 2017 Singer Sourcing Limited LLC. All rights reserved.
