
PREMIER+™ 2 Embroidery
User’s Guide
Mac®
The software to which this User’s Guide relates is subject to change without notice. All
efforts have been made to ensure the accuracy of the contents of this User’s Guide.
The software described in this book is furnished under a license agreement and may be
used only in accordance with the terms of the agreement.
Permission is hereby granted to the licensee of the software to which this guide is related
to reproduce and distribute copies of this guide for nonprofit educational purposes. The
copyright statement on this page must be included on any copy of this work.
Facebook® and the “f” logo are registered trademarks of Facebook and its affiliate companies. Google+® and
the Google+ icon are registered trademarks of Google Inc. YouTube® and the YouTube® social icon are
registered trademarks of YouTube, LLC, which is a Google® company. Instagram® and the Camera logo are
trademarks of Instagram, LLC in the United States and elsewhere. Twitter® and the Twitter bird logo are
trademarks of Twitter, Inc. Flickr® is a trademark of Yahoo! Inc. Other product names mentioned in this guide
may be trademarks or registered trademarks of their respective companies and are hereby acknowledged.
VIKING, PFAFF, PREMIER+ and 6D are trademarks of Singer Sourcing Limited LLC
HUSQVARNA is the trademark of Husqvarna AB.
All trademarks are used under license by Singer Sourcing Limited LLC.
© 2017 Singer Sourcing Limited LLC
All rights reserved. (Version A)

PREMIER+™ 2 Embroidery Contents i
Contents
1 Chapter 1: Welcome to PREMIER+™ 2 Embroidery
5 Chapter 2: Tools and Techniques
5 The PREMIER+™ 2 Embroidery Window
6 The Toolbar
9 Keyboard Shortcuts and Shortcut Menus
11 PREMIER+™ 2 Embroidery Terms and Conventions
14 Chapter 3: Managing Embroideries
14 New
14 Opening Embroideries
15 Notes and Settings
15 Combine
16 Fix as Stitches
16 Save Embroideries
19 Revert To
20 Chapter 4: Viewing Embroideries
20 View Mode
20 Grid
21 Zooming In or Out
22 Backgrounds
25 Life View
27 Design Player
29 Chapter 5: Editing Colors
29 Design Window
30 Color Select
33 Colors Window
34 Color Tone
34 .ColorSort
35 Chapter 6: Modifying Embroideries
35 Selecting Embroideries
40 Move
41 Resize and Scale
42 Rotate
43 Modify Design
43 Flip Vertical and Horizontal
43 Aligning Embroideries
44 Layout Order

ii PREMIER+™ 2 Embroidery Contents
44 Encore
49 Endless Assistant
52 Cut, Copy, Paste and Duplicate Selected
53 Delete
53 Undo and Redo
55 Chapter 7: ExpressMonogram Assistant
56 Create a Monogram with a Border
59 Chapter 8: Creating Lettering
65 Letter Options
65 Lettering Shapes
77 Font Manager
79 Import Font from Embroideries
84 Edit Lettering
85 Letter Properties
86 Fixing Lettering as an Embroidery
87 Chapter 9: QuickFont
87 How to Create a Font
89 Create a Pattern Fill Font
92 Chapter 10: Creating SuperDesigns
93 Edit SuperDesigns
94 SuperDesign Properties
95 Fixing SuperDesigns as Embroideries
97 Chapter 11: Frames, Borders & Underlines
97 Creating Frames
100 Frame or Flourish Options
100 Edit Frames
102 Fixing Frames and Flourishes as Embroideries
104 Creating Borders and Motif Underlines
104 Creating Borders
105 Creating Motif Underlines

PREMIER+™ 2 Embroidery Welcome to PREMIER+™ 2 Embroidery 1
1
Welcome to PREMIER+™ 2
Embroidery
Use PREMIER+™ 2 Embroidery to adjust, modify, personalize and
combine embroidery designs, frames and flourishes, and add appliqué
and decorations.
To get started with PREMIER+™ 2 Embroidery, open it and create embroidery
projects using lettering and SuperDesigns, or open an existing embroidery and
modify it. Personalize your embroideries in true 3D in a real hoop. Rotate your
embroideries to any degree, mirror them from side to side or end to end and scale
or resize your embroideries. Adjust an unlimited number of designs and lettering
’side by side’ in multiple windows.
Adjust the colors to the thread shades from your preferred manufacturer, or even
create your own threads, then combine with lettering or shapes. Select multiple
designs and move them as a unit, or use Group to save the selected embroideries
as a group. Cut, copy or paste and duplicate embroideries between PREMIER+™ 2
Embroidery System apps. ColorSort to intelligently re-sort the color order of a
design to reduce the number of thread changes.
Use 'Encore' to repeat embroideries in a circle, in 8 line and 28 shape options, or
around the hoop. Use the Endless function to make endless embroideries for any
hoop. Add appliqué and decorations to your designs.
Add multi-line lettering with your choice of 35 lettering shapes and flexibility to
resize and reshape words, and space letters individually. Select machine motif
stitches visually to create new designs or embellish existing ones, or add
SuperDesigns. Surround monograms, names or any design with frames and

2 PREMIER+™ 2 Embroidery Welcome to PREMIER+™ 2 Embroidery
flourishes or an automatic border. Adjust the fill, satin and line settings for many
fonts and SuperDesigns.
Use Design Player to play through an embroidery, and Life View to view the
embroidery in real-world perspective with the desired export options. Save your
project with its design parts kept separate in multipart .vp4 format, and Export in
the desired format according to the chosen options to optimize for sewing.
Create designs automatically from clipart or photos with the ExpressDesign
Assistant and PhotoStitch Assistant. Create monograms, quilt blocks, word
sculptures and fonts with the ExpressMonogram Assistant, Quilt Block Assistant,
Word Sculpt Assistant and QuickFont, and split large embroidery projects into
sections for stitching out with the Split Project Assistant. Finally, view your project
on your desired background.
Use 2D editing in the Modify window to alter individual stitches or whole blocks of
stitches, even insert new stitches. Manage colors in your embroideries: move
colors up or down, merge color blocks and insert color changes. For more
information on editing stitches and choosing stitch properties, see the
PREMIER+™ 2 Advanced Features and Assistants User’s Guide.
■ Open PREMIER+™ 2 Embroidery by clicking its icon in the Launchpad, or by
double-clicking its icon in the Finder. The PREMIER+™ 2 Embroidery work area
appears.
Assistants
Note: For information on using the ExpressDesign Assistant, PhotoStitch Assistant,
Quilt Block Assistant and Split Project Assistant, see the PREMIER+™ 2 Advanced
Features and Assistants User’s Guide. The Quilt Block Assistant and Split Project
Assistant are only available in PREMIER+™ 2 ULTRA.
QuickFont
Use the QuickFont to create new fonts for PREMIER+™ 2 Embroidery from most
TrueType® or OpenType® fonts on your computer.
ExpressDesign Assistant
Use the ExpressDesign Assistant to automatically create embroideries from a
picture, either to fit the current hoop or to fit an area you select.
ExpressMonogram Assistant
Use the ExpressMonogram Assistant to create a monogram of up to three letters
from a set of initials, choosing a font style, thread color, shape and size. If desired,
add a border.
Endless Assistant
Use the Endless Assistant to create a continuous embroidery sequence.

PREMIER+™ 2 Embroidery Welcome to PREMIER+™ 2 Embroidery 3
PhotoStitch Assistant
Use the PhotoStitch Assistant to create unique embroideries automatically from
your own photos. Generate a linear pattern of stitches, or a Maze or Spiral effect,
using one thread for a single color result.
Word Sculpt Assistant
Use the Word Sculpt Assistant to create a word design automatically using your
choice of outline, words, and fonts.
Project-in-the-Hoop Assistant
Use the Project-in-the-Hoop Assistant to create an in-the-hoop design using your
choice of project type, style and dimensions.
Quilt Block Assistant
Use the Quilt Block Assistant to create a filled or outline quilt block automatically.
Place a quilting fill around an embroidery!
Split Project Assistant
Use the Split Project Assistant to split your embroidery automatically for your
preferred hoop.
Further Information
This user guide provides instructions to help you design embroidery projects in
PREMIER+™ 2 Embroidery. In addition to this book, other resources are available.
Reference Guide
The Reference Guide shows how to start the app and provides a quick tour of the
main screen. The Reference Guide is supplied in PDF format , ready for printing,
and contains full reference information.
Help
The integrated help contains full reference information. Click the Help button .
Where available, a help topic appears that is relevant to the selected item.
Alternatively, use the Help menu.
Viewing and Printing PDF Guides
To find all the Reference and Sample Guides for your PREMIER+™ 2 Embroidery
System, go to Home/Premier+2/Guides, then double-click Reference Guides or
Sample Guides. Select the desired PDF guide.
Note: To view and print the PDF Guides, you may use Preview which is included in
your Mac OS®.
Readme
The most up-to-date details about the PREMIER+™ 2 Embroidery System are in
the Readme.rtf file available when you install your PREMIER+™ 2 Embroidery
System.

4 PREMIER+™ 2 Embroidery Welcome to PREMIER+™ 2 Embroidery
Internet FAQs
The FAQ option on the Help menu connects to an Internet database of frequently
asked questions about the PREMIER+™ 2 Embroidery System. Search topics
relating to the app you are using, or search all topics.
Tu t o r i a l s
Interactive training exercises are available for many of the apps. They provide a
'show-me' experience that will help you learn how to use key features of the
software. The tutorials are found in the online Learning Center on the Internet.
Use the Help menu, or browse to EmbroideryLearningCenter.com.
Sample Files
Samples are included for your use. The sample files are installed to subfolders of
Home/Premier+2/Samples/Premier+2Emb or the folder of your choice.
Note: To navigate to your Home folder, in the Finder click the Home icon on the
Favorites sidebar. Alternatively, choose Go > Home, or press ⇧⌘H.

5 PREMIER+™ 2 Embroidery Tools and Techniques
2
Tools and Techniques
Get familiar with the tools you use to create embroideries with
PREMIER+™ 2 Embroidery.
Each embroidery project that you create with PREMIER+™ 2 Embroidery is an
individual document.
The first time you open PREMIER+™ 2 Embroidery (by clicking its icon in the
Launchpad or by double-clicking its icon in the Finder), the PREMIER+™ 2
Embroidery work area appears. This is where you will create and edit your
embroideries.
The work area is surrounded by the selected hoop.
The PREMIER+™ 2 Embroidery Window
Showing and Hiding Tools
■ The toolbar gives quick access to the tools needed to create and edit your
embroidery project.
To show or hide the toolbar, choose View > Show Toolbar, or View > Hide
Toolbar (⌥⌘T).
■ The Control Panel gives access to the tools needed to edit your embroidery
To show the Control Panel, choose View > Show Control Panel (⌘G), or click .
■ To load embroideries use File > Insert or File > Open. See “Insert Embroideries”
on page 7.
Toolbar: customize it to show the tools you use frequently
Control PanelWork Area
Menu bar

6 PREMIER+™ 2 Embroidery Tools and Techniques
The Toolbar
The PREMIER+™ 2 Embroidery toolbar gives one-click access to many of the
features you will use as you work in PREMIER+™ 2 Embroidery. You can add,
remove, or rearrange toolbar buttons as desired.
The default set of toolbar buttons is shown below.
To Customize the Toolbar
1 Choose View > Customize Toolbar. Alternatively, Control–click in the toolbar and choose
Customize Toolbar.
2 Make changes as desired: drag items to add or remove them, to return to the defaults drag
the default set, choose an icon/text type from the Show menu, and select the size.
3 Click Done.
Control Panel
Use the Control Panel to edit embroidery designs, repeat designs with Encore, add
lettering, add SuperDesigns, add appliqué and decorations to the design, and add a
frame or a border to the design.
To Open the Control Panel
■ Click the Control Panel button in the toolbar.
■ Choose View > Show Control Panel (⌘/).
There are 9 windows in the Control Panel:
Assistants: Access the ExpressDesign and other assistants
Actions: Insert, Save, Print and other actions
Enlarge or reduce your view
of the embroidery
Resize/rescale the embroidery
Select Hoop
Load, fade or move background
Realistic, 3D & 2D View
Preview design
Designs & Lettering
Group & Ungroup embroideries
Select a block, a stitch, or all stitches
Add to, replace or remove the selection
Design Change colors in embroideries, edit the notes and settings, rotate
and resize. See “Design Window” on page 29.
Encore Repeat embroideries. See “Encore” on page 44.
Letter Add lettering using single or multicolor fonts and fonts of special
characters. See “Creating Lettering” on page 59.
SuperDesign Add SuperDesigns and adjust their size and appearance. See
“Creating SuperDesigns” on page 92.
Frame Surround a design or letters with one of over 500 decorative frames
and flourishes. See “Creating Frames” on page 97.
Border Create a border automatically for a design or lettering, or add a motif
underline. See “Creating Borders and Motif Underlines” on page 104.

PREMIER+™ 2 Embroidery Tools and Techniques 7
Menu Bar
The PREMIER+™ 2 Embroidery menu bar is visible if PREMIER+™ 2 Embroidery
is the active window. Each open embroidery or group of embroideries also has its
own document window showing its name.
There are seven menus in addition to the Apple ( ) menu and the application
menu: File, Edit, View, Design, Assistants, Window and Help.
■ To access the menu options, use the mouse to pull them down from the menu bar.
Insert Embroideries
Use the Insert dialog to select embroidery designs to customize.
Note: Use Insert to customize an embroidery as part of a new project, and use
Open to change the original embroidery. See “Open” on page 14.
Work Area
The work area is the area where embroideries are loaded. The work area includes
the area surrounding the selected hoop. It is where you make changes to an
embroidery. The stitch area is the available area inside the selected hoop.
Stitches are drawn in the appropriate colors. The embroideries are shown in either
3D or 2D. The background color and texture can be changed using PREMIER+™ 2
Configure. You can also load or create a background garment, fabric or quilt block.
In Standard 3D view the real hoop is shown, with blue
corners showing the stitch area within the hoop. The
background is shown.
In Realistic 3D view the embroidery and background are
shown without selection boxes, grid or hoop.
In 2D view , the hoop size is shown by a blue outline with
bold corners. Stitches are drawn in plain colors only, and stitches using multicolor
threads are drawn using only the first color in the thread definition. The
background does not use texture in 2D view.
Background Grid
The work area has a grid. Zooming in or out makes the grid squares look bigger or
smaller.
Appliqué Create, view and adjust appliqué pieces. See “Creating Appliqué
Areas” on page 144.
Decorations Decorate your chosen background and embroidery with beads,
sequins, hotfix crystals or nailheads. See “Creating Decorations” on
page 126.
Modify Edit stitches and blocks of stitches, and add color change, stop and
trim commands. See the PREMIER+™ 2 Advanced Features and
Assistants User’s Guide.
Hoop Corner

8 PREMIER+™ 2 Embroidery Tools and Techniques
Select the Grid and its Size
■ To turn the Grid on or off, choose View > Grid (or ⌘.).
■ To change the size of the grid squares, choose PREMIER+™ 2 Embroidery >
Preferences (or
⌘,) and set the size.
Hoop
By default, the hoop is shown at a size so that the hoop fills the window, as if you
had clicked Zoom To Fit .
To Select a Hoop
■ Click Hoop in the toolbar, or choose Edit > Hoop to open the Hoop dialog.
Note: If a selection box has round handles on its corners, part of it is outside the
selected hoop. Move it into the hoop, or change the hoop size.
Design Information
The stitch count , dimensions (height and width ) and number of
colors for the selected embroidery are shown in the Information area of the
Design window.
Color Select
The Color Select area of the Design Window shows the colors used in the
selected embroidery. See “Color Select” on page 30.
Note: Color Select is blank if no embroidery is selected.
Zooming In or Out
You can enlarge (zoom in) or reduce (zoom out) your view of the work area.
Square handles: inside the hoop Round handles: outside the hoop
Use the slider to zoom in and out
Zoom To Rectangle
Zoom Out
Zoom To Fit
Zoom In
Zoom 100%

PREMIER+™ 2 Embroidery Tools and Techniques 9
Zoom To Fit shows the hoop so that it fills the window. This is the default size.
Click the center marker on the zoom slider to see the embroidery at 100% or real
size. See “Zooming In or Out” on page 21.
Keyboard Shortcuts and Shortcut Menus
You can use the keyboard to perform many of the PREMIER+™ 2 Embroidery
menu tasks and commands. To see a full list of keyboard shortcuts, open
PREMIER+™ 2 Embroidery and choose Help > Keyboard Shortcuts.
Many commands are available from shortcut menus accessed from the design you
are creating.
To Open a Shortcut Menu
■ Press the Control key while you click on a design.
■ Right-click on the mouse or trackpad.
Keyboard Shortcuts
Note: On Mac portable keyboards use Function–Delete or Function–Backspace
(
fn ⌫ ) to delete an object.
↵ Return key
⌘ Command key (cmd)
⇧ Shift key
⌦ Delete - full sized keyboard only
⌃ Control key (ctrl)
⌥ Option key (alt)
⇥ Tab key
← Left arrow
→ Right arrow
fn Function key
⌫ Delete back key (backspace)

10 PREMIER+™ 2 Embroidery Tools and Techniques
Assistants Menu
You can use the Assistants menu to get quick access to the assistants.
To open the Assistants Menu
■ Click Assistants on the toolbar. The Assistants pop-up menu opens.
Actions Menu
You can use the Actions menu to get quick access to
many functions.
Additional options are available, depending on what is selected; for example,
Properties, stitch types, and so on.
To open the Actions Menu
■ Click Actions on the toolbar. The Actions pop-up menu opens.
Insert Open an embroidery in the current window.
Undo Undo the last action.
Redo Redo the last Undo.
Cut Remove the embroidery from the work area
and place it on the Clipboard.
Copy Make a copy of the selected embroidery(ies).
Paste Paste the embroidery(ies) on the Clipboard.
Paste into
Center
Paste the embroidery(ies) on the Clipboard
into the center of the work area.
Duplicate
Selected
Make a copy of the selected embroidery and
paste it on the work area.
Delete Delete one or more selected embroideries, pieces of lettering or
SuperDesigns.
Zoom Select your desired magnification.
Background
Visibility
Set visibility for the active background to a range of levels.
Save Save the embroidery project in the current window in .vp4 format.
Export Export the embroidery project in the current window in any embroidery
format.
Print Print a worksheet for the embroidery project.
Send Express Send the embroidery project in the current window to the screen of the
connected embroidery machine.
Send to
mySewnet™
Send the selected embroidery to the mySewnet™ cloud for your
mySewnet™ enabled embroidery machine.

PREMIER+™ 2 Embroidery Tools and Techniques 11
PREMIER+™ 2 Embroidery Terms and Conventions
For a general overview of terms and conventions, please refer to the PREMIER+™
2 Embroidery System Getting Started Guide.
On-screen pointers
The mouse pointer is most commonly shown as an arrow on the screen.
The following pointers are also used:
I-beam Used when entering text, e.g. in the Notes dialog.
Move A four-headed arrow is used when the pointer is over the
selection box for one or more embroideries, or when Move
Background is selected.
Move crop area A hand is used when moving the crop area in the Rotate and
Crop Picture page of some assistants.
Zoom To Rectangle Used to drag an area to zoom in to.
Adjust/Resize A diagonal double-headed arrow is used when the pointer is
over the square corner handle for a selection box, lettering,
a SuperDesign, or a frame. It is also used when moving a crop
line in the Rotate and Crop Picture page of some assistants.
Rotate Used when the pointer is over the Rotate handle on a selection
box.
Circle Size Used when the pointer is over the square green adjustment
handle for circular lettering types, or when adjusting an Encore
circle.
Horizontal A horizontal double-headed arrow is used when the pointer is
over the flip horizontal handle on a selection box.
Vertical A vertical double-headed arrow is used when the pointer is
over the flip vertical handle on a selection box.
Box Select The Box Select pointer appears when Box Select is chosen. It
also appears when ExpressDesign into Rectangle or
PhotoStitch into Rectangle is chosen in the assistants.
Freehand Select The Freehand Select pointer appears when Freehand Select is
chosen.
Freehand Point
Select
The Freehand Point Select pointer appears when Freehand
Point Select is chosen.
Pick Color The Pick Colors pointer appears when picking colors from a
picture for thread colors in the Choose Thread Colors page of
the ExpressDesign or PhotoStitch Assistants.
Measure The Measure pointer appears when the Get Length function is
selected.
Insert Stop The Insert Stop pointer appears when inserting a Stop
command.

12 PREMIER+™ 2 Embroidery Tools and Techniques
Dialog Controls
The following control symbols are used in many dialogs.
Information Symbols
The following information symbols are used.
Multi-Touch Gestures
Multi-Touch gestures are used when viewing and moving embroideries in
PREMIER+™ 2 Embroidery.
■ To set the use of Multi-Touch Gestures, scroll bars and secondary click options,
choose Apple Menu > System Preferences, then select Mouse or Trackpad to set
the preferences for your hardware.
Autoscroll
You can autoscroll on a portable Mac’s Multi-Touch trackpad, a Magic Trackpad or
a Magic Mouse.
When you drag within a document, the autoscroll feature moves the pointer
automatically, changing the view of the work area. This is useful when zoomed in.
Use autoscroll while moving or resizing a selected embroidery.
■ On a portable Mac’s Multi-Touch trackpad, or a Magic Trackpad, use a two finger
swipe.
■ On a Magic Mouse, use a one finger swipe.
Pinch to zoom
You can use Pinch to zoom on a trackpad to zoom in and out.
Proportional
Non-proportional
Rotational Slider
Flip Vertically
Flip Horizontally
Height
Width
Number of Stitches
Number of Colors
Rotate
Height (percentage)
Width (percentage)

PREMIER+™ 2 Embroidery Tools and Techniques 13
■ On a portable Mac’s Multi-Touch trackpad, or a Magic Trackpad, pinch two fingers
to zoom in, and spread two fingers to zoom out.
Note: You must set the trackpad scroll and zoom options to Zoom in or out. See
“Customizing Multi-Touch Gestures on a Trackpad” on page 13.
Secondary click for Control–click
You can set a secondary click for Control–click when using a trackpad or the Magic
Mouse. A short video demonstrates how to use these gestures.
■ Choose Apple Menu > System Preferences, then select Mouse. In Point & Click,
select Secondary Click: Click on right side.
■ Choose Apple Menu > System Preferences, then select Trackpad. In Point & Click,
select Secondary Click, then choose a click method in the pop-up menu, for
example, Click in bottom right corner.
PREMIER+™ 2 Embroidery and PREMIER+™ 2 Modify Only
Pinch to resize or scale
You can use Pinch to resize or scale the selected embroidery on a trackpad.
■ On a portable Mac’s Multi-Touch trackpad, or a Magic Trackpad, pinch two fingers
to reduce the size, and spread two fingers to increase the size.
Note: You must set the trackpad scroll and zoom options to Zoom in or out. See
“Customizing Multi-Touch Gestures on a Trackpad” on page 13.
Rotate
Twist your thumb and forefinger to rotate the selected embroidery, block of
stitches, lettering or SuperDesign when using a trackpad.
■ On a portable Mac’s Multi-Touch trackpad, or a Magic Trackpad, twist your thumb
and forefinger to rotate the selected embroidery.
Note: You must set the Trackpad scroll and zoom options to Rotate. See
“Customizing Multi-Touch Gestures on a Trackpad” on page 13.
Customizing Multi-Touch Gestures on a Trackpad
The System Preferences options below show short videos of how the gestures
should be used.
1 Choose Apple Menu > System Preferences.
2 Select Trackpad.
3 To use Pinch to zoom, select Scroll & Zoom, and then select the "Zoom in or out"
checkbox.
When Zoom in or out is highlighted, a video demonstrates how to use Pinch to zoom.
4 To use Rotate, select Scroll & Zoom, and then select the Rotate checkbox.
A video demonstrates how to use Rotate.

PREMIER+™ 2 Embroidery Managing Embroideries 14
3
Managing Embroideries
Learn how to open embroideries and new windows, how to save and
export embroideries, how to combine your embroideries, and how
to add notes to them. Cut, copy, paste and duplicate your
embroideries, and undo and redo your changes.
New
Use New to open a new PREMIER+™ 2 Embroidery window so that you can
adjust pasted embroideries or place lettering, motifs, SuperDesigns or frames.
Note: To load an embroidery into an existing window, use Insert.
■ Choose File > New.
■ Press ⌘N
Opening Embroideries
Open embroideries into an existing or new window.
• Use Insert to load individual files by icon, name or number into the current
window.
• Use Open to load individual files by icon, name or number into a new window.
• Use Open Recent to reopen recently edited files into a new window.
• Use Paste to insert a file from the Clipboard into the current window.
• Double-click on an embroidery file in the Finder. The embroidery will open in a
new window.
Use Insert to load Melco .exp format.
Insert
Use Insert to select embroidery designs to customize. PREMIER+™ 2 Embroidery
displays the Insert dialog so you can load a saved embroidery into an existing
window, or start a completely new project.
Open
Use Open to load a saved embroidery into a new window. All formats can be
opened except Melco (.exp). PREMIER+™ 2 Embroidery displays the Open dialog
so you can select an embroidery to open.

PREMIER+™ 2 Embroidery Managing Embroideries 15
Note: To avoid accidentally overwriting your original embroidery, it is
recommended to use Duplicate or Save As and work from a copy when using
Open.
Open an Embroidery
1 Choose File > Open (or press ⌘O).
2 Browse to the desired folder in the Open dialog.
3 Click an embroidery to highlight it.
4 Click the Open button to load the embroidery.
Open Recent
Use Open Recent to open a menu of previously used embroideries.
Note: To avoid accidentally overwriting your original embroidery, it is
recommended to use Duplicate and work from a copy when using Open Recent.
Notes and Settings
Use the Notes and Settings to add a description or category to your
embroidery. The Notes and Settings box is found on the Design window.
To Edit the Notes or Settings
■ In the Design window of the Control Panel , select Notes or Settings ,
then click Edit to open the Notes or Settings dialog and add some text.
Note: Use Option–Return or Control–Return to start a new line of text.
Combine
Use the Combine functions, if desired, to merge the embroideries in your project
into a single embroidery. The Notes and Settings from these embroideries are also
merged. Embroideries are combined when exported for stitchout if the default
settings are retained, so it is not required to use Combine before saving.
Note: Use Group to work with several designs as a single unit.
Choose a folder
Click to select an
Click Open to load
Search by name
embroidery

16 PREMIER+™ 2 Embroidery Managing Embroideries
The embroideries are combined in the exact order that they were loaded into, or
created in PREMIER+™ 2 Embroidery. This will be the stitchout order.
Combine All
Use Combine All to merge all the embroideries in the current window into a single
embroidery.
Combine Selected
Use Combine Selected to merge the selected embroideries into a single
embroidery.
■ Choose Design > Combine Selected.
■ Press ⌘U
Fix as Stitches
Use Fix as Stitches to fix the selected subdesign or subdesigns as embroidery.
You may wish to fix designs to mirror lettering, or a selection or group; to resize
or scale without constant properties; or to rotate the Appliqué Fabric in a
SuperDesign.
as embroidery when you adjust them in the Modify window in PREMIER+™ 2
Embroidery Extra.
■ Choose Design > Fix as Stitches.
■ Press ⌥⌘U
Save Embroideries
There are five methods of saving embroideries:
Note: If you make a mistake when changing an embroidery, use Revert To to
recover the previous version. See “Revert To” on page 19.
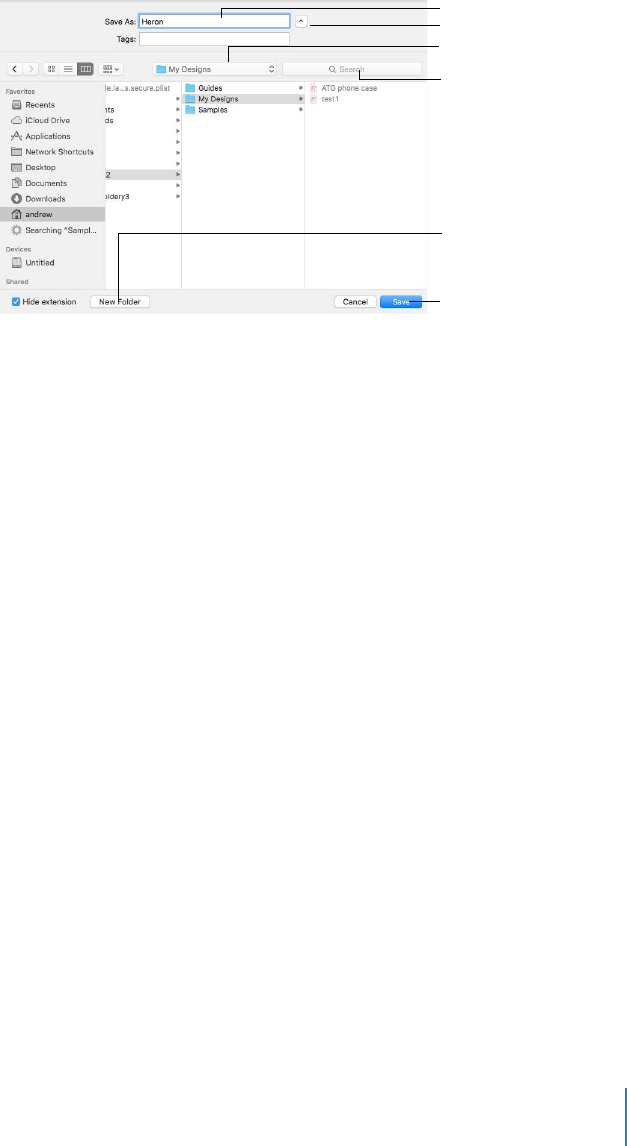
Save
This saves the contents of the open window as a multipart embroidery in .vp4
format, with the name you give it, in the Save dialog.
PREMIER+™ 2 Embroidery Managing Embroideries 17
Note: To use other embroidery formats, choose Export. See “Export” on page 17.
When saving on subsequent occasions, the contents of the open window is saved
under its current name as a multipart embroidery in .vp4 format. A backup is made
of previous versions.
Note: When you save a project, any lettering, SuperDesigns and frames are fixed as
embroidery.
Duplicate
This makes a multipart copy of the open window using that document’s name, with
the word "copy" at the end. Use Save to save this copy under a different name, or
in another folder, in the Save dialog.
Save As
Use Save As to save the contents of the current window as a multipart embroidery
in .vp4 format under a new name.
■ Choose File > ⌥ > Duplicate.
■ Press ⌥⇧⌘S
Save On Close
If you make changes to an unsaved embroidery, then try to close the embroidery
window before saving the changes, a message appears, asking if you want to save
the embroidery.
Note: If you have already saved the embroidery, this message will not appear.
Export
Save the project in the current window in the desired format according to the
chosen options to optimize for sewing. The embroidery must fit in the currently
selected hoop. Use the Design Player to see how the embroidery will be exported
according to the current Optimize for Sewing Options.
Name the embroidery
View the compact Save dialog
Select a folder to save in
Search for a folder or file
Create a new folder
Save the embroidery

18 PREMIER+™ 2 Embroidery Managing Embroideries
The preferred file format for exporting embroideries is Husqvarna Viking / Pfaff
.vp4, as this will preserve the separate parts of multipart designs. It also preserves
thread color information and notes.
You can also export embroideries as Husqvarna Viking /Pfaff (.vp4, .vp3, .vip),
Brother/Babylock/Bernina PEC (.pec), Brother/Babylock/Bernina PES (.pes),
Compucon/Singer PSW (.xxx), Husqvarna (.hus, .shv), Janome (.jef and .sew),
Melco Expanded (.exp), Pfaff (.pcs), Tajima (.dst) or Toyota (.10o).
Note: The initial name is the current file name with "Exported" added. The text
"Exported" may be changed in PREMIER+™ 2 Configure.
Export an Embroidery
1 Create an embroidery project using existing designs, text, frames and SuperDesigns.
2 Save the embroidery.
3 Choose File > Export (or press ⌥⌘S).
4 Choose an embroidery format from the pop-up menu.
5 Select your optimization options.
6 If you are using a multipart hoop, set Intelligent or Straight Line split.
7 Click Continue.
8 The Save or Saving As dialog appears. Save the embroidery as desired.
Note: When exporting an embroidery, the message "Embroidery is too large or will not fit in
hoop." may appear. This means that some part of your embroidery is not entirely within the
hoop, as indicated by round resize handles on the embroidery. If you have multiple elements
that need to be combined, use ? and the arrow keys to step through the embroideries until
you find the item with round resize handles. Drag the embroidery so that it is inside the
hoop. Alternatively, use the Design > Move Into Hoop feature.
Choose an embroidery format
Optimize the embroidery
Go to the "Save" or "Saving as" dialog
Set the options for splitting
Create placement stitches
Rotate the hoop to
for stitching out
for decorations
suit your machine
in a multipart hoop

PREMIER+™ 2 Embroidery Managing Embroideries 19
Export Appliqué Pieces
Use Export Appliqué Pieces to save or print appliqué outlines ready for cutting.
There are five appliqué piece export methods:
■ Export for Cutter: Save as SVG, DXF or FCM files for use in fabric cutters
■ Export for Cutwork Needles: Save as VP4 or VP3 stitch files that can be used
with INSPIRA™ Cutwork Needles
■ Print Templates: Print as an outline template to stick or pin to fabric and then
cut out
■ Print Appliqué Pictures: Print directly onto printable fabric or an iron-on
transfer; this also prints the image of the appliqué piece
■ Export for Custom Layout: Save as SVG files with the fabric image placed as the
fill for each shape. This is designed for use with fully customized layouts.
Export Decoration Template
Use Export Decoration Template to save a template for all your decorations in a
format for your automated cutter. This can be used to create a crystal transfer
template (or rhinestone template) for pressing hotfix crystals and nailheads
directly onto your work.
Revert To
Use Revert To to return to a previous version of your embroidery.

20 PREMIER+™ 2 Embroidery Viewing Embroideries
4
Viewing Embroideries
Select the way you view your embroideries. Zoom in and out, switch
between 3D View, Realistic 3D and 2D View, and use a grid for
alignment. Load or create a background, then move and fade it as
desired. Use the Design Player and Life View to view how your
embroideries will stitch out, and in 3D with a real-world perspective.
View Mode
Select Standard 3D, Realistic 3D, or 2D View stitch display with View Mode.
Use 3D View to see embroideries, background and grid in standard 3D mode. The
stitches of the embroideries have three-dimensional shading.
Use Realistic 3D to view embroideries and background in 3D without selection
boxes, grid or hoop.
Grid
Use the grid to help align embroideries. Adjust its size between 2mm and 50mm
using Preferences.
3D View
Realistic 3D
2D View
Grid On Grid Off
2D shows stitches as
lines with no shading
See your embroidery in Standard 3D
Realistic 3D shows no box, grid or hoop

PREMIER+™ 2 Embroidery Viewing Embroideries 21
■ Choose View > Grid.
■ Press ⌘.
Zooming In or Out
You can enlarge (zoom in) or reduce (zoom out) your view of the work area.
Zoom To Fit shows the hoop so that it fills the window. This is the default size.
Click the center marker on the zoom slider, or press ⌘1 to see the embroidery at
100% or real size.
You can select the position and size of an area to zoom in on with Zoom To
Rectangle.
Magnify an Area with Zoom To Rectangle
1 Select Zoom To Rectangle .
The pointer changes to the Zoom To Rectangle pointer .
2 Drag a rectangle around the area you want to zoom in to.
3 Release the mouse button to zoom in.
Zoom To Rectangle is automatically deselected after you
have used it.
Pan
When zoomed in, move around the work area using pan.
Note: The scroll bars may only appear when you are scrolling. To always show the
scroll bars, choose Apple Menu > System Preferences > General > Show scroll
bars: Always.
■ Drag the scroll bars.
■ Swipe with one finger on a Magic Mouse, or two fingers on the trackpad to scroll
in any direction.
Percentage Zoom
You can set zoom percentage levels for the active embroidery from 25% to 800%,
with 100% being the real size of the embroidery.
■ Click Actions on the toolbar and choose Zoom > Percentage Zoom.
Use the slider to zoom in and out
Zoom To Rectangle
Zoom Out
Zoom To Fit
Zoom In
Zoom 100%

22 PREMIER+™ 2 Embroidery Viewing Embroideries
Backgrounds
Use the Background tools to load a background or create a new background with
the Background Assistant, to move a background, or to fade a background.
Note: The Background tools are only available after a Background has been selected
in the Background Assistant.
Load Background
Use Load Background to start the Background Assistant, where you can load a
background or create a new background for your embroideries.
■ Click the Load Background button on the toolbar.
■ Choose View > Load Background.
■ Press ⇧⌘K
The Background Assistant opens.
Background Visibility
Use Background Visibility to open a pop-up menu and select one of the
background visibility options.
• Background On shows the background at full visibility.
• Background Off hides the background.
• Fade Background (or ⌘K) opens the Fade Background dialog where you can set
the visibility for the background garment or fabric.
■ Click the Background Visibility button on the toolbar, then choose Background
On, Fade Background or Background Off from the pop-up menu.
Background On shows the picture
in the background.
Drag the slider to fade the colors
in the background picture (here
by 50%).
Background Off hides the
picture.
Load or create a background with
Fade the background
Move the background
the Background Assistant

PREMIER+™ 2 Embroidery Viewing Embroideries 23
Move and Rotate Background
Use Move and Rotate Background to move the background that you have
placed behind your embroideries. The mouse pointer changes to a four-headed
arrow .
Using Move Background
1 Click the Move Background button . The mouse pointer changes to a four-headed
arrow .
Alternatively, choose View > Move Background (or press ⌥⌘K).
2 Drag the garment or fabric background around the hoop or project area.
3 When the background is in the desired location, Control–click to deselect the function.
Using Backgrounds
Use the Background Assistant to load an existing background, or create a new
background. Preview the embroideries you have designed on a garment, home
decor item, quilt block, fabric, or other background.
The garment, quilt block and fabric backgrounds supplied with PREMIER+™ 2
Embroidery have already been set to real size.
Select a saved background type
Load a picture to create
a new background
Load a saved background
Select a picture
on your computer
Import a file from a
scanner or camera
The picture is previewed

24 PREMIER+™ 2 Embroidery Viewing Embroideries
Change the angle of the
picture
Select the whole picture
Automatically exclude the
picture background
Zoom in and out
Drag to place a line
across the picture
Set the background
measurement
Zoom in and out on
the background
Browse to select a
Background category
Give the Background a name
Create a new Background
Category

PREMIER+™ 2 Embroidery Viewing Embroideries 25
Life View
Use Life View to show how an embroidery exported from the project will look
in 3D with real-world perspective. Zoom in to see detail, and move and rotate the
embroidery in a three-dimensional view. All parts of the embroidery that are
within the hoop area are shown, whether or not they are selected.
Use Life View at any time when you want to see the design with no grid,
stitches selected, or markers displayed, and when you want to see the effects of
glow in the dark and solar reactive threads.
Use the position slider to move to another part of the Life View window.
■ Drag the cross marker in the center of the box to view the desired part of the
embroidery, using the zoom slider to control the magnification.
Use the rotation slider to view the stitching in the embroidery in 3D.
■ Drag the cross marker in the center of the box to change the angle at which the
embroidery is viewed, and allow you to visualize the project in varying real-world
views.
■ Alternatively, drag directly in the embroidery preview area to change the angle of
view.
Zoom
Use the zoom slider to change the magnification of the embroidery. The box below
the zoom bar displays the current magnification.
Note: When zoomed in, use the position slider to move around the embroidery.
Design Information
Move around the window
Change the 3D viewing angle
Zoom in and out
Light and dark effects
Reset
Animation
Share a picture or video online

26 PREMIER+™ 2 Embroidery Viewing Embroideries
■ Drag the slider to the right to magnify the view of the embroidery, and to the left
to shrink the view of the embroidery.
■ Click the marker in the center of the zoom bar (100%) to view the embroidery at
a magnification as close as possible to the Real Size setting you chose in
PREMIER+™ 2 Configure.
Design Information
View the dimensions (Width and Height ), the number of stitches and the
number of colors in the embroidery.
Glow in the Dark
Use Glow in the Dark to view the effect of using glow in
the dark threads. The preview darkens to simulate the lights
dimming, and the glow in the dark threads are shown in their
luminescent colors.
Note: Glow in the Dark is only available if glow in the dark
thread colors are present in the design.
■ Click Glow in the Dark to view the effect of luminescent threads.
Solar Reactive
Use Solar Reactive to view the effect of using photochromic threads. The
preview simulates the sun shining on the design, and the photochromic threads
change shade to show the colors they become in sunlight.
Note: Solar Reactive is only available if photochromic thread colors are used in the
design.
Play Demo
Use Play Demo to animate the preview and show the embroidery at different
angles automatically.
■ Click Play Demo to start and stop the animation.
Photochromic threads change color in sunlight.

PREMIER+™ 2 Embroidery Viewing Embroideries 27
Play My Demo
Use Play My Demo to animate the preview using your own
demo. Use the menu options to add the current position as a
point in the demo, or reset to create a new demo.
The My Demo animation is used for Life View in all PREMIER+™ 2 Embroidery
System apps. It is stored in the AnimationPath.txt file in the /[User]/Library/
ApplicationSupport/VSMSoftware/Premier+2/System folder.
Note: Copy this file to another location as a backup before creating additional My
Demo animation paths for Life View.
■ Click Play My Demo to start and stop your saved animation.
■ Choose Play My Demo > Store Demo Point to save a point for your demo.
■ Choose Play My Demo > Reset My Demo to create a new demo.
Use Reset to set Rotation, Position and Zoom back to the default settings.Use
Share to save or share a picture or video of your design on your favorite social
media site. Share over Facebook® , Flickr® , Twitter® and YouTube® .
Design Player
Use Design Player to play through the stitches in the embroidery project as if it
was being stitched from an exported embroidery. All parts of the embroidery
project that are within the hoop area are shown, whether or not they are selected.
The current Optimize for Sewing settings from PREMIER+™ 2 Configure are used.
Start or pause play
Control play with
the slider
Design Information
Jump to first stitch
Jump to last stitch
Rewind
Play at double the
current speed
Share a picture or
video online

28 PREMIER+™ 2 Embroidery Viewing Embroideries
Note: All the designs in a multipart embroidery are shown in the Design Player. This
is therefore a good way to see the whole project after adjusting stitches in one of
the designs.
Embroideries that are outside the hoop (within a selection box that has round
corners) are not shown in the Design Player.
Note: If an embroidery contains a felting needle, the project will be shown "flipped",
as it would actually be stitched.
Use Share to save or share a picture or video of your design on your favorite social
media site. Share over Facebook® , Flickr® , Twitter® and YouTube® .
Using the Design Player
1 Choose File > Insert.
2 Browse to Home/Premier+2/Samples/Premier+2Emb/Stitch2/Butterflies and Bugs.
3 Scroll down to "Dragonfly 2.vp4".
4 Click to load the embroidery into the work area.
5 Click Design Player . Alternatively, choose View > Design Player or press ⌘Y.
The Design Player dialog opens and the embroidery is shown being stitched out.
6 Use the Play button at the bottom left to start playing through the stitches in the
embroidery.
7 Use the controls to play forwards or backwards through the embroidery at different speeds
(each time you click the speed doubles), jump to the start or end of the stitches, and stop at
any time.

29 PREMIER+™ 2 Embroidery Editing Colors
5
Editing Colors
This chapter describes how you can change thread colors, how you
can select thread colors to match colors on your computer, and how
to reduce the number of thread changes before stitching out.
Design Window
Use the Design window to change colors in embroideries, edit the notes and
settings, rotate and resize.
To Open the Design Window
■ Click Control Panel , then click Design .
Change a thread color
Check the embroidery information
Rotate the embroidery 45 degrees (Rotate 45)
Resize or rotate (Modify Design)
Center the embroidery in the hoop
Read the Notes and Settings information
Edit the Notes or Settings information
Adjust the brightness and colors (Color Tone)
Thread effect symbol
To learn how to Go to
Change a thread color See “Changing a Thread Color” on page 30.
Choose a color to use for a thread See “Select a Color for a Thread” on page 33.
Check the embroidery information See “Design Information” on page 8.
Read and edit the Notes and Settings See “Notes and Settings” on page 15.
Rotate the embroidery by 45 degrees See “Rotate” on page 42.
Resize or rotate the embroidery See “Modify Design” on page 43.
Center the embroidery in the hoop See “Center In Hoop” on page 43.

30 PREMIER+™ 2 Embroidery Editing Colors
Color Select
The Color Select area in the Design window shows the order in which the thread
colors are used in the selected design. The group of stitches using a particular
thread color is called a color block.
The Color Select area can be used to change thread colors and, in the Modify
window, to hide and show the stitches in any of the color blocks. The first color in
the embroidery is at the top of the list, followed by all the thread color blocks.
Note: You can move and merge color blocks in the Modify window .
Color Selection Dialog
The Color Selection dialog appears when you click a thread color in the Color
Select area. You may choose any thread shade from the available thread
manufacturers' palettes (for instance, Robison-Anton Rayon 40 or Sulky Rayon 40)
or a thread you have added to My Threads.
When you select a new thread color, the color worksheet will show the change and the
work area will show the block of stitches in the new color (assuming the stitches are not
hidden).
When you select a new thread color, the Color Select area shows the color
change, and the work area shows the block of stitches in the new color.
Changing a Thread Color
1 Hover the pointer over a color you wish to change in the Color Select area. The color block
will be highlighted in the work area.
2 Click to select the color, and the Color Selection dialog appears.
Adjust brightness and colors See “Color Tone” on page 34.
Minimize the number of color changes See “.ColorSort” on page 34.
To learn how to Go to
Choose a thread range
Selected thread ranges
Search by thread number
Click a thread color
to select a thread
View the thread
Use the Colors window
Puffy Foam depth
Twin needle
stitch size & color
Two t h r e a d c o l o r s
Wing needle
Felting needle
Cutwork needle
angle
information
to match a color

PREMIER+™ 2 Embroidery Editing Colors 31
Choose a thread range. The available shades for the thread range are shown in the list.
Alternatively, enter a name in the manufacturer search box, then choose a thread range
from the manufacturer popup list.
Note: To clear the manufacturer text box, click the Close button in the box.
3 Click a color in the list to select a thread shade visually. Scroll to see more threads.
4 If you know the shade number, click in the number search box and enter the shade number.
Alternatively, enter some numbers in the number search box, and choose a thread from the
thread number popup list. The current color is always shown.
5 To choose a color visually, click Colors to select a color in the Colors window. See
“Select a Color for a Thread” on page 33.
This is a quick way to jump to threads of the selected color (for example, click the light
yellow pencil to jump to light yellow thread shades).
6 Click OK to confirm the color selection and close the color selection dialog.
Effects
Use the Effects area to show the results of using thread effects or special needles.
Note: Only one thread effect can be used on any thread. In the Modify tab of
PREMIER+™ 2 Embroidery Extra, most thread effects are not shown in the active
subdesign, as it would be difficult to edit the stitches. They are shown in Design
Player and Life View , in addition to the other tabs.
To use Thread Effects
■ Click the desired color block in the list, then choose an effect:
• If you choose Puffy Foam , set the foam height.
• If you choose Twin Needle , set the Twin Needle size. Click the color
button for the Second Color if you wish to use a different thread color.
• For Dual Thread , it is recommended to change the Second Color.
• For Felting Needle select a color for the roving fiber for felting.
• For Cutwork Needle , choose the angle for your needles.
Puffy Foam
Use Puffy Foam to show the three-dimensional effect of stitching over
embroidery foam.
Dual Thread
Use Dual Thread to show the effects of stitching out
two threads through the same needle. This is particularly
suited to blending threads for special effects, such as mixing a
rayon thread with a metallic thread, as in the center of the
star.

32 PREMIER+™ 2 Embroidery Editing Colors
Tw i n N e e d l e
Use Twin Needle to show the effect of stitching out
the color block with a twin needle. This creates a horizontal
offset between the original thread color in the left-hand
needle, and a second thread color in the right-hand needle.
There are several ways that the Twin Needle effect can be
used, including:
• Use with running stitch to create a ribbon effect, typically
using the same thread color in both needles
• Use with a low density fill area to blend two different
thread colors and also have a lightly shadowed effect
Note: On the screen, the Twin Needle effect is shown
horizontally from left to right. If you rotate an embroidery
for stitching out, the twin needle stitchout will be different
from the effect on screen.
Size: Twin Needle Size is only available if the Twin Needle
effect is selected for the current color block. Choose the
size of the gap between the twin needles.
Preview the effect of changing the twin needle size to help decide which needles to
buy. Ensure that the desired size is recommended for embroidery on your
machine.
Second Color: The second thread color for the twin needle is initially set to the
same color as the original color block. Use Second Color to choose a different
thread for the second needle in the Color Selection dialog. The other color is
displayed in the Twin Needle area.

PREMIER+™ 2 Embroidery Editing Colors 33
Colors Window
Use the Colors window to choose a color for a thread. The nearest shade in the
current thread range is selected.
Use the Colored Pencils to select a color quickly.
Note: Other color models show a greater variety of shades: Color Wheel, Color
Sliders, Color Palettes and Image Palettes.
Select a Color for a Thread
1 Select a thread in the Color Selection dialog.
2 Click Colors to open the Colors window.
3 Click Colored Pencils to select the Colored Pencils color model.
4 Click one of the 48 pencils. The thread color changes in the Color Selection dialog.
The shade nearest to the pencil shade is used.
5 Click OK in the Color Selection dialog to confirm the color selection.
Colored Pencils
Select a color model
Click to select a color
Drag the selected color
to the palette

34 PREMIER+™ 2 Embroidery Editing Colors
Color Tone
The Color Tone page includes the Brightness, Contrast and Gamma sliders,
and the Thread Range box.
Note: Try different settings to enhance different designs. You can combine more
than one Color Tone tool.
In the Thread Range box, convert all the threads in an embroidery to a new thread
range, with or without adjusting the Color Tone options.
To u s e C o lo r To n e
■ Select the embroidery, then in the Design window click Color Tone .
■ Select the embroidery, then choose Design > Color Tone.
.ColorSort
Use ColorSort to reduce the selected embroidery to the minimum number of
color blocks.
The final number of color blocks produced in the ColorSort process can vary,
depending on any overlap between areas. If possible, it leaves only one color block
for each thread color used.
To ColorSort an Embroidery
■ Select the embroidery, then choose Design > ColorSort.
View the original
colors
Preview the changed
colors
Zoom in on the design
Adjust light & dark
Change the color
contrast
Optimize the
light/color balance
Choose a different
thread range

35 PREMIER+™ 2 Embroidery Modifying Embroideries
6
Modifying Embroideries
This chapter describes how you can select, move and reshape
embroideries, and how you can use Encore and Endless to place
multiple embroideries in lines and shapes.
Selecting Embroideries
Select an Embroidery
In all windows except the Modify window, the currently selected embroidery is
shown with a selection box around it. The selection box has square resize handles
on the corners, triangular flip handles on the top and left, and a circular rotate
handle on the right.
The handles are blue if in resize mode (density retained when resized), white in
scale mode (stitch count retained when resized), and green for lettering,
SuperDesigns and frames before they are fixed as embroideries, and in Encore.
Note: If a selection box has round handles on its corners, part of it is outside the
selected hoop. Move it into the hoop, or change the hoop size.
If no design is selected, no selection box is visible and the Color Select area in the
Design window is blank.
To Select an Embroidery
■ Click the embroidery.
■ Choose Edit > Previous Design (⌘←).
■ Choose Edit > Next Design (⌘→).
When making a selection, only embroideries that are completely enclosed by the
selection line (Box, Freehand Point, Freehand Line) will be included.
The Context Menu and Individual Designs
Use the Context menu to access editing functions for individual designs, such as
size and rotation.
Rotate Handle
Flip Vertical Handle
Resize Handle
Flip Horizontal
Handle

36 PREMIER+™ 2 Embroidery Modifying Embroideries
You can also change the properties for stitch types in
lettering (in addition to font characters, Lettering Shape
and so on), frames and SuperDesigns, or fix them as
stitches.
Adjust the appliqué fabric and margin for lettering,
Frames and SuperDesigns, and decorations for an
embroidery.
Note: Use the context menu to adjust these properties if
PREMIER+™ 2 Embroidery Extra is not owned.
To adjust the properties for an individual design within a group, click Restrict
Groups in the toolbar or context menu, then select the desired item.
To access the context menu
■ Control–click the design, and select the desired function from the context menu.
Multiple Select Features
You can select more than one embroidery at a time. Select embroideries
individually on the work area, or use one of the selection tools on the Edit menu.
Note: When using Box Select, Freehand Select and Freehand Point Select the entire
embroidery must be selected, otherwise it is not included in the selection.
To select more than one embroidery
■ To select more than one embroidery, Command–click the desired embroideries.
■ To select all embroideries in the work area, click Select All Visible .
The selected designs are surrounded by a selection box with a dotted outline, and
orange handles. The faded outlines of the selection boxes for the included
embroideries and other designs can be seen within the larger selection. Lettering,
Selection resize handle
Selection Rotate handle
Green handles for lettering
White handles for embroide
Dotted outline for a selectio
PREMIER+™ 2 Embroidery Modifying Embroideries 37
frames, SuperDesigns and decoration SuperDesigns retain their green handles, and
Monograms retain their light green handles.
The whole selection can be moved, resized or scaled proportionally, or rotated.
When a selection is enlarged or reduced, each item is resized or scaled according
to its individual state.
■ Lettering or SuperDesigns with green handles are resized with constant stitch
density, as are embroideries with blue handles.
■ Embroideries with white handles are scaled.
Note: There are no flip handles. To mirror the whole selection it must be
combined.
The stitch count and thread colors for the complete selection can be seen in the
Design Panel, and the width and height of the selection box are displayed.
If you click outside the selection box, the designs become separate. Select them
again to recreate the multiple selection. To keep the selected embroideries
together after saving, use Group. See “Group” on page 37.
Select All Visible
Select All Visible will select all of the embroideries in the work area, including
any that are outside the chosen hoop.
■ Choose Edit > Select All Visible.
■ Press ⌘A
Deselect All
Deselect All will deselect every selected embroidery, including any that are
outside the chosen hoop.
■ Choose Edit > Deselect All.
■ Press ⇧⌘A
Group
Use Group to make a more permanent group of all the currently selected
designs. You can group designs permanently, or to make a temporary Group while
moving or editing them. Each design in the group in turn is placed after the one
that is earliest in the stitchout order (nearest the back of the project).
The grouped embroideries are surrounded by a selection box with a solid outline,
and orange handles. The faded outlines of the selection boxes for the included
embroideries and other designs can be seen within the larger selection. Text,
frames, SuperDesigns and decoration SuperDesigns retain their green handles,
while Monograms retain their light green handles.

38 PREMIER+™ 2 Embroidery Modifying Embroideries
A group can be moved, resized or scaled proportionally or rotated. When a group
is enlarged or reduced, each item is resized or scaled according to its individual
state.
■ Lettering or SuperDesigns with green handles are resized with constant stitch
density, as are embroideries with blue handles.
■ Embroideries with white handles are scaled.
Note: There are no flip handles. To mirror the whole group it must be combined.
The stitch count and thread colors for the complete selection can be seen in the
Design Panel, and the width and height of the selection box are displayed.
If you click outside the selection box, and then click one of the designs within the
group, the designs will still be grouped.
Create a Group of designs
■ Place several designs in the work area, and select them with a selection tool. In the
toolbar, click Group . The designs are grouped.
Ungroup
Use Ungroup to split a selected group into the designs which make it up.
These may be embroideries, or lettering, SuperDesigns, frames, Decoration
SuperDesigns, and monograms.
Ungroup a Group of designs
■ In the work area, select a Group of designs, and then in the toolbar click
Ungroup . The designs are now separate.
■ Select a group of designs, then Control–click the group and in the Context menu
choose Ungroup.
Note: Ungroup can only be used when a group is selected.
Group orange resize handle
Solid outline for a group
Group Rotate handle
White handles for embroide
Green handles for lettering
PREMIER+™ 2 Embroidery Modifying Embroideries 39
Restrict Groups
Use Restrict Groups to select and edit individual designs within a group. The
designs remain grouped, but they can be moved, rotated, mirrored and resized or
scaled individually.
Change a single design in a group with Restrict Groups
■ Select a group of designs, and then in the toolbar click Restrict Groups . Move
or change any design within the group as desired.
■ Select a group of designs, then Control–click the group and in the Context menu
choose Restrict Groups. Move or change any design within the group as desired.
Christmas Greetings: Multiple Select and Group Designs
1 Click Hoop in the toolbar, and in the Universal Hoop Group
choose 260mm x 200mm - Universal Large Hoop 3, in Rotated
orientation. Click OK.
2 Choose File > New to open a new window, then choose File >
Insert.
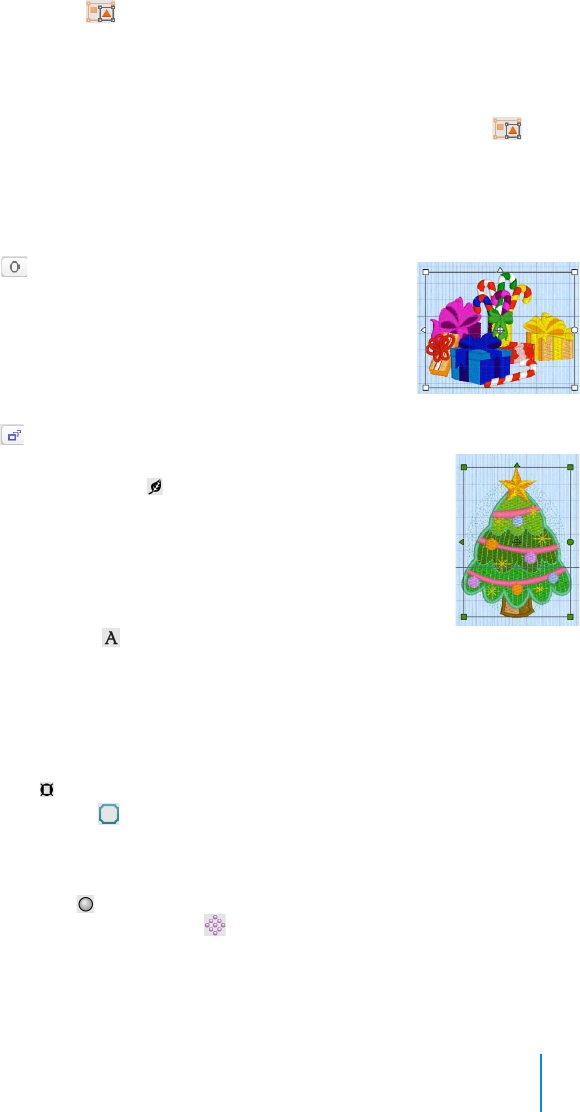
3 In the folder Home/Premier+2/Samples/Premier+2Emb/Stitch2/
Holidays load the embroidery 'Gifts & Candy Canes'.
Note: This is an embroidery; it has white handles showing that it is initially in Scale rather
than Resize mode.
4 Move the embroidery to the right side of the hoop.
5 Open the SuperDesign window and choose "Christmas Tree 1" in the
Holidays Category.
6 Set the Size of the SuperDesign to 90mm, then click Apply.
Note: The SuperDesign has green handles. See “Creating SuperDesigns”
on page 92.
7 Move the christmas tree SuperDesign to the left of the hoop, a little
above the gifts embroidery.
8 Open the Letter window and enter the words "Merry Christmas" in
the Letters box.
9 In the Font pop-up menu choose the font Ivy 2C 15-60mm in the Floral Category. Ensure
that the Lettering Shape is horizontal block, and the Size is 15mm.
10 Click Apply and move the lettering to the bottom of the screen, in the middle.
Note: The lettering has green handles. For more about lettering see “Creating Lettering” on
page 59.
11 Open the Frame window.
12 In Type, click the Frames button, and choose banner 3 in the Banners 2 category.
13 Make sure that Group is selected (checked). This places the banner and lettering as a Group.
14 Ensure that the Merry Christmas lettering is selected, and click Apply. The banner is placed
around the lettering.
15 Open the Decoration window (available if you own PREMIER+™ 2 Embroidery Extra),
and then click Decoration SuperDesign . (In PREMIER+™ 2 Embroidery, load a star
SuperDesign and go to step 19.)
16 Browse to the folder DecorationDesigns/Miscellaneous, select the design Cross 2, and click
Open to load it into the work area. Close the SuperDesign Viewer.

40 PREMIER+™ 2 Embroidery Modifying Embroideries
17 Control–click the decoration design and select Pearl Sequin Cup 4.0 mm in the Context
menu.
18 Click Color, and in the Colors window, set the sequin color to white, then click OK.
19 Move the Decoration SuperDesign to the top center, to look like a star. It also has green
handles.
For more about Decoration SuperDesigns, see “Decoration SuperDesign” on page 132.
20 Press Control and the left or right key to
see each design in turn. Each is in a
selection box or group with a solid outline
and orange, green or white handles.
21 Use Box Select in the toolbar to select
all of the designs. The selection box for the
selected designs has a dotted outline and
orange handles.
The designs can be moved as a unit.
22 Click outside the hoop. The designs are
separate again.
23 In the ribbon bar, note that the Group
and Ungroup buttons are not
available.
24 Use Select All Visible to select the designs again. The Group button is now available.
25 Click Group . The selection box for the group has a solid outline.
Note: The faded outlines and handles for the designs within the group can still be seen.
26 Click outside the group. None of the designs is selected.
27 Click the Christmas tree. The whole group is selected again,the Ungroup button is
available.
Groups are permanent until they are broken apart with Ungroup.
28 Click Restrict Groups . The Restrict Groups button is highlighted.
With Restrict Groups active you can select and edit the designs within the group
individually.
29 Click Restrict Groups again. The group is now a single unit, and the Restrict Groups
button is no longer highlighted.
30 Click Ungroup . The designs that were in the group now form a selection.
31 Drag to move the selected designs. They move as a unit.
Note: While the block is still selected you can reverse the effects of Ungroup by using either
Group or Undo.
32 Click outside the selection box. The designs are now separate.
Note: Use Ungroup to make major changes to a group, or to use the designs within the
group separately.
Move
Move the selected embroidery(ies), or selected block of stitches by dragging them.
When a block is moved in Modify mode, any stitches which lead to or from the
block will be stretched to accommodate the new position.
Note: If you accidentally move the center of rotation, deselect and then reselect the
design.

PREMIER+™ 2 Embroidery Modifying Embroideries 41
■ Select an embroidery, and then move the pointer over the selection box. When
the pointer changes to a four-headed arrow , drag the embroidery to the
required position.
Nudge
An embroidery or block of stitches can be moved in small amounts to nudge it
accurately into the desired position. Use the arrow keys on the keyboard to nudge
an embroidery or block.
You can also position embroideries automatically with Move into Hoop, Center in
Hoop, and the alignment tools.
Resize and Scale
Use Resize to switch between resize and scale for the selected embroidery or
block of stitches. Resize the selected embroidery to any size using free resize or
rescale with the mouse. Alternatively, use Modify Design .
• Resize changes the size of the embroidery while retaining constant density.
• Scale changes the size of the embroidery while retaining constant stitch count.
The handles on the embroidery selection show when resize or scale is selected.
Note: Lettering, SuperDesigns and Frames have green handles before they are fixed
as embroidery. This allows them to be resized from their original design for
optimum results.
To Switch between Resize and Rescale
■ Click the Resize button in the toolbar.
■ Choose Edit > Resize Mode.
■ Press ⌘R
Resize and Rescale an Embroidery
1 Open the Design window of the Control Panel .
2 Select a small embroidery (for example, Toy Soldier.vp4 in Home/Premier+2/Samples/
Premier+2Emb/Stitch2/Toys) and place it in the bottom left corner of the hoop.
3 With a selection box around the embroidery, click Resize until the handles are white.
Blue handles for resize White handles for scale

42 PREMIER+™ 2 Embroidery Modifying Embroideries
4 Look at the stitch count in the Information section of the Design window.
5 Move the pointer over one of the square corner handles and it becomes the diagonal
double-arrow pointer .
6 Drag the handle at the top right until the embroidery is much larger.
Note: When using a trackpad, pinch two fingers on the selected embroidery to decrease the
size, and spread two fingers to increase the size.
Gaps appear between the stitches. Although the size has increased, the stitch count has
remained the same.
Note: Hold down Shift as you drag to resize or scale proportionally. Hold down the Option
key to resize or scale from the center.
7 Click Actions > Undo or ⌘Z to return the embroidery to its original size.
8 Select the embroidery again, and click Resize until the handles are blue.
9 Drag the handle at the top right until the embroidery is several times larger.
The stitching in the embroidery remains dense, as the stitch count has increased greatly.
Rotate
Rotate the selected embroidery or block of stitches to any degree using free
rotation with the mouse. Alternatively, enter a specific angle with Modify
Design or rotate in 45 degree steps.
If desired, move the center of rotation before rotating the embroidery.
Rotate an Embroidery
■ Select the embroidery and use the round rotation handle to rotate it freely.
■ Select the embroidery, and in the Design window click Rotate 45 to rotate the
embroidery by 45 degrees.
■ When using a trackpad, twist your thumb and forefinger to rotate the selected
embroidery, lettering or SuperDesign. Set Multi-Touch Gestures using Apple Menu
> System Preferences.
■ Select the embroidery, and in the Design window click Modify Design . In the
Modify Design dialog rotate the embroidery, then click OK. See “Modify Design”
on page 43.
Move the Center of Rotation
The center of rotation is initially shown in the middle of the embroidery or
selection. Move the pointer over the center of rotation and it changes to the
cross-hair pointer .
Rotate Handle
Center of Rotation

PREMIER+™ 2 Embroidery Modifying Embroideries 43
Modify Design
Use Modify Design to open a dialog where you can resize and rotate the selected
embroidery.
To Open the Modify Design Dialog
■ Select the embroidery, then in the Design window click Modify Design .
■ Select the embroidery, then choose Design > Modify Design.
■ Select the embroidery, then click Actions on the toolbar and choose
Properties.
■ Select the embroidery, then Control–click and choose Properties.
In the Modify Design dialog you can change the height and
width of the embroidery, or rotate the embroidery. The
changes are made when you click OK.
Click the lock button to adjust dimensions proportionally
(lock closed ) or non-proportionally (lock open ).
Flip Vertical and Horizontal
Mirror the selected embroidery or block of stitches vertically or horizontally using
the flip handles on the selection box.
Aligning Embroideries
Use the alignment features to position your embroideries in the work area.
Center In Hoop
Use Center In Hoop to move the selected embroidery or group of
embroideries to the center of the hoop.
■ Select the embroidery to be centered, then in the Design window click Center In
Hoop .
■ Select the embroidery to be centered, then choose Design > Center In Hoop.
Flip Vertical Handle
Flip Horizontal
Handle
44 PREMIER+™ 2 Embroidery Modifying Embroideries
Move Into Hoop
Use Move Into Hoop to move the selected embroideries into the nearest area of
the hoop.
Note: Only the selected embroideries that are outside the hoop are moved.
■ Select the embroideries to be moved into the hoop, or use Select All Visible, then
choose Design > Move Into Hoop.
Alignment Tools
Use the Alignment tools on the Design menu to align embroideries precisely.
Embroideries can be aligned horizontally or vertically. They can also be centered.
Note: The Alignment tools are only available when more than one embroidery is
selected. See “Multiple Select Features” on page 36.
■ Select the embroideries that you want to align, then use an alignment tool.
Layout Order
Use the Layout Order commands on the Design menu: Move Forwards, Move
Backwards, Move to Front, and Move to Back, to move embroideries within the
design. Embroideries at the ’back’ of the design are stitched out first.
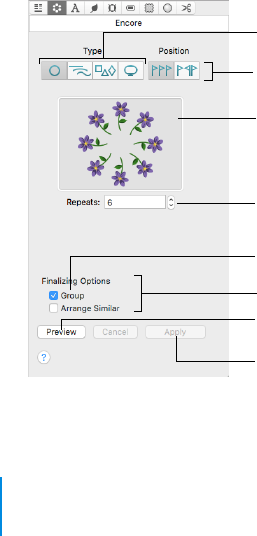
Encore
Use Encore to place repeated copies of embroideries in a circle or ellipse, a line, a
shape, or around the edge of the hoop.
Choose the number of repeats, or the margin and gap, and the number of
embroideries used. Set the position to standard or mirrored.
Select an Encore type: Circle, Line, Shape or Hoop
Select a Position: Standard or Mirrored
Set the number of repeats in a Circle or Line Encore
Optimize the Encore
Preview the Encore
Place the repeated embroideries in the work area
Place the Encored designs in a single Group
Layout indicator

PREMIER+™ 2 Embroidery Modifying Embroideries 45
To Open the Encore Window
■ Click Control Panel , then click Encore .
Repeat an Embroidery with Encore
1 Place a small embroidery on the work area and select it.
2 Open the Encore window .
3 Select an Encore type (circle , line , shape or hoop ) and Position
(standard or mirrored ).
A preview image illustrates the combined effect.
4 Set the number of Repeats, or the Margin and Gap.
5 If desired, select Group and Arrange Similar.
6 Click Preview to view the repeated designs in the work area.
Note: If you select any other tab on the control panel while in Preview mode, the Encore will
be cancelled.
7 Adjust the Encore line or shape on the work area, or adjust the settings and click Preview
again.
8 Click Apply to place the repeated designs as a grouped embroidery with the chosen options.
About Encore
Encore repeats the selected designs in a circle or ellipse, line, shape or hoop using
the chosen position and number of repeats.
Note: You can use any number of embroideries with a line or circle, but only one or
two embroideries with a shape or a hoop. To use more embroideries, Group or
Combine them first.
To l e a r n h ow t o Go to
Use Encore to repeat an embroidery See “Repeat an Embroidery with Encore” on
page 45.
Create an Encore circle with a single
design
See “Create a SuperDesign Daisy Chain” on
page 95.
Create an Encore Line See “Create a Line of Repeated Embroideries”
on page 47.
Create a shape with Encore See “Use Repeated Embroideries in a Shape”
on page 48.
Use Encore in a Hoop See “Use Repeated Embroideries in a Hoop”
on page 49.
Use three designs in an Encore circle See “Flowers in an Encore Circle” on page 46.

46 PREMIER+™ 2 Embroidery Modifying Embroideries
Ty pe
Position
Circle
Place embroideries in a circle and set the number of repeats. Adjust the circle to
form an ellipse.
To Adjust an Encore Circle
■ Drag inside the circle using the four-headed arrow Move pointer to position it.
■ Drag one of the embroideries or the circle where they are placed, using the circle
size pointer , to make the circle smaller or larger.
■ Drag the white handle on the right to change the circle to an ellipse.
Flowers in an Encore Circle
1 If required, choose File > New.
2 Click Hoop and in the Universal Hoop Group select Hoop Size 240mm x 150mm -
Universal Large Hoop 2, Rotated Orientation, then click OK.
3 Open the SuperDesigns window .
4 In the Flowers and Leaves Category, Flowers 1 set, click the first flower in the top line, then
click Apply. The flower is displayed in the work area.
5 Add the second and third flowers in the top line to the work area in the same way. (They are
placed on top of one another.)
6 Click Select All Visible , or choose Edit > Select All Visible or ⌘A to select the three
SuperDesigns.
7 Open the Encore window .
8 In Type, click Circle .
9 In Repeats enter 30.
Circle Place the embroideries in a circle.
Line Place the embroideries in one of 8 line options from left to right.
Shape Place up to two selected embroideries around the edge of a shape.
Hoop Place up to two selected embroideries around the hoop edge.
Standard The copies of the embroidery use the original orientation.
Mirrored Each alternate copy of the embroidery is reflected.
This works best if the number of Repeats is an even number.
Note: You cannot mirror grouped designs.

PREMIER+™ 2 Embroidery Modifying Embroideries 47
10 Click Preview. Your three SuperDesigns are displayed
in a repeating sequence in a circle, in the order you
created them. There are 10 of each SuperDesign.
11 Click on the design at the top, and drag it downwards
using the circle size pointer . The circle becomes
smaller, and the designs move closer together.
12 Drag the rectangular handle on the right inwards. The
circle changes to an ellipse.
13 Change the number of Repeats and preview again.
If you change to Hoop or Shape and preview, you will
notice that only the first two flowers that you created
are in the Encore.
14 Click Apply to group the designs as a multipart
embroidery.
Line
Place the embroideries from left to right in one of 8 line types.
Create a Line of Repeated Embroideries
1 Place some small embroideries on the work area and select them.
2 Open the Encore window .
3 In Type, select Line . The Line options appear.
4 Select the Position (standard or mirrored ).
5 Choose a Line Type from the pop-up menu.
The first option is a straight line. The other 7 line types are curved.
6 Set the number of Repeats as
desired, from 2 to 360.
7 If desired, select Group and
Arrange Similar.
8 Click Preview to view the
repeated designs in the work area.
9 Drag the line of embroideries to
position it.
10 Drag the square white handles on
the top and right sides of the box
to stretch or compress the box, and change the spacing.
With a straight line, only the handle on the right is available.
11 Click Apply to place the repeated line as an embroidery.
Choose one of 8 line types
Set the number of repeats

48 PREMIER+™ 2 Embroidery Modifying Embroideries
Shape
Place up to two selected embroideries around the edge of a shape.
Use Repeated Embroideries in a Shape
1 Place 2 small embroideries on the work area and select them (⌘A).
2 Open the Encore window .
3 In Type, select Shape . The Shape options appear.
4 Select the Position (standard or mirrored ).
5 Click the Shape button, and choose a Shape from the
pop-up menu. There are 28 shapes to choose from.
6 Ensure that Remove Corners is not selected.
7 Set the Gap between the embroideries.
8 If desired, select Group and Arrange Similar.
9 Click Preview to view the repeated designs in the
work area.
The embroidery that you loaded or created first is in
the corners.
10 Drag the shape to position it.
11 Drag the square white handles on the top and right
sides of the box to adjust the shape, and change the
number and spacing of the embroideries.
12 Click Apply to place the shape as an embroidery.
Hoop
Place up to two selected embroideries around the edge of the hoop, to make a
border or frame.
Choose from 28 different shapes
Set the gap between the embroideries
Use a corner embroidery at 45 degrees
Use a corner embroidery at 45 degrees
Set the distance between the embroideries
Set the space between the embroideries and the hoop

PREMIER+™ 2 Embroidery Modifying Embroideries 49
Use Repeated Embroideries in a Hoop
1 Place 2 small embroideries on the work area and select them.
2 Open the Encore window .
3 In Type, select Hoop . The
Hoop options appear.
4 Select the Position (standard
or mirrored ).
5 Ensure that Remove Corners is
not selected.
6 Set the Gap between the
embroideries.
7 Set the Margin between the line
of embroideries and the hoop.
8 If desired, select Group and
Arrange Similar.
9 Click Preview. The Encore forms a frame around the inside edge of the hoop.
The embroidery that you loaded first is in the corners.
10 Adjust the Margin and Gap as desired.
11 Click Apply to place the Encore as an embroidery.
Arrangement
Group: Create a grouped embroidery from the Encored designs.
Note: If the designs are not grouped, they can be moved separately after they are
placed with Apply.
Arrange Similar: Arrange individual designs together when using multiple
embroideries that are overlapped, to optimize the results when ColorSort is used.
This does not change the display order, only the stitchout order.
Endless Assistant
Use the Endless Assistant to add markers to an embroidery so it can be stitched
out in a continuous, regularly spaced, sequence as many times as desired. After
each stitchout, the fabric is re-hooped and the markers are used to align the new
stitchout to the previous stitchout.

50 PREMIER+™ 2 Embroidery Modifying Embroideries
After changing settings, the effect is automatically updated in the preview area.
Create an Endless design
■ Click Assistants > Endless Assistant.
■ Choose Assistants > Endless Assistant.
Fabric Direction
The Fabric Direction is the direction the fabric is moved in the hoop for each
repeat. The direction depends on the size and orientation of the hoop as it is
shown in the Preview area. Select from:
■ Up
■ Down
■ Left
■ Right
The Start marker is always on the side of the embroidery that matches the Fabric
Direction. Hence, the Start Marker 'points' in the direction the fabric will be
moved.
End Marker
The end marker is used to line up the next stitchout of the embroidery. End
marker positions are shown by red dots on the preview. Choose from four types:
Corner: A small L-shaped corner of three long loose stitches. The alignment point
is the corner of the L. This is the default choice for the end marker.
Single Stitch: A long stitch that moves to the corners, placing only one needle point
at each corner. This is ideal if you are stitching onto a fabric that you are concerned
about marking, such as leather or a very light weight fabric.
Tie Off: A few stitches in the same place, centered on the alignment point. The Tie
Off marker is very secure, but may be difficult to remove after stitching.
Set the fabric movement direction
End marker for stitchout alignment
Set number and positon of markers
Space between designs
Repeat design in hoop
Reduce colors & overlap
Zoom in and out
Endless Embroidery information

PREMIER+™ 2 Embroidery Modifying Embroideries 51
Line: A line of three long stitches. The alignment point is at the outside end of the
line, closest to the edge of the hoop.
Note: There is no choice for start markers because they are always movement
stitches. The start markers are used to move the needle into position so that it can
be aligned with the end markers. Hence, only the single 'jump point' is needed for a
start marker. The start marker positions are shown by green dots on the preview.
Marker Positions
Select the positions of the markers. "Both" is recommended for most situations.
You may wish to have markers on only one side if:
■ You have fabric that may be easily marked
■ You have a fabric edge that can be easily followed each time you re-hoop the fabric
■ You have an embroidery with a lot of open space on one side and you do not want
to have any stitches in the open space, which may also partly conceal the presence
of the marker stitches
Both: Select Both for movement stitches to both start corners and end markers on
both end corners. This is the default choice for the marker position.
Left/Bottom: When the Fabric Direction is Up or Down, the markers are on the
left edge. When the Fabric Direction is Left or Right, the markers are on the
bottom edge.
Right/Top: When the Fabric Direction is Up or Down, the markers are on the right
edge. When the Fabric Direction is Left or Right, the markers are on the top edge.
Gap
Use Gap to change the spacing between each stitchout of an embroidery. Gap
changes the position of the start and end markers, as shown in the preview. The
Gap is split evenly on each side of the stitchout.
Embroidery
Repeat Embroidery
Repeat the embroidery as many times as possible within the current hoop size.
This saves having to re-hoop the fabric for each stitchout of a small embroidery.
Done
Click Done to make the embroidery endless. The work area is updated
automatically.
If Repeat Embroidery was selected and two or more repeated embroideries will fit,
the repeated embroideries are connected with movement stitches and then
ColorSorted. The endless embroidery is also centered in the hoop.
Note: If the embroideries are overlapped, they may not ColorSort to the smallest
expected number of colors.

52 PREMIER+™ 2 Embroidery Modifying Embroideries
Start markers are inserted at the beginning of the embroidery as long movement
stitches to the start marker positions. Movement stitches are added at the end of
the embroidery to the end marker positions, which are then stitched according to
the choice of end marker.
Note: It is not advisable to use the Endless function on an embroidery that has
already been made endless. This will create a second set of markers that can be
confused with the first set. If you have no other copies of such an embroidery, first
save the embroidery as a new file, then delete the existing marker stitches using
the Modify functions before making the embroidery endless again.
Cut, Copy, Paste and Duplicate Selected
Note: The functions to Cut, Copy, Paste and Duplicate a selected block of stitches
are available only when using features in the Modify window.
Cut
Use Cut to remove an embroidery or the currently selected block of stitches from
the design and place it in the Clipboard.
To Cut the selected embroidery or stitches
■ Click Actions on the toolbar and choose Cut.
■ Choose Edit > Cut.
■ Press ⌘X
■ Control–click and choose Cut.
Copy
Use Copy to make a copy of an embroidery or the currently selected block of
stitches. The copy is placed in the Clipboard. It can then be pasted as many times
as required, including into PREMIER+™ 2 Modify.
To Copy the selected embroidery or stitches
■ Click Actions on the toolbar and choose Copy.
■ Choose Edit > Copy.
■ Press ⌘C
■ Control–click and choose Copy.
Paste
Use Paste to paste the embroidery or block of stitches in the Clipboard into the
work area, at the same place it was cut or copied from.
To Paste an embroidery or stitches
■ Click Actions on the toolbar and choose Paste.
■ Choose Edit > Paste.
■ Press ⌘V
■ Control–click and choose Paste.

PREMIER+™ 2 Embroidery Modifying Embroideries 53
Paste into Center
Use Paste into Center to paste the embroidery or block of stitches in the
Clipboard into the center of the work area.
Use Paste into Center
■ Click Actions on the toolbar and choose Paste into Center.
■ Choose Edit > Paste into Center.
■ Press ⌥⌘V
■ Control–click and choose Paste into Center.
Duplicate Selected
Use Duplicate Selected to make a copy of the selected embroidery or block of
stitches. The copy is automatically pasted on the work area below and to the right
of the original.
To duplicate the selected embroidery or stitches
■ Select the embroidery, then click Actions on the toolbar and choose
Duplicate Selected.
■ Choose Edit > Duplicate Selected.
■ Press ⌘D
■ Control–click and choose Duplicate Selected.
Delete
Use Delete to remove one or more selected embroideries, pieces of lettering,
SuperDesigns or blocks of stitches.
Note: Delete differs from Cut because it does not place the object on the
Clipboard, so it cannot be pasted.
To delete a selected embroidery or block
Select the object(s), then:
■ Click Actions on the toolbar and choose Delete.
■ Control–click the selected embroidery or block and choose Delete.
■ Choose Edit > Delete.
■ On full-size keyboards, press Delete ⌦.
■ On Mac portable keyboards, press Function–Delete or Function–Backspace
(fn ⌫ ).
Undo and Redo
Undo reverses the last action. The undone action then becomes a Redo.

54 PREMIER+™ 2 Embroidery Modifying Embroideries
Undo
Use Undo to reverse the last action. If you are not satisfied with the result, click
Redo. There are unlimited Undo steps. Undo steps are only lost when you use
New.
To u s e U n do
■ Click Actions on the toolbar and choose Undo.
■ Choose Edit > Undo.
■ Press ⌘Z
■ Control–click and choose Undo.
Redo
Use Redo to reverse the last action that was undone by Undo. If you are not
satisfied with the result, click Undo.
There are unlimited Redo steps. Redo steps are only lost when you use New.
To u s e R e do
■ Click Actions on the toolbar and choose Redo.
■ Choose Edit > Redo.
■ Press ⇧⌘Z
■ Control–click and choose Redo.

PREMIER+™ 2 Embroidery ExpressMonogram Assistant 55
7
ExpressMonogram Assistant
Use the ExpressMonogram Assistant to create a monogram of up to
three letters, selecting a font style, thread color, shape and size. If
desired, add a border.
Use the ExpressMonogram Assistant to create a monogram of up to three letters
from a set of initials, choosing a font style, thread color, shape and size. Surround
the monogram with a border, or create a monogram with no border and add a
Frame or Flourish, or a motif underline.
Create a monogram
■ Click Assistants > ExpressMonogram Assistant.
■ Choose Assistants > ExpressMonogram Assistant.
Use the Monogram page to select the number and size of letters for the
monogram, enter the letters, and to choose an envelope category and type.
Choose the number of
letters and their size
Enter the letters
Choose an envelope
Preview the monogram
Select a font in the viewer
Change the stitch properties
Set the size of the letter
Change the thread colors
Space between the letters
View the size, stitches & colors

56 PREMIER+™ 2 Embroidery ExpressMonogram Assistant
Use the Full Letter and Small Letter pages to select how the large letters in the
monogram are displayed. Select the font, size, stitch type, thread color and spacing
of the letters.
Use the Border page to place a border around the monogram, and to select the
thread color for the border.
Create a Monogram with a Border
1 If required, choose File > New.
2 Click the Hoop button and set the hoop size to 100mm x
100mm - Universal Square Hoop 1.
3 Click Assistants > ExpressMonogram Assistant.
Alternatively, choose Assistants > ExpressMonogram Assistant.
The Monogram page of the ExpressMonogram Assistant appears.
4 In the pop-up menu at the top left, choose the Small - Full - Small
layout. This will produce a monogram with characters sized
proportionally: small, full, small (SFS).
5 Enter the letters ’E’, ’S’ and ’J’ in boxes A, B and C.
Note: E, S and J represent the name Elizabeth Jane Smith, using traditional monogram style
where letters are used in the order of given name, family name, middle name. If the letters
were all full size, EJS could be used as an alternative.
6 In the Envelopes window, choose the second envelope in the Classic category. Its name is
SFS_Classic02.
Note: If you position the arrow pointer over a thumbnail without clicking, the name of the
envelope is shown. The name stands for Small-Full-Small, using the second envelope in the
Classic1 category.
In this envelope the small characters are relatively larger than those in the envelope to the
left, which will suit the curly initials to be used.
7 Click Continue, or click the Full Letter button. The Full Letter page appears.
8 Click the displayed font, and scroll down to see the fonts in the Monogram category.
Note: This category includes fonts that are recommended for the Classic envelopes using SFS
(small, full, small characters).
9 Click to select the font Curly UC 15-30mm, then click OK to close the viewer.
Use a monogram border
Set the space inside the border
Use round or square corners
Create a border for each letter
Select a stitch type
Set the stitch properties
Change the thread color
Add appliqué & choose a fabric

PREMIER+™ 2 Embroidery ExpressMonogram Assistant 57
10 Leave the font size at 22mm.
The initial size of a font is midway in the font size range.
11 Note that the Height and Width measurements below the preview have changed.
Use these dimensions as a guide to the size of your final monogram as you try different
options. If you have a desired final size you may need to alter the font size, or the border.
12 Click the pink thread, and in the Color Selection dialog choose Robison-Anton Rayon 40 in
the Thread Range pop-up menu. The thread changes to Floral Pink, number 2415. Click OK.
Note: This only affects the letter S, as it is the only ’Full’ letter.
13 Click Continue, or click the Small Letter button, and the Small Letter page appears.
14 Ensure that ’Alternative Letter Style’ is selected.
Note: If Alternative Letter Style is not selected, the same font and color are used for small
letters and the full letters.
15 In the Font viewer enter "Curly" in the Search box. Two Curly fonts are shown.
16 Click to select Curly UC 15-30mm, then click OK to use it for the small letters.
17 Note that the Height measurement below the font viewer has changed.
This is the height of the letter ’A’ for the small letter font. It should be within the
recommended size range for the font (as mentioned in the font name). If the height is
outside the recommended range, you may need to return to the Monogram page and
change the envelope, or use the Full Letter page to change the full letter size
18 Click the pink color and the Color Selection dialog appears.
19 In the Thread Range pop-up menu choose Robison-Anton Rayon 40.
20 Scroll up and choose color 2501 (Petal Pink).
21 Click OK. The smaller letters are now a pale pink.
22 Click Continue, or click the Border button, and the Border page appears.
The default border is a green satin line. You can use a Motif Line , a Satin Line , a
Running Stitch line a or Triple Stitch line.
23 é fabric to the monogram.Select Motif Line . The solid green border
is replaced by a line of stars.
24 Select Satin Line and the satin stitches appear again.
25 Click the Thread Color button to display the Color Selection
dialog.
26 Ensure that ’Robison-Anton Rayon 40’ is selected.
27 In Find Thread enter 2501 and choose color 2501 (Petal Pink).
28 Click OK to close the Color Selection dialog. The satin border of the monogram is now
pink.
29 Click the ’Individual Letter Border’ checkbox to place lines between the letters in the
monogram.
Note: Although ’Individual Letter Border’ is now checked, borders do not appear between
the letters as they are relatively closely spaced.
30 To see individual letter borders in the monogram, the spacing
must be increased. Click the Full Letter button to return to the
Full Letter page.
31 Click the up arrow in Spacing 1 to increase the gap to 15mm.
(This is the distance between the first and second letters.)
32 Click the up arrow in Spacing 2 to increase the gap to 15mm.
(This is the distance between the second and third letters.)
The letters now have individual borders. This format may be desired when embroidering
badges.

58 PREMIER+™ 2 Embroidery ExpressMonogram Assistant
33 For a traditional monogram effect, the letters may interlock. Set
Spacing 1 to -3 mm, and set Spacing 2 to -4 mm. The new
positions of the letters can be seen in the Preview. The border
adjusts to fit.
34 Click Done to close the assistant. There is a brief delay while
overlap removal calculations occur, and the design is
ColorSorted. The monogram is then displayed in the work area.
(The density of the overlapping letters is quite low, so in this
case no stitches are removed.)
35 Ensure that the Control Panel button is open at the Design window.
36 Click Settings. The settings information appears in the Settings box.
37 Click Edit to see all of the text.
Note: The Settings give information on the letters, dimensions and font used in the
monogram, including the font size for the large letter, and any patterns and fills used. This
information can be used to recreate the monogram later, if necessary.
Click the Edit button if you wish to edit these notes. The Settings dialog is displayed. Amend
the Settings as desired, then click OK to save your edits.
38 Click Actions on the toolbar and choose Save, or press ⌘S
.
Note: This will save the monogram as a multipart .vp4 file. When you open or insert this file
in the work area, Control–click and choose Properties to open it in the ExpressMonogram
Assistant.
39 Click Actions on the toolbar and choose Export, or press ⌥⌘S
.
40 In the Export dialog, ensure that .vp4 is selected and click Continue.
41 In the saving as dialog, browse to Home/Premier+2/My Designs, and save the embroidery as
EJS_Curly. This saves a version ready for stitching out.
Note: You could use the Background Assistant to preview the use of this monogram on a
blouse or towel. See “Backgrounds” on page 22.

PREMIER+™ 2 Embroidery Creating Lettering 59
8
Creating Lettering
This chapter describes how you can use the Lettering window to
personalize your embroidery project with the fonts available in
PREMIER+™ 2 Embroidery.
In the Letter window you can create lettering to personalize your embroidery
project using single or multicolor fonts (lettering styles) and fonts of special
characters. Alternatively, use the ExpressMonogram Assistant. Use Font
Manager to search for fonts by name or size, and to create, rename, duplicate
and delete user generated fonts. Use QuickFont to create new fonts for
PREMIER+™ 2 Embroidery from most TrueType® or OpenType® fonts on your
computer. Import embroidered letters to create a font with Import Font From
Embroideries .
Choose the font, line format, size, stitch type and thread color. Place lettering
around your embroidery, or anywhere on the work area. Lettering can be resized
with constant stitch density, and the stitch properties adjusted, until it is fixed as
embroidery.
To Open the Letter Window
■ Click Control Panel, then click Letter .
Choose a font
Set the size, gap and connection
Select a Lettering Shape for your text
Place the lettering in the work area
Enter some text
Set the formatting options
Manage, create and delete fonts
Set the Stitch Type options

60 PREMIER+™ 2 Embroidery Creating Lettering
Create Lettering
1 Open the Letter window .
2 Click the displayed font, and scroll up or down the
Font Viewer to select a font.
Set the Size in millimeters as desired, from 3mm to
200mm.
This sets the height of the 'A' character in the font.
Other characters and symbols are sized accordingly.
3 Set the proportions, the gap between the letters,
and the connection type (trim or running stitch).
4 Click in the Letters text box and the pointer
becomes an I-beam.
If needed, drag to highlight any existing text and
overwrite it.
To l e a r n h ow t o Go to
Create Lettering See “Create Lettering” on page 60.
Set properties for new lettering See “Setting Letter Options” on page 76.
Use the font viewer See “Font Viewer” on page 61.
Use Block lettering to sculpt text See “Lettering Shapes” on page 65.
Change an existing block of lettering See “Changing Letter Properties” on page 85.
Check the spelling in your lettering See “Check Your Spelling” on page 63.
Add special characters, e.g. accents See “Emoji and Symbols” on page 64.
Enter letters in an alternative alphabet,
e.g. Greek
See “Alternative Alphabets” on page 64.
Create and adjust circles of lettering See “Using Circular Lettering Shapes” on page 66.
Use straight and wavy lettering lines See “Fit To Straight Line” on page 67.
Place a full circle of lettering around an
embroidery
See “Full Circle Lettering: I Love the Sunshine” on
page 81.
Create a monogram from individual
letters
See “Individual Letter Monogram” on page 82.
Change lettering colors See “Change the Colors in Lettering” on page 85.
Create a monogram with a border
automatically
See “Create a Monogram with a Border” on
page 56.
Create your own embroidered font See “QuickFont” on page 87.
Import embroideries to form a font See “Import Font from Embroideries” on page 79.
Create, rename and delete personal
fonts
See “Font Manager” on page 77.
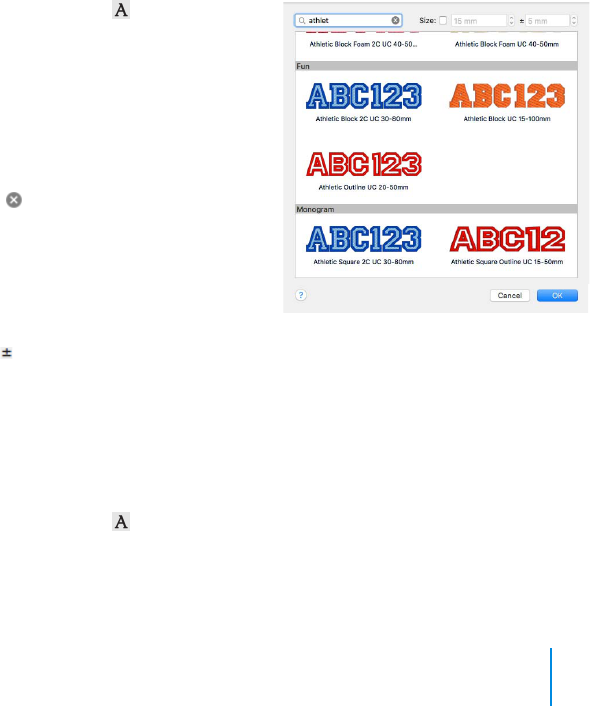
PREMIER+™ 2 Embroidery Creating Lettering 61
5 Enter your desired text, pressing Option–Return to create more than one line of text.
Control–click to view alternatives for words underlined in red by the spelling checker.
Note: Some Lettering Shapes can only use one line of text. See “Lettering Shapes” on
page 65.
6 Choose a Lettering Shape.
You can reverse the order of letters, position (or kern) letters individually, or use Step to
rotate the letters at a different angle from the line.
7 Choose a Stitch Type from the pop-up menu, and edit its properties in the dialog.
8 Click Options to change the alignment and line spacing.
9 Click Apply.
The lettering appears in the work area, leaving any existing lettering unchanged.
10 Control–click the lettering and choose Properties to adjust the lettering properties.
11 Drag the handles on the lettering to resize the lettering, or adjust the proportions for the
lettering shape. Hold the Shift key for most lettering shapes to keep the proportions as you
resize. Hold the Option key for most lettering shapes to resize from the center. See
“Lettering Shapes” on page 65.
Note: Alternatively, use the ExpressMonogram Assistant to create a one, two or three letter
monogram, and add a border automatically.
Searching for Lettering
1 Open the Letter window .
2 Click the displayed font to open the font menu.
3 To search for a font by name, at the top of the
font dialog in the Search box, enter the name of
the font or font category that you want to find.
Note: Part of the name will narrow the list of
fonts displayed, so a search for ’Athletic’ will
display fonts from the Applique, Foam, Fun and
Monogram Categories.
4 Click clear to remove the text from the
search box.
5 To search for a font by size, select (check) the
Size checkbox to enable searching by size.
6 Enter the desired Size for the font in the Size
number box.
7 To choose a size range, adjust the number in
the Range box. The list of displayed fonts will change.
For example, set Size to 5mm, and the Range to 5mm, to select a small font for a quilt label.
You could also set an exact size (Range 0mm) to find an imported embroidery font.
Font Viewer
Use the Font Viewer to browse fonts and select a font for lettering.
To Open the Font Viewer
1 Open the Letter window .
2 Click the font sample.
3 Scroll up or down the list of font Categories and fonts to choose a font.
4 Click on a font to highlight it. Click OK to select the font.

62 PREMIER+™ 2 Embroidery Creating Lettering
Font Search
Use Font Search to search for a font by name or size.
Search
Search for a font by name.
■ Enter the desired text in the Search box. Click Clear to remove the search text.
Note: Click Clear before searching by Size.
Size
Search for fonts by their recommended size.
■ Ensure that the Size checkbox is selected (checked), then enter the desired size in
the Size number box.
Range
To choose a size range, adjust the number in the Range box, increasing the
number to give a larger size range.
Note: For example, if the search range is 10-20mm, then fonts with ranges 5-15mm,
15-25mm, 12-16mm and 5-50mm will be visible, but fonts with ranges 3-8mm &
30-60mm will not. An imported embroidery font within this range will also be
found.
Font Name
Font names include information in addition to the name of the lettering style. All
font names include the recommended size range, and other information is often
included.
Click to select a font
Search for a font by name
Search for a font by size Set the size range for the font search

PREMIER+™ 2 Embroidery Creating Lettering 63
Font Type
Recommended Font Size
A recommended font size is included in the name. For instance, 25-120mm
indicates the font is recommended for use at sizes from 25mm to 120mm.
SuperFonts
For SuperFonts provided in different stitch type variations, a stitch type
abbreviation is also present at the end of the name, for example SF for Spiral Fill.
Examples
Revue 2C UC 25-120mm SF in the Display Category: this font uses two colors
(2C), is uppercase only, has a recommended size range of 25mm to 120mm,
and uses Spiral Fill.
Antonia NP 05-10mm in the Nearest Point Category: this font is a Nearest
Point font and has a recommended size range of 5mm to 10mm.
Note: To see the properties that can be edited in each font, refer to the
PREMIER+™ 2 Fonts Guide in the Sample Guides folder.
ColorSort
Use ColorSort to create lettering with the minimum number of color blocks. See
“Lettering Color and ColorSort” on page 85.
Spelling Checker
The spelling checker underlines unrecognized words in red. You can select
alternatives from the context menu.
Check Your Spelling
1 Control–click in the Letters text box and a context menu appears.
2C The font uses two colors (also 3C for colors, etc.)
LC Lowercase only font
NP Nearest Point font
UC Uppercase only font
CF Contour Fill
MF Motif Fill
MW MultiWave Fill
QS QuiltStipple Fill
RF Radial Fill
SF Spiral Fill
SH Shape Fill
XH Crosshatch Fill

64 PREMIER+™ 2 Embroidery Creating Lettering
2 In the context menu choose Spelling and Grammar > Check Spelling While Typing.
3 Enter the words "Roses are red, vilets are blue" in the Letters text box. The word "vilets" is
underlined in red.
4 Control–click to select the word. A context menu appears, with suggested alternatives
listed at the top.
5 Choose the word "violets" from the context menu. The word is replaced in the Letters text
box.
You can also use Learn Spelling to add words to the dictionary, for example your name, or
use Ignore Spelling to ignore the suggestion.
6 Alternatively, choose Correct Spelling Automatically to see suggested replacements for
unrecognized words.
Emoji and Symbols
Use Special Characters to add the extra characters used in many languages, for
example ß, that are not present on your keyboard.
Add a Special Character to Your Text
1 Choose Edit > Emoji & Symbols.
2 In the Characters dialog, select a character category, e.g. Latin.
3 Click the desired character to select it.
The character is previewed.
4 Double-click on the character to place it in the Letters text box.
5 Click Apply to place the lettering in the work area.
Note: See the Reference Guide for a list of the available characters.
Alternative Alphabets
To enter characters in other alphabets from the National font category, such as
Greek and Hebrew, refer to the Character Sets section in the PREMIER+™ 2
Embroidery Reference Guide or help for the keys used.
Preview the character
Select a category
Select character size
and customize list
Click to preview,
double click to load

PREMIER+™ 2 Embroidery Creating Lettering 65
Letter Options
Use the Letter Options dialog to choose the alignment and line spacing when
creating lettering.
Lettering Shapes
There are three categories of lettering shapes: Block, Line and Vertical Block.
■ Block
Starting from a template, mould the block of letters to the desired shape. See
“Block” on page 68.
■ Line
Place letters along a straight, curved or wavy line. See “Line” on page 65.
■ Vertical Block
Place lettering in a straight vertical line. See “Vertical Block” on page 68.
Using Lettering Shapes
If you have used the Lettering window previously in that session of PREMIER+™ 2
Embroidery, the last setting is remembered. You can adjust lettering with the
handles (green squares) until it is fixed as embroidery, for example when you
rotate, flip or ColorSort it.
Note: Some Lettering Shapes (Circle Clockwise, Circle Counter-Clockwise, Fit to
Straight Line and Fit to Wavy Line) can only use one line of text. Additional lines of
text are combined with the first line for those Lettering Shapes. Full Circle only
uses two lines of text. Any additional lines of text are combined with the second
line.
Reverse: When the Reverse checkbox is selected, the lettering is mirrored.
Reverse is available for all lettering shapes.
Note: Monograms created with the ExpressMonogram Assistant have light green
handles; select Properties from the Context menu to adjust the Monogram
settings. See “ExpressMonogram Assistant” on page 55.
Line
Place letters along a straight, curved or wavy line. Use the handles to adjust the
position of the letters and the shape of the line.
• You cannot resize these lettering shapes with the handles.
Note: Control–click to open the Letter Properties dialog to resize the lettering.
Align the lettering
Set the spacing between lines

66 PREMIER+™ 2 Embroidery Creating Lettering
• Flip handles are not available. You can mirror after fixing the lettering as stitches.
• These lettering shapes can only use one line of text, or two for Full Circle.
Additional lines are combined with the first line, or the second line for Full
Circle.
Circle Shapes
Place characters along a curved line. Circle lettering shapes always use Center
alignment.
• Rotate handles are not available for the Circle lettering shapes. To rotate, fix the
lettering as stitches first.
Using Circular Lettering Shapes
The handles for circular lettering shapes adjust the positioning of the lettering, not
the size.
1 Enter a short line of text in the Lettering window. See “Create Lettering” on page 60.
Circle
Clockwise
Use Circle Clockwise to place lettering
clockwise around a circle.
Drag the square green handle to adjust the
radius of the circle and the position of the
lettering. Multiple lines of text are placed in the
same line. Hold down Shift, then drag the handle
to move the lettering around the circle without
changing the size of the circle.
Circle Counter-
Clockwise
Use Circle Counter-Clockwise to place
lettering counter-clockwise around a circle.
Drag the square green handle to adjust the
radius of the circle and the position of the
lettering. Multiple lines of text are placed in the
same line. Hold down Shift, then drag the
handle to move the lettering around the circle
without changing the size of the circle.
Full Circle
Use Full Circle to place two sections of
text on opposite sides of a circle.
When entering characters in the Letters text
box, enter Option–Return to make a new line
where you want to split the text. When the
lettering is initially placed, the text on the first
line is at the top of the circle and the text on
the second line is at the bottom of the circle.
If more than two lines of text are entered, Full
Circle places all extra lines in the second line.
There are two square green handles. Drag either handle to adjust the
radius of the circle. Hold down Shift, then drag either handle to move the
attached lettering around the circle without changing the size of the circle.

PREMIER+™ 2 Embroidery Creating Lettering 67
2 In the Lettering Shape area, click Circle Clockwise.
3 Click Apply. The lettering appears in a line over the top of a circle.
4 Drag the square green handle at the top of the circle of lettering downwards. The pointer
changes to the circle size pointer .
The circle becomes smaller, but the size of the letters is unaffected.
5 Undo your change. The circle returns to its original size.
6 Hold down the Shift key and drag the square green handle at the
top of the circle to the right of the circle. The line of lettering
moves to the right side of the circle.
Note: You cannot resize circular lettering shapes with the handles.
Use the Size and/or the height and width settings in Letter
Properties. See “Changing Letter Properties” on page 85.
Rotate and flip handles are not available. To rotate or mirror, use
ColorSort to fix the lettering as embroidery first.
The alignment setting does not affect circular lettering shapes.
Fit to Straight and Wavy Lines
Use these line types to place lettering along a straight or wavy line.
Step: When the Step checkbox is selected, the letters can be rotated to any angle.
Step is available for Fit to Straight Line and Fit to Wavy Line.
Fit To Straight
Line
Use Fit To Straight
Line to place
lettering along a line.
Drag the square
green end handles to rotate the line to any angle and to extend the line.
Drag the round green handle to move the text along the line.
The text may also be
rotated independently of
the position of the line.
Select the Step option,
then click Apply to create
new lettering. There is an
additional round green
handle at the end of
another line. Drag this
handle to rotate the
letters to any angle.
Note: You cannot resize Fit
To Straight Line lettering with the handles. Use the Size and/or the height
and width settings in Letter Properties. Fit to Straight Line places multiple
lines of text onto the same line.
Note: Flip handles are not available. To mirror, use ColorSort to fix the
lettering as embroidery first.

68 PREMIER+™ 2 Embroidery Creating Lettering
Vertical Block
Use Vertical Block to place lettering in a straight vertical line with
an outline box that has four square green handles. Drag the handles to
resize the lettering.
Note: Lettering is created with Center alignment by default. For Vertical
Block, this changes the alignment of characters in each column of
lettering.
Block
There are 29 Block templates available. A
block can be changed to any other kind of
block using the handles and Handles menu
options.
To change the settings for a Block
■ Click the yellow handle on the selected block, and use the options in the Handles
menu to change the Top and Bottom line types, and to set different Constraints.
Individual: When the Individual checkbox is selected, the letters can be moved
and resized individually. Only one line of lettering can be made when Individual is
selected.
Handles Menu
Use the Handles menu to adjust the settings for the selected block of lettering.
Change Template Settings in the Block Menu
1 Open the Letter window .
Fit To Wavy
Line
Use Fit To Wavy Line to
place lettering along a
curved line.
Drag the square green
handles to change the curve
to any shape. Drag the round green handle to move the text along the line.
The text may also be rotated independently of the position of the line.
Select the Step option, then click Apply to create new lettering. There is
an additional round green handle at the end of another line. Drag this
handle to rotate the letters to any angle.
Note: You cannot resize Fit To Wavy Line lettering with the handles. Use
the Size and/or the Height and Width settings in Letter Properties. Fit to
Wavy Line places multiple lines of text onto the same line.

PREMIER+™ 2 Embroidery Creating Lettering 69
2 Enter the text "Jonathan" in the Letters text box. See
“Setting Letter Options” on page 76.
3 Click the current Lettering Shape, and in the pop-up
menu, choose Arch Over , then click Apply to place
the name.
Note: The top and bottom lines of the lettering use the
Arch line type, with a single handle in the middle.
4 Drag the lettering to the top of the work area.
5 Drag the two middle handles (top and bottom)
upwards, to raise the height of the arch.
6 Click the yellow Handles button to open the handles
menu.
Note: In the menu the line type is shown as Arch.
7 Deselect Match Top and Bottom Lines. This enables you to use a different line type for the
top and bottom of the shape.
8 Open the Handles menu again, and then click to open the Bottom Line Type submenu.
Note: The line type for the bottom line is also Arch.
9 In the submenu, change the bottom line to Straight.
Note: The bottom of the lettering is now a straight line with a
handle at each end.
10 Open the Handles menu again, and change the top line to
Diamond.
Note: The top line forms a point, instead of a curve. The Double
Diamond option forms a straight line with two peaks.
11 Open the Handles menu again, and change the top line to
Curve.
Note: The top line now has a curve with two handles.
12 Move the two middle handles on the top line separately.
13 Open the Handles menu again, and choose Add 3 points to curve. Three more handles
are added to the top of the block.
Note: The add and remove points options are only available when the line type is a Curve.
14 Adjust the top line as desired.
While you can adjust the top and bottom as desired, the sides are still parallel straight lines,
and if you move the handle at the top of one side, the handle at the top of the other side
moves with it. This is Constraint - Size.
Note: If you hold the Shift key while dragging, the proportions of the shape are locked. With
Option key the shape is resized from the center.
15 In the Handles menu, choose Constraint - Pennant.
16 Drag the handle at the top right upwards. The handle
below it moves in the opposite direction.
Note: With a rectangular block, this would create a
shape like a pennant. Hold down the Shift key to create
a skewed rectangle effect.
17 In the Handles menu, choose Constraint - Perspective.
18 Drag the handle at the top right to the left. The lines on the side of the block now form a
slope.
19 In the Handles menu, choose Constraint - Free. You can now move any of the corner
handles in any direction you like.
Note: You can only drag the middle handles in the curve up and down.

70 PREMIER+™ 2 Embroidery Creating Lettering
20 In the Handles menu, deselect Force Even Distribution.
21 Drag one of the middle handles on the curve sideways. The letters move with the handle.
The functions in the Handles menu enable you to sculpt a block of lettering into almost any
shape you like.
Top and Bottom Line Types
Choose a line type for the top and bottom of the block to set how the lettering is
displayed.
Add and Remove Points to a Curve
■ Use the Add and Remove points functions to change the number of points in a
Curve.
• Add a point to curve adds a single point to the right end of the selected curve.
• Add 3 points to curve adds three points to the right end of the selected curve.
• Remove a point from curve deletes a single point from the right end of the
selected curve.
Note: The minimum number of points in a Curve is four.
Match Top and Bottom Lines
■ Use Match Top and Bottom Lines to use the same line type for the top and bottom
lines in a block.
Straight Use Straight to create a lettering block
with a straight line for the top and / or
bottom, and with a handle at each end.
Diamond Use Diamond to create a lettering block with
a point at the top and / or bottom. Drag the
central handle to change the angle of the
slope.
Double
Diamond
Use Double Diamond to create a lettering block
with straight lines between the four handles at the
top and / or bottom. Drag the central handles to
change the angle of the straight lines.
Arch Use Arch to create a lettering block with a curve
at the top and / or bottom. Drag the central
handle to change the angle of the curve.
Curve Use Curve to create a lettering block with
curved lines between the four handles at
the top and / or bottom. Drag the central
handles to change the curves between the
handles.
Note: You can add and remove extra points (handles) in a Curve.

PREMIER+™ 2 Embroidery Creating Lettering 71
Note: When Match Top and Bottom Lines is selected, the Bottom Line Type
submenu is not available.
Constraints
Constraints affect how the corner handles on a block behave.
Size When Constraint - Size is used, the two corners adjacent to the corner
that is dragged move the same distance, in the same direction. The corner
diagonally opposite does not move. The handles on the straight or curved
lines between the corners move in proportion.
This preserves the shape of the block, while the size changes.
Note: If you hold the Shift key while dragging, the proportions of the shape
are locked. With the Option key the shape is resized from the center.
Pennant When Constraint - Pennant is used, the corner above or below the corner
that is dragged moves the same distance towards or away from the dragged
corner vertically. The other two corners do not move. This forms a
pennant shape.
Note: Hold down the Shift key to give a vertical skew to the lettering.
Perspective When Constraint - Perspective is used, the corner to the right or left of the
corner that is dragged moves the same distance towards or away from the
dragged corner horizontally. The other two corners do not move. This
gives a perspective effect.
Note: If you hold the Shift key while dragging, the two handles move
together as with Italic.

72 PREMIER+™ 2 Embroidery Creating Lettering
Force Even Distribution
■ Use Force Even Distribution to distribute the handles between the two corners
evenly.
Note: Force Even Distribution affects both the top and bottom of the block.
Block Templates
There are 29 templates for use with lettering.
Italic When Constraint - Italic is used, the corner to the right or left of the
corner that is dragged moves the same distance, in the same direction. The
other two corners do not move. This gives an italic look to the lettering.
Note: If you hold the Shift key while dragging, the two handles move
separately as with Perspective.
Free When Constraint - Free is used, the corner handles can be dragged in any
direction.
Note: If you hold the Shift key while dragging, the proportions of the shape
are locked. With the Option key the shape is resized from the center.
Horizontal
Block
Use Horizontal Block to place
lettering in a straight line with an
outline box that has four square
green handles. Drag the handles to resize the lettering.
Template Settings: Straight, Straight; Constraint - Size, Force Even
Distribution
Double Arch
Use Double Arch to place
lettering in an envelope with an
inwardly curving top and base.
There are six square green
handles. Drag the handles to resize the lettering and the curvature of the
arches.
Template Settings: Arch, Arch; Constraint - Size, Force Even Distribution

PREMIER+™ 2 Embroidery Creating Lettering 73
Diamond
Use Diamond to place lettering in a
diamond envelope. There are six square
green handles. Drag the handles to resize
the lettering and the distance between
vertical pairs of handles. Hold down Shift, then drag the handles to move
the vertical pairs of handles while keeping the same distance between
them.
Template Settings: Diamond, Diamond;
Constraint - Pennant, Force Even
Distribution
Italic
Use Italic to place lettering in an envelope that
is slanted to the right. There are four square green
handles. Drag the handles to resize the lettering.
Hold down Shift, then drag the handles to the left
or right to change the slant of the text.
Template Settings: Straight, Straight; Constraint - Italic, Force Even
Distribution
Freeform
Use Freeform to place lettering in a
fully adjustable straight envelope.
There will be 4 square green handles.
Drag the handles to resize the lettering
and change the shape as desired.
Template Settings: Straight, Straight; Constraint - Free
Flag
Use Flag to place lettering in a curving
envelope. There will be eight square
green handles. Drag the handles to resize
the lettering and change the shape.
Template Settings: Curve, Reflect Top and Bottom Lines; Constraint -
Perspective, Force Even Distribution
Free Sculpt
Use Free Sculpt to place
lettering in a fully adjustable
curved envelope. There will be
14 square green handles. Drag
the handles to resize the
lettering and change the shape.
Template Settings: Curve, Curve; Constraint - Free
Arch Over
Use Arch Over to place lettering in
an envelope with an outwardly curving
top and an inwardly curving base.
There are six square green handles.
Drag the handles to resize the lettering
and the curvature of the top and base.
Template Settings: Arch, Arch; Constraint - Size, Force Even Distribution

74 PREMIER+™ 2 Embroidery Creating Lettering
Arch Under
Use Arch Under to place lettering
in an envelope with an inwardly curving
top and an outwardly curving base.
There are six square green handles.
Drag the handles to resize the lettering and the curvature of the top and
base.
Template Settings: Arch, Arch; Constraint - Size, Force Even Distribution
Pennant Right
Use Pennant Right to place
lettering in an envelope that is larger
on the right side. There are four
square green handles. Drag the
handles to change the size of each
end of the pennant. Hold down Shift, then drag the handles to move one
end of the pennant up or down.
When the Individual checkbox is
selected, each letter is created in a
pennant-shaped envelope and can
be moved and resized individually.
Template Settings: Straight, Straight; Constraint - Pennant, Force Even
Distribution
Pennant Left
Use Pennant Left to place lettering
in an envelope that is larger on the left
side. There are four square green
handles. Drag the handles to change
the size of each end of the pennant. Hold down Shift, then drag the
handles to move one end of the pennant up or down.
Template Settings: Straight, Straight; Constraint - Pennant, Force Even
Distribution
Perspective
Use Perspective to place lettering
in an envelope that is narrower at the
top. There are four square green
handles. Drag the handles to resize the
lettering and change the width of the top or bottom of the text. Hold
down Shift, then drag the handles to the left or right to change the slant of
the text.
Note: Increasing the Gap setting is recommended for Perspective lettering.
Template Settings: Straight, Straight; Constraint - Perspective, Force Even
Distribution

PREMIER+™ 2 Embroidery Creating Lettering 75
Bridge Convex
Down
Use Bridge Convex
Down to place
lettering in an envelope
with a flat top and an
outwardly curving base. There are five square green handles. Drag the
handles to resize the lettering and the curvature of the base.
Template Settings: Straight, Arch; Constraint - Size, Force Even
Distribution
Bridge Concave
Down
Use Bridge Concave
Down to place
lettering in an envelope
with a flat top and an
inwardly curving base. There are five square green handles. Drag the
handles to resize the lettering and the curvature of the base.
Template Settings: Straight, Arch; Constraint - Size, Force Even
Distribution
Bridge Convex
Up
Use Bridge Convex Up
to place lettering in an
envelope with a flat base and
an outwardly curving top.
There are five square green
handles. Drag the handles to resize the lettering and the curvature of the
top.
Template Settings: Arch, Straight; Constraint - Size, Force Even
Distribution
Bridge Concave
Up
Use Bridge Concave
Up to place lettering in
an envelope with a flat base
and an inwardly curving
top. There are five square green handles. Drag the handles to resize the
lettering and the curvature of the top.
Template Settings: Arch, Straight; Constraint - Size, Force Even
Distribution
Zigzag
Use Zigzag to place lettering in an angled
line envelope. There will be eight square
green handles. Click and drag the handles to
resize the lettering and the angle of the sides.
Template Settings: Double Diamond, Reflect
Top and Bottom Lines; Constraint - Italic
Gem
Use Gem to place lettering in an envelope with seven
square green handles. Click and drag the handles to
resize the lettering.
Template Settings: Double Diamond, Diamond;
Constraint - Perspective, Force Even Distribution

76 PREMIER+™ 2 Embroidery Creating Lettering
Setting Letter Options
1 Enter some text in the Lettering window. See “Create Lettering” on page 60.
2 Click the arrows for height and width to change the proportions of the lettering from 25%
to 400%. Alternatively, enter a size in the number box.
3 Adjust Gap to change the spacing between the letters. Click the arrows, or enter a value.
Negative values move letters closer together, and positive values move them farther apart.
4 Select Trim or Running Stitch as the connection method.
Note: Use Running Stitch connection for small single-color lettering with Nearest Point
fonts.
5 Select a Lettering Shape for your lettering. See “Setting Letter Options” on page 76.
6 Click Options. The Letter Options dialog appears.
7 Select the alignment of the line of lettering. Click Left, Center or Right, as desired.
8 Click the arrows for Line Spacing to set the distance between multiple lines of text.
Alternatively, enter a size in the number box.
9 Click OK to close the Letter Options dialog.
10 Choose a line or fill type from the Stitch Type pop-up menu with the ellipsis (3 dots). The
properties dialog for the stitch type opens. See the PREMIER+™ 2 Advanced Features and
Assistants User’s Guide.
11 Change the stitch properties for the lettering in the properties dialog, for example the
density, pattern, angle or stitch length. Click OK to close the dialog.
12 In the Lettering window, click Apply to view your lettering.
To change the lettering, use Control–click to open the Letter Properties dialog or a stitch
properties dialog (see “Changing Letter Properties” on page 85). To change settings for new
pieces of lettering, open the Letter Options dialog again, and alter your settings. Then click
Apply in the Lettering window again.
Ramp
Use Ramp to place lettering in an envelope
with a curved top, a straight base, and sloping
sides. There will be six square green handles.
Click and drag the handles to resize the
lettering and change the angle of the sides and
top.
Template Settings: Curve, Straight; Constraint - Italic
Rocket
Use Rocket to place lettering in an
envelope with a peaked top and an arched
base. There will be six square green handles.
Click and drag the handles to resize and
reshape the lettering.
Template Settings: Diamond, Arch; Constraint
- Perspective

PREMIER+™ 2 Embroidery Creating Lettering 77
Font Manager
Use Font Manager to arrange, rename, duplicate and delete user fonts.
Note: Font Manager only displays user created fonts.
Font Preview
The selected font is previewed, showing its type, name, category and size range.
Name
Use the Name text box to change the name of the selected user font.
To rename a font
■ Edit the font name in the text box, then click Apply to save your changes.
Note: Remember to preserve the size range information when changing the name.
Changing the name does not change the size range.
Category
Select a different Category for the font, or enter the name for a new font
Category.
Change the font Category
■ Select a Category from the pop-up menu, and click Apply to confirm the change.
The font moves to its new Category.
Note: If the selected Category already contains a font with the same name, an error
message is displayed: "A font already exists in this category with this name."
Rename the font, or select another font.
Size
View the Minimum and Maximum recommended size for the font.
Note: This is the size range used by Font Search.
Duplicate
Use Duplicate to create a copy of the selected user font.
Name of the selected font
Move to a different font Category
Click to select a font
View the size range
Apply your changes to the font
Duplicate or delete a font
Import letters to form a font
Create a font with QuickFont
78 PREMIER+™ 2 Embroidery Creating Lettering
The copy is placed in the same Category as the original font, using the same name
suffixed with "Copy of ".
Make a Copy of a Personal Font
1 Open the Letter window .
2 Click to launch Font Manager .
3 Click the font you want to copy in Font Manager.
4 Click the Duplicate button. The font name changes to the original name with "Copy of "in
front.
Your original font and its copy are now in the font category, with your new font selected.
5 In Name, change the text to give your copied font a new name.
Note: Take care not to remove the part of the name indicating the font size.
6 Click Apply to save the copied font under the new name.
7 If desired, use the Category pop-up menu to place the font in a different Category, then click
Apply again to confirm this change.
Note: Alternatively, enter the name for a new font Category, then move the font.
Delete
Use Delete to remove the selected user font from your computer. You cannot
delete system fonts using Delete.
Note: If you delete a font that you used in an embroidery, when you open the
embroidery again the lettering will have been fixed as an embroidery. You will no
longer be able to edit the lettering.
Delete a Font
Note: Make a backup of your fonts before using Delete, as you cannot Undo font removal.
1 Open the Letter window .
2 Click to launch Font Manager .
Note: You can only Delete a User generated (personal) font.
3 Click to select the font you want to delete in Font Manager.
4 Click the Delete button. A message is displayed "This will remove your font and cannot be
undone. Do you want to continue?".
5 Click Yes to remove the font from your computer.
Note: If you deleted the wrong font, copy it back in from your backup.
Font Tools
Import Font from Embroideries
Use Import Font from Embroideries to import individual embroidered letters
to create a font in the Import Font from Embroideries dialog. See “Import Font
from Embroideries” on page 79.
QuickFont
Use QuickFont to create new fonts for PREMIER+™ 2 Embroidery from most
TrueType® or OpenType® fonts on your computer in PREMIER+™ 2 QuickFont.
See “QuickFont” on page 87.

PREMIER+™ 2 Embroidery Creating Lettering 79
Import Font from Embroideries
Use Import Font From Embroideries to import individual embroidered letters
to create a font.
Note: For best results, remove any stray stitches in PREMIER+™ 2 Modify before
importing the letters.
As the imported letters are stitch files, rather than fully adjustable design files, they
work best at their original size, with the minimum of reshaping.
Note: Imported fonts work best with the Line, Vertical Block and Horizontal Block
lettering shapes.
Create a Font from Embroidered Letters
1 Place your embroidered letters in a folder on your computer.
2 Open the Letter window .
3 Click Font Manager . The Font
Manager dialog opens.
4 Click Import Font from
Embroideries . A dialog opens for
you to name your font.
5 Enter a name for your font, and click
OK.
The font naming dialog closes and an
Open dialog appears.
6 In the Open dialog, browse to the folder with your embroidered letters.
Select a character set for the font
Code for the selected letter
Scroll to view more characters
Created letters are highlighted
The selected letter is blue and
created letters are green
Replace the selected letter
Move the Baseline for the letter
Delete the selected letter
Embroidery information
Font name and size
View the baseline for the selected character

80 PREMIER+™ 2 Embroidery Creating Lettering
7 Select the Upper Case letter ’A’, then
click Open. The Import Font from
Embroideries dialog opens with the letter
’A’ selected.
Note: When using Import Font from
Embroideries to create a font from
individual embroideries, the Upper Case
’A’ is always created first. The size of the
letters in the font is taken from the letter
’A’.
8 In the Letter panel on the left, click the
letter ’B’. The Open dialog opens for you
to load the letter ’B’.
9 Click to select the letter ’B’, then click
Open to load it in the Import Font from Embroideries dialog.
10 Click to select the letter ’C’ and load
it.
Note: The Icon View option is useful
when selecting letters.
11 Click to select the letter ’D’, but in
the Open dialog select the letter ’K’
and click Open.
The letter ’D’ is highlighted, but the
letter ’K’ is in the preview.
12 With the ’D’ selected, click Load.
13 Click OK when asked about
overwriting the character, and in the
Open dialog select the letter ’D’.
Note: Alternatively, you could have clicked Delete to remove the incorrect letter.
14 Load the other Upper Case letters in this alphabet.
15 The red line across the preview is the Baseline for the selected letter. Click and hold the
down arrow in the Baseline box. The line moves upwards across the letter.
Note: The Baseline sets where the letter will be placed along the line relative to the other
letters in the font.
16 Adjust the Upper Case letters so that they will rest on the Baseline.
Note: If you want to start again with a particular letter, click Load and reload the embroidery.
Many Upper Case fonts will need little Baseline adjustment.
17 Load the Lower Case letters for your font.
Note: Lower Case letters are likely to need more adjustment, particularly letters like p, g,
and y with descenders.
18 When you have created all of your letters,
click Close to save your font, and then in
Font Manager click Close again.
19 Use your new font in the Letter tab.
Note: To fine tune the placing of your letters
in the work area, use the Individual option.
Alternatively, you can adjust the Baseline and
colors of an imported font in PREMIER+™ 2 Font Create.
Imported fonts work best with the Line, Vertical Block and Horizontal Block
lettering shapes.

PREMIER+™ 2 Embroidery Creating Lettering 81
As the imported letters are stitch files, rather than fully adjustable design files, they
work best at or near to their original size, with the minimum of reshaping.
Lettering Examples
Use lettering to enhance an embroidery, or create a monogram.
Full Circle Lettering: I Love the Sunshine
1 If required, choose File > New.
2 Click Hoop and in the Universal Hoop Groups select 260mm x 200mm - Universal
Large Hoop 3.
3 Set Orientation to Rotated and click OK.
4 Choose PREMIER+™ 2 Embroidery > Preferences or ⌘, and ensure that the Grid size is
set to 10mm.
5 Choose File > Insert. See “Insert” on page 14.
6 Browse to Home/Premier+2/Samples/Premier+2Emb/Stitch.
7 Scroll down to "Sunshine Applique Large.vp4" and select it.
8 Click Open to load the embroidery into the work area.
The embroidery has white or blue handles on its selection box, depending on the Resize
mode.
9 In the Letter window of the Control Panel , click the displayed font, and scroll down
the font viewer until you see the Traditional font category.
10 Select the font Georgia 20-40mm and click OK.
11 Deselect (uncheck) ColorSort.
Note: Each letter will have its own color block.
12 Enter the words "I love the" in the Letters text box.
13 Press Option–Return to start a new line.
14 Enter the word "Sunshine".
15 In the Lettering Shape pop-up menu, click Full Circle.
16 Click Apply. The lettering appears in the center of the work area surrounding the
embroidery. Its handles are green.
Note: The green handles indicate that the lettering has not yet been fixed as an embroidery.
Note: If the lettering does not surround the embroidery, the embroidery was not selected.
Click Actions > Undo or ⌘Z to undo the lettering, click to select the embroidery,
then click Apply again.
17 Drag the square green handle at the top of the circle of
lettering downwards half a grid square.
The circle becomes smaller, but the size of the letters is
unaffected.
18 Open the Design window of the Control Panel . Each
letter has a separate color block in the Color Select area.
19 Move the arrow pointer over the 9th color block and pause
for a moment. The letter ’S’ is highlighted, and a popup
description of the thread is displayed.
20 Click the color block. The Color Selection dialog appears.
21 Select ’All Thread Ranges’.
22 Choose Solar Active Ultra Violet 40 from the pop-up menu.

82 PREMIER+™ 2 Embroidery Creating Lettering
23 Select thread color 0002 (White/Orange). Click OK to change the color.
The S in Sunshine is now white.
24 Change each of the other color blocks in the word ’Sunshine’ to
Solar Active Ultra Violet 40, thread color 0002 (White/Orange).
25
The lettering now has white or blue handles (depending on the
resize setting). You can no longer adjust other stitch
properties.
26 Click Design > ColorSort. There are now only two thread
colors.
27 Click the blue (number 1) in the Color Select and in the Color
Selection dialog ensure that All Thread Ranges is selected, then
choose Solar Active Ultra Violet 40 from the pop-up menu.
28 Select thread color 0001 (White/Yellow) and click OK to change
the color.
29 In the toolbar, click Select All Visible , then click Design > Center in Hoop. Both the sun
embroidery and the lettering are centered in the hoop.
30 Click Life View .
31 Click Solar Reactive . The sun’s face and the
lettering change from white to yellow and orange.
Note: Solar Reactive simulates the sun shining on the
photochromic threads in the design. The threads
change shade to show the colors they will become in
sunlight.
32 Click File > Save and save the embroidery as ’I love
the Sunshine’.
This will save the sun and lettering separately within
this multipart embroidery, making further adjustment
easier.
33 Click File > Export to export the sunshine
embroidery.
34 In the Export dialog, ensure that .vp4 is selected and click Continue.
35 In the Saving as dialog, browse to Home/Premier+2/My Designs, and save the embroidery as
’I love the Sunshine’ (a .vp4 file extension and the word Exported are added automatically).
Note: When exported, the embroidery is automatically combined and ColorSorted if those
options are selected.
36 Click the displayed font, and in the font viewer scroll to the Traditional category and Ensure
that ColorSort is selected (checked).
Individual Letter Monogram
1 In the Lettering window, click the displayed font, and scroll down until you see the
Monogram font category.
Note: These fonts have most characters of equal width, designed for monograms. They are
all upper case only.
2 Choose Athletic Square 2C UC 30-80mm and click OK.
This is a two–color monogram font.
3 Enter the letters "OTG" in the Letters text box.
Since this is an uppercase font, it is not required to enter uppercase letters.
4 In the Lettering Shape area, click Horizontal Line.

PREMIER+™ 2 Embroidery Creating Lettering 83
5 Select the checkbox labeled "Individual".
6 Click the ellipsis (3 dots) button and in the Stitch Type pop-up menu and choose Pattern Fill.
The stitch type can be changed in the Letter window before the lettering is created. To
change the stitch type for lettering placed in the work area, Control–click each letter
separately and select the stitch type from the context menu.
7 In the Pattern Fill properties dialog, click the Pattern button.
8 In the Pattern viewer, choose Diamonds from the pattern pop-up menu.
9 Click the pattern in row 1, column 1 (number 97).
10 Click OK twice to return to the Letter window.
11 Click Apply. Each letter forms a separate block, with its own handles.
12 Drag the lettering towards the top of the screen. The pointer changes to the Move
pointer, and the lettering moves as a block.
13 Click outside the lettering. None of the letters are now selected.
14 Click the "T". It alone is surrounded by a selection box.
15 Drag the top right green handle up and to the right, until the T is
approximately twice the height, and one and two-thirds the
width, of the other two letters.
16 Drag the T to the left so that it is midway between the two
letters.
17 Alternatively, use the arrow keys to nudge the T into position.
This forms a simple three-letter monogram.
Note: To create monograms with different fonts for the large and small letters, use the
ExpressMonogram Assistant.
18 In the Control Panel, click Design. The Design window appears.
As only the T is selected, only the two threads for the T can be
seen in Color Select.
19 Click Select All Visible in the toolbar. All three letters are
surrounded by selection boxes again. See “Select All Visible” on
page 37.
20 Choose Design > Combine Selected. See “Combine Selected”
on page 16.
The three letters are combined and fixed as a single embroidery. In Color Select separate
threads can be seen for each of the three letters.

84 PREMIER+™ 2 Embroidery Creating Lettering
21 Choose Design > ColorSort. There are now only two thread colors. See “.ColorSort” on
page 34.
You could also change the thread colors for single letters in the monogram. See “Change the
Colors in Lettering” on page 85.
Edit Lettering
You can adjust lettering after it has been placed in the work area, but before it has
been fixed as an embroidery.
Note: A block of lettering that has not been fixed as an embroidery has green
handles. Lettering fixed as an embroidery has white or blue handles, depending on
the Resize setting. See “Resize and Scale” on page 41.
To Adjust Lettering
■ Drag the green handles to change the size and arrangement of a block of lettering.
See “Lettering Shapes” on page 65.
■ Control–click a block of lettering and choose an option from the context menu:
• Choose Properties to change the text, proportions, connection and line
formatting. See “Changing Letter Properties” on page 85.
• Choose a stitch type and open its properties dialog to alter properties such as
density, pattern, angle and stitch length. See the PREMIER+™ 2 Advanced
Features and Assistants User’s Guide.
■ To change the thread colors in the lettering, in the Control Panel click Design, then
click a thread color. See “Color Select” on page 30.
■ Fix the lettering as an embroidery. See “Fixing Lettering as an Embroidery” on
page 86.
Change the Fill in Lettering
1 In the Lettering window, click the displayed font, and Inform UC 25-120mm QS. Click to
select the font. This is an uppercase font using QuiltStipple fill.
2 Enter the name "Alex" in the Lettering window.
3 Under Lettering Shape, ensure that Individual is not
selected, then click Apply. The lettering appears in the
work area.
4 Drag the lettering towards the bottom of the screen.
5 Control–click the lettering and choose QuiltStipple Fill from the context menu. The
QuiltStipple Fill properties dialog opens.
6 Set the Type to Straight.
7 Click OK to close the QuiltStipple Fill dialog. The fill now uses straight lines.
8 Open the QuiltStipple Fill dialog again.
9 Set the Spacing to 2 mm.
10 Click OK to close the QuiltStipple Fill dialog.
The lines in the fill are now more widely spaced.

PREMIER+™ 2 Embroidery Creating Lettering 85
Letter Properties
Use the Letter Properties dialog to alter the font, lettering shape, text,
proportions, connection and line formatting when editing lettering.
ColorSort
Use ColorSort to create lettering with the minimum number of color blocks. See
“Lettering Color and ColorSort” on page 85.
Lettering Shape
Change the lettering shape, and select Reverse or Stepped lettering. See “Lettering
Shapes” on page 65.
Changing Letter Properties
Use Letter Properties to change lettering after it has been placed, but before it has
been fixed as an embroidery.
Lettering Color and ColorSort
The ColorSort option sets whether all the characters in a single-color font are
placed as a single color block, or whether each character in the lettering is initially
placed as a separate color block. This allows you to use different colors for each
character, or the same color for all characters.
Note: If Running Stitch Connection is selected, a single color block is always used.
For multicolor fonts, each character has its own sequence of color blocks.
Change the Colors in Lettering
1 In the Letter window, ensure that ColorSort is not selected (checked).
2 In the Control Panel, click Design . The Design window appears.
Change the height and width
proportions of your lettering
Change the spacing between the letters
Select a connection method
Align the lettering
Set the spacing between lines
Change the lettering text Change the font size
Change the lettering shape
Rotate the lettering
Reduce the number of colorsChoose a different font

86 PREMIER+™ 2 Embroidery Creating Lettering
The thread colors for each letter can be seen in the Color Select area. There is a color
block for each color in every letter.
3 Click the top color in the list. The Color Selection dialog opens. See “Color Selection
Dialog” on page 30 for more information.
4 Change the color to a contrasting color.
5 Click OK to close the dialog.
In the work area one of the colors in the first letter in the text has changed. Use Color
Select to change the color of individual letters in your lettering.
6 Control–click the lettering, and choose Fix as Stitches in the Context menu.
In the work area the handles on the lettering are now white. The lettering has been fixed as
an embroidery.
7 Click Design > ColorSort. There is now only a single occurrence of each color. See
“.ColorSort” on page 34.
8 Chose Edit > Undo twice to reverse the sorting of the colors. The lettering has green
handles again.
You can use the Colored Pencils to rapidly change groups of letters to different
colors. Then, after using ColorSort, change the remaining single colors to the
actual desired colors. See “Colors Window” on page 33.
Fixing Lettering as an Embroidery
Lettering is fixed as an embroidery when it is Combined with another design, or
when Fix as Stitches is used. See “Fix as Stitches” on page 16.
If lettering is selected when opening the Modify window, it will be fixed. The
stitches are then created, and any further resizing of the embroidery may affect
stitch density and length. The stitch properties, for example the density, pattern,
angle or stitch length, may not be changed after it is fixed.

87 PREMIER+™ 2 Embroidery QuickFont
9
QuickFont
Use QuickFont to create fonts automatically for use with your
PREMIER+™ 2 Embroidery System, or your embroidery machine.
Create a font automatically from a
Tru eTyp e® or Ope nTyp e® fo nt on
your computer for use with your
PREMIER+™ 2 Embroidery System, or
certain HUSQVARNA VIKING® or
PFAFF® embroidery machines.
To c re at e a f on t
■ In Font Manager , click QuickFont .
■ Click the QuickFont icon in the Launchpad.
■ Double-click the QuickFont icon in the Finder.
1 Open the Letter window and click to launch Font Manager .
How to Create a Font
Select Font
1 Start QuickFont . The Select Font page appears.
Note: The initial settings in QuickFont are remembered from the last time it was used.
2 In the Font pop-up menu, choose the desired font name. The previews to the right of the
window change with the font choice.
3 In the Typeface pop-up menu,
choose the desired style, for
example Regular, Light, Bold or
Oblique. The options will vary
according to the selected font. The
previews to the right of the window
will change according to the style
choice.
4 Select a File Type. Choose between:
A font to use in the PREMIER+™ 2
Embroidery System
A font to use on your embroidery
machine.
5 In the Character Set pop-up menu,
choose the desired set.
The choice of character set will vary,
depending on the File Type chosen
above.
6 Click Continue. The Set Stitch Options page appears.

88 PREMIER+™ 2 Embroidery QuickFont
Set Stitch Options
7 In the Stitch Type pop-up menu,
choose the desired Stitch Type. The
Output Size may change according
to the selected Stitch Type.
The previews to the right of the
window will change according to the
selected Stitch Type.
The first three uppercase characters,
lowercase characters and numbers
are previewed. The size for the 'A'
and 'a' characters are set half way
between the Minimum and
Maximum output size for a
PREMIER+™ 2 Embroidery System
font, or the characters are set as
near as possible to the Output Size
for a machine font.
The Real Size % box shows the size
of the previews, compared to the
Real Size setting in PREMIER+™ 2 Configure.
8 If desired, click Stitch Options and/or Border Stitch Options and change the settings for the
selected Stitch Type, such as the fill pattern or satin border width.
9 To change the thread color used for satin columns or pattern fill areas, click the Fill Thread
Color button . The Color Selection dialog appears for you to choose a new color.
10 To change the thread color used for satin borders, appliqué borders and outlines, click the
Border Thread Color button . The Color Selection dialog appears for you to choose a
new color.
Note: After you have chosen a new thread color, the previews are shown with the new color.
11 To change the color used for appliqu fabric, click
the Appliqu Color button . The Appliqu
Selection dialog appears for you to choose a new
color.
12 If desired, adjust the Output Size (for a machine
font), or Output Size Range (for a PREMIER+™ 2
Embroidery System font).
13 In Joining Point, select Baseline to join letters at
the bottom, select Nearest Point to join letters at
the place where they are closest for fast stitchout
of a small font, and use Continuous for a flowing
handwriting effect with a script font.
Note: Joining Point options are only available with
a PREMIER+™ 2 Embroidery System font.
14 Click Continue. A generating preview message
appears, saying that the font is being created. The Output Options page then appears.

PREMIER+™ 2 Embroidery QuickFont
Output Options
15 The Font Name is automatically generated to show the TrueType® font name, then the style
name (for example, Regular), then the Stitch Type (S for Satin, F for Fill, FSB for Fill + Satin
Border, SB for Satin Border, A for Appliqué or O for Outline), then the character set (E for
Extended, SE for Super Extended and so on). At the end is the minimum and maximum
recommended sizes in millimeters (for a PREMIER+™ 2 Embroidery System font), or the
Output size (for a machine font). If desired, click in the Font Name box to change the name.
16 The PREMIER+ Font Category is initially set according to your choice of Joining Point. It is
set to My Fonts for Baseline joining, Nearest Point for Nearest Point joining or Script for
Continuous joining. If desired, choose a different category from the pop-up menu.
Note: PREMIER+ Font Category is not available when creating a machine font.
17 Machine fonts are saved to Home/Premier+2/My Designs by default. If desired, you can
choose a different folder, or save to a USB stick. Click the button with the ellipsis (three
dots) to choose a new folder or drive.
18 To view the complete font, use the Previous and Next buttons below the preview to step
through the character set.
19 To print a reference sheet showing the characters in the font, click Print Catalog.
20 To start a new font after creating the current one, select the "Return to start when I click
Done" checkbox.
21 Click Done and QuickFont will close. The font is saved according to the selected options.
Create a Pattern Fill Font
1 In PREMIER+™ 2 Embroidery, open the Letter window , click the Font Manager
button, then click the QuickFont button . Alternatively, click the PREMIER+™ 2
QuickFont icon in the Launchpad, or double-click the PREMIER+™ 2 QuickFont
icon in the Finder.
The Select Font page appears.
2 In the Font pop-up menu choose the font Lucida Grande.
The previews show the appearance of the 'ABC', ’abc’ and '123' characters in the font.
3 Ensure the Typeface is set to Regular.
4 If you are creating a font for use in PREMIER+™ 2 Embroidery, choose ’For using in my
PREMIER+ Software’.
If you are creating a font for a machine, select ’For using on my embroidery machine’, and
choose your machine brand.
Note: The pictures here illustrate using QuickFont to create a font for PREMIER+™ 2
Embroidery.
5 Select a character set:
• If you are using QuickFont for PREMIER+™ 2 Embroidery, ensure that Extended is set as
the Character Set.
• If you are creating a font for a HUSQVARNA VIKING® embroidery machine, ensure that
Western 1 is set as the Character Set.
• If you are creating a font for a PFAFF® embroidery machine, ensure that Western 4 is set
as the Character Set.
Note: These character sets are appropriate for general English text, with letters, numbers
and some punctuation.

90 PREMIER+™ 2 Embroidery QuickFont
6 Click Continue and the Set Stitch Options
page appears.
7 Set the Stitch Type to Pattern Fill . The
previews now show the pattern fill, and the
Output Size and Output Size Range values
change, as Pattern Fill is suitable for larger
letter sizes than the default Satin.
8 Click the Stitch Options button and the
Pattern Fill dialog appears.
9 Click the Patterns button (the button with three dots) to
choose a pattern for the fill.
10 In the Pattern viewer ensure the Pattern is set to 3 from
the Standard 1 category.
11 In the Pattern Fill dialog, ensure the Density is set to
Constant, and that the value is set to 2.
12 Click OK to close the dialog.
13 Click the Fill Thread Color button and the Color
Selection dialog appears.
14 Ensure the Thread Range is set to Robison-Anton Rayon
40.
15 Click in the Find Thread box and enter '2409'. Thread
color 2409 (Yellow Mist) is found in the list.
16 Select the thread, and then click OK. The previews are
updated with the new thread color.
17 Ensure the Joining Point is set to
Baseline, which is the recommended
setting for most lettering.
Note: Nearest Point is recommended
for faster stitchout of small fonts,
where connection stitches will be left
untrimmed. Continuous is used for
Script fonts where the lowercase
letters are joined.
The Joining Point options are only
available when creating a font for use
in PREMIER+™ 2 Embroidery. They
are not accessible when creating a
machine font.
18 Click Continue. The font is
generated, and the Output Options
page appears.
19 Use Next and Previous to preview
the other letters in the font.
20 Leave the Font Name unchanged.
Note: The Font Name is automatically generated to show the TrueType® font name, then
the typeface (here Regular), then the Stitch Type (F for Pattern Fill), then the Character Set
(here E for Extended), then the minimum and maximum recommended sizes in millimeters
(or output size for a machine font). Other letter combinations are used for different style
and stitch type choices.

PREMIER+™ 2 Embroidery QuickFont
21 If you are creating a font in QuickFont for use in PREMIER+™ 2 Embroidery, leave the
Category as My Fonts. This will save the font to the My Fonts folder on your computer.
22 If you are creating a font for use on a machine, save the font to the My Designs folder on
your computer (the default location), or to a USB embroidery stick.
23 If desired, click Print Catalog to print a reference sheet that shows the font details and the
characters in the new font.
24 Click Done to close QuickFont.
Note: To use the font in PREMIER+™ 2 Embroidery, in the Font viewer, browse to the My
Fonts Category. The font Lucida_Grande_regular_F_E_20_120 is previewed in the font
display. The Font viewer automatically detects and previews any new fonts you add to My
Fonts, and the font can be used in the same way as the system fonts.

92 PREMIER+™ 2 Embroidery Creating SuperDesigns
10
Creating SuperDesigns
This chapter describes how you can use the SuperDesigns available in
PREMIER+™ 2 Embroidery to enhance your embroidery project.
Create SuperDesigns from the SuperDesign sets available in PREMIER+™ 2
Embroidery. SuperDesigns are special designs that can be resized with constant
stitch density.
Some SuperDesigns are multicolored, and the stitch type for many can be changed.
Alter the size, proportions, stitch type and thread color. A SuperDesign can be
resized with constant stitch density, and the stitch properties adjusted, until it is
fixed as embroidery.
To Open the SuperDesigns Window
■ Click Control Panel , then click SuperDesign .
Choose a SuperDesign Category
Scroll down and select a design
Alter the size of your chosen design
Adjust the proportions of the design
Change the appearance of the
stitching in the design
Place the design in the work area
Search for a SuperDesign by name or keyword
Choose a SuperDesign style
To learn how to Go to
Create a SuperDesign See “Create a SuperDesign” on page 93.
Change the shape of a SuperDesign See “Reshaping a SuperDesign” on page 93.
Change the properties for an existing
design
See “Changing SuperDesign Properties” on
page 94.

PREMIER+™ 2 Embroidery Creating SuperDesigns 93
Create a SuperDesign
1 Open the SuperDesign window .
2 Choose a SuperDesign Category from the pop-up menu.
The preview shows the first design set in that category.
Note: Choose a single Category, or browse All Categories.
3 Scroll down to select a SuperDesign set.
4 Click a design to select it.
5 Choose a SuperDesign Style (for instance, Color or Line).
6 Set the Size in millimeters as desired, from 5mm to 200mm. This sets the height of the
SuperDesign, and the width is set proportionally.
7 Click the arrows for width and height to change the proportions of the design.
Alternatively, enter a size in the number box.
8 If desired, select a line or fill type from the Stitch Type pop-up menu, then click the stitch
type to open the properties dialog for the stitch type. See the PREMIER+™ 2 Advanced
Features and Assistants User’s Guide.
9 Change the stitch properties for the SuperDesign in the properties dialog, for example the
density, and the stitch length, angle and pattern. Click OK to close the dialog.
10 Click Apply. The SuperDesign appears in the work area, leaving any existing SuperDesigns
unchanged.
About SuperDesigns
SuperDesigns are created from the SuperDesign sets available in PREMIER+™ 2
Embroidery.
SuperDesign sets are grouped into Categories. Each set contains 9 SuperDesigns.
The SuperDesign window shows thumbnails of all the SuperDesigns in the
currently selected SuperDesign Category.
If there is more than one stitch area of a particular type in the design, the pop-up
menu will show that stitch type in a numbered list; for example Pattern Fill 1,
Pattern Fill 2.
Edit SuperDesigns
You can adjust SuperDesigns after they have placed in the work area, but before
they have been fixed as an embroidery.
Reshaping a SuperDesign
1 Choose a SuperDesign in the SuperDesign window. See “Create a SuperDesign” on page 93.
Change the color of a SuperDesign See “Change SuperDesign Color” on page 94.
Fix a SuperDesign as an embroidery See “Fixing SuperDesigns as Embroideries” on
page 95.
Create a SuperDesign circle with Encore See “Create a SuperDesign Daisy Chain” on
page 95.
To learn how to Go to

94 PREMIER+™ 2 Embroidery Creating SuperDesigns
2 Click Apply. The SuperDesign appears in the work area.
3 Drag the design a short distance to the right. A four arrow pointer appears as you drag.
4 Place the pointer over one of the square green handles at the corners of the design. The
Adjust/resize pointer appears.
5 Drag the handle to change the shape of the SuperDesign.
6 Hold the Shift key and drag one of the handles. The size changes, but the shape remains the
same. (Hold the Option key to resize from the center.)
7 Use the round handle on the right to rotate the SuperDesign. The handles on the design are
now white or blue. This means that the SuperDesign has been fixed as an embroidery.
8 Undo the rotation. The green handles reappear. You can adjust the design again.
SuperDesign Properties
Use the SuperDesign properties dialog to change the SuperDesign size, width,
height and angle of a design that has been placed on the work area.
Changing SuperDesign Properties
Use the SuperDesign properties dialog to change a design after it has been placed,
but before it has been fixed as an embroidery.
1 appliquéControl–click within the SuperDesign and select Properties from the context
menu. The SuperDesign properties dialog appears.
2 Adjust Size to change the basic size of the SuperDesign. It is recommended to use a size
within the range suggested in the SuperDesign guide.
Note: Each set of SuperDesigns has its own default size. The default size is set automatically
each time a SuperDesign set is selected.
3 Click the arrows for percentage width and height to change the proportions of the
SuperDesign. Alternatively, enter a size in the number box.
4 Click OK to apply your changes to the selected SuperDesign.
SuperDesign Color
You can change the colors of SuperDesigns before or after they have been fixed as
embroideries.
Change SuperDesign Color
1 Open the SuperDesign window and choose "Borders" from the
SuperDesign Category pop-up menu. The Borders 1 SuperDesign
set appears.
2 Click the design in row 3 column 3 and click Apply.
Change the SuperDesign size
Adjust the proportions of the design
Change the angle of the SuperDesign

PREMIER+™ 2 Embroidery Creating SuperDesigns 95
3 In the Control Panel, click Design . The Design window appears. The thread colors for
the SuperDesign can be seen in the Color Select area.
4 Click the top color in the list. The Color Selection
dialog opens. See “Color Selection Dialog” on
page 30 for more information.
5 Change this pale green to a deeper green.
6 Click OK to close the dialog.
The green has changed in the Design window and in
the SuperDesign in the work area.
7 Undo the color change. The SuperDesign has
returned to its original colors.
Fixing SuperDesigns as Embroideries
SuperDesigns are fixed as an embroidery when they are Combined with another
design, or when Fix as Stitches is used. See “Fix as Stitches” on page 16.
If a SuperDesign is selected when opening the Modify window it will be fixed.
The stitches are then created, and any further resizing of the embroidery may
affect stitch density and length. The stitch properties, for example the density,
pattern, angle or stitch length, may not be changed after it is fixed.
Note: When SuperDesigns are fixed as embroideries, the handles change from
green to white or blue.
Create a SuperDesign Daisy Chain
Use Encore to create a circle of SuperDesigns.
1 Open the SuperDesign window .
2 Choose "Borders" from the SuperDesign Category pop-up menu. The
Borders SuperDesign sets are shown.
3 In the Borders 1 set, click the flower design in row 1 column 3 (number
3).
4 Ensure that Size is set to 20mm.
5 Click Apply and the flower SuperDesign appears on the work area.
6 In the Control Panel, click Encore . The Encore window appears. See
“Encore” on page 44.
7 Ensure that the Encore Type is set to Circle .
8 Ensure that Position is set to Standard .
9 Set Repeats to 6.
10 Ensure that Group is selected.
11 Click Preview and a circle of daisy designs appears on the work area.
The daisy designs appear a little sparse. More designs would create a
better circle.

96 PREMIER+™ 2 Embroidery Creating SuperDesigns
12 Increase the number of Repeats to 10 and click Preview again.
The circle now looks more balanced.
13 Drag the top of the circle downwards until the daisy designs
meet.
14 Click Apply. The daisy design is now surrounded by a selection
box with a solid line (a group). The individual SuperDesigns can
be seen within this group.
15 In the Control Panel, click Design. The colors for the individual
SuperDesigns have been kept.
Use ColorSort when Exporting to minimize the number of
colors when stitching out. The minimum number of colors will
be 3, if none of the designs overlap.

97 PREMIER+™ 2 Embroidery Frames, Borders & Underlines
11
Frames, Borders & Underlines
This chapter describes how you can use the frames, flourishes,
borders and motif underlines in PREMIER+™ 2 Embroidery to
enhance a design or lettering, or to create individual frames, borders,
motif underlines and individual motifs.
In the Frame and Border windows you can create a frame or border which is
placed at a size to fit around the currently selected embroidery, lettering or
SuperDesign, or if no embroidery is selected, on the work area at a chosen size.
You can also create flourishes above and below, or motif underlines below the
selected embroidery, or separately from an embroidery, or place single motifs.
Creating Frames
In the Frame window you can select corners, frames, side pieces and flourishes to
place around your embroidery.
Choose from the categories of corners, frames and side pieces. Then choose a
frame set, and select a design. Place the frame around your embroidery, or
anywhere on the work area.
Scroll down and choose a design for your frame
Choose corners, frames, side pieces or flourishes
Crop your embroidery, or select Margin
and set its size
Group the embroidery and the frame
Change the appearance of the stitching in the frame
Set the size and proportions for the frame
Place the frame around your embroidery

98 PREMIER+™ 2 Embroidery Frames, Borders & Underlines
Alternatively, select Flourish and choose a flourish to be placed above, below or as
a duo above and below the selected embroideries.
Some frames are multicolored, and the stitch type for many can be changed. A
frame can be resized with constant stitch density, and the stitch properties
adjusted, until it is fixed as embroidery.
The Surround options stay the same until you change them, or close PREMIER+™
2 Embroidery.
To Open the Frame Window
■ Click Control Panel , then click Frame .
Create a Frame
1 Load an embroidery in the work area and select it.
2 Open the Frame window.
3 Select a frame Type (corners , frames or side pieces ).
The preview shows the first frame set of that type and its name.
4 Scroll down to choose a frame set.
5 Click a frame to select it.
6 If desired, select Group to keep the frame with the embroidery.
7 Select to use a margin or to crop the embroidery when placing the frame.
Margin leaves a space between the embroidery and the frame around it. Crop leaves no
margin visible, and will cut the embroidery to the shape of the frame.
Note: It is recommended to use the Group option when Crop is selected.
8 If you selected Margin, set the Size in millimeters from -50 mm to 50 mm.
9 If desired, select a line or fill type, or appliqué, from the pop-up menu to open the
properties dialog for the stitch type. See the PREMIER+™ 2 Advanced Features and
Assistants User’s Guide.
10 Change the stitch or appliqué properties for the frame in the properties dialog, for example
the density, and the stitch length, angle and pattern. Click OK to close the dialog.
11 If desired, click Size Options to set the frame size, height and width in the Frame Options
dialog. Click OK to close the dialog.
Note: When one or more embroideries are selected, the frame is placed around that
selection. The settings in the Frame Options dialog will be used if no embroidery is selected.
12 Click Apply in the Frame window to view your framed embroidery.
To learn how to Go to
Create a frame See “Create a Frame” on page 98.
Create a flourish See “Create a Flourish” on page 99.
Set the size of a frame See “Setting the Frame Size” on page 100.
Change the shape of a frame See “Reshaping a Frame” on page 101.
Change the size of a frame See “Changing Frame Properties” on page 101.
Place a frame around an embroidery See “Grapes and Birds in a Frame” on page 102.

PREMIER+™ 2 Embroidery Frames, Borders & Underlines 99
Create a Flourish
1 Load an embroidery in the work area and select it.
2 Open the Frame window.
3 Select Flourishes .
The preview shows the first flourish set and its name.
4 Scroll down to choose a flourish set.
5 Click a flourish to select it.
6 Select whether to place the flourish Above , Below , or as a Duo above and
below the embroidery.
7 Set the Size of the Margin in millimeters from -50mm to 50mm.
Note: If a negative margin is used the flourish may overlap the embroidery.
8 Set the percentage width relative to the size of the embroidery.
9 If desired, select Group to keep the flourish with the embroidery.
10 If desired, select a line or fill type, or appliqué, from the pop-up menu to open the
properties dialog for the stitch type. See the PREMIER+™ 2 Advanced Features and
Assistants User’s Guide.
11 Change the stitch or appliqué properties for the flourish in the properties dialog, for
example the density, and the stitch length, angle and pattern. Click OK to close the dialog.
12 If desired, click Size Options to set the flourish size, and percentage width and height in the
Options dialog. Click OK to close the dialog.
Note: When one or more embroideries is selected, the flourish is placed above or below
that selection. The settings in the Size Options dialog will be used if no embroidery is
selected.
13 Click Apply to view the finished result.
Appliqué Frames and Foam Frames
For appliqué fonts, SuperDesigns and frames, the fabric can be changed as well as
some of the border settings. For example, in Stitch Type select Appliqué Fabric,
and in the Appliqué Selection dialog change the fabric, angle and margin. The
appliqué placement stitches cannot be edited, but the position of the placement
line may be adjusted to match the appliqu.
For Foam fonts and frames, only the color can be changed. The Stitch Type area is
unavailable, and no properties can be selected in the Context menu.
Special instructions are displayed for stitching out appliqué or foam fonts,
SuperDesigns and frames. The instructions can be previewed in the Design Player.
Appliqué frames are designed to be stitched out in a particular sequence. They are
created with the standard appliqué options, to trim on the machine. Preview the
two stops in the Design Player, with instructions to place the fabric and to trim it.
These instructions are also present on the printed worksheet.
Note: If you are using pre-cut pieces (with outlines created in Export Appliqué
Pieces for a fabric cutter or INSPIRA® Cutwork Needles), the second stop can be
ignored as there is no need to trim. It may also be useful to match the placement
line to the appliqu

100 PREMIER+™ 2 Embroidery Frames, Borders & Underlines
Foam frames are designed to be stitched out in a particular sequence. Preview the
two stops in the Design Player, with instructions to place the foam and to remove
any excess foam. These instructions are also present on the printed worksheet.
Frame or Flourish Options
Use the Frame Options dialog to change the size, width and height of a frame
before it is placed on the work area.
Note: This size will only be used if no embroidery is selected.
Setting the Frame Size
Use the Frame Options dialog to change the dimensions of a frame before it has
been placed on the work area.
1 In the Frame window, click the Size Options button. The Frame Options dialog appears.
2 Adjust Size to change the basic size of the frame.
3 Click the arrows for height and width to change the proportions of the frame. Alternatively,
enter a size in the number box.
4 Click OK to apply your changes to the frame.
Edit Frames
You can adjust frames after they have been placed in the work area, but before they
have been fixed as an embroidery.
Note: A frame that has not been fixed as an embroidery has green handles. A group
has orange handles. A frame fixed as an embroidery has white or blue handles.
To A d j u s t F ra me s
Note: Use Restrict Groups to select a frame that is grouped with an embroidery.
See “Restrict Groups” on page 39.
■ Drag the green handles to change the shape of a frame. Hold the Shift key while
dragging to retain the original proportions. See “Reshaping a Frame” on page 101.
■ Control–click a frame and select an option from the context menu:
• Choose Properties to change the size, height and width. See “Changing Frame
Properties” on page 101.
• Choose a stitch type and open its properties dialog to alter properties such as
density, stitch length, angle and pattern. See the PREMIER+™ 2 Advanced
Features and Assistants User’s Guide.
■ To change the thread colors in the frame, in the Control Panel click Design, then
click a thread color. See “Changing a Thread Color” on page 30.
Change the frame size
Adjust the proportions of the frame

PREMIER+™ 2 Embroidery Frames, Borders & Underlines 101
■ Fix the frame as an embroidery. See “Fixing Frames and Flourishes as
Embroideries” on page 102.
Reshaping a Frame
1 Create a frame in the Frame window. See “Create a Frame” on page 98.
2 Click Apply. The frame appears in the work area.
Note: If Group was selected when creating the frame, use Restrict Groups to adjust the
frame separately from the embroidery. See “Restrict Groups” on page 39.
3 Drag the frame a short distance to the right. A four arrow pointer appears as you drag.
4 Place the pointer over one of the square green handles at the corners of the frame. The
Adjust/resize pointer appears.
5 Drag the handle to change the shape of the frame.
6 Hold the Shift key and drag one of the handles. The size changes, but the shape remains the
same. (Hold the Option key to resize from the center.)
7 Use the round handle on the right to rotate the frame, then Undo the rotation.
8 Click Restrict Groups to finish editing the frame separately.
Rotation
Changing Frame Properties
Use the Frame properties dialog to change a frame after it has been placed, but
before it has been fixed as an embroidery.
Note: You cannot change the frame with Frame properties. Create a new frame
instead. To change the stitch type or appliqué, Control–click the frame and select it
from the context menu.
1 Control–click within the frame and select Properties from the context menu. The Frame
properties dialog appears.
2 Adjust Size to change the basic size of the frame.
3 Click the arrows for height and width to change the proportions of the frame. Alternatively,
enter a size in the number box.
4 Click OK to apply your changes to the selected frame.
Frame Color
You can change the colors of frames before or after they have been fixed as
embroideries.
Change the frame size
Adjust the proportions of the frame
Change the angle of the frame

102 PREMIER+™ 2 Embroidery Frames, Borders & Underlines
Fixing Frames and Flourishes as Embroideries
Frames and flourishes are fixed as an embroidery when they are Combined with
another design, or when Fix as Stitches is used. See “Fix as Stitches” on page 16.
If a frame or flourish is selected when opening the Modify window, it will be
fixed. The stitches are then created, and any further resizing or rescaling of the
embroidery will affect stitch density and length. The stitch properties, for example
the density, pattern, angle or stitch length, may not be changed after it is fixed.
Frames Examples
Frame one or more embroideries, or use a frame with appliqué.
Grapes and Birds in a Frame
Frame an embroidery and change the frame properties.
1 Choose File > Insert. See “Insert” on page 14.
2 Browse to Home/Premier+2/Samples/Premier+2Emb/Stitch2/Birds.
3 Scroll down to "Grapes and Birds.vp4".
Note: If the viewer is set to Icons Only, hover the pointer over a design thumbnail to view its
name.
4 Click to load the embroidery into the work area.
The embroidery has white or blue handles on its
selection box, depending on the Resize mode.
5 Open the Frame window , and in Type select
Corners .
6 Scroll down the Corners window to Ornamental 2 MC,
and click the corners in row 1, column 1.
These corners are designed to frame a square
embroidery. The corners in rows 2 and 3 are for
portrait and landscape formats.
7 In Surround, select Margin and ensure that it is set to
2.5 mm. (This is the default size.)
8 Deselect Group.
9 Click Apply. The set of corners is placed around the
embroidery as a frame. It has green handles.
10 Drag the frame a short distance. It moves separately
from the embroidery.
If the embroidery moves with the frame, Group was
selected. Group treats the embroidery and frame as a
unit. If Group is not selected, the frame can be
immediately nudged into place. Only deselect Group
when you want to move the frame after placing it.
Note: If you grouped the embroidery and frame, use
Restrict Groups to adjust them separately.
11 The frame would look better if it fitted a little more
snugly. Delete the frame.
12 In the Frame window, click the down arrow to change Margin to 0.5 mm.

PREMIER+™ 2 Embroidery Frames, Borders & Underlines 103
13 Ensure the design is selected, then click Apply. The frame now fits closely around the
embroidery, but does not overlap it.
The satin line on the outside of the corners is a little heavy. Its width can be changed.
14 Control–click the frame and select Satin Line from the context menu. The Satin Line
properties dialog appears.
Alternatively, you could have used Stitch Type to change the satin properties before placing
the frame.
15 In the Satin Line properties dialog, click the down arrow
to change Width to 2.5 mm.
16 Click OK. The frame is now more delicate.
17 Click outside the frame to view the design without the
selection box.
Alternatively, click Realistic 3D mode or Life
View to see the design without the selection box and
grid.
18 To keep the embroidery and frame together as a unit,
select both and in the toolbar click Group .
Note: To merge the embroidery with the frame, fixed as
stitches, choose Design > Combine All.

104 PREMIER+™ 2 Embroidery Frames, Borders & Underlines
Creating Borders and Motif Underlines
In the Border window you can create a border to place around your embroidery,
or create a motif line underneath your embroidery, or a single motif.
To Open the Border Window
■ Click Control Panel , then click Border .
Creating Borders
Select a border type, then set the margin width, and select rounded or square
corners. Use Stitch Options to set the properties for each stitch type.
Note: The stitch properties may only be adjusted before the border is created.
The border is placed around the rectangular "edge" of the currently selected
embroidery, or around the inside edge of the hoop. (In the ExpressMonogram
Assistant, the border is placed around the edge of the envelope area.)
Note: If more than one embroidery is selected, the border is placed around the
selected embroideries. If no embroidery is selected, the border is placed around
the inside edge of the hoop.
To learn how to Go to
Create a border around an embroidery See “Create a Border” on page 105.
Create a motif underline See “Create Lines of Butterfly Motifs” on
page 106.
Place a single motif See “Create a Single Motif” on page 105.
Select a stitch type for the border
Set the stitch properties for the border
Set the width of the margin around the border
Group the embroidery and border
Select rounded or square corners
Create the border
Choose a motif for the underline
Preview the selected motif
Set the number of repeats in the motif line
Set the length of the motif line
Create the line of motifs
Add appliqué to the border
Audition a fabric for the appliqué
Set the properties for the appliqué

PREMIER+™ 2 Embroidery Frames, Borders & Underlines 105
The border is placed with white handles or blue handles, depending on the
Resize mode.
Create a Border
1 Load an embroidery in the work area and select it.
2 Open the Border window.
3 Select a Stitch Type (Satin Line, Triple Stitch, Running Stitch
or Motif Line).
4 If desired, click Options to open the properties dialog for
the stitch type. See the PREMIER+™ 2 Advanced Features
and Assistants User’s Guide.
5 Change the stitch properties for the border in the
properties dialog, for example the density and stitch length.
Click OK to close the dialog.
6 If desired, click Add appliqué to place an appliqué piece
behind the embroidery and border, and then click Select
Fabric to choose a fabric.
7 Set the Margin size in millimeters from -50 mm to 50 mm.
Note: For a satin or motif border you may need to adjust the margin to avoid overlapping the
embroidery.
8 Select Rounded or Square corners.
Rounded corners may overlap the corners of the embroidery. Adjust the Margin for the
desired effect.
9 If desired, select Group to keep the border and the embroidery as a unit.
10 Click Apply in the Border window to view your framed embroidery.
Creating Motif Underlines
Create a motif line of a chosen length or a selected number of repeats below the
currently selected embroidery. Alternatively, place a single motif. The motif line is
created below the selected embroidery or embroideries, or in the center of the
work area if no embroidery is selected.
Motifs are relatively small single-color designs similar to machine stitches, created
using single, running and triple stitches. Motifs are created from the motif sets
available in PREMIER+™ 2 Embroidery, including any My Motifs you made in
PREMIER+™ 2 Create.
Create a Motif Underline
■ Select the length of the motif line, or select the number of repeats. Use the Motif
button to select a motif, its stitch type and its size.
Note: The stitch properties may only be adjusted before the motif underline is
created.
Create a Single Motif
■ Use the Motif button to select a motif, its stitch type and its size. Set Repeats to 1,
and click Apply. A single motif is placed in the work area.

106 PREMIER+™ 2 Embroidery Frames, Borders & Underlines
Create Lines of Butterfly Motifs
1 Open the Border window.
2 In the Motif Underline section, click the Motif button. The
Motif Line selection dialog opens.
3 In the Motif Line selection dialog, click the Motif button.
The Motif dialog opens.
4 Select Universal from the Group pop-up menu.
5 Select General Motifs 1 from the Category pop-up menu.
6 In the Pattern pop-up menu, select motif 23, a butterfly.
The Height and Width are initially set according to the
chosen motif.
7 Check that Proportional (lock closed) is on.
8 Set Height to 14mm.
9 Click OK to set the motif.
10 In the Motif Line selection dialog, ensure that stitch type is
set to Running.
11 Set Length to 2.0mm.
Note: Length is initially set to the recommended value for
the motif.
12 Click OK to select the butterfly motif line type.
13 In the Motif Underline section of the Border window, click
Length to select it.
14 Set the Length to 100mm.
15 Click Apply. A line of four butterflies is placed on the work area.
The width of the butterfly motif is 25mm, so the line contains four motifs.
Note: You can resize or rescale this line of motifs, or change its color, in the same way as for
any other design.
16 Set Length to 120mm and click Apply
again. There are still four motifs, but
they are more widely spaced.
Only complete motifs are used when
placing a motif line with Motif
Underline.
Note: The second motif line forms a
Group with the first line. Use
Restrict Groups or Ungroup to use
the lines independently.
17 In the Motif Underline section, select Repeats.
18 Click the arrows to set the number of repeats to four, then click Apply. The motif line is the
same size as the first line you created.
19 Click the arrows to set the number of repeats to one, then click Apply. This places a single
motif in the work area.
Note: Use Encore to create curved motif lines, circles and shapes using single motifs, and to
mirror motifs within a line. See “Encore” on page 44.
