
ajidev.com
Crafting what’s next
ajidev.com
Crafting what’s next
Welcome to iAnnotate v 1.5!
www.ajidev.com
Contents
1: Getting Started 1
1.1: QuickStart Guide 1
1.2: Using the iAnnotate Interface 2
2: In-app help 5
2.1: Tips 5
2.2: Interactive Help 5
2.3: Further Resources 5
3: Transferring Documents into and out of iAnnotate 6
3.1: E-mail 6
3.2: Using iTunes USB file transfer 6
3.3: Downloading documents from the Web 7
3.4: Working with other applications 9
3.5: Working with Dropbox and WebDAV 9
3.6: Using the Aji PDF Service 10
3.7: Transferring documents using APS 15
3.8: Printing Documents 16
4: The Document Manager 17
4.1: Finding Documents 18
4.2: Changing the Document Browser View 19
4.3: Selecting Documents 19
5: Reading Documents 21
5.1: The PDF Display 21
5.2: Document Navigation 24
5.3: Tabbed Reading 27
5.4: Single Page Mode 30
6: Annotation 31
6.1: Creating new Annotations 31
6.2: The Annotation Editor 31
6.3: Managing popup behavior 32
6.4: Working with Color Annotations and the Color Chooser 33

www.ajidev.com
ii
iAnnotate v1.5
6.5: Annotation Types 34
7: Sharing Your Annotated Documents 39
7.1: Mailing Annotated Documents 39
7.2: Mail Summary 40
7.3: Copy to Clipboard 40
7.4: Uploading Using iTunes USB File Transfer 40
7.5: Sending Documents to Other Applications 40
7.6: Printing Documents 40
7.7: Uploading Using the Aji PDF Service 41
8: Customizing the iAnnotate Interface 42
8.1: Managing Toolbars 42
8.2: Editing Toolbars 43
9: Settings 44
9.1: Reading Settings 44
9.2: Display Settings 45
9.4: Notification Settings 45
9.5: Annotation Settings 46
9.6: Sharing Settings 47
9.7: Security Settings 47
9.8: Advanced Settings 48
10: Other Topics 50
10.1: Using VGA Output 50
11: Understanding PDF Processing 50

www.ajidev.com
1
iAnnotate v1.5
Welcome to iAnnotate! This section will introduce you to the interface and features of iAnnotate.
In addition to this User Guide, iAnnotate includes an integrated help system, including Tips that will help
guide you through all of the features of iAnnotate. For more detailed information, see the rest of this User
Guide; or, for troubleshooting tips or support requests, visit the Aji Support Site.
1: Getting Started
1.1: QuickStart Guide
New to iAnnotate? Use the following steps to get started working with your PDF documents; or see
the rest of this User Guide for more detailed information.
1. Get Documents: Get PDF documents onto your iPad from E-mail by tapping on attachments, from
the web using our integrated web downloader, from yourDropbox or WebDav account, or from your
computer using the Aji PDF Service or iTunes USB file sharing.
2. Find your Documents: Whether you have one or thousands of PDFs, iAnnotate makes it easy to
find exactly what you’re looking for with the Document Manager. The Document Manager allows
you to locate and organize your documents. Use Document Search to search the full-text of all
your documents instantly. Or search by the document names and tags that you have added to your
documents. You can also organize PDFs into favorites, recently read documents, new documents,
and more.
3. Read: Use the tabbed reading interface to open and quickly switch between multiple documents.
Use the many navigation options to find your way around documents.
4. Annotate: Use the toolbar commands, or tap-and-hold on the PDF to bring up the popup context
menu for adding annotations. Once annotations are created, use the popup annotation editor to
read, modify, or delete your markup.
5. Share your Notes: When your notes are finished, tap the Mail button on the left-hand top toolbar.
From here you can e-mail your annotated PDF, view or e-mail a text-only annotation summary, or
upload your annotations to the Aji PDF Service on your computer.
6. Customize: Once you’ve gotten the hang of iAnnotate, you may wish to customize it for the tasks
you do most! Use the toolbar customization interface to edit the number of toolbars, their size,
transparency, location, and command buttons. Also, there are many Settings to fine-tune the
behavior of iAnnotate.

www.ajidev.com
2
iAnnotate v1.5
1.2: Using the iAnnotate Interface
1.2.1: Top Toolbar
The Top Toolbar of iAnnotate allows you to work with your on-device document library, and also
control the iAnnotate interface and settings.
The Library icon in the upper-left gives you access to your document library -- use this to find and
open new document tabs. Next over is the Download icon, where you can get documents from your
computer using the Aji PDF Service, the web, or a Dropbox or WebDav account. The Upload icon allows
you to upload all annotated documents to your computer using the Aji PDF Service, or to prepare your
documents for upload if you’re using iTunes file sharing.
The E-mail icon allows you to send out the currently viewed document via e-mail. You can also use this
to mail out the annotation summary.
In the upper-right corner of the screen are icons for controlling iAnnotate behavior. Use the wrench
icon to manage your toolbars, and the gear icon to access and change Settings. The ? icon gives you
access to iAnnotate’s interactive help system, and links for more information about iAnnotate.
Left top toolbar
Right top toolbar
1.2.2: Document Toolbars
Most of the tasks you will use in your daily work in iAnnotate can be done with the Document
Toolbars. For example, to create a Note annotation in an open document, tap the Note icon
on the annotation toolbar on the right-hand side, and then tap the location of the document
at which you’d like your Note to appear. After creating the Note, you can edit it using the
popup annotation editor. Most annotation tools work in a similar manner, and there are tips
to guide you along the way.
iAnnotate also allows you to customize your toolbars by tapping the wrench in the top
toolbar. Now you can use the grabbers on either side of the toolbar to drag them to a
different edge of the screen. Or, use the Edit (gear) icon on the edge of the toolbar to change
its appearance and the buttons that it uses. You can choose from a variety of
different commands, and set up the toolbars so that they have exactly the tools
you want to have ready at your fingertips.
You may access infrequently used commands with the Master button on your
toolbar, which brings up a selection of all currently-available commands.
When editing toolbars, you can also tap the Add button in the lower-right corner to add
another toolbar. iAnnotate comes with several useful pre-defined toolbars, or you can
create your own custom toolbars from scratch.
Document Toolbar
Note
Master icon

www.ajidev.com
3
iAnnotate v1.5
1.2.3: The Navigation Panel
Navigation Panel
toolbar button
The Navigation Panel allows you to quickly move throughout your document and locate
content by thumbnails, bookmarks, PDF outline, annotations, or with full-
document search. To access the Navigation Panel, tap the Navigation Panel
mini icon to the left of the tab buttons. See 5.2: Document Navigation for
more information about using the Navigation Panel.
To navigate with Thumbnails, choose the Thumbnail view option from the view selector
buttons. Tap any thumbnail to move directly to that page in the document, or use the scroller
on the left to move to a different part of the document.
Tap PDF Outline to navigate with the embedded PDF outline of a document as well as any
Bookmarks that have been created.
Select the Annotations view option to display a list of any Annotations that you’ve added to
the document. Each annotation will be listed with the annotation type, color, page, and
descriptive text.
Tap Search to Search the full-text of the document.
1.2.4: Opening Documents
Library button
Use the Library button in the upper-left corner to open the Document Manager, where
you can locate and open documents in your on-device library. Tap any document to read
it. Or, use a two-finger-tap on any document to preview. To exit the Document Manager,
tap the Done button at the bottom of the screen. Tap the ? for in-app help with any item
on screen.
(See 3: Transferring Documents into and out of iAnnotate for more details on obtaining new
documents.)
The Document Manager
Nav Panel mini icon

www.ajidev.com
4
iAnnotate v1.5
1.2.5: Using Context Menus
Many actions in iAnnotate can be performed using context menus. For document-level actions, tap
the tab of the currently open document to access the Document Context Menu. (You can also tap-
and-hold the tab of an inactive document to bring up the context menu without switching to it.) This
will give you options for navigating and sharing the document, getting more info, closing the tab, or
deleting the document.
Document Context Menu
You can also access common annotation actions from the Annotation Context Menu on the PDF display
itself, by doing a tap-and-hold anywhere on the document display.
Annotation Context Menu
When using the Navigation Panel in Thumbnail view, tap and hold on any thumbnail to bring up the
Thumbnail Context Menu. The Thumbnail Context Menu includes options for altering the structure of
your PDF document.
Thumbnail Context Menu

www.ajidev.com
5
iAnnotate v1.5
2.1: Tips
First, iAnnotate uses Tips to help guide you through the process of learning the interface and features
of iAnnotate. Tips drop-down over an area of the screen and describe some aspect of the iAnnotate
functionality as you encounter it.
Tap the tip in order to hide it, but to be reminded later. If you wish to never see the tip again, tap the X
button in the upper-right corner of the tip.
You can disable Tips completely under Notification Settings. Also, if you wish to reset the list of
tips, you can do so by turning off the Show Tips setting then turning it back on.
2.2: Interactive Help
iAnnotate also includes interactive help. Tap the ? icon in the upper-right corner, then
choose Interactive Help. This puts iAnnotate in Help Mode -- you can now tap anything on
the screen to get help on how to use it and what it does.
You can also access help in various other areas by tapping the ? button, including the PDF
Information screen, the Settings menu, and while customizing your toolbars,
2.3: Further Resources
For further help, troubleshooting tips, or support requests, please visit the Aji Support Site.
Help button
2: In-app help
Sample Tip
iAnnotate includes several ways to help you become familiarized with the features and interface.

www.ajidev.com
6
iAnnotate v1.5
3.1: E-mail
You can download PDF attachments from the Mail application into iAnnotate. In Mail, tap-and-hold
the icon for the PDF attachment, and then choose Open In... iAnnotate – or, if you have other PDF
applications installed, you may have to choose the Open In... option and then select iAnnotate from the
list.
You can also tap the PDF to preview the document directly in the Mail app, and then tap the Open in
iAnnotate or Open In... button in the upper-right corner to open the document in iAnnotate.
In either case, this will launch the iAnnotate app, and then open the attached PDF in a new tab.
If your attached PDF is one-page only, tap-and-hold in order to use Open In... to open it in iAnnotate.
PC users can now read and annotate their Microsoft Word (.doc) and Microsoft PowerPoint (.ppt)
documents with iAnnotate! Tap-and-hold the attachment to use Open In..., iAnnotate will convert the
.doc or .ppt document into PDF format, and add it to your Document Library.
To e-mail your annotated documents, use the Mail icon in
the top toolbar. These actions can also be accessed through the Document Context Menu or the PDF
Information screen. See 7.1: Mailing Annotated Documents for more details
3.2: Using iTunes USB file transfer
You can use the iTunes file sharing feature to transfer documents into and out of iAnnotate.
This is convenient for quickly transferring a few files, but if you are transferring a lot of documents, we
highly recommend using the Aji PDF Service. This free companion application allows you to preserve
your existing document folder structure, easily download new documents only, upload your annotated
documents back to their original locations, and also performs a lot of the processing required so that
iAnnotate doesn’t have to.
In order to transfer using USB, you must have your iPad
connected to your computer using iTunes. In iTunes, click on
your device in the Devices section, and then click on the Apps
tab. Under the Apps tab, find the File Sharing section (you may
have to scroll down to the bottom of the page), and then click on
the iAnnotate PDF entry in the list.
To move a PDF document from your computer to iAnnotate, drag it into the iAnnotate PDF Documents
Upload button
3: Transferring Documents into and out of iAnnotate
Opening a .doc file in iAnnotate

www.ajidev.com
7
iAnnotate v1.5
area on the right, or use the Add... button to locate a document on your computer. Due to the
limitations in iTunes file sharing at this time, it is not possible to transfer folders -- only individual PDF
documents. (You can multi-select and drag many PDF documents in at once, but no folders will be
preserved.)
You can transfer Microsoft Word (.doc) and Microsoft PowerPoint (.ppt) documents as well as
PDF documents. Add the file following the steps above, and iAnnotate will convert it into PDF
format. You can then read and annotate the file as usual.
Transferring a document back out from iAnnotate is a two-
stage process. First, if you want to be able to see your annotations, you need to let iAnnotate know that
you wish to transfer the documents out, so that it can embed your annotations back into the PDF. To
do this, simply choose the Prepare for iTunes Upload option from the Upload button in the top toolbar.
This will make sure all of your documents are ready for transfer and write all the annotations you have
added into the PDF files. (You can also prepare a single document at a time, using the Prep For iTunes
button in the PDF information screen.)
After your documents are prepared, you drag documents or folders out of the iTunes File Sharing area,
or use the Save to... button to select the location to save on your computer.
3.3: Downloading documents from the Web
3.3.1: Using the Integrated Web Downloader
Web Downlad
button
To use the integrated Web Downloader, tap the Web
Download option under the Download Menu in the
top toolbar or use the Web Download toolbar
button. This will bring up a web browser, which you
can use like Safari. Enter a URL or search terms to
find a page with the PDF document(s) you’d like to
download.
The integrated browser will automatically detect when you
navigate to a PDF link, and then download the linked file into your document library. If the browser is
having trouble detecting PDF links on a particular website, turn on Compatibility Mode.
Download documents from the web
Transferring documents via iTunes

www.ajidev.com
8
iAnnotate v1.5
Compatibility Mode can be found on the Action Button Menu. In Compatibility Mode, browse until
you have loaded a PDF in the integrated browser. Then, tap the Action button and choose Download
PDF.
Once downloaded, you can use the arrow button in the lower
left to open and read the document; or, you can continue
browsing and downloading new documents.
If you are downloading a particularly large PDF, you can close the
Browser screen (X in the upper-right) and go back to iAnnotate,
and the download will continue. You will be notified when the
download is complete.
You cannot leave the iAnnotate application, or else the
download will be cancelled.
Another option you have is to convert a webpage itself to PDF
format. Tap the Action button and then choose Save Page as
PDF. iAnnotate will then copy the contents of the webpage
and convert it into PDF format. The PDF will be saved to your
Document Manager, and you may read and annotate it as usual.
3.3.2: Using Safari
You can open PDF documents in iAnnotate directly from Safari by using iAnnotate’s built-in URL
handlers. Once you’ve accessed a PDF document in Safari (or any web page), tap on the URL bar to
edit the URL. Scroll all the way to left (you may need to tap-and-hold to bring up the cursor, then
move left to scroll), and then add an “a” to the front of the URL – so that, for example, it reads “ahttp://
myurl/...”, or “ahttps://myurl/...”. Then tap the Go button – this will launch iAnnotate and open the PDF
or web page that you were viewing in iAnnotate.
If you are browsing to an authenticated site, you may be required to log in again from the iAnnotate
integrated browser before being allowed to download the requested files.
Launch iAnnotate from Safari
Arrow button
Action Menu
Action button

www.ajidev.com
9
iAnnotate v1.5
3.4: Working with other applications
iAnnotate allows you to transfer PDF documents from other applications that support the Open In...
feature, and also allows you to transfer documents out of iAnnotate to other apps that support the
Open In... feature.
To open a PDF in iAnnotate from another app, you’ll need to consult that application’s instructions.
Usually there will be an Open In... command or a way to access it similar to the Mail app. Choose
iAnnotate from the list, then iAnnotate will launch and display the requested document.
If you have another PDF application on your device that supports App Sharing, you can transfer your
documents from iAnnotate using the Open In.. functionality. Tap on the tab for your document, choose
Share.., then Open In.., and then select the desired application from the list. (Choosing iAnnotate here
will not do anything -- it is displayed there by default by the device operating system.)
Most iPad PDF applications do not have the ability to display PDF annotations, so your annotations
may not display in other iPad apps. They are present in the PDF document, however, and will be
visible if they are viewed in any standard PDF viewer such as Adobe Reader or Mac Preview.
3.5: Working with Dropbox and WebDAV
iAnnotate offers easy access to documents stored in online file sharing accounts such as Dropbox
and WebDAV. To begin, tap the Download button in the top toolbar and choose the Create Account
option. You may also create new account by tapping the + button in the upper-right of the Download
menu. Select the desired account type, either Dropbox or WebDAV, and enter the account information,
including a name to be used within iAnnotate. You can optionally specify a password or leave it blank
to be prompted each time you access the account.
Once your account is created, it will appear on the download menu. Tap the account to log in and
browse your files. You can navigate and download individual PDFs; or tap the orange Download arrow
on a folder to download an entire folder.
After you’ve created an account, you may
edit the account information, or delete it
entirely, by tapping the Edit button on the
upper-left of the download menu.
Add Dropbox account
Edit account
Download button

www.ajidev.com
10
iAnnotate v1.5
3.5.1 Uploading to Accounts
There are two ways to transfer PDFs to your Dropbox or WebDAV accounts.
The first way to upload an individual PDF to an account is with the Document
Context Menu. Tap-and-hold the tab of the PDF you’d like to transfer to
open the Document Context Menu. Then, select Share... followed by
Upload... At this point, if you have more than one account configured,
select the specific account to which you would like to upload the PDF.
If you choose the account from where you got the PDF originally, it will
be uploaded into the folder from which it was originally downloaded
into iAnnotate. However, if you choose a new account for the PDF, it will
be uploaded into the default uploads folder for that account, which for WebDAV and Dropbox
accounts is called “iAnnotate PDF”.
The second way to upload PDFs to an account is via the Upload icon on the top toolbar. In the Upload
popup menu, tap Upload To Account. When you choose this option, you can select among your
configured accounts (including APS). This will upload all modified PDFs that you originally downloaded
from the selected account back into that account -- and only PDFs originally from that account.
NOTE: The PDFs that you currently have open for reading are irrelevant when using this button;
this button is for “syncing” all new annotations back into an account whether the annotated PDFs
are open or not.
3.6: Using the Aji PDF Service
iAnnotate allows you to transfer your entire PDF Library to your iPad using the free Aji PDF Service
(APS).
The Aji PDF Service provides a fast and convenient way to transfer PDF documents between your
computer and your iPad. It also processes PDF files for iAnnotate and provides the information
required to support some of the advanced features of iAnnotate, such as Document Search, Library
Search, and accessing PDF annotations and PDF Outlines. For more details on this process, see the
PDF processing section.
The Aji PDF Service is available as a free download for the Mac and Windows platforms.
3.6.1: Installation
Install on Mac
To install the Aji PDF Service, download the Aji PDF Service for Mac, and double-click to mount the
Disk Image. Then drag the Aji PDF Service icon to your Applications folder.
That’s it! To launch the Aji PDF Service, go to your Applications folder and double-click Aji PDF Service.
For more details on using the service to share documents, see the Sharing section below.
Select account

www.ajidev.com
11
iAnnotate v1.5
Install on Windows
To install, download the Aji PDF Service for Windows, double-click, and follow on-screen instructions.
Note that you may have to grant the installer permission to install files. As part of the installation, the
installer will set up Bonjour for Windows, which is required to facilitate communication between
iAnnotate and the Aji PDF Service. The installer will launch the Aji PDF Service when complete.
That’s it! You can find the Aji PDF Service in your Start Menu, under the Aji Programs group.
The Aji PDF Service uses a network connection to communicate with the iAnnotate, so you may
have to approve the Aji PDF Service with any firewall software you have set up. Please contact our
Support Team at any time if you are have any troubles with your security or firewall setup, or if
you are having troubles getting the iAnnotate app and Aji PDF Service to communicate.
For more details on using the service to share documents, see the Sharing section below.
3.6.2: Sharing Documents
The Aji PDF Service works by sharing folders on your computer that contain PDF documents. You
can choose any number of folders to share, and any PDF documents in the shared folders (or any
subfolders) will be available for download by the iAnnotate application.
The Aji PDF Service displays the list of shared folders in the white box in the middle of the application
window. Use the Add button to choose a new folder to add:
Mac:
The Aji PDF Service works with folders only, and not individual PDF files. If you wish to share an
individual PDF file, simply share the folder in which it resides. Then, when accessing your shared
folders, you can choose to download only an individual PDF document, as described in the
Transferring Documents from the Aji PDF Service section below.
Windows:
Adding a new Shared Folder Adding a new Shared Folder
Add folders
Add folders

www.ajidev.com
12
iAnnotate v1.5
You can add as many different folders to the list as you like. iAnnotate will synchronize all your PDF
documents in those folders as well as in any subfolders.
You can also use the Remove button to remove folders from the shared list after highlighting the folder
to be removed.
Mac
On the Mac, you can also use the Browse button to locate the folder on your computer. Use the Explore button
in Windows.
When you have finished transferring documents to iAnnotate, you may quit the Aji PDF Service; the
service is only required when fetching new documents from your computer.
Browsing for a folder
Windows:
Browse folders
Browsing for a folder
Mac:
Browse folders
Windows:
Removing a Shared Folder Removing a Shared Folder
Remove folders
Remove folders

www.ajidev.com
13
iAnnotate v1.5
3.6.3: Settings
The Aji PDF Service includes a few settings to fine-tune its behavior. These are accessed from the Settings
button on the right side of the Aji PDF Service main screen:
Changing the Service Name
The Service Name controls how your server appears from iAnnotate; usually the default is acceptable, but
you may wish to change this setting here.
Configuring the Uploads Folder
When PDF documents are obtained via some method other than Aji PDF Service, they will be placed in the
Uploads folder when transferred to your computer by Aji PDF Service. If you wish to change the location of
the Uploads folder, you may do so by clicking on Choose New Folder and then browsing for the preferred
location. This is especially useful if you frequently wish to access PDF documents on your computer that
were downloaded from the web or e-mail with iAnnotate. Otherwise, you may leave the Uploads folder at
the default location.
Device Authorization
By default, the Aji PDF Service allows any device on your local network to connect and download PDF
documents from your computer. This is the easiest approach for most users, and is safe in home network
environments.
Some users, however, will wish to control access to their shared documents and ensure that only authorized
devices are allowed to connect. If you wish to do this, uncheck the Allow all devices to connect check box.
Also, you will probably want to use the button to reset the list of authorized devices just in case an unknown
device had been previously authorized.
When your device first connects and authorization is required, the Aji PDF Service will request confirmation
before sending any data to the device:
Windows:
Mac:
Changing the service name
Changing the service name

www.ajidev.com
14
iAnnotate v1.5
Mac:
Windows:
A device only needs to be authorized once; after initial authorization, the device is always allowed
to make subsequent connections. If you wish to de-authorize a device, use the Reset Authorized
Devices button under Settings.
Authorize Device
Authorize Device

www.ajidev.com
15
iAnnotate v1.5
3.6.4: Troubleshooting
If you are having trouble locating your computer under Get Documents or transferring documents to
iAnnotate, we have several resources to help you get running.
First, please see our FAQ which includes troubleshooting tips for getting iAnnotate connected to the
Aji PDF Service.
Finally, Aji support is also available to help -- you can e-mail us directly.
3.7: Transferring documents using APS
The Download Menu
Once you have your computer set up with Aji PDF Service, you can
transfer documents from your computer using the Aji PDF Service
option from the download menu in the top toolbar.
Choose your computer from the list, and then you navigate your
files and folders and download by tapping files or using the orange
download button on folders. You can also download all new files
on your computer at once using the orange download button on
the computer name in the top level of the APS section.
Downloading all of the files on the computer or in a folder will only download new files, so you can
use this to sync your iAnnotate library with your desktop computer.
You can upload all of your annotated documents back to APS using the Upload to APS option in
the upload menu -- this will upload only documents with new annotations that have not yet been
transferred to your computer using APS. You can also upload one specific PDF using the Tab context
menu or the PDF Information screen.
If you wish to use APS while you are not on a local
network, you can set up custom APS host and port
settings in iAnnotate under Advanced settings. The
port will need to match the custom port specified
in your APS settings, and the hostname will need to
be a valid network-reachable address of the
computer running APS.
Selecting Documents or Folders to download

www.ajidev.com
16
iAnnotate v1.5
3.8: Printing Documents
Print &
Print Current
Page buttons
iAnnotate allows you to print in-app with the iPad iOS 4 AirPrint feature. AirPrint allows
your iPad to wirelessly connect to any AirPrint-enabled printers on your wireless network.
For more information about AirPrint as well as a list of HP AirPrint-enabled printers, go to
http://support.apple.com/kb/HT4356.
You must have iPad iOS 4 or higher installed on your iPad as well as an AirPrint-
enabled printer in order to print via AirPrint.
To print a document, select Print from the Sharing menu, the Document Context Menu,
or tap the Print toolbar button. This opens the Sharing Options dialog box where you can
adjust the print options. There are two format options for printing: Flattened or Original PDF. Select
Flattened to print the document with all of your annotations embedded. Embedded annotations can
be viewed but not altered in any PDF reader. If there are Note annotations, the text of those notes will
be summarized in extra pages at the end of the document. If you’d like to only print those pages of your
document that have been annotated, switch the Annotated Pages Only selector to ON. Annotated
Pages Only applies to Flattened documents. Choose Original PDF to print the original PDF document
without any annotations added to it.
Sample of flattened annotations
Sample of Note summary page
Once you’ve selected a document format, the Printer Options dialog box opens. Tap Select Printer
for a list of AirPrint-enabled printers and choose the printer you’d like to use. To print specific pages,
tap Page Range. You can also adjust the number of copies to be printed by tapping the + and - buttons
above the print button.
If you’ve chosen to print Annotated Pages Only, the Page Range will only
display the number of pages that have been annotated plus the extra
pages that contain text Notes. For example, if you’ve annotated pages
2, 5, and 6 in your 10-page document, and Note annotations have been
summarized for you on page 11 (see above), the provided Page Range will
be 1 - 4. To print only page 2 (the first page of the given range), select 1 -
1; to print page 5 only, choose 2 - 2 on the Page Range selector. To print
only the text of the Note annotations, select 4 - 4.
To quickly print a single page, use the Print Current Page toolbar
button.
When you’re ready, tap the Print button to start printing. You can now go back to working with your
document while your printer gets to work in the background.
Selecting the page range

www.ajidev.com
17
iAnnotate v1.5
4: The Document Manager
The Document Manager allows you to locate and organize your documents. To access the Document
Manager, tap the Library button in the upper left corner. Once you’ve opened the Document Manager,
tap any document to read it. Or, use a two-finger-tap on any document to preview. To exit the Document
Manager, tap the Done button at the bottom of the screen. Tap the ? for in-app help with any item on
screen.
Folder
Document
The Document Manager
Document Library
Panel
Selection Panel
Sort & View
options
Breadcrumbs
Done
Help
New Folder
Document
Actions

www.ajidev.com
18
iAnnotate v1.5
4.1: Finding Documents
By default, the Document Manger opens in Browse mode with the files and folders in the home
directory displayed in the Document Browser area. From here, navigate through your folders by
tapping them, or use the Breadcrumbs on the top of the browser window .
Another way to find documents is to take advantage of the sorting options:
Tap Favorites to display all documents in the library that have been marked as Favorite.
Mark a document as Favorite on the Document Information screen, which can be
accessed in the Document Manager by two-finger tapping any document thumbnail.
New displays the documents in the order that they were added to the Library, newest
documents first.
Use Recents to find recently read documents. The documents will be sorted with the
most recently read document first.
Annotated documents displays all documents that have been previously marked up in
iAnnotate.
Tap Unread to display all documents in the library that have not yet been opened in
iAnnotate.
4.1.1: Library Search
For a more focused search, tap the Search icon to open the Library Search panel.
Here you can enter search keywords in the text box.
Documents matching the search terms will be displayed
in the Browser area.
Use the selector below the text box to change the scope of the search.
Search using the Full-Text of documents, or tap Tags to search the
notes/tags you have applied to documents. Names will search only
the titles of the documents.
Narrow the search by switching from All Files (the
contents of the entire library) to one of the other sort
options:
Tap Unread to search all documents in the library that have not yet been opened in
iAnnotate.
Tap Favorites to search all documents in the library have been marked as Favorite.
Annotated documents searches all documents that have been previously marked up in
iAnnotate.
To return to Browse Mode, tap the blue back arrow on the top right of the Library Search Panel.
Search icon
Library Search panel

www.ajidev.com
19
iAnnotate v1.5
4.2: Changing the Document Browser View
Use the selector to change the order in which documents are
displayed. Choose Alpha to list by document names, view by Date
Added (the date the documents were added to the library), or display
in the order when documents were Last Read.
The Split View button will toggle the split view display, which shows
the normal document browser on top and a folder-only browser on
the bottom. This is especially useful if you wish to move files from
one folder into another. Simply drag your files from the top area of the Document Browser to the
target folder you’d like to use in the bottom area.
Tap the List button to switch the documents from a thumbnail display to a list display. This may be
preferable when working with many documents or documents with long file names.
4.2.1: Organizing Files
It’s easy to rearrange and organize your files by using the Breadcrumb Display. The Breadcrumb
display indicates which folder’s contents you are viewing. Tap on any folder icon to view the contents
of that folder. You can also move files (including selected files) by dragging them into folder icons in
the breadcrumb view.
To the right of the breadcrumb display is the New Folder icon, tap it to create a new folder. After you
enter a name for the folder, you may drag files into it and move it around like any other folder.
4.3: Selecting Documents
Expedite your organizing by using the Selection panel! To select a
document , drag it into the Selection box. The selection box displays
and controls the currently selected documents. Tap the Selection box
to view and modify the current collection of selected documents.
As an alternative to dragging them into the selection box, add or
remove files from the selection by tapping the Selection Mode button.
Exit Selection Mode by tapping the green check mark icon. Select All
will add all documents currently displayed in the document browser to
the selection. Remove all documents in the selection
by tapping the Clear Selection button.
Breadcrumbs
New Folder
Selection
Mode
Select All
Clear
Selection
Selection box
Sort and View Options
Exit Selection Mode

www.ajidev.com
20
iAnnotate v1.5
Once files have been selected, drag the contents of the selection box to a folder in order to move them.
Or, drag them to one of the action buttons below the Sort and View panel.
Tag will apply tags/notes to the files in the selection.
Mail opens an e-mail window with the selected documents attached. For more
information about mailing documents, please see section 7: Sharing your Annotated
Documents.
Drag the selection to Duplicate to make copies of the documents. The copies will be
located in the same folder as the original.
To delete the files, drag the selection to the Delete button. You may also drag folders
to this button to delete them.
Use of the Selection panel is not required to perform these actions. You may drag single files
directly from the Document Browser to Tag, Mail, Duplicate, and Delete them.

www.ajidev.com
21
iAnnotate v1.5
5: Reading Documents
iAnnotate is a powerful, fast, easy-to-use PDF reader. This section will detail the PDF reading features.
5.1: The PDF Display
When you open a document in a new tab, iAnnotate presents the document so that the page content
takes up the majority of the screen. You can use the standard gestures to navigate the document: drag
and flick to scroll, pinch to zoom in and out.
At any time, you can tap on the PDF display to hide the iAnnotate user interface, and read your
documents in full-screen mode. Simply tap again when you need access to the interface.
If you prefer, you can turn on the Overlay Toolbars on PDF setting (under Display Settings in the Main
Menu) to shrink the PDF display so that the toolbars are shown outside of the PDF display and not on
top of it. Even when this mode is turned on, you can still tap to hide all interface elements and read in
full-screen mode.
To automatically fill the display with your document, use the Fit Document to
Height and Fit Document to Width commands. The Fit Document to Height
button will update the document scale so that the height of the page matches the
height of the display. Fit Document to Width scales the document to match the
width of the display.
Use Scroll Lock to keep the document from moving horizontally while you scroll vertically.
If you turn on Scroll Lock, you may also want to engage Elastic Scroll Lock in the Settings
menu. Elastic Scroll Lock allows some horizontal movement when you tap-and-drag; lift
your finger and the document automatically reverts back to original position.
If you’d rather read documents one page at a time, instead of using a continuous scrolling view,
turn on Single Page Mode in the Display Settings menu. See 5.4: Single Page Mode for more details
5.1.1: Modifying the Document
Sometimes PDFs that were created using a scanner have pages with that were scanned in sideways or
upside-down. To correct for this, use the Rotate Page or Rotate Document commands.
It is important to understand that these commands modify the PDF file itsself (as opposed to
merely rotating the display of it).
Rotate Document 180 Degrees
Rotate Document Clockwise
Rotate Document Counter-Clockwise
To rotate the all the pages in a document at once, use the Rotate
Document Clockwise (90 degrees - a quarter turn), Rotate
Document Counter-clockwise (90 degrees in a counter-clockwise
direction), or Rotate Document 180 Degrees toolbar commands.
Fit Document to Height
Fit Document to Width
Scroll Lock
www.ajidev.com
22
iAnnotate v1.5
iAnnotate allows you to rotate single pages with the Rotate Page
Clockwise, Rotate Page Counter-clockwise, and Rotate Page 180
Degrees toolbar commands. Rotating a single page requires iAnnotate
to re-process your entire document - not just the page being rotated. If
you’re working with a large document or doing multiple rotations, you
may experience some delays. For more information about document
processing, please see 11: Understanding PDF Processing.
All existing markup annotations in the document will NOT be rotated when any of the Rotate Page
or Rotate Document commands are used.
To add blank pages to your document, use the Add Page Before and Add Page
After toolbar commands. Add Page Before will insert a blank page before the
current page, Add Page After will insert the page after the current page.
Remove Page
To remove any page, use the Remove Page command.
If you’d like to delete all the annotations on a particular page, use the Delete
Annotations on Page toolbar command. To delete all the annotations in the
document, use Delete All Annotations.
Delete Annotations on Page and Delete All Annotations will permanently remove your annotations.
Use with care!
5.1.1: The Page Locator
By default, iAnnotate shows the Page Locator view in the bottom-right corner of the PDF
display area. The red border indicates the area of page that is currently being displayed
on-screen.
The display of the Page Locator (and the Page Number display above it) can be turned off
in the Settings menu, under Display.
5.1.2: Select Text
Select Text
iAnnotate allows you to select and copy text from PDF documents onto the iPad clipboard
with the Select Text command. The copied text can then be pasted in any text view (such
as a Note annotation) or in other applications. You may also use Select Text to look up the
dictionary entry for single words. Or, you can explore the meaning of words and phrases
with Google and Wikipedia.
Rotate Page 180 Degrees
Rotate Page Clockwise
Rotate Page Counter-Clockwise
Add Page Before
Add Page After
Delete Annotations on Page
Delete All Annotations
Page Locator

www.ajidev.com
23
iAnnotate v1.5
To enter Select Text Mode, tap the Select Text toolbar button (looks like a clipboard), or choose Select
from the annotation context menu.
When you enter Select Text Mode, the interface is hidden, allowing you to use the full
screen area for selecting. To alter the areas of text that have been selected, drag the blue
Handlebars on either end of the selection. If you’d like to exit Select Text Mode before
you’ve selected anything, tap the End Select Text icon in the upper left-hand corner.
Once you’ve selected a word or phrase, release your finger and the Select Text Context
Menu will appear. From here, you can Copy your text, or choose to open Google Dictionary,
Wikipedia, or Google Search in the integrated web browser and examine the selected text in further
detail.
You must have a single word selected in order to use Google Dictionary. Wikipedia and Google
Search also work best with single words or short phrases. If you’ve selected a long passage of text,
the only option available to you will be Copy.
Select Text Context Menu
Selecting Text
Handlebar
Not all PDF files support text selection, and not all text in all PDF files can be selected. If you are
having problems selecting text from your document, please verify that you can select text using a
desktop application such as Adobe Reader or Mac Preview.
5.1.3: Select Image
Select Image
The Select Image command allows you to select and copy an area of your PDF as a PNG
image file. To enter Copy Image mode, tap the Copy Image toolbar button. When Select
Image mode is active, manipulate the red Draggers on the corners and
edges of the selection box to chose the area of the document you’d like
to save as an image.
When you’re satisfied with the selection, choose from
options on the pop-up menu: Copy to Clipboard will save
your selected image to the iPad Clipboard, which can then
be pasted in other applications. E-mail will open a new
e-mail message with the image as an attachment. Add to
Saved Photos saves the image to your iPad photo library.
Use Open In... to view or use the image in another iPad app.
Once you’ve saved an image to the Clipboard or your Saved Photos library, you can then attach the
image to your document as a Photo annotation or use it to create a custom Stamp annotation.
End Select Text
Select Image options
Selecting an image
Dragger

www.ajidev.com
24
iAnnotate v1.5
5.2: Document Navigation
Navigation Panel
toolbar button
One of the most efficient ways to navigate through your document is to use the Navigation
Panel. The Navigation Panel allows you to quickly move throughout your document and
locate content by thumbnails, bookmarks, PDF outline, annotations, or with full-document
search. To access the Navigation Panel, tap the Navigation Panel mini icon to the left of
the Tab buttons, use the Navigation Panel toolbar button, or select the Navigator option
from the Document Context Menu.
To navigate with Thumbnails, choose the Thumbnail view option
from the view selector buttons. You will see a scrollable list of
thumbnail images for each page in your document, with the
corresponding number for each page overlaid on top. The current
page is indicated by a blue outline and blue page number. Tap any
thumbnail to move directly to that page in the document, or use
the scroller on the left to move to a different part of the document.
Tap PDF Outline to navigate with the embedded PDF outline of a
document as well as any Aji Bookmarks that may have been created.
Top level outline entries will be displayed initially. If an outline entry
is a group node, you can tap the grey arrow button on the right to
view the child outline elements. To return to the parent outline
element, tap the blue arrow icon at the top of the list. Tap the Aji
Bookmarks link above the outline entries to view a list of existing
bookmarks.
Select the Annotations view option to display a list of any
Annotations that you’ve added to the document. Each annotation
will be listed with the annotation type, color, page, and descriptive
text.
Tap Search to Search the full-text of the document.
You can use the Thumbnails, PDF Outlines, Navigate Bookmarks,
Navigate Annotations, and Search toolbar button commands to access
their corresponding Navigation Panel view options.
Thumbnail
Navigation Panel
showing Thumbnail view
Sample PDF Outline Sample Annotation list
Sample Search result

www.ajidev.com
25
iAnnotate v1.5
5.2.1: Page Navigation
Go To Page icon
Choose Go To Page in order to specify a particular page number to jump to. Note that
there is an absolute number of actual pages in a document. Page numbers, as they relate
to a table of contents, may not correspond to actual document pages. Example using this
guide: actual pages 1 and 2 of this guide (title & table of contents) are pages i and ii;
numbered page 1 begins on actual page 3.
Back & Forward
The Back and Forward buttons enable you to navigate through pages and links in
the same way you would with a web browser. For example, if you start at the Table
of Contents of a document and tap one of the Contents entries, iAnnotate will
navigate to the page associated with that entry. To navigate back to the Table of
Contents page without scrolling through all of the previous pages, tap the Back
button.
If you are zoomed in while reading, the Move Screen Left and Move Screen
Right button commands will shift the document to the right or left, revealing the
parts of the document that had zoomed off the document display.
Move Screen Up
Move Screen Down
To move up or down one screen height, use the Move Screen
Up and Move Screen Down buttons.
You can use the Next Page, Previous
Page, First Page, and Last Page buttons
or menu commands to navigate by pages.
5.2.2: Using Bookmarks
Bookmark icon
iAnnotate also allows you to create and navigate using bookmarks. Tap the Add
Bookmark button to create a new bookmark -- bookmarks are automatically given a
default name based on the document and page. Tap the name area in the popup editor to
change the name.
You can change the color associated with bookmarks, in case you’d like to organize
your bookmarks by color.
To go to a bookmark, use the Aji Bookmarks button or menu command (it looks like a stack of
bookmark icons). This will open the Navigation Panel in PDF Outline view. Tap the Aji Bookmarks entry
on the top of the outline list to see all bookmarks in the current document -- tap an entry to navigate to
that bookmark.
Use the Previous Bookmark and Next Bookmark commands to
navigate directly to the next or previous Bookmark in your document.
Move Screen Left
Move Screen Right
First Page, Previous Page, Next Page, Last Page icons
Aji Bookmarks, Previous Bookmark,
Next Bookmark icons

www.ajidev.com
26
iAnnotate v1.5
5.2.3: Navigate Outline and Bookmarks
Outline icon
Many PDF documents include information about the document’s structure in a table of
contents or outline format. iAnnotate processes this information, if it is available, and
allows navigation with the Navigation Panel using the PDF Outline and Bookmarks
button or Document Context Menu command.
To jump to an outline location, simply tap the corresponding outline entry. If the outline
element is a group node, you can tap the grey arrow button on the right to view the child outline
elements. To return to the parent outline element, tap the blue arrow icon at the
top of the list. Tap the Aji Bookmarks link above the outline entries to view a list of
existing bookmarks.
Use Previous Outline Entry and Next Outline Entry move between outline
entries without opening the Outline Menu and choosing an entry.
5.2.4: Annotation Navigation
Navigate
Annotations icon
If you have created annotations on your document, you can use the Navigate Annotations
button or Annotation Context Menu command to display a list of any existing annotations
in the Navigation Panel. The annotations list indicates the annotation type, color, and page
number of the annotation, along with the text that is associated with it.
To navigate to an annotation without picking from the annotations list, use the Previous
Annotation and Next Annotation commands.
5.2.5 Document Search
Search icon
Search, one of the most powerful functions of iAnnotate, gives you the ability to search the
full-text of a document. Use the Search button to open the search interface in the
Navigation Panel. In the search interface, tap inside the text box to enter search terms and
hit the Search button on the keyboard popup to start the search.
Search results will be displayed below the text box, with the
corresponding page number for the result to the right of a short
excerpt of context text with the search terms shown in bold. Tap any result to
navigate to it on the PDF. Each search result will be indicated on the document with a
yellow box.
Search includes all document text as well as annotations and
text within annotations.
Previous & Next
Outline Entry
Search
text box
Search
result list
Navigation Panel Search view
Search Result

www.ajidev.com
27
iAnnotate v1.5
5.2.6: Set Mark
Set Mark, Return to Mark
To set a temporary mark or “quick bookmark” at your current location, use the
Set Mark toolbar button. Use the Return to Mark toolbar button to return to
the last set mark.
The last set mark may be in another open tab. If this is the case, the current document will be
switched to display the document with the mark in it.
5.2.7 PDF Thumbnails
Thumbnails
Use the Thumbnails toolbar command to open the Navigation Panel and show the PDF
thumbnails of each page the document you’re currently reading. A thumbnail is an image
that displays a scaled down version of the contents of a particular page. Tap and hold any
thumbnail to open the Thumbnail Context Menu.
5.3: Tabbed Reading
iAnnotate allows you to open several documents at once using a familiar tabbed interface. When you
open a new document, a tab is added in the upper display bar.
Next Tab, Previous Tab
You can switch between tabs by simply tapping the corresponding tab button, or
by using the Next Tab and Previous Tab toolbar commands.
Use the Duplicate Tab toolbar command to open another copy of the document you are
currently working with in a new tab. This is useful for quickly switching between reading
and important places in the document such as figures, references, and footnotes.
Tap the X button on the tab area to close the active tab. Your most recent position and zoom level will
be remembered by iAnnotate, even if you close the tab.
Each open document requires additional resources from the device, so opening many tabs may
decrease performance. When reading very large or complex documents, it’s recommended to
keep the number of open tabs to a minimum.
Tabs
Close
Duplicate Tab

www.ajidev.com
28
iAnnotate v1.5
5.3.1: The Document Context Menu
The Document Context Menu provides options that enable you to navigate and share your document,
access PDF information, close the tab, or delete the document. To open the Document Context Menu,
tap-and-hold the tab of the document you are currently working with.
If you’re finished working with a document, tap Close to remove the document and tab from the PDF
display.
Tap Navigator to open the Navigation Panel with navigation actions available for the PDF.
The Share... button opens a sub-menu with options for sharing your documents. To E-mail your
PDF, tap the E-mail button. Note Summary... offers options for sharing the notes summary if
your document (E-mail, E-mail with Document, and Copy to Clipboard). Use Open In... to open the
document in another app that supports the Open in... feature (such as iBooks). Tap Copy to copy
your PDF to the clipboard.
Upload allows you to transfer the PDF to a remote account, either via Dropbox, WebDAV or Aji PDF
Service.
Note that for WebDAV and Dropbox, if you choose the account from where you got the PDF
originally, it will be uploaded into the folder from which it was originally downloaded into iAnnotate.
However, if you choose Aji PDF Service or a new account for the PDF, it will be uploaded into the
default uploads folder for that account, which for WebDAV and Dropbox accounts is called
“iAnnotate PDF” and for Aji PDF Service is configurable in the settings (see 7.7.2: Viewing Uploaded
Documents on Your Computer).
Select Print to Print the document. Tap Info to access the Document Information window. Use
Duplicate Tab to open the current document in another tab. Delete... allows you to either delete the
entire document or delete all of the annotations in the document.
If you choose Delete All Annotations, be aware that all annotations and bookmarks will be
permanently removed from the document.
Active tab Document Context Menu
Tap-and-hold any inactive tab to bring up a Context Menu without opening that document. Tap
Close to close the document. Use Share... to access sharing options. Select Info to edit Document
Information. Tap Delete... to delete the document or all of the annotations in the document.
inactive tab Context Menu

www.ajidev.com
29
iAnnotate v1.5
5.3.2: The Annotation Context Menu
The Annotation Context Menu provides options for annotating your document. To open the
Annotation Context Menu, tap the tab and hold any portion of the document you are currently working
with.
Select Note... to create a Note or Typewriter annotation. Markup... will allow you to Highlight,
Underline, or Strike Out text. Tap Drawing... to make a Finger or Line annotation. Tap Media to
include a Stamp, Photo, or Sound Clip annotation. Select Mark to add a Bookmark, to set a Mark, or to
return to a Mark. The Select... option will enable the Select Text orSelect Image mode.
Annotation Context Menu
5.3.3: The Thumbnail Context Menu
The Thumbnail Context Menu provides options for altering the structure of your document. When
using the Navigation Panel in Thumbnail view, tap and hold on any thumbnail to open up the Thumbnail
Context Menu.
Select Add Blank Page... to use the Add Page Before/Add Page After toolbar commands on the
current page. Tap Rotate... to see options for rotating the current page or document. Remove Page
will delete the current page. Delete Annotations will permanently remove all annotations from the
current page.
Thumbnail Context Menu
5.3.4: Document Information
Tap Info on the Document Context Menu to access and edit the information associated with your
PDF. To change the document title, tap inside the title text box. Use the text area below the title box
to enter notes or tags that describe your document. Once you enter tags, you may use them while
searching for documents in the Document Manager with the Tags selector in Library Search. Use the
star icon at the bottom to mark the document as a Favorite. To change the thumbnail image displayed
for the document in the Document Manager, first navigate to the page you’d like to use, then open the
Document Information window and tap the thumbnail image. The thumbnail image will be updated to
display the current page.
Tap the i button to see details about your document, such as: title, number of pages, date added, last
time viewed, and last time annotated.

www.ajidev.com
30
iAnnotate v1.5
The Gear button to the right of the Favorite icon will
open a menu with options for Sharing your document 113.
From here you may also access advanced settings for the
document. One of the advanced options is to re-process
the PDF; for more information about PDF processing, see
section 11: Understanding PDF Processing. If iAnnotate
experienced problems processing the PDF, there will be
a Report button that allows you to e-mail error logs to Aji
support, along with the problematic PDF.
Please take caution when working with advanced
settings – they should only be used as directed by
the Aji support team. If you’re experiencing problems
with a PDF, please visit the Aji Support Site.
If you’d like to completely remove the document and any annotations it may have from iAnnotate, tap
the Delete button.
5.4: Single Page Mode
To read documents one page at a time, instead of using the continuous scrolling view, turn on Single
Page Mode in the Display Settings menu. In single-page mode, iAnnotate will display only one page at
a time, and then you can swipe, tap, or slide the pages to change.
The page-changing behavior in Single-Page Mode depends on how you are reading. If you zoom out
so that you can see the full page-width at once and no scrolling is possible -- for example, using fit-to-
width-- then you can use swipe gestures, to the left and to the right, to change between pages.
You can also use swipes if you have Scroll Lock turned on.
However, if you are zoomed in enough to allow horizontal scrolling, then swipes won’t work, since they
are used to control horizontal scrolling. In this case, you can drag the pages off the edge in order to
navigate.
For example, to move to the next page, scroll all the way to the right edge of the page, then drag the
page even further to the left (so the background shows). After you do this, iAnnotate will change to the
next page.
In either case, you may prefer to use taps on the right or left edges to change pages. If the Tap-to-
Advance setting is On (the default), you can tap to move vertically down the page; then, once you
have hit the bottom of the page, iAnnotate will proceed to the next page on the next tap (and likewise,
going backwards). To always change pages with taps, turn on the Tap Advances Full Page setting in
the Reading options.
Finally, another option is to use the Next Page / Previous Page buttons in your toolbars to change pages.
For use with fullscreen reading, you may wish to try the Show Toolbars in Fullscreen Mode option
under Display settings.
Title box
Tag box
Favorite
Thumbnail
Document Information window

www.ajidev.com
31
iAnnotate v1.5
The core functionality of iAnnotate is, of course, the ability to annotate your documents. iAnnotate provides
an easy-to-use and efficient interface for working with PDF standard annotations, allowing you to easily make
notes and mark up your documents, as well as share them with others.
6.1: Creating new Annotations
Highlighter
in Annotation Mode
When creating annotations, iAnnotate will enter Annotation Mode. This is indicated
by an icon in the upper-left corner of the screen. The icon serves as a reminder of the
kind of annotation you are in the process of creating, and also allows you to cancel the
annotation -- simply tap the icon to end Annotation Mode.
For Drawing annotations, Note annotations, Bookmarks and Stamp annotations, tap
on the document where you’d like your annotation to appear. This will end Annotation
Mode, create your new annotation, and opens the popup Annotation Editor which
allows you to modify the text or color of the annotation, if desired.
For Markup annotations, Annotation Mode remains in effect until you end it. So, for example, if you
wish to create a highlight, first tap the Highlight button. Then, drag your finger over the areas of text
that you’d like to highlight; this means you can include multiple non-
contiguous areas as part of the annotation. To alter the areas of text
that have been highlighted, drag the blue Handlebars on either end.
When all desired areas are highlighted, tap the End Annotation Mode
icon to finish and create your annotation.
Bookmark, Note, and Drawing annotations can be repositioned by
simply dragging them: hold your finger on the annotation and then drag it to the new location.
6.2: The Annotation Editor
The popup Annotation Editor allows you to modify the text contents and/or color of your annotations.
The editor displays directly on the PDF view, allowing you to work with your annotations without
having to leave the main PDF display.
If the annotation editor is not already visible, simply tap on any existing annotation to display the
annotation editor.
Edit
Change
Color
Delete
Sticky
Popup Annotation Editor
Hide
Handlebar
Handlebar
6: Annotation

www.ajidev.com
32
iAnnotate v1.5
The right most button on the toolbar is the Hide or Done button -- it looks like a minus sign. You can
use this at any time to hide the annotation popup editor.
Use the X button on the left side of the toolbar to delete the annotation. You will be asked to confirm
before the annotation is permanently deleted.
The middle two buttons allow you to edit the annotation. The Edit button (looks like a pencil) allows
you to edit the text contents of the annotation (if applicable). Note that markup annotations (such as
highlight and underline) allow you the option of adding a text comment to the annotation, if desired.
The Change Color button brings up the Color Chooser, allowing you to change the color of the
annotation you’re working with.
The pushpin button can be used to control whether or not the popup view is Sticky -- see the next
section for more details about managing popup view behavior.
For Stamp annotations and Typewriter annotations, there will be a Transform button on the
toolbar, which allows you to move, rotate or resize the stamp image or text.
The Font Chooser button appears for Typewriter annotations. The Font Chooser includes
options for editing the font size, color, family, style and alignment.
If you have a Photo or Sound Clip annotation, you have the option of sharing it with the Share
button. Choose E-mail to send the annotation as an attachment in an e-mail. Use Open In... to
work with the annotation in another iPad application.
6.3: Managing popup behavior
By default, iAnnotate presents at most one annotation editor at a time. When Auto-Popup mode is
turned on, iAnnotate automatically displays the editor for the annotation that is nearest the center
of the screen. Other editors are hidden if a new annotation is closer. This behavior allows you to
automatically see the contents of text annotations without having to perform any action to display
them.
If you wish to see the editor for a different annotation than the one selected for auto-popup, simply
tap the annotation. This will hide the current auto-popped annotation editor and display the one for
the tapped annotation. You can also tap the Hide button on the annotation editor to prevent it from
auto-popping.
This Auto-Popup behavior is on by default, but can be turned off in the Settings Menu, under
Annotation Settings. If Auto-Popup is disabled, then the annotation editor will only be displayed when
an annotation is tapped.
In addition to normal popup behavior, iAnnotate also includes the ability to make selected
annotation editors Sticky, using the pushpin icon on the toolbar. When the pin is in, the
annotation editor is Sticky -- this means it will never be hidden automatically. You can use this
to ensure that the note is always visible whenever the annotation is visible.
You can have multiple annotation editors Sticky at the same time. Tap the pushpin again, or use the
Hide button, to make an annotation non-sticky.

www.ajidev.com
33
iAnnotate v1.5
6.4: Working with Color Annotations and the Color Chooser
Note & Note with Color icon
The annotation toolbar commands come in two types: the basic version simply
adds the annotation with the default color, for example yellow for Note
annotations.
The second version allows you to associate a particular color with your toolbar
command: these are labelled with a rainbow swatch in the command library.
These commands are useful if you wish to organize your annotations by color. Using this, you can set
up, for example: one button for yellow highlighting; one for red highlighting; one for green highlighting;
and one for pink highlighting. Then, when reading your document, choosing between your highlight
colors is a matter of a simple tap on a toolbar button.
Sample Highlighter buttons with specific colors
When you choose one of these commands and add it to your toolbar, iAnnotate will display the Color
Chooser, allowing you to select the default color for your button command. iAnnotate uses a standard
HSB color map, similar to the one used in Mac OS. Tap or drag over the color map to adjust the hue of
your color. RGB and hex values for your color are displayed in the upper area of the Color Chooser.
These are editable, so you can also specify RGB or hex codes to choose your preferred color.
The Color Chooser supports up to 16 saved custom
colors, displayed at the bottom of the chooser. If you
wish use one of these colors, simply tap a custom color
to select it.
To set up a new custom color, first pick your color using
the normal methods as described above. Then, drag
the swatch in the upper-right corner down into the
custom colors area, over the cell that you’d like to adjust.
The cell will update, and now your custom color will
remembered for future use.
When working with Drawing annotations, the Color
Chooser will have slider controls for Pen Transparency
and Pen Thickness in addition to the color options.
While you’re using your toolbars, you can tap-and-
hold the button to change the default color for your
command. This allows you to adjust the toolbar button
colors without having to go back to the toolbar editor.
You can always change the color of any annotation
you make after you’ve created it, using the
annotation popup editor.
Color Chooser
Color Map
Pen
Thickness
Saturation
Custom color palette
Color
Swatch
Pen Transparency

www.ajidev.com
34
iAnnotate v1.5
6.5: Annotation Types
iAnnotate includes several different standard annotation types for marking up documents.
6.5.1: Drawing Annotations
Finger & Line
annotation icons
Drawing annotations allow you to use your finger to draw freehand or straight-line
annotations, which are overlaid upon the document content. Create a freehand drawing
with the Finger annotation tool. The Straight-Line annotation tool will only make
straight lines. Start your line by tapping the spot on the document where you would like
the line to begin, drag the line to the spot where you’d like it to end and release to
complete the line.
Tap the Color Chooser button on the Annotation
Popup Editor to adjust the color of your drawing.
Use the Pen Transparency slider in the Color
Chooser to control the translucency of your
annotations. The Pen Thickness slider allows you to adjust the
thickness of your line or drawing. Edit the text contents of the
annotation with the Edit button.
It is possible to edit your Finger and Straight-Line annotations
while in Annotation Mode. Options for editing appear as
buttons at the top of the display. To delete a part of your drawing, tap the Erase button. Tap a section
of your Finger annotation or a line segment of a Straight-Line annotation to remove it. If you use Erase
with the Straight-Line Tool, the entire line segment you tap will be deleted. To change any drawing or
erasing you’ve done, tap Undo and Redo buttons.
Edit buttons
Finger tool in
Annotation Mode
Want to reuse a Drawing or Line annotation? Turn your
annotation into a custom Stamp. To do this, tap the Stamp
button on the Annotation Popup Editor. Then, name your
stamp and tap the arrow button to add it to the Stamp Library.
To cancel this process, tap anywhere outside of the Enter
Stamp Name window. See 6.5.4: Stamp Annotations for more
information on Stamp Annotations.
Sample Finger annotation
The Stamp button
Stamp
www.ajidev.com
35
iAnnotate v1.5
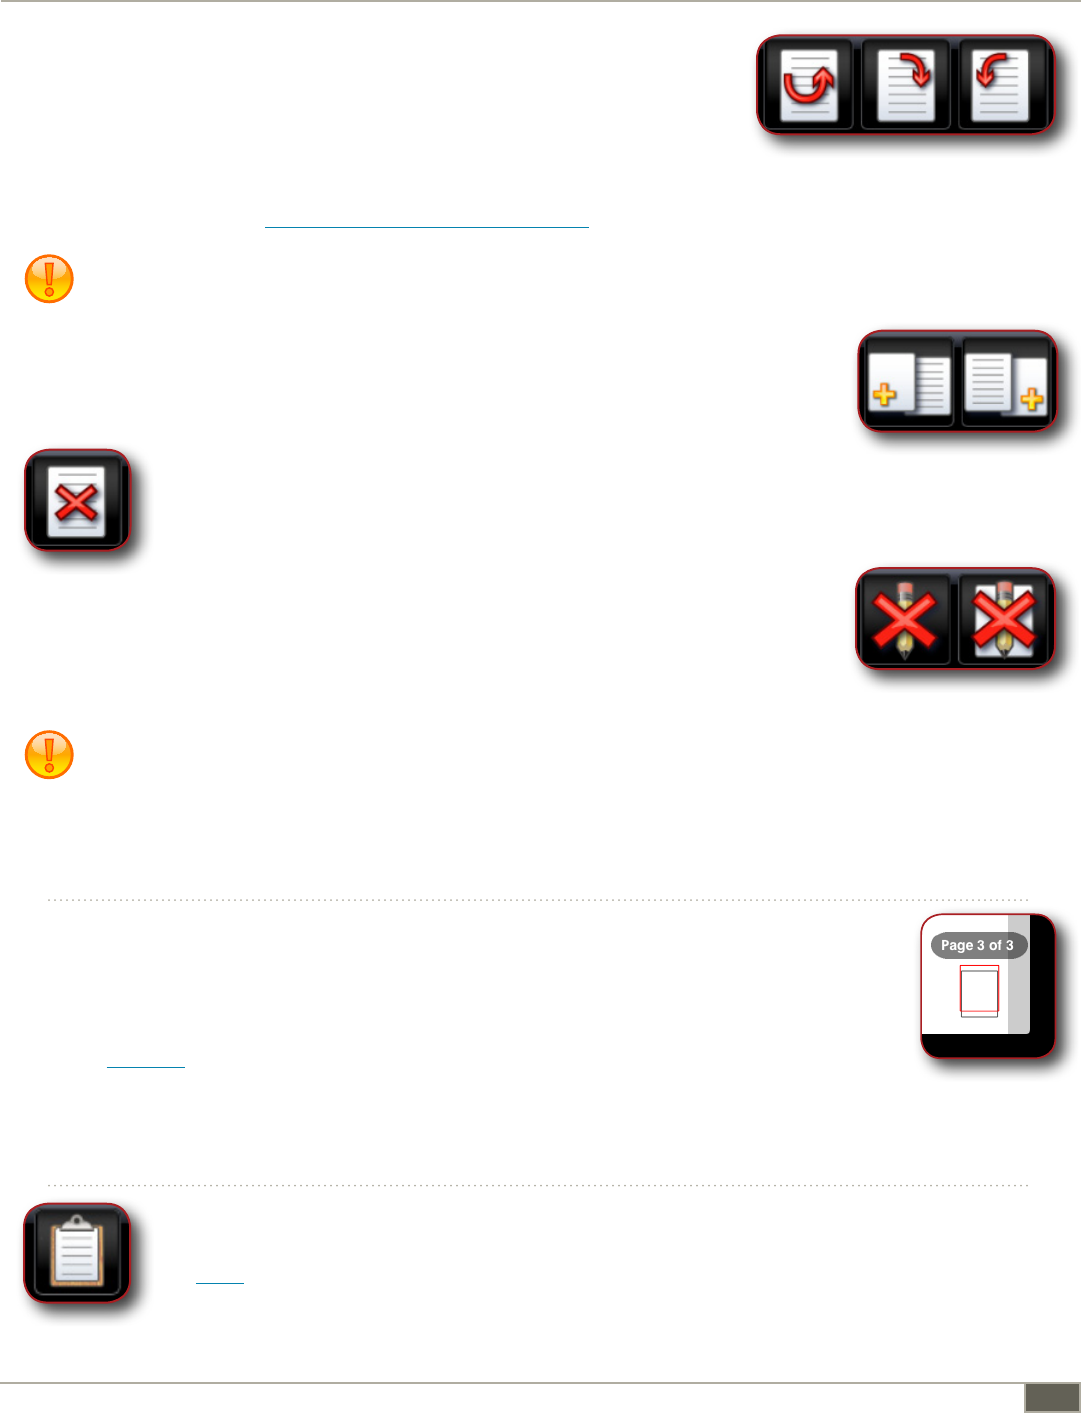
6.5.2: Markup Annotations
Highlight, Underline, Strikeout
annotation icons
Markup annotations include Highlight, Underline, and Strikeout
annotations. These annotations track the text in your document.
When creating markup annotations, drag your finger over the text
which you’d like include. You can include multiple non-contiguous
chunks of text in your annotation. Use two fingers to scroll through
your document without leaving the annotation mode.
You can optionally include a text comment with your markup annotation and adjust the color using
the popup annotation editor.
Sample Highlight annotation Sample Underline annotation
Sample Strikeout annotation
6.5.3: Note Annotations
Note
annotation icon
Note annotations allow you to associate a text note with a
specific location in your document. Enter the text in the
annotation editor -- you can scroll inside the annotation
editor if you have a lot of text in your annotation. Note
annotations also have a color associated with them, in case
you wish to color-code your notes.
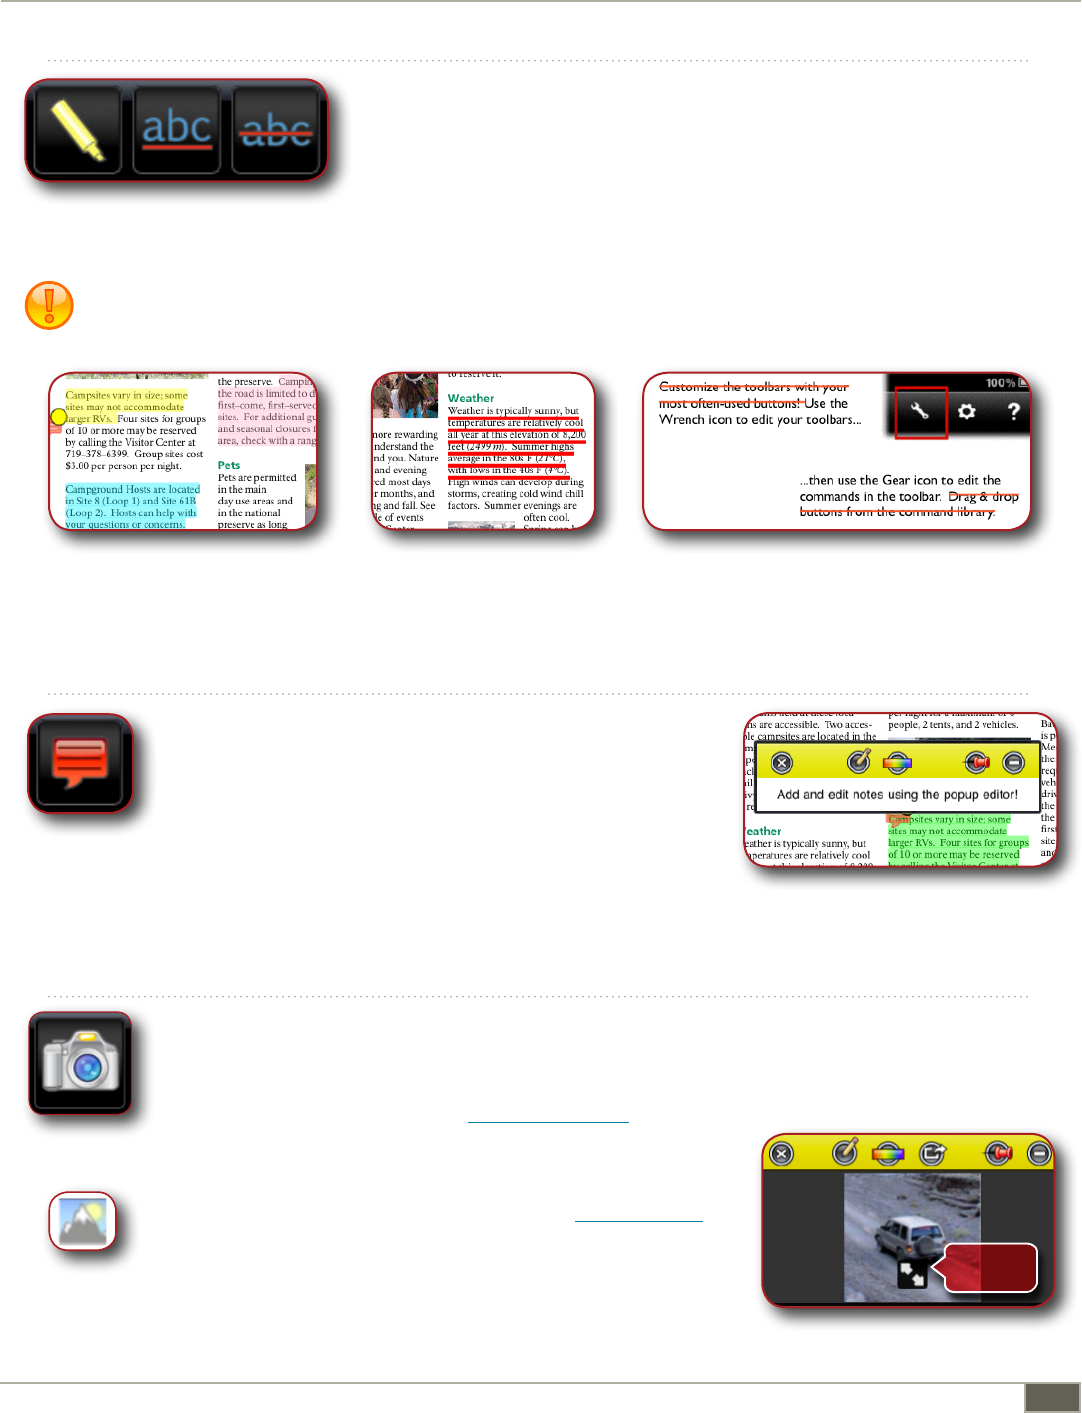
6.5.4: Photo Annotations
Photo
annotation icon
Use the Photo Annotation toolbar command to attach an image or photo annotation to
the document. You can select an image from your iPad Photo Library, use the Camera to
take a picture (iPad2 or later), or use an image that is on the iPad Clipboard (to copy images
from a PDF to the clipboard see 5.1.3: Image Copy).
Once you’ve selected an image to attach, the Photo
annotation will be indicated on the document with the photo
attachment icon. Tap the icon to open the Popup Editor for
the annotation. From here you will see a scaled-down
version of your image - to view a fullscreen version, tap the
enlarge image button.
Sample Note annotation
Photo attachment popup editor
Photo
attachment icon
Enlarge
Image

www.ajidev.com
36
iAnnotate v1.5
6.5.5: Stamp Annotations
Stamp with
Specific Image
Stamp
Stamp annotations allow you to overlay an image on your document. To
add a stamp annotation, first tap the Stamp icon to enter annotation mode.
Once in annotation mode, simply tap the area on your document where
you want to locate the stamp. Unless you have previously picked a stamp
with a specific image, the Stamp Library will open after you tap – scroll
through the stamp options and tap to select. Search the Stamp Library by
typing in the search box. To leave Stamp annotation mode, hit the cancel
button in the upper left-hand corner.
To transform stamps, tap the Transform button on the Annotation
Popup Editor. Now your stamp will be in transformation mode
(indicated by a flashing blue outline). Tap and drag to reposition the
stamp. Resize the stamp by using pinch gestures inside the box. Rotate
it by using 2 fingers and twisting.
You can’t resize and rotate at the same time; you must tap the Transform button again to switch
modes. When you’re finished, tap inside the box to exit transformation mode.
You may also add a text annotation to any stamp by tapping the Edit button.
Customize your Stamp Library by importing images from
your iPad Photo Library. To browse your Photo Library, tap
the + button at the top right of the Stamp Library window.
Select the image you want, and tap the arrow button to
finish. Your new image stamp will be added to the Stamp
Library.
Another way to create a custom stamp is to use
a Drawing or Line annotation you’ve previously
created. Find the annotation you’d like to use
and tap the Stamp button on the Annotation
Popup Editor. Then name your stamp and tap
the arrow button to add it to the Stamp Library.
To cancel this process, tap outside of the Enter
Stamp Name window.
Once a custom stamp is added to the Stamp
Library, you may select and use it like any of the
other stamps.
Tap and hold any stamp in the library to
permanenty remove it.
Sample Stamp annotation
Transform
Stamp Library
Tap to add
custom stamp
Search your
Stamp Library
Creating a custom stamp from a Drawing annotation

www.ajidev.com
37
iAnnotate v1.5
6.5.6: Sound Clip Annotation
Sound Clip
annotation icon
Use the Sound Clip toolbar command to record a short audio or sound recording and
attach it as an annotation to the document. To begin, tap the Sound Clip annotation
button to enter into annotation mode, and then tap the area on your document where
you want to attach the annotation.
Once you tap, the recording interface will appear at the top of the display and you will
hear a tone signaling the start of recording. Now you may use your iPad microphone to
record a short sound clip. To end the recording, tap the Stop button. To restart the recording, tap the
Restart button.
Sound Clip recording interface
Pause button
Restart button
Stop button
The duration of the recording will be limited to one minute due to file size considerations.
Photo
attachment icon
When you’ve finished a recording, the new sound clip
will be indicated on the document with the sound clip
attachment icon. Tap this icon to open the pop-up
editor for the annotation. Tap the play button to
listen to the recording, and use the scrubber to move
to a specific spot. To pause, hit the Pause button. Tap
Restart to rewind to the beginning of the clip.
6.5.7 Typewriter Annotations
Typewriter
Typewriter w/Font
Typewriter w/ Date
To add a free-text annotation directly onto a page of your PDF, use the Typewriter
command button. Tap the document where you’d like your annotation to appear, and
use the keyboard to type inside the text box. To change the dimensions of the text box,
tap-and-drag the red Draggers. If you’d like to adjust the appearance of your text, tap
the Font Chooser button on the Annotation Popup Editor menu bar.
Sample Typewriter with Date annotation
Text box
Dragger
Font Chooser
Text box
Dragger
Sound Clip recording pop-up editor

www.ajidev.com
38
iAnnotate v1.5
The Font Chooser has options for changing the appearance of your text.
Use the top two buttons on the Font Chooser to change the
font family (Helvetica, Arial, etc.) and font style (bold, italic).
Adjust the font size by using the Font Size slider in the middle.
To change the alignment of your text, tap the button below the
Font Size slider. Tap the Color button on the bottom to open
the Color Chooser and change the color and transparency of
your text.
Customize the Typewriter command by using the Typewriter
with Font and Typewriter with Date buttons. Drag these
buttons onto your toolbar from the Toolbar Editor. When
you chose Typewriter with Font, you will be prompted to set
the font family, style, size, alignment and color with the Font
Chooser. Typewriter with Date works in the same way, except
that any annotation you make with it will have today’s date
added to the text. To change the font settings of either of
these buttons without switching to the Toolbar Editor, tap-
and-hold the toolbar button.
Typewriter annotations differ from Note annotations - the Typewriter text is always displayed
on the PDF while text entered into a Note is contained within the Popup Editor box, and is not
visible when the Popup Editor box is minimized.
The Font Chooser

www.ajidev.com
39
iAnnotate v1.5
7: Sharing Your Annotated Documents
7.1: Mailing Annotated Documents
Share icon
If you would like to e-mail an annotated document, simply tap the Share button on the left-
hand top toolbar. Tapping the Share icon causes a popup menu to appear with five options:
Mail Document, Mail Summary, Mail with Summary, Print, and Open in.... (You may also e-mail
documents by tapping Share... in the Document Context Menu .) Select the desired Mail
option, and the Sharing Options dialog box will open.
There are three format options for your PDF available: Annotated, Flattened, and Original PDF.
To include editable annotations in your document that can be viewed and edited in compatible PDF
readers such as Adobe Acrobat and Preview, tap Annotated. Select Flattened to print the document
with all of your annotations embedded. Embedded annotations can be viewed but not altered in any
PDF reader. If there are Note annotations, the text of those notes will be summarized in extra pages
at the end of the document. If you’d like to only print those pages of your document that have been
annotated, switch the Annotated Pages Only selector to ON. Annotated Pages Only applies to
Annotated and Flattened documents,but not Original PDF . Choose Original PDF to print the original
PDF document without any annotations added to it.
Sample of flattened annotations
Sample of Note summary page
Sample of editable annotations
After you decide on the Sharing options, the e-mail
composition window opens. Here you may
compose and send your e-mail just like you would
in Mail without leaving iAnnotate. In addition to
attaching the document, iAnnotate auto-fills the
e-mail subject line with the title of the document,
as well as your e-mail address in: Cc/Bcc/From.
Feel free to replace the auto-filled text with
whatever you wish. When you are ready to send
the e-mail, simply tap the Send button; the window
will close while the e-mail is sent and you can
resume working with iAnnotate.
In addition to the Share top toolbar button, you may also use the E-mail
Current Page and Mail Document toolbar buttons to access the Sharing
Options and e-mail composition window.
E-mail Current Page,
Mail Document
E-mail composition window
Send
button

www.ajidev.com
40
iAnnotate v1.5
7.2: Mail Summary
E-mail Annotation
Summary
Mail Summary allows you to e-mail a text summary of all your annotations without
mailing the PDF itself. Access this function by tapping the Share icon and selecting the
Mail Summary option or by using the E-mail Annotation Summary toolbar button.
Once selected, an e-mail composition window will open, and the e-mail body will contain
a text list summarizing all the annotations you have made so far. They’ll be sorted in the
order that they appear in the document, with the page number at the beginning of each
annotation, followed by the type of annotation (Note, Highlight, Underline, etc.), the
color of the annotation, and finally the content.
E-mail PDF
& Summary
Mail with Summary allows you to e-mail a text summary
of your annotations, along with the PDF document itself.
Tap the Share icon and select the Mail with Summary
option or use the E-mail PDF and Summary toolbar
button. The e-mail popup menu will open the mail
window. The list summary of your annotations will be in
the e-mail body and the PDF document will be attached.
7.3: Copy to Clipboard
iAnnotate allows you to select and copy text and images from PDF documents onto the iPad clipboard.
From the Context Menu, select Share... and then Copy to copy your PDF Document to the clipboard.
You may also copy blocks of text to the clipboard with the Select Text tool. The copied text can then be
pasted in any text view or in other applications.
To copy an image from the document to the clipboard, use the Select Image toolbar command. Images
copied to the clipboard can then be attached to a PDF by creating a Photo annotation.
7.4: Uploading Using iTunes USB File Transfer
See 3.2: Using iTunes USB file transfer for information about uploading your documents to iTunes.
7.5: Sending Documents to Other Applications
If you’d like to open your document in another application, see 3.4: Working with other applications.
7.6: Printing Documents
To print your document, please see 3.8: Printing Documents.
Sample Annotation Summary

www.ajidev.com
41
iAnnotate v1.5
7.7: Uploading Using the Aji PDF Service
7.7.1: Uploading Documents
Upload icon
To upload a document (to Dropbox, WebDAV, or the Aji PDF Service), tap Share... followed
by Upload... on the Document Context Menu. If you have multiple servers set up, you can
choose which account you’d like to upload the file to.
You can also upload back all of your annotations from
downloaded documents using the Upload icon on the top
toolbar. In the Upload popup menu, select the account which
you wish to upload to, or select Aji PDF Service. Once you do this, messages
will appear at the top of the screen, listing the titles of each newly annotated
document. iAnnotate will upload any PDF in your library with new annotations,
whether it is currently open in the app or not.
7.7.2: Viewing Uploaded Documents on Your Computer
Once you’ve uploaded the documents in iAnnotate, you can switch to your computer in order to view
them. Click the Browse Uploaded... button to open the document directly from Aji PDF Service. If the
original document was uploaded from your computer into iAnnotate using Aji PDF Service, you can
find the annotated version in the folder that housed the original with “-Annotated” added to the end
of the file name.
By default, Aji PDF Service will save documents downloaded from the internet in the Uploads folder
on your computer. Clicking the Browse Uploads Folder button will open a path to that folder for you.
Change the destination of the Uploads folder by clicking on Settings in Aji PDF Service and choosing a
new folder in the settings window.
Changing the Folder
Choose new folder

www.ajidev.com
42
iAnnotate v1.5
8: Customizing the iAnnotate Interface
One of the most powerful features of iAnnotate is the ability to customize the user interface, and tailor it to
exactly the kinds of actions you perform most. Primarily, this is done by creating and managing Toolbars.
8.1: Managing Toolbars
Wrench icon
Tap the wrench icon in the upper-right to enter Toolbar Editing Mode. In this mode,
additional editing controls are added to the toolbars, and you have the ability to create new
toolbars.
To add a new toolbar, tap the Add Toolbar button in the bottom-right corner of
the screen. You can choose from a selection of pre-defined toolbars, or you can
choose to create a new empty toolbar for customization. Even if you choose a pre-defined
toolbar, you can later edit the particular commands.
When editing toolbars, each toolbar will display two grabbers, one on either end of the command
buttons. Use these grabbers to pick up and drag the toolbars to another location on the screen.
Toolbars can be docked on any of the four edges of the display. Note that multiple toolbars can be
docked on a given edge of the screen.
Toolbar grabbers
Use the Edit Toolbar (gear-shaped) button on one end of the toolbar to enter the editing mode. See
Editing Toolbars for more information about editing a toolbar.
Use the Remove Toolbar button (X-shaped) on the other end of the toolbar to remove it from display.
At this time, removed toolbars are permanently deleted -- although you can, of course, re-create the
toolbar later using the toolbar editor.
Edit
Toolbar
Remove
Toolbar
By default, the toolbars are displayed on top of the PDF content area. You can use the Overlay Toolbars
on PDF setting (under Display Settings) to adjust the PDF view so that the toolbars remain completely
outside of the reading area. This reduces the size of the reading area, but also ensures
that none of the reading area is blocked by the toolbars.
The Master Button allows one-tap access to all toolbar buttons, providing an easy
shortcut to infrequently used buttons without taking up space with extra toolbars.
Add Toolbar
Master icon

www.ajidev.com
43
iAnnotate v1.5
8.2: Editing Toolbars
The toolbar editor allows you to configure the command buttons on your toolbar, and also the size and
transparency of your toolbar.
Use the Transparency slider to control the transparency of toolbars, allowing you to read the
content behind the toolbars.
The button size will be limited if there are many buttons in your toolbar.
The central area of the toolbar editor contains the library of commands that are available for your
toolbars. Toolbar commands are grouped according to their functions: Annotation commands
include options for adding annotations to a document. Navigation commands offer ways to help
you move around efficiently within a document. Reading commands like Add Bookmark, Set Mark,
and Next/Previous Tab are useful while reading a PDF. Document commands allow you to alter the
document itself - such as Add Page Before/Add Page After, Remove Page, and Rotate Page Clockwise.
Commands grouped under Utilities offer other options such as Print, Present, and Edit Toolbars. To
see all the commands in the library at once, select the All option.
To add a command to your toolbar, simply drag the command icon from the command library into your
toolbar at the bottom of the screen. The existing buttons will adjust their location based on where you
place the new command.
Some commands can only be added once to a toolbar, but many make sense to be added multiple
times. If a command is already in your toolbar and cannot be added again, it will be grayed out in
the command library.
You can also reorder the command buttons in your toolbar by dragging them into their new position,
and remove commands by simply dragging them outside of the toolbar.
Toolbar Editor
Toolbar
Size slider
Transparency
slider

www.ajidev.com
44
iAnnotate v1.5
9: Settings
iAnnotate includes several settings for customizing app behavior and interface. These settings are accessible
from Settings in the Main Menu. For in-app help, tap the ? icon next to any
setting.
9.1: Reading Settings
Brightness
Use the Brightness slider to control the brightness of the application
display. This is especially useful for night reading.
Elastic Scroll Lock
Turn on this setting to use a soft lock when Scroll Lock is turned on. This
allows you to tap-and-drag the document over horizontally (to look at
something in the margin, for example), but it will always return to the
locked position when let go.
Single-Page Mode
When Single-Page Mode is switched on, iAnnotate will display only one page at a time, instead of a
continuous vertical scrolling view.
In order to change pages, you can:
a) use the Next Page / Previous Page toolbar buttons,
b) use left / right swipe gestures, if the page is zoomed-out enough, or
c) drag the page off edge of the screen, if the page is zoomed-in enough.
Tap-to-Advance
When Tap-to-Advance is on, tap the right edge of the display to advance one screenful; tap the left
edge to go back one screenful. In Single Page Mode, a tap will move the document forward and back
full pages. Turn off to disable.
Tap-Advances-Full-Page
Turning Tap-Advances-Full-Page on while using Tap-to-Advance enables taps to move the document
forward and backward a full page, instead of a screenful. When off, Tap-to-Advance works as normal.
Slide-to-Advance
This setting is only relevant in Single Page Mode. When set to on, slide the page over the edge of the
screen, to the right or left to advance the page as appropriate. Note that the page must be zoomed
in far enough to allow horizontal scrolling. The default for this setting is on, to disable this behavior
switch it to off. See Swipe-to-Advance below for changing pages in Single-Page Mode when the page is
zoomed out.
Swipe-to-Advance
This setting is only relevant in Single Page Mode. When on and the page is zoomed out far enough,
swipe your finger to the left or right to change the page as appropriate. The default is on, so turn this
setting off to disable the behavior.
The Settings menu

www.ajidev.com
45
iAnnotate v1.5
9.2: Display Settings
Show Links
If this option is enabled (turned on), iAnnotate will display translucent blue boxes over links in your
documents; this can help with visibility of links on some documents.
Show Page Number
Turn this setting on and iAnnotate will display the number of the page you are currently viewing, as well
as how many pagers there are in total, in the bottom right-hand corner.
Show Page Locator
When switched on, Show Page Locator will show the Page Locator in the lower right-hand corner of
the screen to help with orientation. It is a small red box representing the current page dimensions.
With this, you can tell how much of the page, and which part of it, you are currently viewing.
Overlay Toolbars on PDF
Use this setting to control whether or not the PDF reading view is re-sized to fit within the area inside
your toolbars, or if it is fit to the whole screen with the toolbars displayed on top of the reading area.
Show Toolbars in Full-Screen Mode
Full-screen mode removes the menus and tab bars at the top of the screen so that you can see more of
your document while reading. The Show Toolbars in Full-Screen Mode option controls whether or not
the toolbars are visible in full-screen mode.
Display Context Menu
Use Display Context Menu to disable the context HUD menu on the PDF display that is normally
presented when you do a long-tap on the display.
9.4: Notification Settings
Show Informational Alerts
iAnnotate occasionally displays status alerts in the upper-right corner of the screen when various
actions are completed, such as downloading new documents or connecting to the Aji PDF Service. You
can turn off the Show Informational Alerts setting if you wish to suppress informational messages:
warning and error messages will still be displayed.
Show Tips
iAnnotate uses Tips to help guide you through the process of learning the interface and features of
iAnnotate. You can turn the Show Tips setting off to disable the display of tips.
Anytime you tap OK for a tip, that tip will no longer be displayed.
If you wish to reset the tips so that all tips are displayed again, turn this option off and then on again.

www.ajidev.com
46
iAnnotate v1.5
Show Processing Status
iAnnotate must process documents in your library before many operations (like Search and Highlight)
are possible. iAnnotate takes care of this automatically, but if you’d like to monitor the status of
a document while it’s processing, turn Show Processing Status on. If turned on, a spinner will be
displayed in the top right corner of the screen when a document is being processed. Tapping on the
spinner will reveal information about what page is currently being processed.
9.5: Annotation Settings
Hide Interface when Annotating
By default, the Hide Interface when Annotating setting is on. In this case, iAnnotate goes into full-
screen mode whenever you are creating a new annotation. Turn this off to leave the interface visible
when making new annotations.
Auto-Popup Annotations
This setting is on by default; use this to disable this option. See Managing popup behavior for more
information about auto-popup behavior.
Annotation User Name
The Annotation User Name setting controls the name used when adding annotations to the PDF. This
is only visible when viewing annotations in an external program such as Adobe Reader or Mac Preview.
Confirm Annotation Deletion
Turn this setting off to disable confirmation when deleting annotations.
Auto-Add Markup to Annotations
Turn Auto-Add Markup to Annotations on to have iAnnotate automatically add the marked-up text for
Markup annotations to the annotation’s pop-up note content.
Wrist Detection
The Wrist Detection setting allows you to control wrist detection when creating Drawing annotations.
This allows you to rest your palm or wrist on the display while using a stylus, in the same way you would
with a pen and paper.
Right-Handed / Left-Handed
Right and Left-Handed settings are effective for most right or left-handed users. If you write with a
hook style, with your hand above the written text (common with left-handers), try the Hook setting.
Some users may get the best performance using the Knuckle Only setting - in this case, only rest the
knuckle of your pinky finger on the display while keeping your palm and wrist raised.
You can disable all wrist-detection heuristics by selecting None.

www.ajidev.com
47
iAnnotate v1.5
9.6: Sharing Settings
Default E-mail Subject
Use Default E-mail Subject to set the subject line of any e-mail message sent via iAnntoate. Leave this
setting blank to use a default subject based on the name of the PDF you’re working with.
Default E-mail Body
This setting controls the default text that is included along with mails sent out using iAnnotate.
Include Bookmarks in Summary
The Include Bookmarks in Summary option controls whether or not bookmarks are included when
e-mailing a text annotation summary.
9.7: Security Settings
Save PDF Passwords
Turn this option on if you wish to have iAnnotate save the passwords for your password-protected
documents. If you turn this option off, all your saved passwords will be erased.
Application Lock
Turn this option on to enable an application lock for iAnnotate. When locked, iAnnotate will require
the specified password before starting up.
It is not possible to recover a lost or forgotten password.
Lockdown Mode
Turn this option on to put iAnnotate into ‘Lockdown’ mode. When locked down, iAnnotate will disable
all network-based document import and export options. (It is not possible at this time to disable
iTunes file sharing.)
When turned on, you will be prompted for a password. The only way to disable lockdown mode will be
to supply the same password. It is not possible to recover a lost or forgotten password.
Warn on Bad WebDAV Certificate
Turn on Warn on Bad WebDAV Certificate to have iAnnotate alert you to a possible problem with a
credentials certificate whenever you try to connect to a remote site using WebDAV. When the warning
appears, there is some risk that the site may be an imposter.
You must quit and restart iAnnotate if you ever turn this from On to Off. (Double-tap the home
button to make sure iAnnotate is not still running in the background.) Although iAnnotate will
affect certificates and/or associated permissions that are stored in your keychain, even if this
setting is on, connection information is sometimes cached and so must be reset.

www.ajidev.com
48
iAnnotate v1.5
9.8: Advanced Settings
Aji PDF Service Host
Aji PDF Service Host allows you to specify the hostname or IP address of a fixed Aji PDF Service (APS)
server to use here. By default, iAnnotate will automatically discover any APS service on your local
network, so usually you do not need to configure this option.
Aji PDF Service Port
The TCP/IP port to use when connecting to fixed Aji PDF Service (APS) server. By default, iAnnotate will
automatically discover any APS service on your local network, so usually you do not need to configure
this option. If you have configured iAnnotate to use a specific APS host, then you need to have that
host use a specific port (in APS settings) and then set this value to match.
Disable Thumbnails
Turn this on to disable thumbnail generation. This can improve the performance of the file manager
for large libraries.
Regular Expression Search
Turn this on to allow in-document search using regular expression. For advanced users. See http://
userguide.icu-project.org/strings/regexp for the regular expression syntax.
Open Links in Integrated Browser
By default, links from PDF files are opened in the integrated web browser. Turn this option off if you
wish to have them loaded in Safari.
From the integrated browser, you can use the Open in Safari button on the toolbar to open the
URL in Safari.
Browser Compatibility Mode
Turn this option on to use Compatibility Mode when using the integrated Web Browser. This is useful
for downloading PDFs from websites which don’t work properly within the integrated iAnnotate
browser. For most sites, you won’t have to use this; but if a site is not working properly, or if the PDF
downloads in the browser (instead of your Library), try using Compatibility Mode to fix the issue.
To use Compatibility Mode, browse until you have loaded a PDF in the integrated browser. Then, tap
the Action button, located to the left of the URL bar, and choose Download PDF.
Auto-Process Documents
When a PDF is brought onto the iPad via any means other than through Aji PDF Service, it needs to be
processed by iAnnotate before you can do certain things with it, such as search or highlight it. When
the Auto-Process Documents setting is On, this will happen automatically when iAnnotate sees a new
document arrive.
However, if you often transfer big documents, you may wish to process the documents manually when
you have time to wait for it to finish. This can be done here. It can take some time when this is done on
the iPad because of processing memory limitations inherent in the device.
If you turn off processing, certain functionality (like search and highlighting) will not be available.

www.ajidev.com
49
iAnnotate v1.5
If you have a large library of files to transfer, we highly recommend using the Aji PDF Service, so that
this time-consuming on-device processing can be skipped (it is done on your computer instead, where
it is much faster).
See also the Process Documents when Opened option.
Process Documents when Opened
When a PDF is brought onto the iPad via any means other than through Aji PDF Service, it needs to be
processed by iAnnotate before you can do certain things with it, such as search or highlight it. When
this setting is On, this will happen automatically when you open such a document for the first time in
iAnnotate.
If you often transfer big documents, you may wish to switch this Off and process the documents
manually when you have time to wait for it to finish. This can be done via the Advanced sub-menu of
the document’s Information menu. It can take some time when this is done on the iPad because of
processing and memory limitations inherent in the device.
If you have a large library of files to transfer, we highly recommend using Aji PDF Service, so this time
consuming on-device processing can be skipped (it is done on your computer instead, where it is much
faster). See also the Auto-Process Documents option.
Auto-Add to Full Library Search
When this setting is off, the text from a new document will not be added to the full-library index by
default. This will prevent the document from showing up in full-library searches, even if it contains the
search terms.
You can add a document to a full-library search later, if it didn’t happen upon its arrival, via the Advanced
section of the document information screen. This process can take some time due to processing and
memory limitations inherent in the device.

www.ajidev.com
50
iAnnotate v1.5
10: Other Topics
10.1: Using VGA Output
Present toolbar
icon
iAnnotate includes the ability to present your documents using the iPad Dock Connector
to VGA Adapter. When the dock connector is connected to your iPad and a valid
external display (monitor or projector), iAnnotate will allow you to present one of your
document tabs on the external display.
When a valid display is connected, you can begin the presentation in one of two ways.
First, you can use the Present option from the tab context menu. Also, you can use the
Present toolbar icon, if you have added it to one of your toolbars.
This option is only available when the Dock Connector is properly connected.
When presenting, the external display will mirror your iPad as you scroll and zoom. All annotations will
also be mirrored, including popups as you display and hide them. When you create or edit annotations,
these will also be reflected on the VGA display.
You can switch between document tabs on your device without affecting the VGA display; a green
indicator will flash on the tab that is being presented. This is especially useful if you have one
document that you’d like to present, and notes in another document.
To end presentation mode, use the End Presentation option from the tab context menu, or tap the End
Presentation toolbar icon.
11: Understanding PDF Processing
iAnnotate uses built-in support (the Quartz rendering engine) to display and navigate PDF documents.
However, this engine is limited to displaying the document on-screen only and is not able to perform the
processing required to access detailed information about the document. This is why iAnnotate has to process
documents in order to get this information into a format that is more readily usable.
This information includes data about the textual content of the document, including the locations of words
on pages -- information which, perhaps surprisingly, is not readily available from PDF documents. This also
includes standard PDF information such as the PDF Outline and existing annotations (including PDF links,
which are a form of annotation).
iAnnotate includes built-in support for processing documents on the device. In many cases, this will be
sufficient and the use of APS will not be required. However, it is often faster and more convenient to use the
Aji PDF Service on your computer for this task, especially for very long or complex/unusual documents. The
Aji PDF Service takes advantage of the superior processing power of standard computers to do all of this
hard processing work and provide the information to iAnnotate in a way that is more suited to the device
capabilities.
