Audio Lab Manual
Last updated: January 12, 2023
Table of Contents
1. Introduction
2. Safety First
a. How to avoid feedback: Headphones or Speakers?
b. Phantom Power: 48V power
3. Audio Input/Output Routing
4. Audio Lab Routing Diagram
5. Digital Audio Workstation Software
6. Routing Sound In/Out of DAW software
a. Reaper
b. Ableton Live
c. Adobe Audition
d. Audacity
7. Getting VST Plugins to show up
8. Continuing your work Outside the Audio Lab
9. Equipment Links

1. Introduction
The Dimensions Lab Audio Lab is an accessible space and resource that enables
the production of podcasts, music recordings, and sound for video. It is advised
that you read this document prior to using the Audio Lab and refer to it during
your use of the Audio Lab. This manual will evolve over time, but will always
contain information you will need to successfully navigate the Audio Lab.
Expectations
The Audio Lab is a professional recording studio environment available to people
with varying levels of skill using audio recording technology. Some folks have a
background in sound and will have an easy time getting results. Others will find
that they may need to devote an entire session to figure out how to get sound
into an audio application. We advise you to plan accordingly.
There are many things to learn: audio recording techniques and practices,
different types of cables and jacks, sampling rates, bit rates, hardware buffer
sizes, plugins, DAW (Digital Audio Workstation) software such as Reaper, Adobe
Audition, Audacity and Ableton Live, and much more. To address this, we’ve done
our best to simplify the setup, while providing enough functionality to get
professional results. Over time we hope to develop and share learning resources
to increase the usability of this resource.
Limited Assistance
Keep in mind that immediate assistance in the Audio Lab is limited. You may ask
Dimensions Lab Assistants for help as they have some limited training in the
space, but we may or may not have someone on staff during your session. You
may also email libraries.helpdesk@wsu.edu
for assistance. This help may or may
not be immediate.
Important Information about using the lab:
The information in this short section has been outlined in the reservation process
and the form you will have signed, but it is good to review.
Food and drink are not allowed in the space. Please keep this in mind as you may
be banned from reserving the space if you violate this rule. This is for both your
own safety and the safety of the equipment.
If you need to leave during your session, make sure you bring your ID and proof of
your reservation with you, and lock the door behind you. If a Dimensions Lab
Assistant is on staff they can let you back in or you may visit the circulation desk
to have circulation staff let you back in.
Please remember to give yourself enough time to back up your work, return the
space to its original state, wipe down the surfaces with provided wipes, sign out
of the computer and visit the circulation desk to initiate check-in process. You will
need to accompany the staff back to the Audio Lab before they can remove it
from your library account. If the space is returned late, you will be fined $50 per
hour.
Audio Lab!
We are excited to offer this resource and hope that it will contribute to your
learning experiences at WSU.
2. Safety First
To ensure your safety and the proper handling of the technology in the Audio Lab,
there are three things you must understand prior to using the equipment: no food
or drink, avoid feedback and only enable 48V phantom power for condenser mics.
How to avoid feedback: Headphones or Speakers?
The Audio Lab is equipped with a microphone, speakers and a set of headphones
to accommodate recording and monitoring sound.
When recording, always make sure you are only monitoring in headphones to
prevent feedback. Feedback happens when a signal is fed back into itself
continuously, resulting in a potentially loud squeal that can cause damage to your
ears and to the equipment.
When playing back sound you may use the speakers. This is useful for audio
editing, mixing or sequencing, and to prevent ear fatigue.
The MOTU 828es Audio Interface has both headphone jacks for monitoring
sound, in addition to providing outputs to the speakers. Press the following
buttons to switch between the two modes:
• Button A: Headphones
o Use this setting when Recording
• Button B: Speakers
o Use this setting when playing back. Prevent feedback by ensuring
that tracks are not in record ready.
Phantom Power: 48V power
Only enable 48V phantom power condenser mics. The Audio Lab is a space used
by many different people, so if you find yourself patching into the jacks on the
front panel of the 828es, make sure the 48V buttons are not backlit (red).
Similarly, if you plug something else into the Art Voice Channel, you’ll need to
make sure the Phantom Power button is not illuminated. In either case, you may
enable 48V phantom power on a condenser mic, but it is advised you do so after
plugging it in.
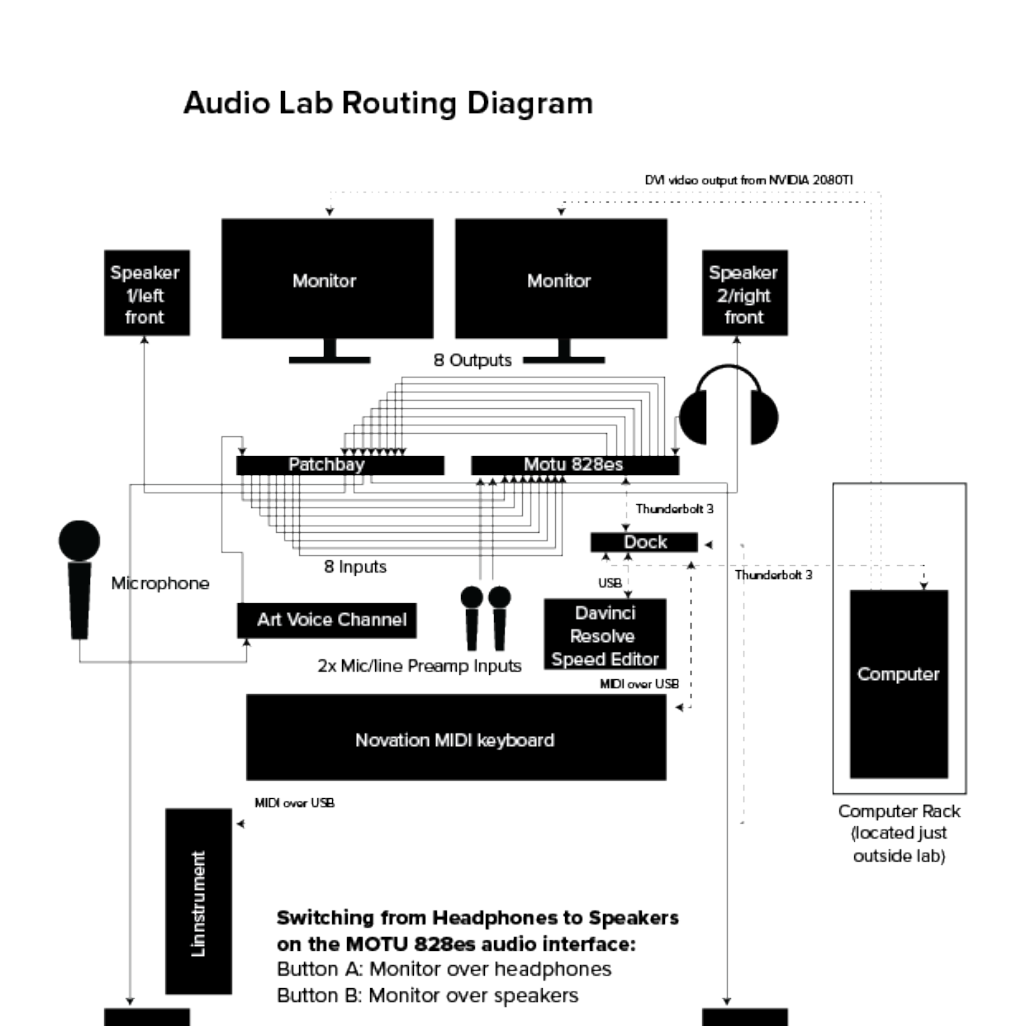
3. Audio Input/Output Routing:
Please consult the Audio Lab Routing Diagram for a visual image of how the
studio is setup.
The large condenser microphone, an Audio Technica AT4033, is routed through
the Art Voice Channel rackmount unit. It provides physical controls for gain,
compression and EQ to improve voice recordings. The AT4033 is a condenser mic,
so it requires 48V of power. It is enabled with the Phantom Power button
provided by the Art Voice Channel. This is routed to the MOTU 8282es input
channel 3, labelled on the patchbay as 828 In 3.
Additional microphones can be patched into In 1 and In 2 on the MOTU 828es. If
the microphone is a condenser type microphone, it will likely require 48V which
you will need to enable by pushing the 48V button for that input on the 828es.
Never enable 48V phantom power for any other type of microphone, line level
output or instrument output. Doing so may cause damage to the equipment. Also
note that ¼” or XLR connectors may be patched into these inputs. The other 5
inputs are available at the patchbay and do not have preamps. They are labeled as
828 In 4-8.
MOTU 828es output channels 1-4 are routed through the patch bay and
normalled to the 4 speakers. Front Left/channel 1 and Front Right/channel 2
speakers are usually powered on. To use the Rear Right/channel 3 or Rear
Left/channel 4 speakers, they must be powered on. They may also need to be
repositioned by moving their stand/speaker. If you use these, please move them
back into their original position prior to the end of your session and power them
off. The other 4 outputs are labelled 828 Out 5-8.
Using Your Own Microphones
Microphones that can connect with either ¼” or XLR connectors can be used in
the Audio Lab with the Motu 828es Audio Interface. USB Microphones will likely
not work with the existing Audio Interface and is not supported. USB
Microphones can be used instead of the Audio Interface, but we do not
recommend it, as it may cause issues routing sound in/out of the
speakers/headphones.
4. Audio Lab Routing Diagram
5. Digital Audio Workstation Software:
DAW (Digital Audio Workstation) software comes in many varieties. The Audio
Lab has the following DAW software: Reaper, Adobe Audition, Audacity, Ableton
Live and Native Instruments Komplete.
Reaper is very flexible, has many features and is very customizable. This is the
DAW we recommend using in the Audio Lab. It’s compatible with
Mac/Windows/Linux, and there is an abundance of available online learning
resources. Reaper is inexpensive to purchase an individual license should you
want to work on projects you’ve started in the lab on your own computer.
Audacity is free and open source. Its compatible with Mac/Windows/Linux and is
pretty easy to use. Audacity only supports recording up to two channels at once,
but you can layer sounds in a given session. Many people get professional results
from Audacity.
Adobe Audition is Adobe software that works well with other Adobe products like
After Effects and Premiere, has many features. It only works on Windows and
Macs, and requires a subscription to Adobe Creative Cloud. WSU students have
access to Adobe products while on campus when signed in with their NID.
Ableton Live is DAW software geared towards music production, with an
emphasis on electronic music production. It can be used as a live music creation
tool and has streamlined much of its functionality to accommodate live music
making.
Native Instruments Komplete is a suite of synthesis and sampling tools as stand-
alone apps and plugins for music and sound design. It isn’t really a DAW per se,
but offers a set of plugins and virtual instruments.

6. Routing Sound In/Out of DAW software:
To route sound in/out of DAW software applications, you must use the MOTU
828es audio interface. The 828 has its own application to adjust routing, sample
rate, buffer rates and control gain called Motu Pro Audio Control. This app lives
on the 828 itself and is accessed from a web browser when you click the shortcut.
On occasion you may find a need to adjust sampling rate or hardware buffer sizes
in the app.
Reaper tends to hold the settings from the last time it was used, but on occasion
you may find yourself needing to reselect the MOTU 828es audio interface. To do
this within Reaper, you go to Options > Preferences, then under Audio click
Device. The following settings will allow you to access the In and Out ports of the
828.
Create a new track, then select which input you are using by viewing the Routing
Matrix: View > Routing Matrix. The AT4033 microphone in the Audio Lab is
connected to the Art Channel Voice and normalled to the 828 In 3 within the
patchbay, but in Reaper it will be labelled Analog 1. When selected, it won’t be

activated. If you press the button again or put the track in record ready, be sure
to be monitoring over headphones to avoid feedback.

Ableton Live is slightly different. To select the MOTU 828es audio interface go to
Options > Preferences > Audio. For Driver Type select ASIO. For Audio Device
select MOTU Pro Audio. After it thinks for few seconds it should show you the
following options.
In order to use all the inputs and outputs of the MOTU 828es you must enable
them. Click Input Config and select the following:

Press OK.
Then select Output Config and select the following:

Press OK and close the Preferences dialog box. At this point an individual Audio
Track can be configured to the desired input. Select input 3 for the AT4033 studio
mic.
Ableton Live will automatically mute the track but display the level meters. To
hear the track, press A on the 828 to monitor from headphones, then select the
Auto button for that track. Now you should both hear and see the level meters
from the mic signal.
To enable Native Instrument plugins in Ableton Live you must manually go to
Options > Plug-Ins, then click the “Off” button next to Use VST3 Plug-In System
Folders to toggle to “On”. Now you can use an amazing suite of software
instruments in Ableton!

Adobe Audition
First create a new Multitrack session.
File > New > Multitrack Session
Name the session and save the file to a location you can easily find.
Now select the audio hardware
Edit > Preferences > Audio Hardware

Device Class: ASIO
Device: Motu Pro Audio
On individual tracks, inputs will default to None. To set the correct input channel,
click None > Mono > [03M] Analog 1

Arm track with the R record ready button. Make sure you are monitoring over
headphones when recording from the mic (A button on the Motu 828es audio
interface)
Press the round, red circle button on the transport panel to begin recording.

Audacity
Click Audio Setup in top toolbar.
Set Host to MME.
Set Playback device to Motu 828 1-2 for two channels. Sometimes this is listed as
Speakers.
Set Recording device to Motu 828 1-2 for two channel inputs.
For recordings made from the microphone, set Recording Channels > 1 (Mono)
Recording Channel.

Create a new track:
Tracks > Add New > Mono Track
Due to Audacity’s limited capability of recording only 2 tracks at once, you can
only record from Mic/Line In 1 or Mic/Line In 2. This means you will need to
reroute the physical microphone cable. First disable the Phantom Power button
by pressing it (the light will go out). Then pull the XLR cable connected to the Mic
from the Voice Channel input, and plug it into In 1 on the front of the Motu 828es.
Press the 48V button to power the mic. Set the Preamp Gain for Channel 1.
To monitor the microphone level in Audacity, click the Mic button and select start
monitoring. You should see levels from the mic. Set a level so that the voice peaks
between -12 and -6. This will help you avoid digital distortion.
Press the red circle Record button to begin recording.

When finished you must return the studio to its original configuration. Turn off
the 48V button for the mic. Unplug the XLR cable connected to the mic from the
Motu 828es In 1. Plug this cable back into the Voice Channel Input and reengage
the Phantom Power button to power the mic.

7. Getting VST Plugins to show up
Reaper will show Native Instrument VST & VST3 plugins by default. Audacity will
also attempt to import some plugins, but some are incompatible.
In Ableton Live, to have these plugins show up you will have to set the VST plugin
folder to its location on the hard drive. Go to Options > Preferences > Plug-Ins. Set
‘Use VST2 Plug-In Custom Folder’ to ‘On’. Click browse and set that location to
C:\Program Files\Native Instruments\VSTPlugins 64 bit\ Set ‘Use VST3 Plug-In
System Folders’ to ‘On’. Then click ‘Rescan’ to ‘Rescan Plug-Ins’. After some time
you should have VST and VST3 plugins available.
In Ado
be Audition, to have these plugins show up you will have to set the VST
plugin folder to its location on the hard drive. Go to Effects > Audio Plug-In
Manager… Click Add… to add C:\Program Files\VstPlugins and Select Folder. Then
click add again to add C:\Program Files\Native Instruments\VSTPlugins 64bit and
Select Folder. Then click Scan for Plug-Ins. You will see the plugins populate as it
scans. Click OK and now you should have VST and VST3 plugins available.
8. Continuing your work Outside the Audio Lab:
Dimensions Lab:
The Dimensions Lab currently contains one Audio Workstation. This workstation
includes a MIDI keyboard and an iD4 Audio Interface (with 2 channels in/out), and
has all the same software the Audio Lab has, except for DaVinci Resolve.
All of the other Dimensions Lab stations have the Native Instruments Suite and
Reaper.
Make a Plan - DAWs & Plugins:
Whichever DAW you choose, if you plan to continue your work on a different
computer and/or DAW, plan accordingly. For example, you won’t be able to open
a Reaper session in Audacity, but you could import the audio files you recorded in
Reaper into Audacity. If you use plugins in the Audio Lab, you may not have
access to those on another computer. Some plugins are free and can be found
online. Others must be purchased and can be expensive like the Native
Instruments Komplete suite. If you know you don’t have access to specific plugins
on another computer and want to continue what you’ve started in the lab, export
the sounds to audio files that can be imported into the DAW you’ll be using
outside the lab.

9. Equipment Links:
Motu 828es Audio Interface: https://s3.amazonaws.com/motu-www-
data/manuals/proaudio/828es_User_Guide.pdf
Art Voice Channel:
https://artproaudio.com/framework/uploads/2018/06/om_voicechannel.pdf
Novation 61SL MkIII Midi Keyboard:
https://fael-downloads-prod.focusrite.com/customer/prod/s3fs-
public/downloads/SL%20MkIII%20User%20Guide%20V2%20English.pdf
Linnstrument:
https://www.rogerlinndesign.com/support/linnstrument-getting-started
