
Python and Jupyter Notebook Installation Instructions
1. Python
Python is supported on a range of operating systems. In general, Linux and macOS
have Python pre-installed. For other operating systems like Windows, Python can be
downloaded from the website (https://www.python.org/downloads/).
For this course, we will install Python through an open-source data science package
management system called conda. It is developed by Anaconda, Inc. and runs on
Windows, macOS and Linux.
Python has two versions:
● Python 2.x
● Python 3.x
Of these two, Python 2 is older and is no longer supported or maintained by
Python.org. So, we will use the latest stable version of Python 3 that comes with the
conda installer.
There are two types of conda installers:
Anaconda
A full setup with IDE, GUI, CLI and
scientific packages
Needs 3GB+ disk space
Miniconda
Minimal installer with conda, Python
and dependencies
Needs 400MB disk
space
We recommend downloading Miniconda for its lean setup, it contains all the
essential tools required for this course. Additional Python packages can be easily
installed using the conda or pip package managers.
To download Miniconda, visit the url:
https://docs.conda.io/en/latest/miniconda.html Choose the installation file by
● your operating system - Windows or macOS
● your computer’s CPU bit size - 32 or 64 bit (most present day computers are 64 bit)
● Python 3.x version
Once you have the installation file downloaded to your computer, follow the below
operating system specific instructions.
Installation Steps: WINDOWS OS
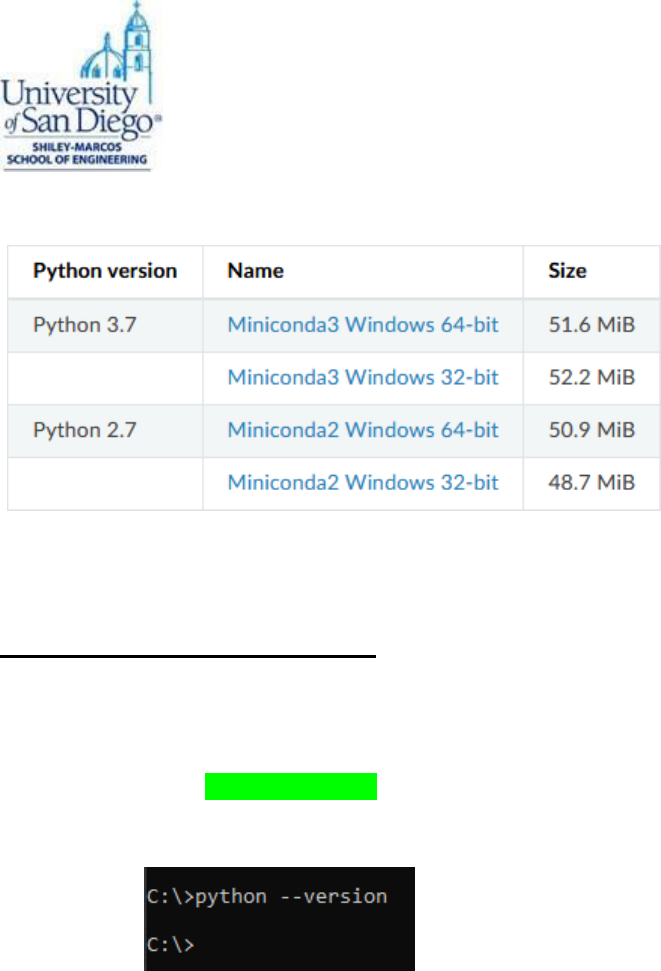
● The first step is to verify if your computer already has Python installed. Here’s a
simple way to check that:
○ Open Command Prompt from the Windows Start menu
○ Type python --version and press Enter
○ If Python is installed, a version number will be returned
○ If Python is not installed, a blank line will appear
○ Remember this, as it will be useful later during Miniconda installation
● Now open the Miniconda installation file that you have downloaded to your computer

● A setup guide window will appear (similar to the below image), click Next.

● Click I Agree on the license agreement window and proceed to the next window.

● Choose the Just Me option on Install for window. This is important if you are
installing Miniconda on a work computer as you might not have the
administrator privileges.

● Select the installation folder for Miniconda, we recommend the default option
at C:\Users\<your-username>\Anaconda3\. Make sure not to have spaces in
your file path.
● The next step is an important part of the installation process.
○ Keep the first option “Add Miniconda3 to my PATH environment variable”
checked so that you can use conda directly from your Command Prompt
(Windows) or Terminal (Mac OS).
○ The second option “Register Miniconda3 as my default Python” is
selected by default. You can keep this selected if this is your first
Python installation and if you want to use this Python version in other
applications. If you already have Python pre-installed and using it for
other applications, then you might want to uncheck this option as well.


● The next window will install Python, conda and other required dependencies. This
might take 1-2 minutes. Proceed to the Next window once installation is complete.

● Click Finish and exit setup. You can refer to the resources or opt out based
on your preference.
● Optionally, you can restart your computer now.
Verify Installation:
● Open Anaconda prompt from Windows Start menu.

● Enter conda list to check if conda is installed and working, this will display a
list of installed packages and their versions.

● Enter the command python. This command runs the Python shell. If conda is
installed and working, the version information it displays when it starts up will
include Anaconda. To exit the Python shell, enter the command quit().

Installation Steps: macOS
● Miniconda has two types of installation files for macOS:
○ Package file (.pkg) for GUI based installation
○ Shell file (.sh) for installation through Terminal
● Download either of these file types based on your preference.
Package File Installation (GUI):
● Open the installer file you have downloaded to your computer.
● Follow through the steps on the installer screen by agreeing to the license terms.
● Choose the default option Just Me on the Destination select window, this is
important if you do not have the administrator privileges for the computer. The
default installation

path for GUI based installation is at /Users/<your-username>/opt folder.
● Continue through the installation and close the installation window once complete.

Terminal Installation:
● Open the Terminal and navigate to the folder where the installation file is downloaded
to.
● Run the bash command followed by the filename
like: bash Miniconda3-latestMacOSXx86_64.sh
● Follow through the screen prompts and agree to license terms by entering yes
● Next, select the default installation location by pressing ENTER key. Unlike the
.pkg file, the default path for shell installation is at: //Users/<your-username>
● The installer prompts “Do you wish the installer to initialize Miniconda3 by
running conda init?” Type yes.
● This will make changes to your bash_profile at: /Users/<your-
username>/.bash_profile. Once the installation is complete, close and reopen
the Terminal.

Python installation without Anaconda (Windows 10)
1. Apart from this course, you can install Python directly without using Anaconda
package manager.
a. Download the latest Python 3 release from https://www.python.org/.
Choose either the web-based installer or the executable installer.
b. Run the installer. Select the option to Add Python 3.x to PATH.
2. Install Python packages using pip
a. Open a Command Prompt window
b. For example, enter the following command to install NumPy package: pip
install numpy. This will download and install the package.

2. Jupyter Notebook
Jupyter supports interactive data science and scientific computing across multiple
programming languages. There are two types of Jupyter software:
Jupyter Notebook: open-source web application that allows you to create and
share documents that contain live code, equations, visualizations and narrative
text.
JupyterLab: web-based interactive development environment for Jupyter
notebooks, code, and data. JupyterLab will eventually replace the classic
Jupyter Notebook.
You can start working with Jupyter Notebook and as you get comfortable using it,
you can move on to JupyterLab later.
Install Jupyter Notebook
●
Install Jupyter Notebook using the following command in the Command
Prompt: conda install -c conda-forge notebook
● This will in turn install several required packages and prompts for your
permission to proceed. Type y and wait until the installation is complete.
● In order to save jupyter notebooks as PDF documents, install the package notebook-
as-pdf
by running the following commands:
○ python -m pip install -U notebook-as-pdf
●
Once done, launch jupyter using the command: jupyter notebook

● This will start the notebook server and open a new tab in the default web
browser of your computer.
● You can either browse to your desired directory using the Jupyter interface or
navigate to the directory in the command prompt prior to launching Jupyter
notebook.
● To create a new notebook, select Python 3 option under New menu.

● As a notebook opens in the new tab, make sure to select the code option
to execute Python script. You can add text to the notebook using
markdown option.

● To save a notebook to pdf, select File menu > Download as and click on PDF
via HTML option.

Python Package Management:
A Python package or library is a collection of modules, functions and methods that
allows for a minimal use of code during development. There are several useful data
science packages for Python and we will work with a few of them in this course.
Installing a package is quite similar to the Jupyter installation you have just done. In
general packages are installed through package managers like conda and pip. Just
specifying the command conda install <package_name> in the Command Prompt and it
will install that package if it exists in conda’s repository. If not you can always use pip
install <package_name>, which is in fact the most famous and widely used package
management system for Python.
Let us go over an example and install NumPy package using conda. In Command Prompt:
●
conda install numpy will install the NumPy package in your environment
●
Use conda list command to verify the installation or to list all packages in
your environment
●
You can install a specific version of the package limited to your
environment by specifying the version number like conda install
numpy==1.18.1
● conda update numpy will update the NumPy package to the latest version
● Finally to uninstall the package, use the command conda remove numpy
As we are primarily using the conda package manager, use pip only as an
alternative, that is if a package is not found through one of the conda’s channels.
