
Sharon Thornton- Instructional Technology 1
Podcasting with Audacity Software and Podbean
Free Podcast Hosting and Publishing
ISTE NETS-Students- 1. Creativity and Innovation
Students demonstrate creative thinking; construct knowledge, and developing innovative
products and processes using technology.
----------------------------------------------------------------------------------------------------------------------------------
TEA Technology TEKS:
7C- Use a variety of data types including text, graphics, digital audio and video.
11B- Use presentation software to communicate with specific audiences.
What is Podcasting?
Podcasting stands for Portable On Demand Broadcasting.
A podcast is like a radio show. However, instead of being broadcast live, a podcast is
recorded multimedia file that is distributed by subscription (paid or unpaid) over the
Internet, so that you can listen to it whenever you please. It can also be
Played back on mobile devices (ipods, MP3 players, iphones) and personal computers
Podcasters' Web sites may offer direct download or streaming of their content
May be downloaded automatically through iTunes store
http://coleycast.blogspot.com/ - Fifth graders at Tovashal Elementary School in Murrieta,
CA share what they're learning in the classroom.
http://mabryonline.org/ - Middle School Podcasts
http://www.ahisd.net/campuses/cambridge/radio/radio.htm - Radio Cambridge
Elementary Schoool
PreK Podcasts by John Tower Elementary
Steps to Creating a Podcast
Step 1: Decide on the purpose for your podcast.
Step 2: Plan your session by writing a script
Step 3: Use Audacity to record your session and Export recording as an MP3 file.
Step 4: Upload files, and publish on a Podcasting Host site. It creates your own website to
upload, store and view all of your podcasts.
Click here to see the Podbean website I used to upload files for training.
Step 5: What can I do with my podcasts?
Step 6: Subscribing to Podcasts
Let's Look at Some Examples of how Podcasting is being used in schools

Sharon Thornton- Instructional Technology 2
Step 1: Decide on the purpose of your Podcast
Teacher Ideas:
Record a welcome note to post on your web page.
Record classroom rules.
Record directions for homework assignments or projects.
Record audio newsletters that include classroom information.
Record a lesson or lecture and post on your web page for students who were absent or
need review.
Record spelling, pronunciation and definitions of grade level Word Wall words so students
can practice these at home.
Record science or social studies content words or concepts for students to refer to at home
for practice.
Explain the steps on how to solve a math problem.
Record word problems of the day for students to solve at home for extra credit.
Record directions for classroom projects and post on your web page as a reference for
students and parents.
Record directions for a listening center.
Record multiplication facts or any other type of facts for a listening center or post on your
web page for home practice
Create audio books for your students
Create a debate podcast where you post the prompts and the students record their
responses and post.
Classroom and Student Ideas:
Record oral presentations based on student research
Record writing samples as a way to edit work through auditory feedback.
Import music to their writing samples to set the tone or mood of the story.
Post these stories to Podbean so the kids become real authors writing for a real purpose
with an authentic audience. Have each student add a comment to their peers’ story.
(make sure students have permission to post online and they only use first names.)
Narrate field trips or assign each student something to report on from their experience.
Record an interview.
Students take turns reporting on the weather each day.
Record a news broadcast with students reporting on different topics.
Record news of the day for your city, country or world.
Record classroom debates and or discussions
Record classroom or individual poems written by students. Another poem
Record stories that you have written and add background music- becoming real authors.
Record book reviews and post for others to read

Sharon Thornton- Instructional Technology 3
Record book trailers to get others to read a book they’ve read
Record grammar tutorials and questions for review.
Record a play or reader's theater.
Record songs that help learn content.
Record subject content to play back for reviewing purposes.
Record information from research.
Record directions on how to do something.
Explain how to solve a math problem.
Explain a scientific process or how you conducted your science fair project.
Record a project from student work on what they have learned.
Create a Photo Story 3 project from research and record student scripts.
Older grade levels can record audio books for younger students.
Create a song from content and record as a class to reinforce instruction.
Record choir songs to use for feedback and to post and share performances on-line.
Record band practices to use for feedback and post final performances on school web
pages.
Step 2: Plan your session by writing a script
You can use reader’s theater scripts, write your own scripts or use one of these templates.
http://audacity.pbworks.com/Reader%27s-Theatre
Podcast Starter Script for 1 person
Podcast Script Skeleton
Podcast Training Script
Podcast Screen Script
Podcast Storyboard
Podcast Rubric
Handouts used with permission from a workshop by Jason Buck (Podcasting on the Cheap)
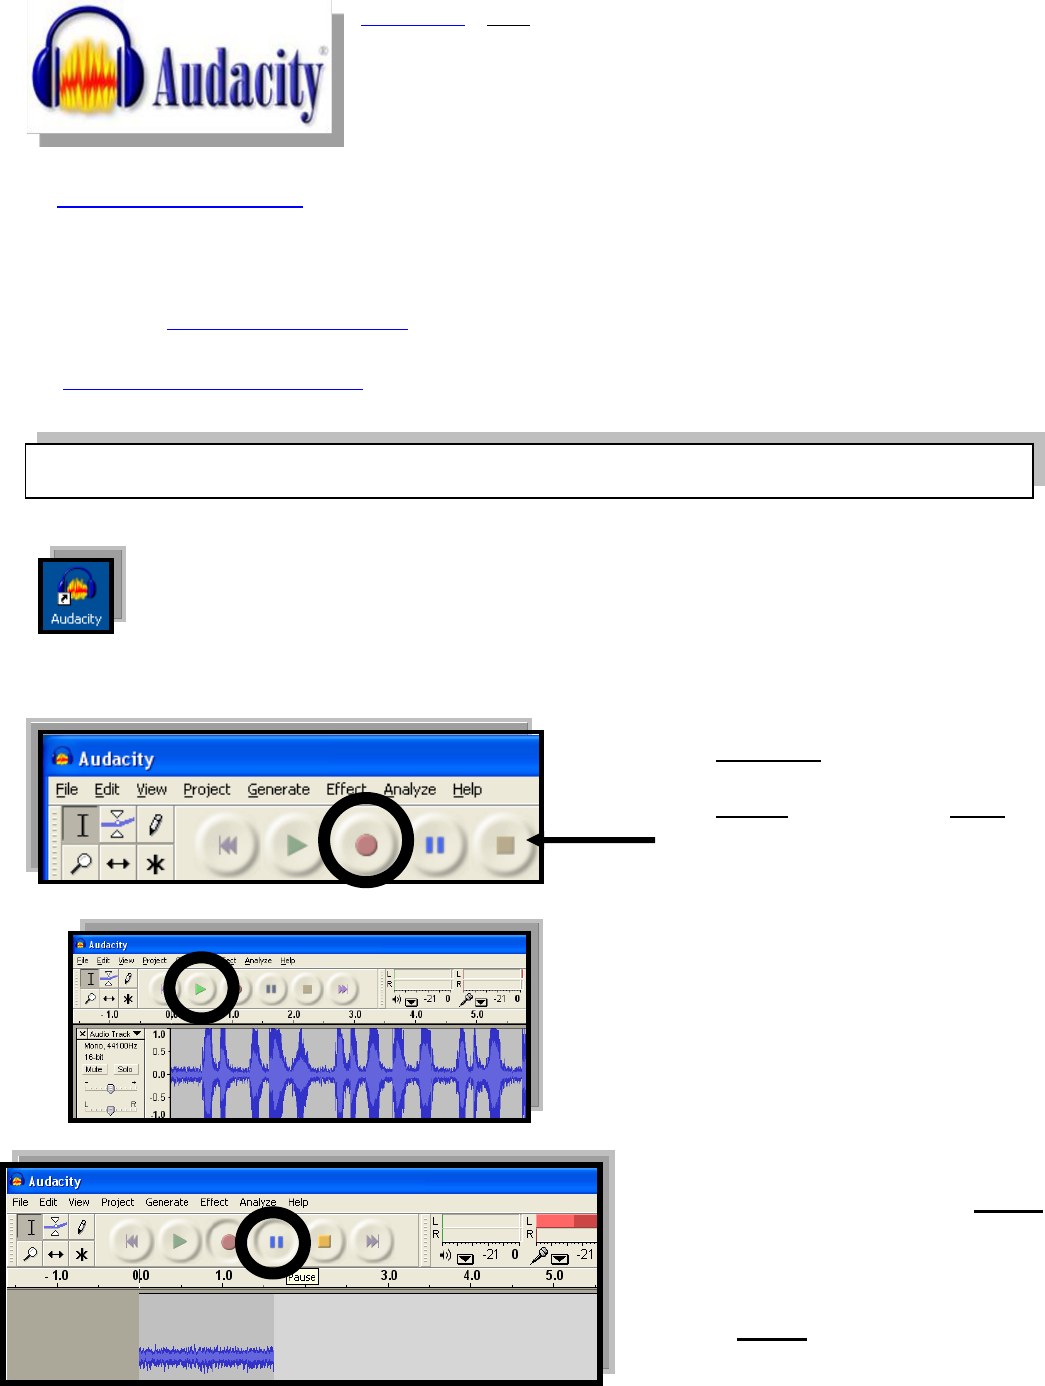
Step 3: Use Audacity to record your session
Information about Audacity Software
Sharon Thornton- Instructional Technology 4
Audacity is free open source software that is very easy to use for
teachers and any age student. Click on the link above for directions
and how to download at home. It is installed at school.
Audacity Training wiki- Use this link for directions on setting up Audacity, recording, adding music
and exporting files as MP3's. It also includes ideas on how to use Audacity to improve literacy.
You will need to download the Lame Encoder and set this up in Audacity to export recordings as
MP3 files. Click here for tutorials.
Download the lame encoder (so you can export files as MP3.)
1. Open Audacity software on the desktop.
2. Plug your headset microphone and headphone cables in the correct ports on your
computer (match the embossed icons on the headset with the pictures
on the ports of your computer.)
3. Click on the Red circle and read your passage.
4. Click on the yellow square icon to stop.
Once you stop the recording is finished.
5. Click on the green arrow to listen to your
recording.
Notice the sound waves go up and down when
you show expression in your voice.
You can also click on the blue Pause
button to pause while you are reading
or listening to your session.
Click the Pause button again to resume.
3A. How to use Audacity to Record
Sharon Thornton- Instructional Technology 5
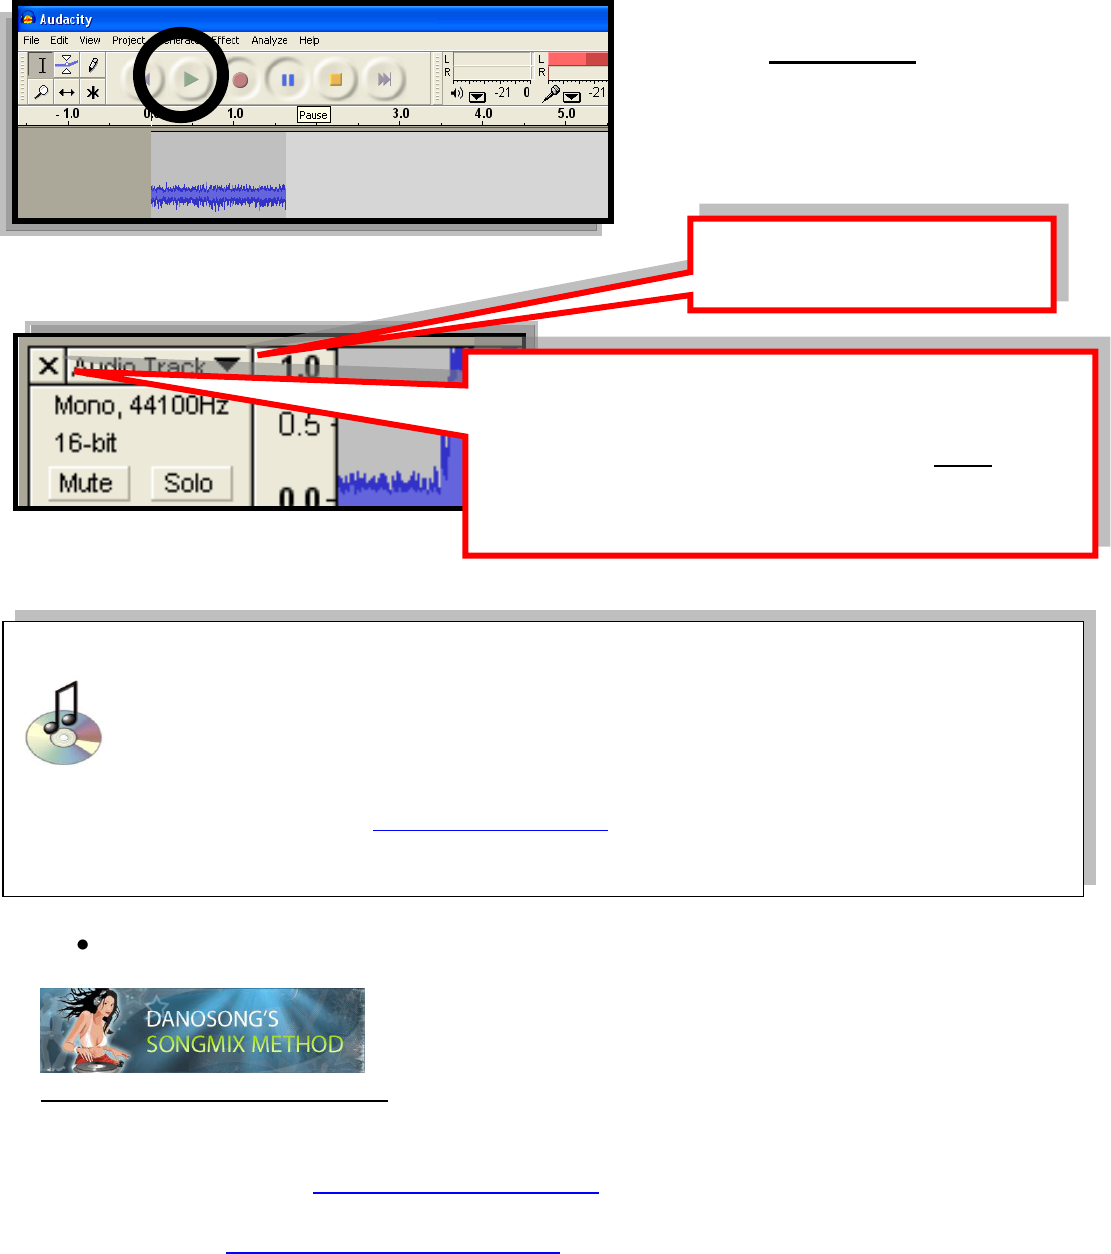
Click on the Green arrow to listen to
your recording.
-Music sets the tone or mood of the recording
Click on this example to listen:
http://audacity.pbworks.com/f/Reading+Mia+good.mp3
Two good places to download Royalty Free Music- save to the desktop.
1. Danosongs Royalty Free Music
You can download music files for free with this Creative Commons Music.
Make sure to give credit ("Free Royalty Free Music by DanoSongs.com")
or add a link to his website http://www.danosongs.com/
Free Play Music - http://www.freeplaymusic.com
- Download some fitting music to the desktop
If you are not happy with your recording, simply close
the current session by clicking on the tiny x in the
session and start again. You can also press mute and
record another session without hearing the one you
have already recorded.
Click on the drop down arrow
and name this track.
3B. Find and download Music that you can import into your recording using Audacity
Music sets the tone or mood of the recording.
Introduction music
Background music- Click here for example
Closing music

Sharon Thornton- Instructional Technology 6
3C. Import your downloaded music into your recording
Use your mouse to click on the place where you
want the music to start. Sometimes the kids click
in the middle of the recording like this below, so
the music will start playing where that line is.
Notice the black line right past the 15 mark. You
can change where the music starts later if you
change your mind.
Click on Project>Import Audio
Make sure you have clicked where you want the
music to start.
Navigate to where you downloaded
the music file.
Select the song and click open.

Sharon Thornton- Instructional Technology 7
Notice the music will now show up
under the narration. When the
recording is played, you will now
also hear the background music. It
has two lines because it is stereo
track.
If students decide that the music does
not convey the mood of their story, they
simply click on the X next to the audio
Track to delete. Then they can go back
and import a different song.
They can also select mute and search
for a better song.
*If the background music is too soft or loud,
You can use the sound controls on the left to
to turn the volume up or down.
You can do the same thing for your recording.
Or you could also select the student's
recordings and Choose Effect>Amplify to
make their voices louder.

Sharon Thornton- Instructional Technology 8
Once you decide which song you want, you may have extra music at the end that you don't need,
because the recording will be finished and the song will continue to play, making the file too large.
Click on the selection tool (selected by default) shown below. Use your mouse to click and drag to
select the part of the music you want to delete. Here I left a little music at the end, but then
selected all the rest of
it.
Select Edit>Cut as
shown.
You can also just press
the delete key on your
keyboard.
No problem: Use the selection tool to select all of the music that is in there (it will turn gray like
shown above.) Then click on Edit>Copy from the menu bar (you can see you have this option in
the example above.)
Next, use your mouse to click where the music ends, and click on Edit>Paste.
Use the selection tool to select all of the music.
Click on the Time Shift Tool <-->.
Now you can move the music by just dragging it to the place you
want to bring it in.
Note: You can also do this with your narration recording as well.
How to delete extra music from the end of the recording
What if the music isn't long enough for your narration?
What if I want to change where the music starts?

Sharon Thornton- Instructional Technology 9
Fading the music in or out and your recording will be smooth and professional.
You may want to save the project you are
working on so you can go back and edit it
later.
In order to do this, you must save the
project as an Audacity file (.aup.)
Why? Exporting as an MP3 file gives you a recording that can be played outside of Audacity. That
means you can email it to someone and they can open it- even if they don’t have Audacity
software.
3F. Export it as an MP3 file
3D. Add Special Effects- fade music in and out
Use your mouse to click and drag
to select either the beginning or
ending of your imported music.
Choose Fade in or Fade out.
3E. Save your Audacity project- so you can edit later on.

Sharon Thornton- Instructional Technology 10
Note: Exporting as an MP3 creates a file that can be played back on any device that plays mp3
files. Podcasting sites also prefer MP3 files for uploading. You can also export as a WAV that will
play in windows media player (we will not be exporting as WAV files for this session.)
Important Note: The first time you export, you will get this message. Follow these steps assuming
already that you have installed the Lame Encoder- Click on Yes
Navigate to where you want to save
your MP3 file.
Name your file.
Click Save
On the main tool bar,
Click File<Export as MP3

Sharon Thornton- Instructional Technology 11
Navigate to the Lame Encoder Folder - My Computer/C:/Program Files
Name your recording here if you want here with
more details, but not necessary.
Click OK
Click on the lame_enc.dll file to select it.
Click Open
Click on Yes

Sharon Thornton- Instructional Technology 12
You can also create and upload videos to create Video Podcasts
Click here for directions on how to make a podcast in Pixie 2 of student work
Use Photo Story 3 to create video
Currently you can upload the following types of files:
.jpg, .gif, .mp3, .m4a, .ogg, mp4, .m4v, .mpg, .mov, .avi, .flv, .3g2, .3gp, .wmv, .pdf, .doc, .xls,
.ppt, .zip
Step 4: Find a Free Podcast Hosting Site to upload and publish your podcast
It creates your own website to upload, store and view all of your podcasts.
Click here to see the Podbean website I used to upload files for training.
You can add a link to this website from your own webpage, blog or wiki or email the link to
someone.
It allows readers to subscribe to your podcasting page so they will automatically receive
your new podcast through an RSS feed.
It provides code to embed your podcast (as a media player) right inside your webpage,
blog or wiki.
You can download this file to a portable player like an Ipod, Iphone or MP3 player.
We will use Pod Bean to upload and host our podcasts.
Why publish to a podcast hosting site?
Wait for the export to complete.
Now your file is saved as an MP3.

Sharon Thornton- Instructional Technology 13
What is Podbean?
Pod Bean is a free site to upload and publish podcasts. It provides your own webpage of podcasts
and provides code for you to share your podcasts through email, blogs, wikis and personal
websites. Here are some features according to Podbean descriptions:
Podbean.com is an easy and powerful way to start podcasting- a Free Podcast Hosting site
Easy to publish your podcast in 3 steps. No tech to learn.
Powerful promoting tools, iTunes Preview, Statistics.
No limitation on storage
Podbean is a Podcast Publishing and Social Subscribing site:
Publish your own podcast is fast, easy and free.
Discover popular podcasts and find what other people subscribe to.
Collect your favorite podcasts in one place and access them from anywhere on the web.
Share your taste in podcast with friends and get recommendation in return.
Click here for a list of FAQ about Pod Bean
Let’s get started.
Step A: Create a free account, verify and login
Navigate to: http://www.podbean.com
Verify your account through email notification.
Login to Pod Bean with your new account information.
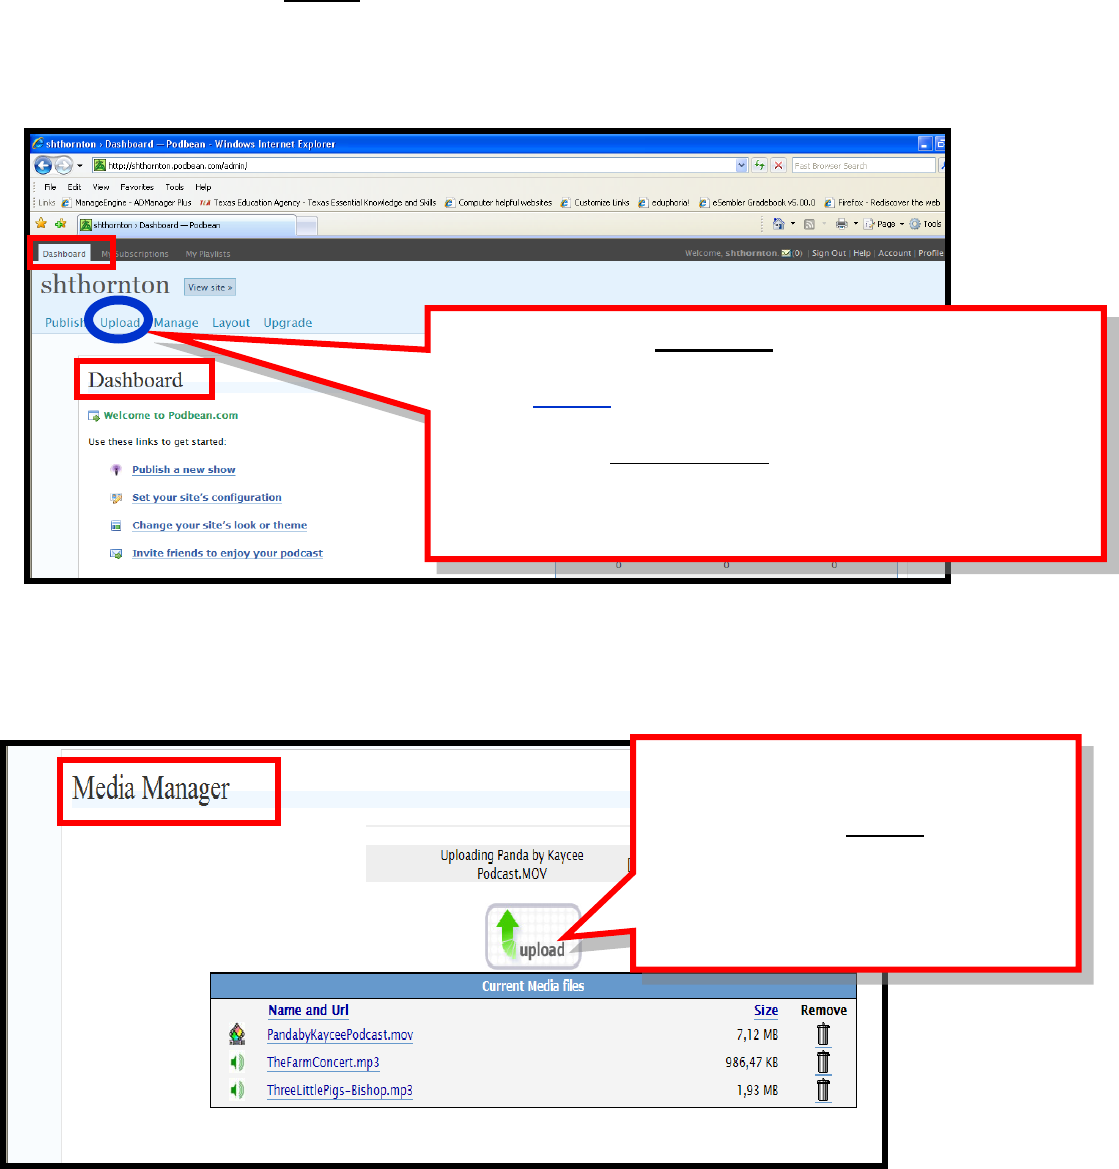
Step B: Upload your file to Podbean.
The first you want to do is locate your dashboard. This is where you get most all the options you
need to work in Pod bean.
There a couple of ways to get to your dashboard.
Click on Publish a Podcast tab
on the main home page.
Upload and publish Podcasts directly from the home page
Sharon Thornton- Instructional Technology 14
You are now in one of the dashboard views
Note: You can always navigate back to the home page by clicking on the PodBean icon.
You will see 4 tabs in your dashboard: Publish, Upload, Manage, Layout and Upgrade.
We will use the Upload tab first to upload the MP3 file(s) you created for your podcast.
This takes you to the Media Manager View as shown below.
It takes you to your Dashboard View
Click on Upload tab
Note: You can go to Publish a new show hyperlink where you can upload and
publish in one step, but I had a better experience doing this in steps by
uploading files first and then clicking on the Publishing tab.
In the Media Manager,
Click on the green Upload button.
Notice how it also shows the other files you have
uploaded already.

Sharon Thornton- Instructional Technology 15
Step C: Write a show description for this Episode and Publish
Note: Once files are uploaded, they will all be listed here under Current Media Files.
Click on the Browse button and
navigate to your saved file.
Once the file is loaded, click on the
Upload button.
There is also a link to click on supported
files types it will allow you to upload.
Those are also listed on page 12 in this
handout.
Still In the Dashboard View
Click on the Publish tab.

Sharon Thornton- Instructional Technology 16
Now you will be in the Publishing window as shown below.
Pay attention to the message at the bottom of this screen.
You are now in the Write Post/Episode window
1. Add tags to your podcast to make it easy to locate.
2. Type a Title for this specific podcast.
Make sure you are in the Visual tab.
3. Type a description or information about this episode
of your podcast. This is what people will read.
4. Add categories for your podcasts to organize them. Create a
category by typing it in the window and click Add. Now just
select it when you publish a new podcast.
5. Decide to allow comments under discussions box.
Select a file from your account.
You can click on the drop down
arrow next to select from account
and choose the file you want to
publish in your post.
Click on Publish>>
You can also save and
publish later or continue
editing.
It says: For security reasons, this form must be
submitted within one hour of when it was loaded:
12:14am GMT. If you would like to spend longer than
that composing your post, click Save and Continue
Editing. This is one of the reasons why I upload first and
then publish in a separate step.

Sharon Thornton- Instructional Technology 17
Itunes options: Located in the same publishing window above.
After you publish, it will say Post Saved; view your site
Click on Show
View your new website with your first episode
Use the drop down menus to
change the default settings.
Click on Hide when you are finished
This is your new podcasting webpage. Your
podcasting website url will be listed in the
address window. It is your
username.podbean.com
Ex: http://shthornton.podbean.com/
You will see the episode title along with
published date.
Notice the description for this episode.
Visitors can visit your website-click on click on
the arrow to listen.

Sharon Thornton- Instructional Technology 18
Step 5: What can you do with your podcast?
Things you can do with your Podcast or episodes:
1. Others can download this podcast.
2. Share your podcast website address with someone.
3. Share a specific episode with friends via email, blog or social networking site.
4. Add a link to this podcasting website of specific episode from your GPISD web page.
5. Add and moderate comments
6. Get the code and paste in a Gadget on your blog, wiki or website so the file will come up in
a media player with controls to listen.
7. Allow people to subscribe to your podcast via RSS feeds (covered later.)
8. Subscribe to your feed in iTunes so you can download to mobile devices. (covered later.)
1. To download this specific
episode: Click on Download link
and save the file.
2. Share Podcast Website:
Click on Share to send your
podcasting website address to
someone.
You can also copy the url in the address bar.
2. Share your entire podcast website: This is a
good way to share if you are sending to just a
few people since you type to type in their
addresses.
Type in email addresses
Your name
Your email
Type in a message
Scroll to the bottom and click send.

Sharon Thornton- Instructional Technology 19
You can just paste the url website right into your GPISD website
Example: http://shthornton.podbean.com/
You can also type what words you want to show and then add a hyperlink and paste the
website url. Example: Click here to view my podcasting website.
You will see a list of options for sharing
Click on email to send this episode
to someone in an email.
You can also share this on blogs
and other social network sites.
3. Share specific episodes with Friends
By email this specific episode to
someone- click on Share this link.
Via blog or social networking sites.
4. Add a link to this podcasting website of specific episode from your GPISD web page.

Sharon Thornton- Instructional Technology 20
5. People can add comments here and rate
your show if you give them permission when
you set up rights for your website.
6. Get the Code to embed a media player of a podcast in another website, blog or wiki.
Click on Embeddable hyperlink under a
specific episode.
They give you codes for a gray or black
backgrounds on the player.
Copy & Paste the following code to your blog or
website
Select html view in a blog post, and paste.
Insert plugin and choose HTML/Java Script
Paste code into a gadget.

Sharon Thornton- Instructional Technology 21
You can also upload and post movies. They are video podcasts.
Here is an example of what a
movie looks like posted as a
podcast. You can see the actual
media player.
Note: Students here used Pixie
2 to create this video and
saved it as a Podcast in Pixie 2.
If you put your mouse over the Share
this green icon, it gives you a number of
ways you can share this video podcast
with someone just like a regular podcast.
Notice the one to share it on Blogger.
You can see that it puts the day that it’s posted
along with the description that you typed for the
podcast.
The player controls are at the bottom of this
video that is playing.

Sharon Thornton- Instructional Technology 22
How to modify your podbean account through your dashboard- My Profile
Go to your Podbean home screen by clicking on the Podbean icon.
Now click on your username in the top
right hand corner of the screen.
You can also click on My Profile link.
Here you see the website url of
your podcasting site.
You can click on it to view the site or
copy and paste to share with others or
link from your blog, wiki or website.
Change your photo.
Change your profile and setting.
Change your password.
Edit your profile and Settings information
Click on Profile and settings link.

Sharon Thornton- Instructional Technology 23
Notifications
Change settings and click on
update.
Under Edit Profile you can change:
Profile Info.
Privacy
Notifications
Privacy Settings:
Friend Options
Who can see my Profile
Click on Update.

Sharon Thornton- Instructional Technology 24
You will need to be back in your dashboard. Click on the PodBean icon then on My Profile.
Remember: You can click on the Upload tab to see a list of your uploaded files
You can manage your files through the Manger tab in your dashboard
Click on My Dashboard
In the manage view, you will see a list of all
your podcasts .
Here you can:
See categories
View how many comments you have
View the podcast
Edit it
Delete it
Get the embed code
Click on the Manage tab.
You can also view the site.

Sharon Thornton- Instructional Technology 25
Embed Code Choices and their functions
MP3 audio player in white
MP3 audio player in black
HTML code for Text Link
HTML code for download
Here you will find all types of embed code to
copy so you can post your audio and video
to blogs, websites and email messages.
Embed Code –Use to add media players of podcasts into websites, blogs or wikis.
Examples of players and
functions for the code

Sharon Thornton- Instructional Technology 26
While you are still in your Dashboard, click on the Layout tab.
Modify the layout of your Podcasting website
Click on the Layout tab
Here is where you can change the theme,
header image, add sidebar widgets, add
sidebar link and edit in CSS.
The template will open.
Click on the hyperlink that says
View Site.
Under the layout tab you can also
edit:
Header image
Sidebar widgets
Sidebar links
Edit CSS
Browse through the templates.
Click on a template to select.

Sharon Thornton- Instructional Technology 27
Step 6: How to subscribe to your podcast RSS feeds
People can subscribe to your podcast through RSS feeds. That means new episodes will
automatically be downloaded as you add them. You can also download other podcasts.
To subscribe from within Podbean, go to the main url website for
your podcast.
This means they have to login to Podbean and click on podcasts to
see new episodes.
You can also subscribe using the image links in Podbean as shown.
I didn’t find this to be the best way to do this. (see below)
You can also manage the settings on all these
other features listed under the Manager tab.
People can subscribe to your podcast from your website.
Add tags if you like and click on
Add to my Subscriptions.
With iTunes
Google
Yahoo
RSS Podcast

Sharon Thornton- Instructional Technology 28
This isn’t the most practical way to subscribe to a podcast either.
Let’s look at another way
Here you will see a list of all the episodes.
You can click to listen or download.
You can also click on the subscribe link.
.
You can add tags to categorize this podcast
if you like.
Click on Add to my Subscription.
Any new episodes will automatically be
downloaded in your Podbean account.
.
In Podbean, click on the Podcasts tab
You can search by categories or type in a
search at the top right of the screen.
How you can search for and subscribe to other podcasts through Feeds on Pod Bean

Sharon Thornton- Instructional Technology 29
What if you don’t want to have to login to a hosting site like Podbean to see new episodes?
Subscribe to a podcast and iTunes automatically downloads new episodes as they become
available. Note- you have to go back and manually add episodes in the past.
Using iTunes Subscribe to Podcasts on other websites and directories
Here I clicked on the podcast to open.
I can download specific episodes or I can
subscribe to this podcast.
I can now listen to all future episodes from
within iTunes. They are stored in the
Podcasts source panel.
The video icon will appear next to an
episode if it is a movie.
From there you can listen or download
these to an MP3 player, iphone or ipod.
You can search by category. Here I typed
in a search for Google Sketchup and got
these podcasts.
.Note: iTunes University is a great
resource.
You can click on subscribe right below the
description.

Sharon Thornton- Instructional Technology 30
Step 1:
Navigate to the website with the RSS feed.
Click on Subscribe
Copy the website’s RSS feed’s url address.
Step 2:
Open iTunes
Click on the advanced menu.
Choose Subscribe to Podcast.
Right click and paste the url into this field
(can also press the Control + V key to
paste.)
Click OK.
Hint: You can use iTunes to subscribe to podcasts, even if you find the podcast outside of iTunes in
another Podcast directory or simple website. Subscribing this way will put all your podcasts in one
location where you can listen to or download them easily into your mobile device.
Note: If the feed is embedded or
tied to image, then right click and
Copy Link Location.
Here I right clicked on the
RSS Podcast image.
