
EZWrite 6
V1.0
Paste
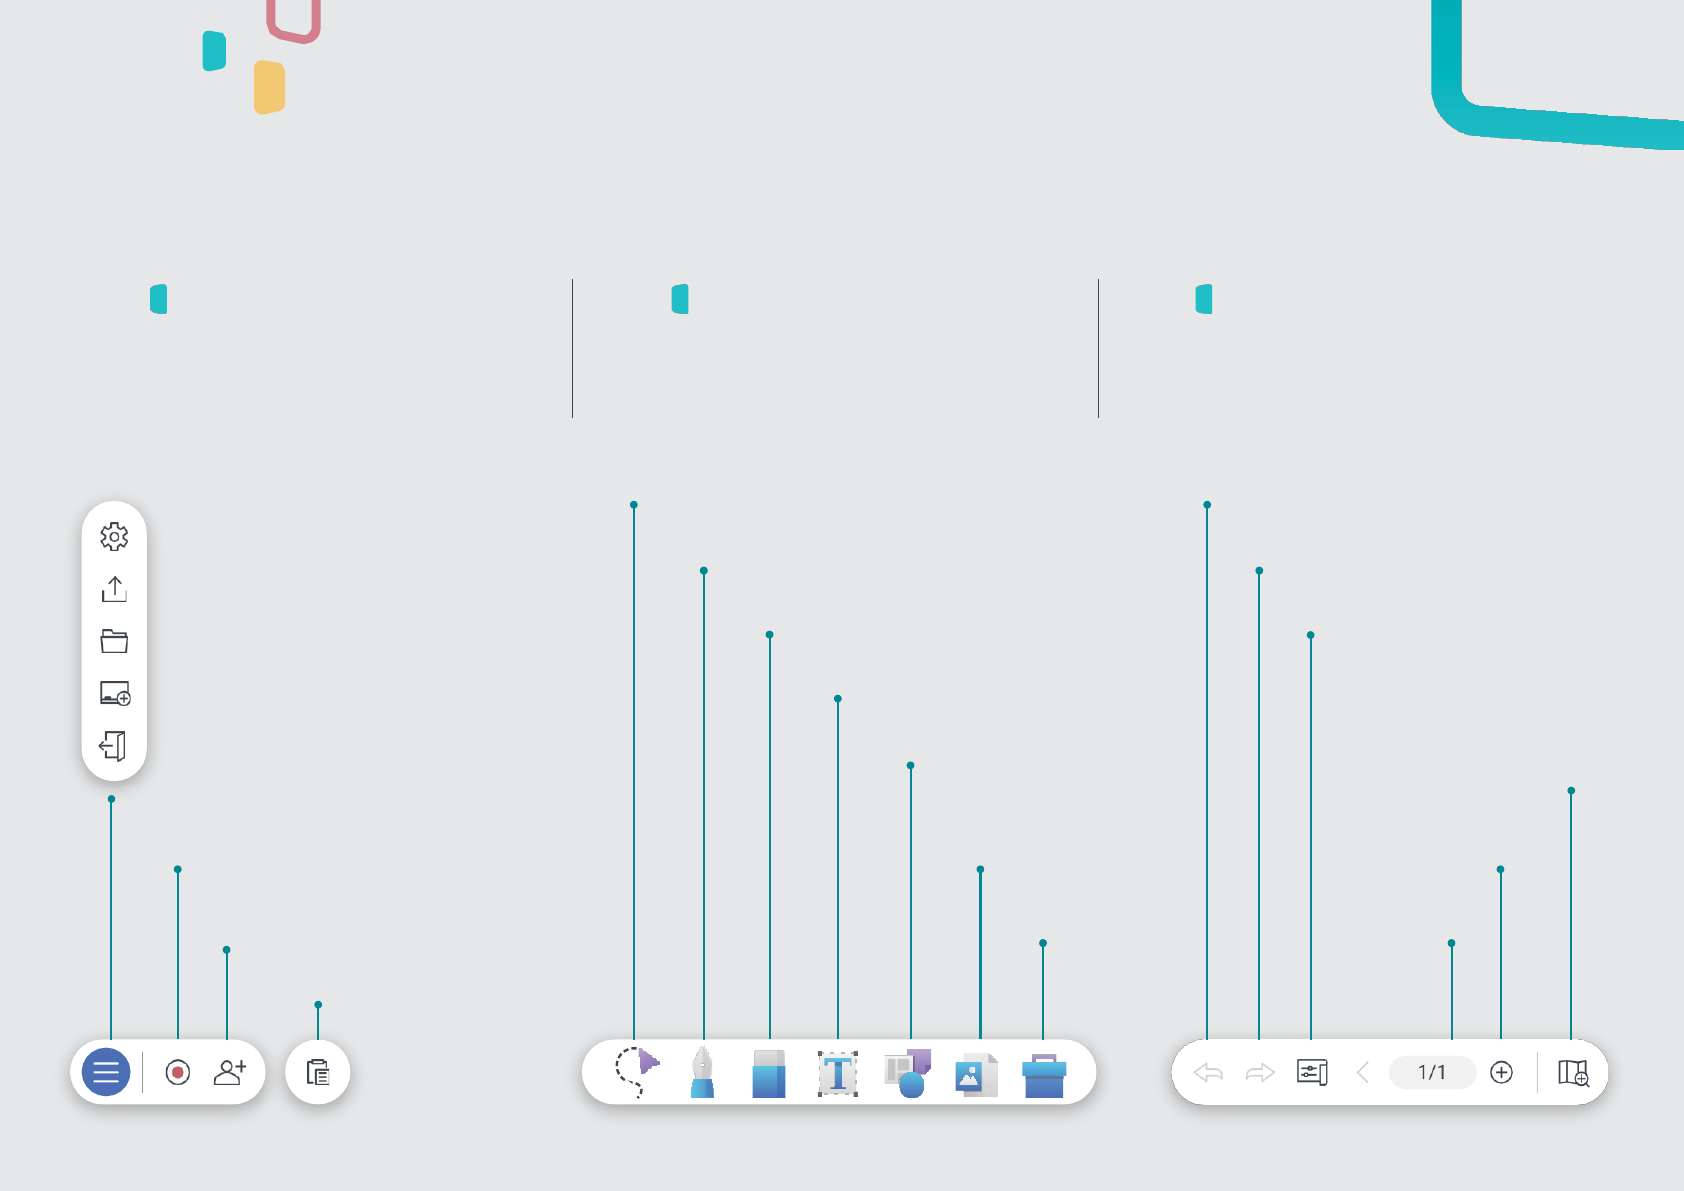
Menu bar
Found at the bottom-left
corner, the menu bar contains
the following:
Toolbar
At bottom-center is the toolbar,
which has the all the essential
EZWrite whiteboarding tools:
Navigation bar
At bottom-right is the navigation
bar, which has the following
controls:
EZWrite settings
Export
Open file
Create new whiteboard
Exit EZWrite
Record video
Start cloud whiteboard
Selection tool
Pen
Undo action
Redo action
Change background
Page map
Add page
Page
number
Eraser
Text
Shapes and
templates
Import media
Toolbox
The EZWrite Workspace
When you open EZWrite, you load the workspace and the
three main menus.
1

Navigation bar
Use this bar to add new pages, view
the page map, and navigate to
other pages. It’s located at the
bottom-right corner of the screen.
Every time you open a new
whiteboarding session or create a
new page, you automatically begin at
the default area in the center, which
you can outline as a reference point.
Default area
Outline the default area
1. Tap then .
2. Enable Outline default area.
How do I move
around the page?
There are two ways to do this:
Use the page map on the
navigation bar.
Tap and drag the page
using two fingers.
Fit to screen
Show all contents on the page.
Reset
Go back to the default area.
Zoom out
Zoom in
Delete
Duplicate
From here,
you can also:
Tip
How do I add new pages?
There are two ways to do this:
1
Add a new page at the end
Tap on the navigation bar.
2 Add a new page in the middle
1. Tap the page number on the navigation bar.
2. Tap one of the pages on the list.
3. Tap then .
1
2
Did you know?
You can add up
to 999 pages.
Page Navigation and Controls
Each page on EZWrite is expansive, allowing you to work on a large
blank canvas. If you want more free space, you can easily move to a
different area of the page or add new pages.
2

Select an object
Tap it with one finger
Move object
Tap and drag object
Write or draw
With the pen tool selected,
drag your finger on the screen
Finger erase
With the eraser tool selected,
drag your finger on the screen
Move around page
Tap and drag with two fingers
Palm erase
With the palm eraser enabled
and the pen tool selected,
drag your palm on the screen
Zoom out
Pinch the screen with
two fingers
Zoom in
Hold the screen with two
fingers then spread them
apart
Open lock menu
Tap and hold object
Hand Gestures
EZWrite lets you use hand gestures to perform different
tasks on the page.
3

What are objects?
An object is any item that you can interact with
on the page. They can be pen strokes, shapes,
images, and other types of media.
What are object controls?
Object controls are the set of actions you can do
with any object on the page. The controls that
are common for the majority of objects are
called general object controls.
To access the object controls menu, just tap the
object you want to modify.
Lock
You can lock objects in place to prevent
accidentally moving or deleting them.
Locked objects also remain on the page
even if you use Erase all.
Delete
Tap this button to
delete the object
from the page.
Rotate
Tap and drag this
button to rotate the
object.
Show more
Tap this button to
show more object
controls.
Bring to front
Tap this to bring the
object in front of all
other objects on the
page.
Send to back
Tap this to move
the object behind
all other objects on
the page.
Add link
You can link an
object to a site by
tapping this button
and adding a URL.
Duplicate
Tap this to instantly
create a copy of the
object on the page.
Copy
Tap this to add
the object to the
clipboard.
Paste
Paste the object
from the clipboard.
This appears beside
the main menu.
Unlock
If an object is already locked, tap and
hold it for at least two seconds to reveal
the unlock button. Tap the button to
unlock it.
In case you want to
undo or redo a certain
action, you can easily
tap or on the
navigation bar at the
bottom-right corner of
the screen.
Tip
General Object Controls
4

You can use any of the following with the pen tool:
BenQ Board
pen
Your fingers
A paintbrush
Paintbrush
The paintbrush tool is sensitive to the
thickness of your strokes. If you’re
using an actual paintbrush on the
screen, it will replicate your strokes as
if you were painting on a canvas.
Highlighter
The highlighter tool allows you to
highlight any object on the page for
emphasis.
Dual pen mode
Selecting this mode allows you
to write in two different colors,
depending on which tip of the
BenQ Board pen you are using.
Single pen mode
When this mode is enabled, only
one user can write on the board at
a time. Both the Dual pen and
Paintbrush modes are disabled.
Pen
The pen tool lets you write or draw on
the page.
The thin and thick tips of the pen have different functionalities
depending on the mode you are using.
In single pen mode, using the thin tip automatically switches
to the pen tool even if another tool is selected.
Color 1 Color 2
Pen Eraser
In dual pen mode
In single pen mode
Color picker Color swatches
You can add colors using the
picker or swatches.
Tapping and holding any object with the pen
Tip tool also allows you to move that object
around the page.
Eyedropper
5

To prevent accidental
erasures while you’re writing,
you can also Enable palm
rejection.
Tip
Eraser
The eraser tool lets you erase pen strokes and other
content from the page.
Finger
Erases parts of the
pen stroke that your
fingers touch
Erase all
Erases all unlocked
content on the page
with one tap
Strikethrough
Erases the entire pen
stroke or object that
you strike through
You can use any of the following with the pen tool:
BenQ Board
pen
Your fingers
BenQ Board
eraser (RP04)
Did you know?
You can also use your palm to
erase pen strokes and objects
any time.
Enabling the palm eraser
1. Tap then .
2. Tap Enable palm eraser.
6

Import Media
EZWrite lets you import various file types and links to add
multimedia elements to lessons.
Camera
Stream live video from a camera and
take screenshots.
See Live camera for more details.
YouTube videos
Paste a link to a YouTube video
or search for one directly from
EZWrite.
Links
Add a URL to your whiteboard to
quickly access useful websites
during lessons or for students to
review at their pace.
Audio files
Add audio files in MP3 and
WAV formats to play them on
the page.
Video files
Import video files to play them directly
in EZWrite. Pause and annotate over
videos, even take screenshots.
Whiteboard files
Import pages from EZWrite, IWB,
and NOTEBOOK whiteboard files
to use as lesson materials.
Office files or PDFs
Add your existing lesson materials
to your whiteboard and select
which pages in your file to import.
Image files
Import image files in a variety
of file formats, including
animated GIFs.
Volume
7
Take screenshot
Seek bar
Playback
speed
Play
Rewind 15s Fast forward 15s

AI Recognition Tools
EZWrite has three built-in AI tools that you can use to make handwriting,
text, and 2D shapes on the board perfectly legible.
Handwriting recognition
Convert your handwritten text into editable
text in dozens of languages.
Write on the board in print or cursive, select it
using the selection tool, then tap .
AI recognition setup
To configure any of the AI tools settings,
tap then to access their menus.
Hold or for
more than two
seconds to bring up
their settings.
Tip
Shape recognition
Convert hand-drawn geometric shapes into
editable, perfect shapes. Draw a shape, select
it using the selection tool, then tap .
Optical character
recognition (OCR)
Convert text from images and documents
into editable text by selecting an image, then
tapping .
8

Text Box
Use the Text Box to input, edit, and translate text. You can even have
EZWrite read it aloud. To access it, tap on the toolbar.
Text-to-speech (TTS)
Have the board read your
text aloud in a natural voice.
Translate text
Translate text into various languages
with Google Translate.
Text alignment
Choose from left
align, center, and
right align.
Edit text
Select the text you
want to edit.
Font size
Change the font size.
Font style
Choose from bold,
italic, and underline.
Font color
Change the font color.
Hold or for
two seconds to bring
up their respective
settings.
Tip
9

Shapes
EZWrite has various editable 2D and 3D shapes that you can add to the page for
geometry class and more. To insert shapes onto the page, tap on the toolbar,
then tap to pull up the available shapes.
2D Shapes
3D Shapes
Fill color
Line color
Line weight
10

Backgrounds
Change the background of your pages to match your lessons. You can access
the background options by tapping on the navigation bar. Choose from any
of the preloaded background patterns or images.
Background images
Choose from a collection of backgrounds or tap
to add your own.
Background patterns
Newly chosen colors
will appear here after
you tap Save.
Tip
Graph for
easy creation
of graphs.
Ruled for
guided
handwriting.
Dotted for
easy creation
of tables and
graphs.
Isometric for
easy drawing
and 3D
shapes.
Popular backgrounds
Sheet music Blank clock Tactical board
Color
swatches
Color
wheel
Image
Color
Pattern
11

Geometry Tools
EZWrite has a set of built-in geometry tools that you can use to draw precise shapes
and lines on the board. You can access all of them from the Toolbox .
Ruler
Draw straight lines every time.
Protractor
Measure and draw angles, arcs,
segments, and even perfect circles.
Set square (Geodreieck)
Draw straight lines and measure
angles.
Compass
Draw circles and arcs.
Tap and drag the
ends to adjust the
length of the ruler.
Tap and drag the corners to adjust
the size of the set square.
Set the exact
angle of the ruler.
Close the tool Rotate the tool
Angle
Arc
Adjust the radius
Draw
Segment
Tap and drag the points to manually set the
size of the angle or enter the exact value.
12

Math Tools
EZWrite has built-in math tools to help you easily calculate or evaluate computations
directly on the board. To access them, tap on the toolbar.
Calculator
Use the calculator to perform simple arithmetic
functions such as addition, subtraction,
multiplication, and division.
Math Solver
Access Microsoft Math Solver to get step-by-step
solutions to math problems for pre-algebra, algebra,
trigonometry, and calculus.
13

Activity Tools
EZWrite has built-in activity tools that you can use to make lessons more engaging
and help students focus. To access them, tap on the toolbar.
Timer
Set a custom countdown
up to one hour to time
activities.
Scoreboard
Keep scores for up to to eight teams.
Tap the top of a team’s scorecard to add
a point, and tap the bottom to deduct a
point. You can even edit team names.
Random draw
Pick up to eight random numbers from a range of 1 to 99.
Ex. Draw four students from a group of 28.
Stopwatch
Use the stopwatch to time
classroom activities.
1. Under Pick number, tap 4.
2. Set the range from 1 to 28.
3. Tap Start.
Tap to minimize activity tools for more
efficient space usage.
Tip
Deduct
points
Add
points
Edit
team name
Timer
Random Draw
14

Collaboration Tools
EZWrite gives you collaboration tools to stimulate discussion and
brainstorming. To access them, tap on the toolbar.
Templates
EZWrite includes pre-loaded interactive templates for class
collaboration, such as Maslow’s Hierarchy and a Venn Diagram.
Edit the text, sticky notes, or the templates themselves.
Sticky Notes
Add sticky notes to the board during cloud whiteboarding
sessions to brainstorm with students. Let them contribute
by typing notes from their devices and sticking them to the
shared board.
You can also use sticky notes for activities such as polling,
SWOT analysis, and more.
Select and edit text
Select note color
15

Team Post
Get students to compete against each other, individually or in teams, to test their
understanding of the subject matter. Split the board into two or three sections
and hold a live quiz right in front of the class.
Take a screenshot
Clear all content
Change the background color
Post a question
Minimize Team Post on EZWrite
Close Team Post
How do I set up Team Post?
1. Tap then .
2. Select the number of teams.
3. Ask a question.
Record a video
16

Split-Screen Mode
Activating the split-screen mode from EZWrite allows you to whiteboard
while using Google Chrome or Maps.
Drag the divider to adjust
the size of both windows.
Tip
Split with Chrome
Tap then .
Splitting with Google Chrome conveniently
lets you search for information related to
your lesson.
Did you know?
You can easily copy text, images, and
links to EZWrite by holding it in Chrome
for two seconds and then dragging it
onto the whiteboard.
Split with Maps
Tap then .
Splitting with Google Maps lets you explore
real-world locations that are relevant to the
topic at hand.
17

Spotlight
Use the spotlight to highlight and hide parts of the screen for
more engaging teaching.
Q
A
Interactive Q&As
Highlight a question on the
board then move the spotlight
to reveal the answer.
Focus on phrases
Zoom in on specific words or
phrases when studying long
sections of text.
Reveal a sequence
Show a map or diagram
portion by portion to discuss
parts of a journey or sequence.
Analyze details
Isolate parts of a busy image to
examine noteworthy details
that can be easily missed.
To open the spotlight, tap then .
Settings
Adjust spotlight size
Adjust shadow opacity
Close
Move
Tap and drag
Resize
Pinch to decrease or
spread to increase
18
Jump to area
Tap and hold a
different area

Live Camera
Present a live camera feed directly on EZWrite so you can zoom in on
important details while whiteboarding.
To open the camera, tap then .
View reference materials
Use a document camera to show text
and illustrations from books and
other printed materials.
Monitor experiments
Check the status of your students’
experiments by magnifying their
results on the board.
Examine objects
Give students a closer look at fragile
artifacts without having to pass them
around the room.
Demonstrate steps
Show the step-by-step process of an
activity so that students can follow
closely from their seats.
Select camera
EZWrite lists every available camera connected to the BenQ Board.
Close
Enlarge/reduce
window size
Freeze frame
Rotate image 90° Take screenshot
Flip image horizontally
19
Camera is optional.

Open, Record, Share, and Save
EZWrite lets you easily use, share, and save your lesson files, whether
it’s for students or for your own reference.
20
Share by QR code
.
Open
To open lesson files in EZWrite, tap then
Locate your file and then tap it from the list.
Share and save
You have different options for sharing
and saving your lessons on EZWrite.
To access them, tap then .
Share lesson by QR code or e-mail
Both options let you select which pages to
share as images or PDFs.
Save as image or PDF
Choose to save your EZWrite pages as
images or PDFs to the board or your cloud
storage.
Tip
Save as IWB or EZWrite
Save your pages as EZWrite or IWB files to
the board or the cloud.
Save your lessons as EZWrite files for
maximum compatibility with BenQ Boards.
Only EZWrite files will save your sticky notes,
3D shapes, URLs, and YouTube links.
You can add timestamps to show when files
were shared and saved.
Record
Team Post
Record
To record a lesson, tap on the menu bar. You
can then save the recording to the board or your
connected cloud storage. If your board has built-in
or external microphones, your recording will also
include sound.
You can also record in Team Post:
Toolbox > Team Post >
Record

Cloud Whiteboard
Enabling the cloud whiteboard feature allows others to join your
whiteboarding session remotely from their devices.
How do I join a session?
1. Either scan the QR code or enter the URL.
2. Enter the Room ID.
3. Enter a user name.
How do I host a session?
Tap then Start cloud whiteboard.
EZWrite will display the room information:
You can join using a laptop, smartphone, or tablet.
How do I moderate the session?
Tap to show the list of participants.
From this window, you can:
Refresh the list of participants
Tap .
See who’s raising their hands
Check who has beside their names.
Tap to lower their hand.
Lower all participants’ hands
Tap .
Enable or disable hand-raising
Tap then Enable or Disable hand-raising.
Enable or disable editing for a participant
Tap beside their name.
Enable or disable editing for all participants
Tap or .
View or hide what participants are editing
Tap or .
Remove participants
Tap then Remove.
End the cloud whiteboarding session
Tap Leave Room.
21

Maximum picture quality
Select the maximum resolution for imported and
exported images. Select Full HD for faster
loading times and 4K for better image quality.
Images with resolutions lower than the maximum
will remain unchanged, while images with higher
resolutions will be compressed.
EZWrite Settings
Tap then to modify EZWrite settings.
Enable palm eraser
This setting allows you to use
your palm to erase annotations
on the board.
Enable palm rejection
This setting prevents you from
leaving marks on the page every
time your palm accidentally
touches the screen. This disables
the palm eraser.
Keep Floating Tool on screen
Have the Floating Tool on the BenQ
Board screen when you exit EZWrite,
giving you easy access without having
to tap and hold the screen.
Google Translate language
Select the source and target languages.
Optical Character Recognition
(OCR)
Select among different OCR language packs.
Text to Speech
Select a language and set the speech rate and
pitch of the AI voice.
Show default area
Create an outline to mark your original starting point.
This makes it easier to navigate each page.
EZWrite update
Tap Check to see if you are running the
latest version of EZWrite.
If an update is available, a pop-up message will appear
asking if you want to Update Now or Update Later.
Handwriting recognition
Download and select a language pack for
handwriting recognition and an image library
for shape recognition.
Although EZWrite automatically saves
your work in the background, it is still
recommended to save your whiteboard
before tapping Update Now.
Tip
22
