
T r a i n i n g G u i d e
4 – Receiving email
Microsoft Outlook 2010
– Level 1

Microsoft Outlook 2010 - Level 1
© Learning and Development Service Page 2 Receiving email
RECEIVING EMAIL
Email messages are received in the Outlook Inbox in much
the same way as letters are received in a letterbox.
Messages can be made to appear here automatically or
upon request.
You’ll probably spend a fair proportion of your time with
Outlook in the Inbox dealing with new messages as they
arrive.
In this booklet you will:
gain an understanding of the Inbox
learn how to retrieve email from the mail server
learn how to open another data file in Outlook
learn how to adjust the various message views
learn how to arrange messages in the message
list
learn how to read email messages
learn how to open multiple messages
gain an understanding of conversation view
learn how to navigate conversations
learn how to reply to a message
learn how to reply to a message in a conversation
learn how to reply to all messages
learn how to reply to a message without including
the original message text
learn how to add comments to reply messages
learn how to nominate a different email address
for replies to your messages
learn how to forward messages
learn how to find related messages
learn how to ignore conversations
learn how to mark messages as being unread
INFOCUS

Microsoft Outlook 2010 - Level 1
© Learning and Development Service Page 3 Receiving email
UNDERSTANDING THE INBOX
1
When you receive email messages, either
from an internal mail server or from the
Internet, the incoming mail is normally
placed in the Inbox. Once mail appears in
the Inbox it can be moved to another
folder, read, deleted, printed, plus more
using the various tools provided by Outlook.
You can also configure the Inbox in a
number of ways to ensure that it best suits
your needs.
2
In the example above the Inbox screen appears with three main vertical panels, the
Navigation pane, the Message list and the Reading pane.
1
The Navigation pane (optional) displays a list of folders making it easy for you
to view the contents of the Inbox, Sent Items or Outbox. To view these
folders you simply click on the one that you want to view.
2
The Message list displays all of the messages in the selected folder. For
example, the Inbox message list displays incoming messages. Unread
messages normally appear in bold as this helps you identify which messages
still need to be read.
3
The Reading pane (optional) displays the contents of the message that is
currently highlighted (or selected) in the Message list. It allows you to read the
contents of a message without having to open the message in its own window.
4
The To-Do bar (optional) integrates your tasks, emails flagged for follow up,
forthcoming appointments and calendar information in one central place on the
screen. It is minimised by default.
5
The People pane (optional) lets you view and access information that the
Outlook Social Connector displays from social networks.
3
4
5

Microsoft Outlook 2010 - Level 1
© Learning and Development Service Page 4 Receiving email
RETRIEVING EMAIL
Try This Yourself:
Before starting this exercise
ensure Outlook has
started...
1
Click on [Mail] in the
Navigation pane to
open the Mail feature,
then click on Inbox to
open this folder if it is
not already open
The Inbox is the folder
where you receive
incoming email
messages…
2
Click on the Send /
Retrieve tab
3
Click on
Send/Receive All
Folders in the Send
& Receive group
Any messages
addressed to you on
the various mail
servers will be
delivered to you, and
any messages in your
Outbox will be sent to
the mail sever(s) for
delivery
For Your Reference…
To retrieve email:
1. Open the Mail feature
2. Click on Send/Receive All Folders
in the Send & Receive group on the
Send / Retrieve tab
Handy to Know…
You can quickly retrieve and send email
by clicking on Send/Receive All
Folders in the Quick Access
toolbar or by pressing
.
2
3
All email messages must pass through a
mail server − the email equivalent of a
post office. With most computers a call is
periodically made to the server to see if
there is any mail for you. If you are
waiting to receive a message you can force
your computer to check the server rather
than waiting for it to do it of its own accord
and any incoming messages will be added to
your Inbox.

Microsoft Outlook 2010 - Level 1
© Learning and Development Service Page 5 Receiving email
OPENING AN OUTLOOK DATA FILE
For Your Reference…
To open a data file in Outlook:
1. Click on the File tab to open the
Backstage
2. Click on Open
3. Click on Open Data Outlook File
4. Select the data file and click on [OK]
Handy to Know…
When you open a second Outlook data
file you will have access to two
Inboxes. However, Outlook will still
deliver all incoming mail to the default
Inbox designated for receiving mail –
this is usually the one associated with
the Personal Folders data file.
2
3
All of the things you do and wish to retain
in Outlook are stored in a data file – this
data file is organised into folders to help
you manage the contents. The default data
file and its folders appear under the name
of Personal Folders. You can, however,
open and work with additional data files. We
will do this so that we will have some sample
email messages to work with.
Special Note: You normally don’t
open data files in Outlook (other
than backup files). We are doing
this only so that you have some
practice messages and data to
work with on this course
4
Try This Yourself:
Before starting this exercise
ensure Outlook has started...
1
Click on the File tab to
open the Backstage, click
on Open and then click on
Open Outlook Data File
The Open Outlook Data
File dialog box will open
pointing to the default
folder where data files are
saved: the Documents\
Outlook Files folder…
2
Navigate to the Course
Files for Outlook 2010
folder, click on
Watsonia_01.pst and
then click on [OK] to open
the data file in the
Navigation pane
3
Click on the black
collapse icon to the left
of the original data file
(pdawson in our sample),
then click on the expand
icon for Watsonia_01
4
Click on Inbox to see the
messages stored here

Microsoft Outlook 2010 - Level 1
© Learning and Development Service Page 6 Receiving email
ADJUSTING THE MESSAGE VIEW
For Your Reference…
To adjust the views of the Outlook screen:
1. Click on the View tab and adjust the
desired settings
Handy to Know…
If each message appears in a single
line rather than as a snippet over
several lines when you change the view
to Single, AutoPreview mode is
switched off. To turn AutoPreview
mode on, right-click on a blank area at
the bottom of the Message list and
select AutoPreview Layout.
2
3
You can customise both the Inbox screen
and the various panes that can appear in
the Inbox to suit your own personal
preferences. All of the panes, and their
options, together form a specific view of
your messages. In this exercise we’ll switch
off and on various options to see what they
do, and then finish by configuring the screen
so that it appears with some of the most
useful features.
Try This Yourself:
Continue using the previous
file with this exercise...
1
Click on the View tab to see
the View commands
2
Click on Change View
and click on Preview
The Reading pane will be
closed and a short snippet
of each message will
appear…
3
Click on Change View
and click on Single
Again each message will
appear in a single line but
the Reading pane is open.
This is the ideal view when
you receive many messages
a day…
4
Click on Change View
and click on Compact
Here the Sender and
Subject appear on separate
lines in each message and
the Reading pane is open.
Now, let’s close the People
pane...
5
Click on People Pane
and select Off to hide the
People pane from the
bottom of the Reading
pane
6
Click on To-Do Bar and
select Minimised to
minimise the To-Do bar

Microsoft Outlook 2010 - Level 1
© Learning and Development Service Page 7 Receiving email
ARRANGING MESSAGES
For Your Reference…
To arrange messages:
1. Click on Arrange By in the
Arrangement group on the View tab
and ensure Show in Groups is ticked
2. Select the desired option indicating the
order in which you want the messages
arranged
Handy to Know…
If Show in Groups is not ticked, the
messages will simply be listed in order
by the sorting criteria, such as by
sender. When Show in Groups is
ticked, Outlook will group each
category under an appropriate group
heading.
1
3
Outlook allows you to sort your email
messages by sender, date received,
subject, and more. Once the messages
have been arranged they can be further
organised into groups. When messages are
grouped you can expand or collapse the
groupings. This helps you to better organise
and manage your messages.
4
Try This Yourself:
Same
File
Continue using the
previous file with this
exercise, or open the
file Watsonia_01.pst...
1
On the View tab, click
on Arrange By in
the Arrangement
group to display a menu
2
If Show in Groups is
not ticked, click on
Show in Groups
Notice that the
messages are currently
arranged by date...
3
Repeat step 1 to re-
display the menu again
(if necessary) and select
Attachments
The messages will be
arranged and grouped
by those with or without
attachments…
4
Click on the collapse
icon next to No
Attachments to hide
these messages
5
Click on the expand
icon next to No
Attachments to display
the messages again
6
Repeat step 1 and
select Date to arrange
the messages by date
again

Microsoft Outlook 2010 - Level 1
© Learning and Development Service Page 8 Receiving email
READING MESSAGES
Try This Yourself:
Same
File
Continue using the
previous file with this
exercise, or open the
file Watsonia_01.pst...
1
Ensure the Inbox is
selected so that you
can see the messages
you’ve received
Unread messages
appear with bold
formatting…
2
Click on the
Marketing budget
message from Amanda
Bennett to see it in the
Reading pane at the
right of the screen
3
Double-click on the
same message to open
it in its own window
4
Click on close to
close the message
window
You can also press
to close the active
message window
For Your Reference…
To read messages:
1. Click on the message to display it in
the Reading pane
or
Double-click on the message to display
it in its own window
Handy to Know…
You can set up Outlook so that when
you read a message in the Reading
pane, the bolding disappears from the
message in the Message list when you
click on another message. Click on
Reading Pane (View tab), select
Options and tick Mark items as read
when viewed in the Reading Pane.
2
3
Email messages are just like paper-based
messages and will need to be read.
Messages in Outlook can be read using the
Reading pane. When the message is
selected in the Message list, its content will
appear in the Reading pane. Outlook
messages can also be opened and read in a
separate window.

Microsoft Outlook 2010 - Level 1
© Learning and Development Service Page 9 Receiving email
OPENING SEVERAL MESSAGES
Try This Yourself:
Same File
Continue using the
previous file with
this exercise, or
open the file
Watsonia_01.pst...
1
Click on any
message in the
Inbox to select it
2
Press and hold
down and click
on another
message to select it
as well
3
Right-click on one
of the selected
messages and
select Open
The mail messages
will open in their
own separate
windows…
4
Close the two open
messages
For Your Reference…
To open several messages:
1. Click on a message, press and hold
down and click on other messages
as desired
2. Right-click on one of the selected
messages and select Open
Handy to Know…
You can use a keyboard shortcut to
open several selected messages. The
keyboard shortcut is +
.
If you have opened several messages,
you can close them all in one go by
returning to the Inbox and clicking on
Close All Items in the Windows
group on the View tab.
2
3
Outlook lets you open more than one
message at a time. For example, you can
double-click on a message in your Inbox
and once it opens in a window of its own,
you can return to the Inbox again (or any
other Mail folder) and open another
message. You can repeat this process for as
many messages as you want opened.
Alternatively, you can open the desired
messages simultaneously.
Microsoft Outlook 2010 - Level 1
© Learning and Development Service Page 10 Receiving email
UNDERSTANDING CONVERSATION VIEW
When the Outlook feature Conversations
is turned on (and it isn’t by default),
messages that share the same Subject will
be organised by date and arranged by
Conversation in the message list. In other
words, if you send a message to someone
and they reply to it and then you reply
again, these three messages will be grouped
and listed under the one conversation.
The messages within each conversation are sorted with the newest message on top. When
you receive a new message that relates to one of your conversations, the entire
conversation will move to the top of your message list. When you click on a conversation
header in the message list, the conversation appears in the Reading pane with the newest
message on top. Because all messages in the conversation thread are included, you can
very quickly and easily read the entire conversation.
Expanded conversations provide a visual relationship between all messages in the
conversation. For instance, when you click on the first message in a conversation, Outlook
displays an icon comprising a small orange square with a yellow line protruding to the left.
Then as you click on other messages in the conversation, Outlook displays a vertical line
linking the related messages (as shown in both the above and below examples).
If a specific message gets two or more responses, Outlook will split the conversation into
multiple related but separate conversations, as shown below. The latest message in each
split will appear in the Reading pane when you click on the conversation.
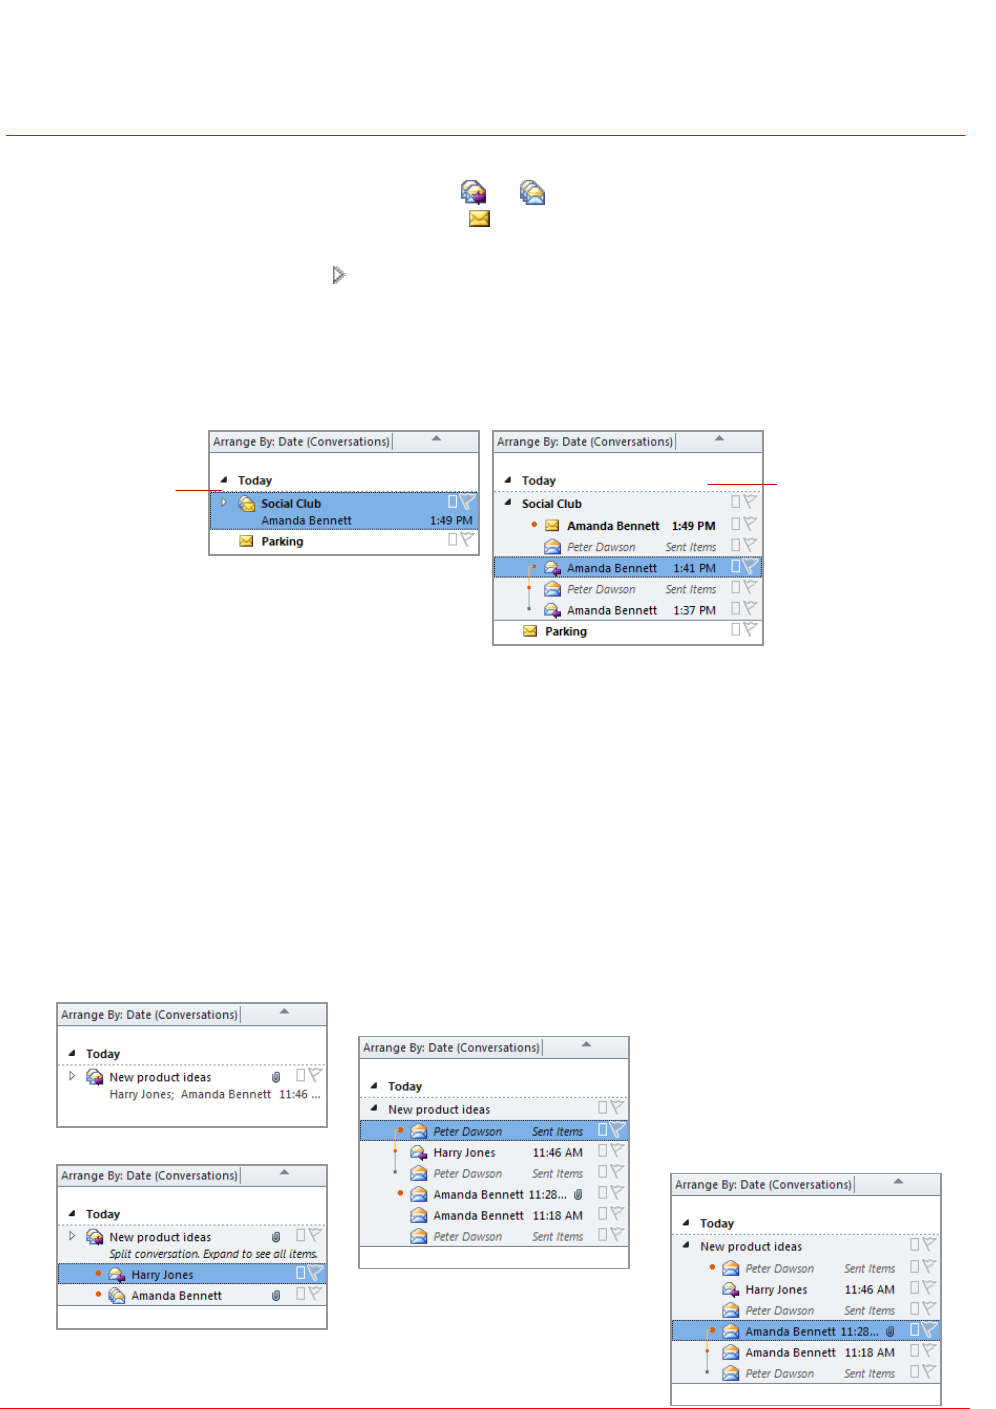
Collapsed
conversation
Expanded
conversation
comprising five
messages, where
the latest one is
unread
Collapsed conversation
Partially expanded
conversation which has been
split into two conversations
Fully expanded conversation
showing the relationship
between the three messages
in the top conversation
Fully expanded
conversation showing
the relationship between
the three messages in
the bottom conversation
When Conversations is turned on, you can identify a conversation in the message list by
an icon showing multiple items, such as or . The icons for other messages in the
message list show a single item, such as .
Each conversation can be expanded or collapsed. You can expand a conversation by
clicking on the expand icon to see all messages in the conversation. Notice in the
example below that some messages are stored in the Inbox and others are located in the
Send folder – it doesn’t matter in which folder they are located, Outlook still maintains the
relationship. Any unread messages in a conversation will have a bold heading. (Note that if
you turn off Conversations, only the messages stored in the Inbox will appear in the
message list – you would have to click on Sent Items to see the related messages that
you have sent.)
Microsoft Outlook 2010 - Level 1
© Learning and Development Service Page 11 Receiving email
NAVIGATING MESSAGES IN A CONVERSATION
For Your Reference…
To navigate messages in a conversation:
1. Click on Show as Conversations on
the View tab
2. Expand the conversation and click
on the desired message to view it in
the Reading pane
3. Collapse the conversation
Handy to Know…
If you happen to receive from someone
a message that has the identical
subject to other unrelated messages
that you’ve sent and/or received,
Outlook will group them together as
one conversation.
3
6
When you turn on the Conversation
feature, Outlook groups all messages with
the same Subject as a conversation. You
can expand a conversation to view its
messages and then collapse it again when
you’re finished. Using Conversations helps
you organise your Inbox so that it is not so
cluttered by grouping together and then
collapsing related messages.
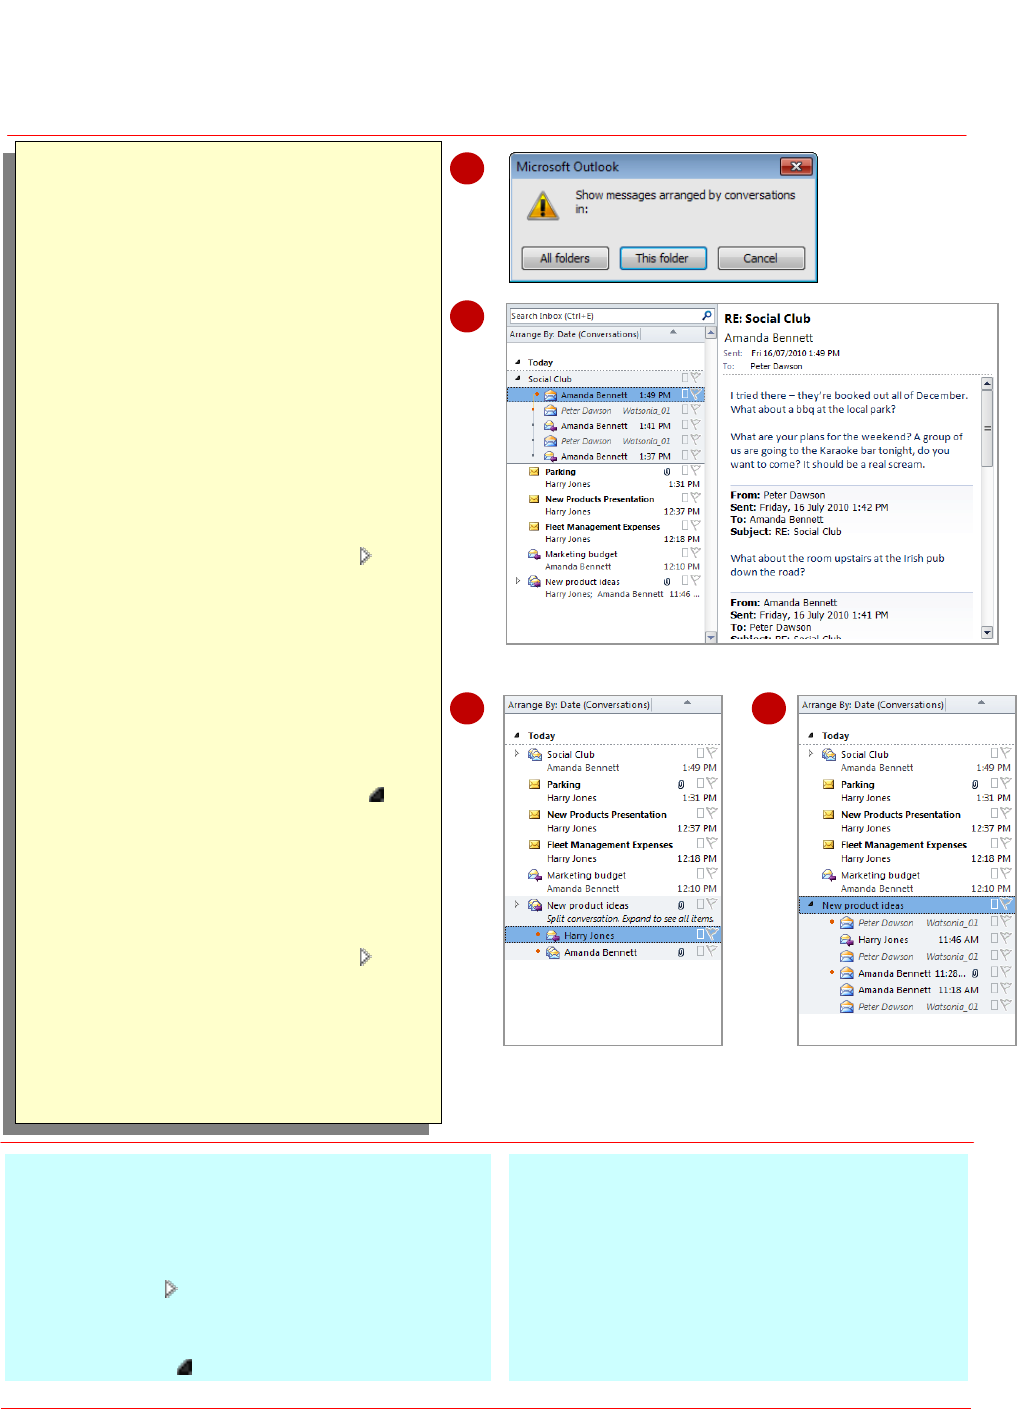
7
1
Try This Yourself:
Same
File
Continue using the previous
file with this exercise, or open
the file Watsonia_01.pst...
1
Click on the top message in the
message list, then click on
Show as Conversations in
the Conversations group on
the View tab to turn on
Conversations
A message will display…
2
Click on [This Folder] to
group all messages with the
same subject as a conversation
3
Click on the expand icon for
the Social Club conversation
to expand the conversation
and see it in the Reading pane
Now you can view all messages
easily…
4
Click on the oldest Amanda
Bennett message to see the
original message in the thread
5
Click on the collapse icon
Split conversations are just as
easy…
6
Expand the New product
ideas conversation – this has
been split into two threads
7
Click on the expand icon to
expand the conversation fully
The two orange dots show the
two threads…
8
Click on the various messages
to open them

Microsoft Outlook 2010 - Level 1
© Learning and Development Service Page 12 Receiving email
REPLYING TO A MESSAGE
Try This Yourself:
Same
File
Continue using the
previous file with this
exercise, or open the
file Watsonia_01.pst...
1
Click on the message
from Harry Jones
with the Fleet
Management
Expenses subject to
select it
2
Click on Reply in
the Respond group to
open a reply message
in a new window
Notice that To and
Subject have been
entered and the cursor
is in the message
ready for your
response…
3
Type No worries
4
In real life you would
click on Send now
to send the message
but because you’re in
a training situation,
press and click on
[No] to close the reply
window without
sending or saving the
message
5
Close the message
window
For Your Reference…
To reply to a message:
1. Select or open the message
2. Click on Reply in the Respond
group
3. Type your response
4. Click on Send
Handy to Know…
When you reply to a message that
includes attachments, the attachments
will not be sent back to the sender with
the reply.
2
Some messages sent to you will require a
reply. You can reply to a message either
directly from the Inbox or from the
message window after you have opened it.
When you choose to reply to a message,
Outlook will create a new message with the
To and Subject boxes already completed.
As a default, it will also display the original
message in the lower part of the message
window.

Microsoft Outlook 2010 - Level 1
© Learning and Development Service Page 13 Receiving email
REPLYING TO A MESSAGE IN A CONVERSATION
Replying to a message that is part of a
conversation is only slightly different to
replying to any other message. You can
reply to any message in a conversation
and Outlook will send a response to the
For Your Reference…
To reply to a message in a conversation:
1. Expand the conversation
2. Select or open the message to which
you want to respond
3. Click on Reply in the Respond
group on the Home tab
Handy to Know…
If a conversation has split into two or
more conversations, you must click on
the part of the conversation to which
you want to reply and the response will
be sent to the latest message in that
split.
1
2
message that appears at the top of the
Reading pane. As a result of this, you must
expand the conversation and click on the
desired message before clicking on Reply.
3
Try This Yourself:
Same
File
Continue using the
previous file with this
exercise, or open the file
Watsonia_01.pst...
1
Ensure that
Conversations is turned
on, then fully expand the
New product ideas
conversation if necessary
This conversation has
split into two. Let’s reply
to the latest message
received from Amanda
Bennett…
2
Click on the message as
shown
3
Open the Home tab,
then click on Reply in
the Respond group to
open a reply message
4
Type Thanks Amanda.
I’ll email Harry and
check his availability
for tomorrow.
5
Press rather than
Send to close the
message
If you were to send this
reply, Outlook would add
it to the top of the
Amanda Bennett split
conversation

Microsoft Outlook 2010 - Level 1
© Learning and Development Service Page 14 Receiving email
REPLYING TO ALL MESSAGES
Try This Yourself:
Same File
Continue using the
previous file with this
exercise, or open the
file
Watsonia_01.pst...
1
Click on the message
from Harry Jones
with the Fleet
Management
Expenses subject to
select it
2
Click on Reply All
in the Respond
group to open a reply
message in a new
window
Notice that Outlook
has completed both
the To and Cc fields
…
3
Type We’ll all have
to tighten our belts
a bit to meet the
new figures
4
Press rather than
clicking on Send
to close the reply
window
For Your Reference…
To reply to all messages:
1. Select or open the message
2. Click on Reply All in the Respond
group
3. Type your response
4. Click on Send
Handy to Know…
If you click on Reply All to a large
recipient list, Outlook will display a mail
tip in the header checking whether you
really want to reply to all recipients or
only the initiator.
2
When you reply to a message in the
normal way the reply is sent back to the
original sender. If the original email had
courtesy or blind copies, these people can
also receive the reply. This can be achieved
using the Reply All feature. This is useful
where copy recipients also need to know
what your response is to a message.

Microsoft Outlook 2010 - Level 1
© Learning and Development Service Page 15 Receiving email
REPLYING WITHOUT THE ORIGINAL MESSAGE
Try This Yourself:
Same File
Continue using the
previous file with this
exercise, or open the
file
Watsonia_01.pst...
1
Click on the File tab
to open the
Backstage, then
click on Options to
open the Options
dialog box
2
Click on the Mail
category in the left
pane, then scroll
down to the Replies
and forwards
section
3
Click on the drop
arrow for When
replying to a
message and click
on Do not include
original message
We won’t actually
change the default
setting, so let’s
simply cancel out of
the dialog box...
4
Click on [Cancel] to
close the dialog box
without saving the
change and to return
to the Inbox
For Your Reference…
To ensure replies don’t include the original
message text:
1. Click on the File tab and click on
Options
2. Click on the Mail category
3. Change When replying to a
message to Do not include original
message
Handy to Know…
The Mail category in the Options
dialog box has a number of options
that allow you to configure how your
email will work. These are worthy of
further exploration.
2
3
Normally, when you reply to a message
the original message is sent back
appended to the bottom of your reply. As
messages and replies move back and
forth, a history of the communication is seen
within the message. But if you do not want
this to occur, you can elect to reply to
messages without sending the original text.

Microsoft Outlook 2010 - Level 1
© Learning and Development Service Page 16 Receiving email
ADDING COMMENTS TO REPLIES
For Your Reference…
To add comments to replies:
1. Click on the File tab and click on
Options
2. Click on the Mail category, click on
Preface my comments with and
then type your name
3. Click on [OK]
Handy to Know…
You can add inline comments to reply
messages without adding your name to
the Preface my comments with
option. However, your comments will
be easier to see in the reply message if
you do utilise this option.
2
5
When you reply to some email messages,
it can be clearer and quicker to simply type
your responses next to the statements
within the body of the original message.
You can do this using inline comments.
And to ensure your comments are clearly
marked, you can alter the Options so that
your name (or other text) automatically
appears before your comments.
Try This Yourself:
Same
File
Continue using the
previous file with this
exercise, or open the
file Watsonia_01.pst...
1
Click on the File tab,
click on Options, click
on the Mail category,
then scroll down to the
Replies and forwards
section
2
Click on Preface my
comments with, then
type your name in the
box
3
Click on [OK] to return
to the Inbox
4
Double-click on the
message from Harry
Jones with the New
Products
Presentation subject,
then click on Reply
5
Click at the end of the
first paragraph and type
Paula Cleary and then
click at the end of the
next paragraph and
type 30 August
6
Press twice to close
the message without
sending the reply
7
Repeat steps 1 to 3 to
turn off the comments
option

Microsoft Outlook 2010 - Level 1
© Learning and Development Service Page 17 Receiving email
GETTING REPLIES SENT TO ANOTHER ADDRESS
For Your Reference…
To direct replies to another email address:
1. Create a new blank message
2. Click on Direct Replies To in the
More Options group on the Options
tab
3. Tick Have replies sent to
4. Type the new email address
Handy to Know…
The Properties dialog box includes an
option to delay sending a message until
after a specified time (Do not deliver
before), and an option to give a
message a use by date (Expires
after). Note that an expired message
will still appear in your Inbox but its
Subject will display in strikethrough.
3
5
When you create an email message, you
can nominate someone else to whom the
replies to your email should be sent. This
may be useful if you want to initiate a
message but are then going on a holiday.
Or perhaps you are a project leader and you
want to delegate work to be done via email,
but you need someone else to manage the
responses and progress.
Try This Yourself:
Same
File
Continue using the
previous file with this
exercise, or open the file
Watsonia_01.pst...
1
Create a new email
message
2
Address the message to
one of your colleagues
3
Type Advertising
Budget in the Subject
and type Could you
please send your final
submission by the end
of the day? as the
message
4
Click on the Options tab,
click on Direct Replies
To in the More
Options group to open
the Properties dialog
box
5
Ensure that Have
replies sent to under
Delivery options is
ticked, and then type the
email address (or use
[Select Names]) for the
person who you want to
receive the replies
6
Click on [Close] and
then click on Send

Microsoft Outlook 2010 - Level 1
© Learning and Development Service Page 18 Receiving email
FORWARDING MESSAGES
Try This Yourself:
Same File
Continue using the
previous file with this
exercise, or open the
file
Watsonia_01.pst...
1
Click on the message
from Harry Jones
with the Parking
subject to select it
2
Click on Forward
in the Respond
group to open a
forwarding message
in a new window
3
Type the message
Would you mind
casting your eye
over these
documents as well
please?
4
Click on [To] to open
the Select Names
dialog box, double-
click on the desired
name and then click
on [OK] to place the
name in To
5
Click on Send to
send the forwarding
message
For Your Reference…
To forward messages:
1. Select or open the message
2. Click on Forward in the Respond
group
3. Nominate the recipient
4. Type your response
5. Click on Send
Handy to Know…
You can forward a conversation in the
same way as other messages. Clicking
on Forward creates a new message
with the conversation as the message
body.
Unlike replies, attachments are
forwarded with a forwarded message.
4
The Forward facility of Outlook Mail lets
you take a message that you have
received and forward it to other users. You
can add your own comments if you need
to, or you can send the original message
without any additional information. Either
way, the original message is clearly marked
for easy identification – the Subject is
preceded by the letters FW: (an
abbreviation for forward).

Microsoft Outlook 2010 - Level 1
© Learning and Development Service Page 19 Receiving email
FINDING RELATED MESSAGES
For Your Reference…
To view related messages:
1. Double-click on the message
2. Click on Find Related Items in
the Editing group on the Message tab
3. Select Messages in This
Conversation or Messages from
Sender
Handy to Know…
You can further filter the search results
using the various commands on the
Search Tools: Search tab.
2
5
The Find Related Items feature lets you
quickly search for all messages that you’ve
received from a specific sender. And if you
don’t utilise the Conversation feature,
you can also use the Find Related Items
feature to list all messages in a selected
conversation – that is, all messages with the
same subject.
Try This Yourself:
Same
File
Continue using the
previous file with this
exercise, or open the file
Watsonia_01.pst...
1
Double-click on the first
message from Amanda
Bennett with the subject
Social Club
2
Click on Find Related
Items in the Editing
group on the Message
tab, and select Messages
in This Conversation
All messages in this
conversation will be listed
in the message list making
it easy for you to read
them in the Reading
pane...
3
Click on Close Search
in the Close group to
display the Inbox
4
Double-click on a message
from Harry Jones
5
Click on Find Related
Items in the Editing
group, and select
Messages from Sender
All messages from Harry
Jones will be listed in the
message list...
6
Click on Close Search

Microsoft Outlook 2010 - Level 1
© Learning and Development Service Page 20 Receiving email
IGNORING CONVERSATIONS
For Your Reference…
To ignore a conversation:
1. Click on the conversation
2. Click on Ignore Conversation in
the Delete group on the Home tab
3. Click on [OK] and then [Ignore
Conversation]
Handy to Know…
You can reduce the size of a conversation
by clicking on Clean Up in the Delete
group. This function will delete all
redundant messages in a conversation
(messages that are not flagged or
categorised, plus read messages except for
the newest message in each branch of the
conversation).
2
3
How often do you find yourself getting
distracted by messages that bounce back
and forth between you and other people,
often being work-related initially but soon
digressing? The Ignore Conversations
feature deletes all messages in a
conversation, plus any future replies you
may receive for the same conversation. If
you change your mind later, you can reverse
the process.
4
5
Try This Yourself:
Continue using the previous
file with this exercise...
1
Click on the Social Club
conversation
2
Read the first message at
the bottom of the Reading
pane – it’s relevant
3
Read the entire
conversation – the latest
email is going off the track
Let’s ignore it…
4
Click on Ignore
Conversation in the
Delete group on the Home
tab – a message may
appear
5
Click on [OK] – another
message may appear
6
Click on [Ignore
Conversation] to remove
the conversation from the
message list
7
Click on Deleted Items in
the Navigation pane to see
the messages in the
selected conversation – let’s
reverse it
8
Click on Ignore
Conversation and click
on [Stop Ignoring
Conversation], then click
on the Inbox

Microsoft Outlook 2010 - Level 1
© Learning and Development Service Page 21 Receiving email
MARKING MESSAGES AS UNREAD
Try This Yourself:
Same File
Continue using the
previous file with this
exercise, or open the
file
Watsonia_01.pst...
1
Click on the New
Products
Presentation
message to select it
2
Click on Unread /
Read in the Tags
group on the Home
tab
3
Click on another
message to deselect
the marked message
Notice how it now
appears in bold and
the icon has changed
to the unread
message
icon .
We’re ready to close
this data file now…
4
Right-click on
Watsonia_01 in the
Navigation pane
and select Close
“Watsonia_01”
Only the default data
file will remain listed
in the Navigation
pane
For Your Reference…
To mark messages as unread:
1. Click on the message
2. Click on Unread / Read in the
Tags group on the Home tab
Handy to Know…
If you mark a replied/forwarded
message as unread, the message
symbol still shows as an open
envelope. But it is considered unread
for sorting, grouping or filtering.
1
2
Messages that appear in bold in the Inbox
are considered to be unread. If the
Reading pane is active, a message is
considered to be read when it displays in
the Reading pane, even if it hasn’t
actually been opened in its own window and
read. If the bolding is removed from a
message, you can set it back on again by
marking the message as Unread.
3

Microsoft Outlook 2010 - Level 1
© Learning and Development Service Page 22 Receiving email
CONCLUDING REMARKS
Congratulations!
You have now completed the Receiving email booklet. This booklet was designed to get
you to the point where you can competently perform a variety of operations as listed in the
objectives on page 2.
We have tried to build up your skills and knowledge by having you work through specific
tasks. The step by step approach will serve as a reference for you when you need to repeat
a task.
Where To From Here…
The following is a little advice about what to do next:
Spend some time playing with what you have learnt. You should reinforce the skills
that you have acquired and use some of the application's commands. This will test
just how much of the concepts and features have stuck! Don't try a big task just yet if
you can avoid it - small is a good way to start.
Some aspects of the course may now be a little vague. Go over some of the points
that you may be unclear about. Use the examples and exercises in these notes and
have another go - these step-by-step notes were designed to help you in the
classroom and in the work place!
Here are a few techniques and strategies that we've found handy for learning more about
technology:
visit CLD’s e-learning zone on the Intranet
read computer magazines - there are often useful articles about specific techniques
if you have the skills and facilities, browse the Internet, specifically the technical
pages of the application that you have just learnt
take an interest in what your work colleagues have done and how they did it - we
don't suggest that you plagiarise but you can certainly learn from the techniques of
others
if your software came with a manual (which is rare nowadays) spend a bit of time
each day reading a few pages. Then try the techniques out straight away - over a
period of time you'll learn a lot this way
and of course, there are also more courses and booklets for you to work through
finally, don’t forget to contact CLD’s IT Training Helpdesk on 01243-752100
